Part nostalgia-bomb, part note-taking and part FAQ, what started in GameTrailers as a video game blog is now on Blogger. This blog is a look back at video games, both popular and obscure, from the video game industry's infancy all the way to the previous console generation.
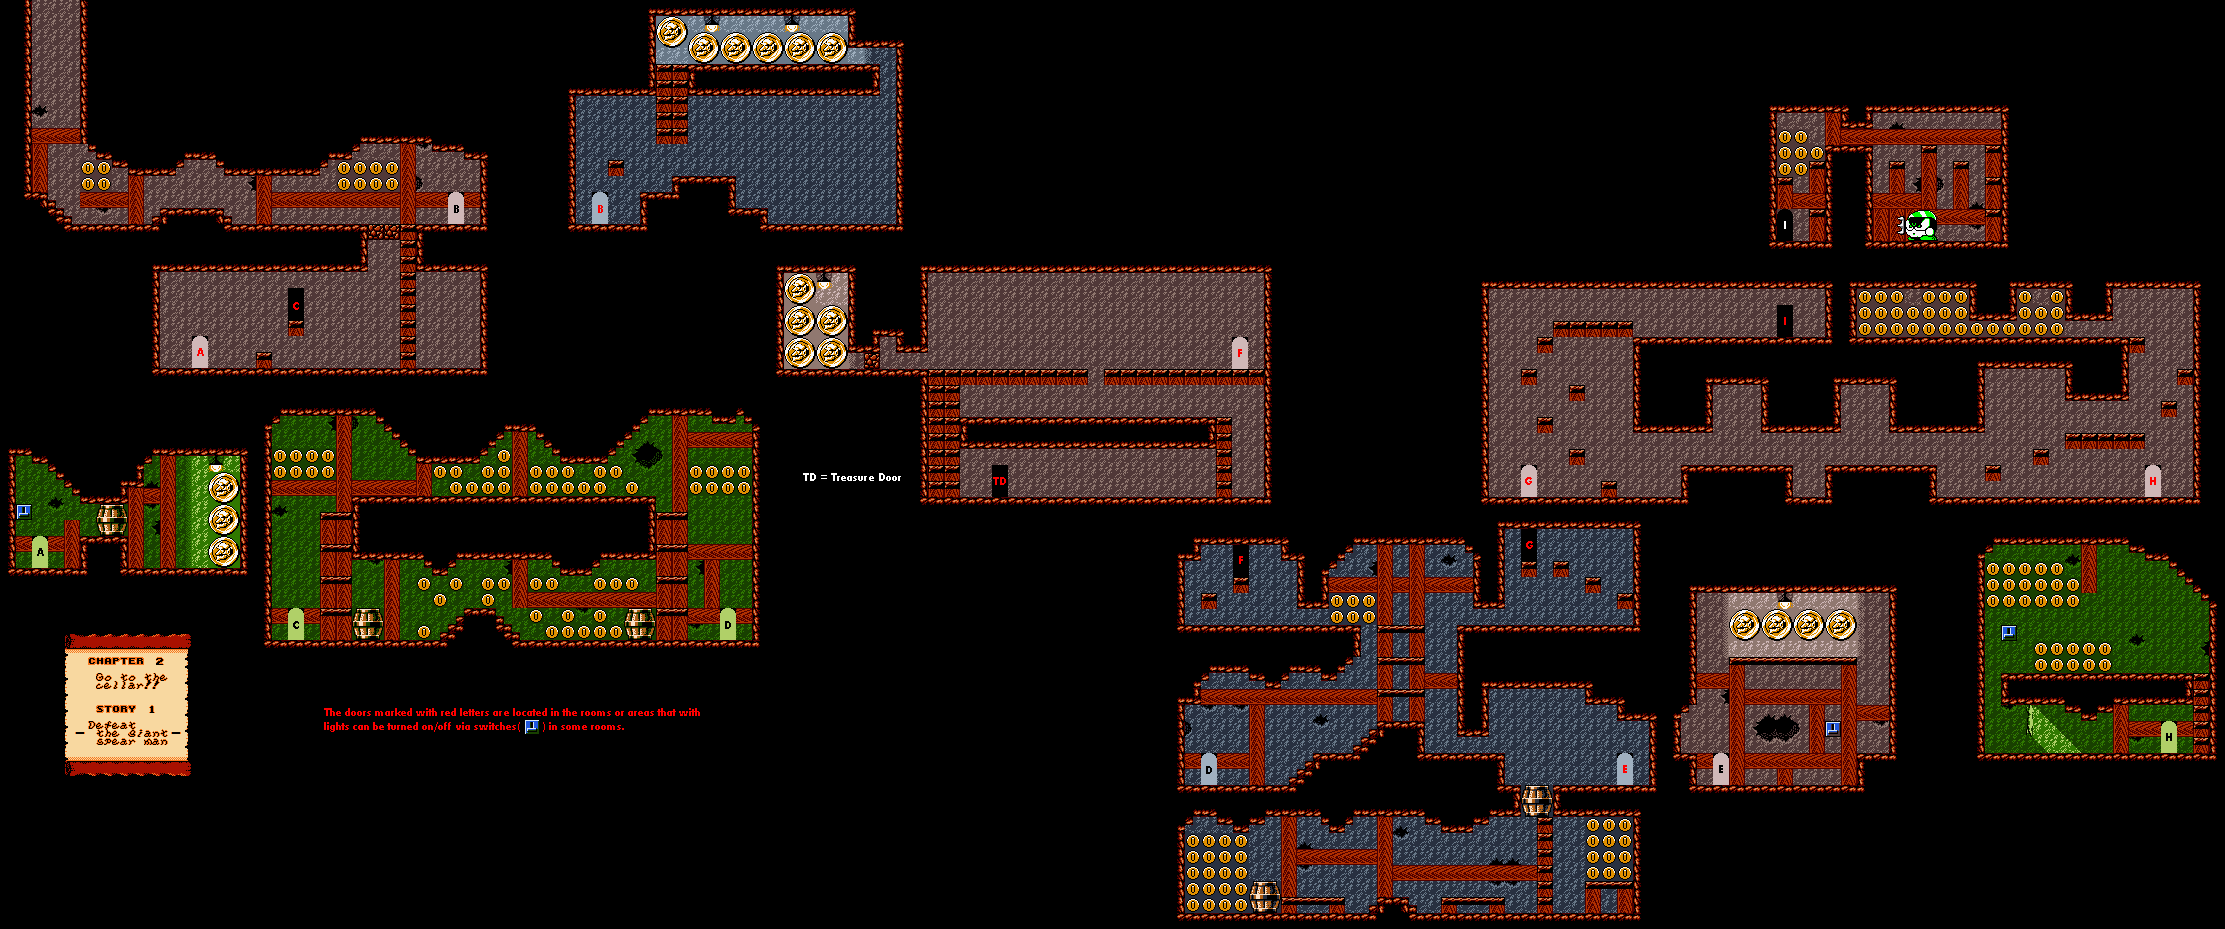
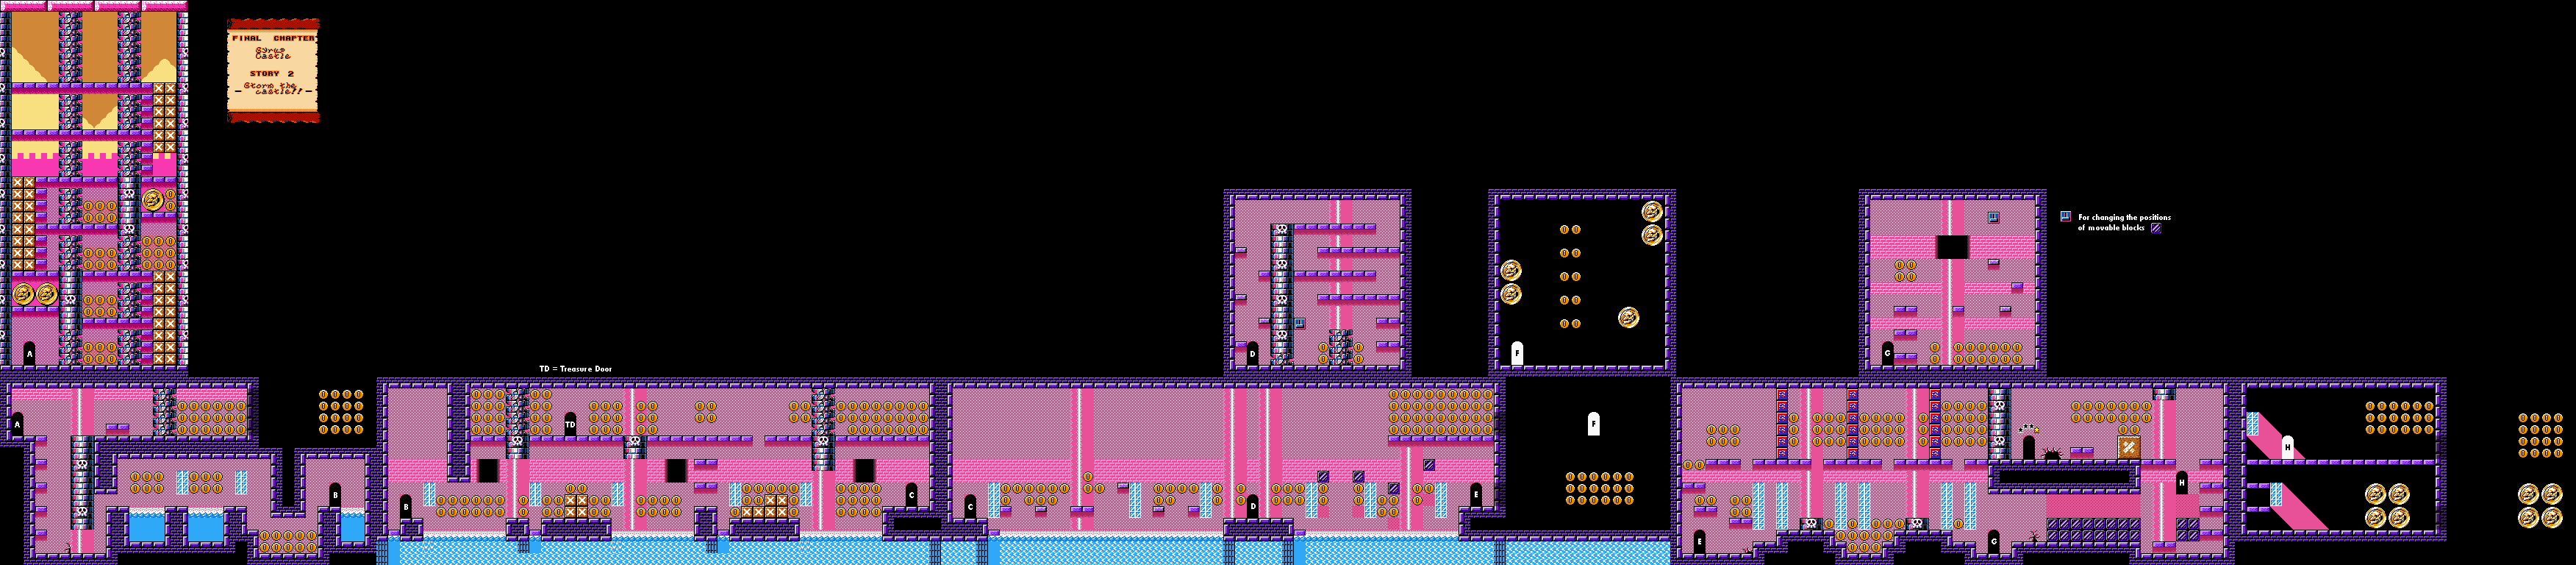
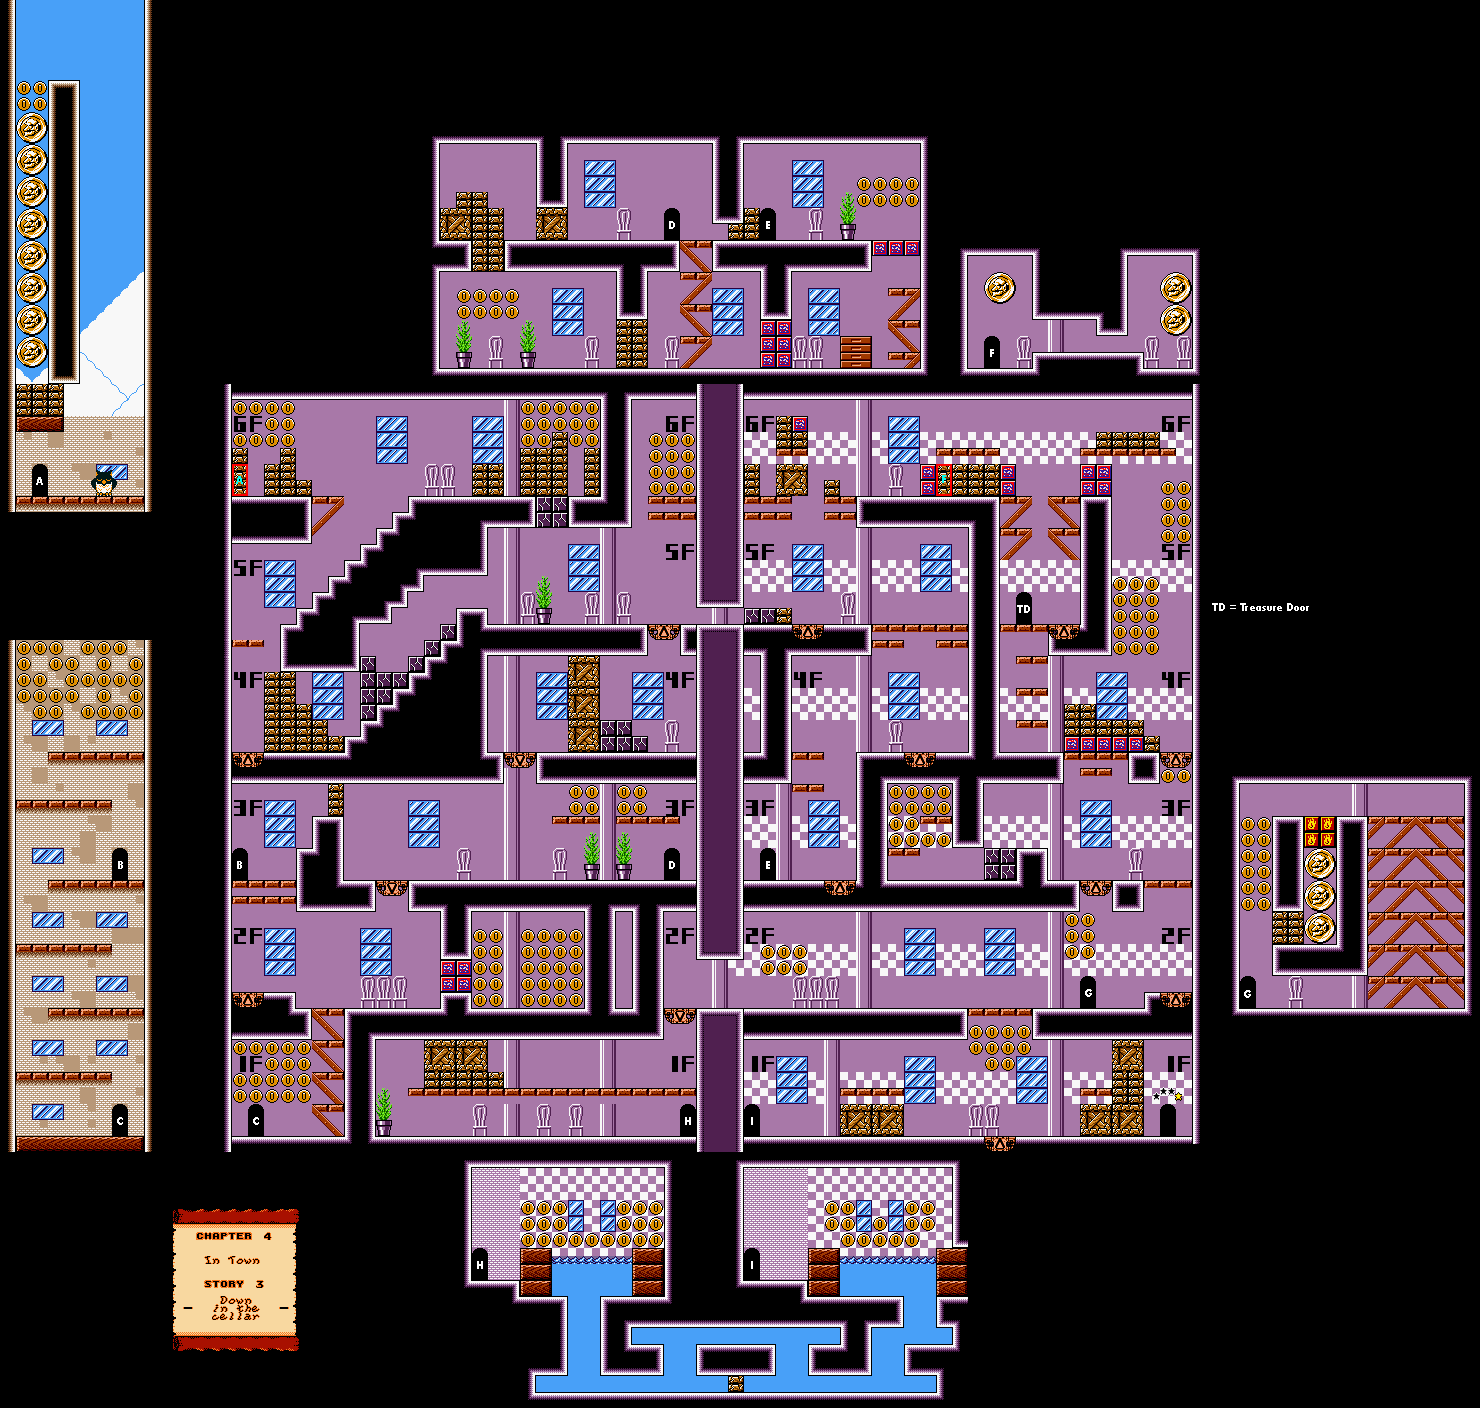
In our second side-story, Captain Syrup's goons enter the cellar instead of escaping out of the castle and through the forest. This should prove interesting.
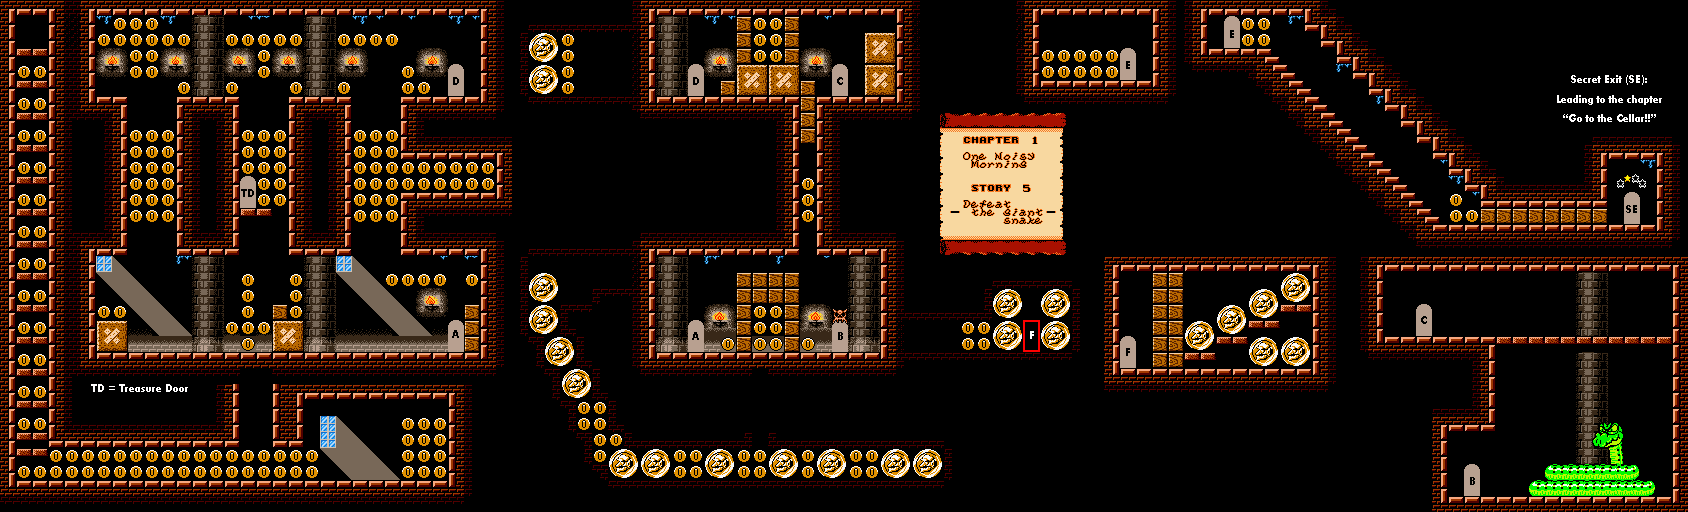
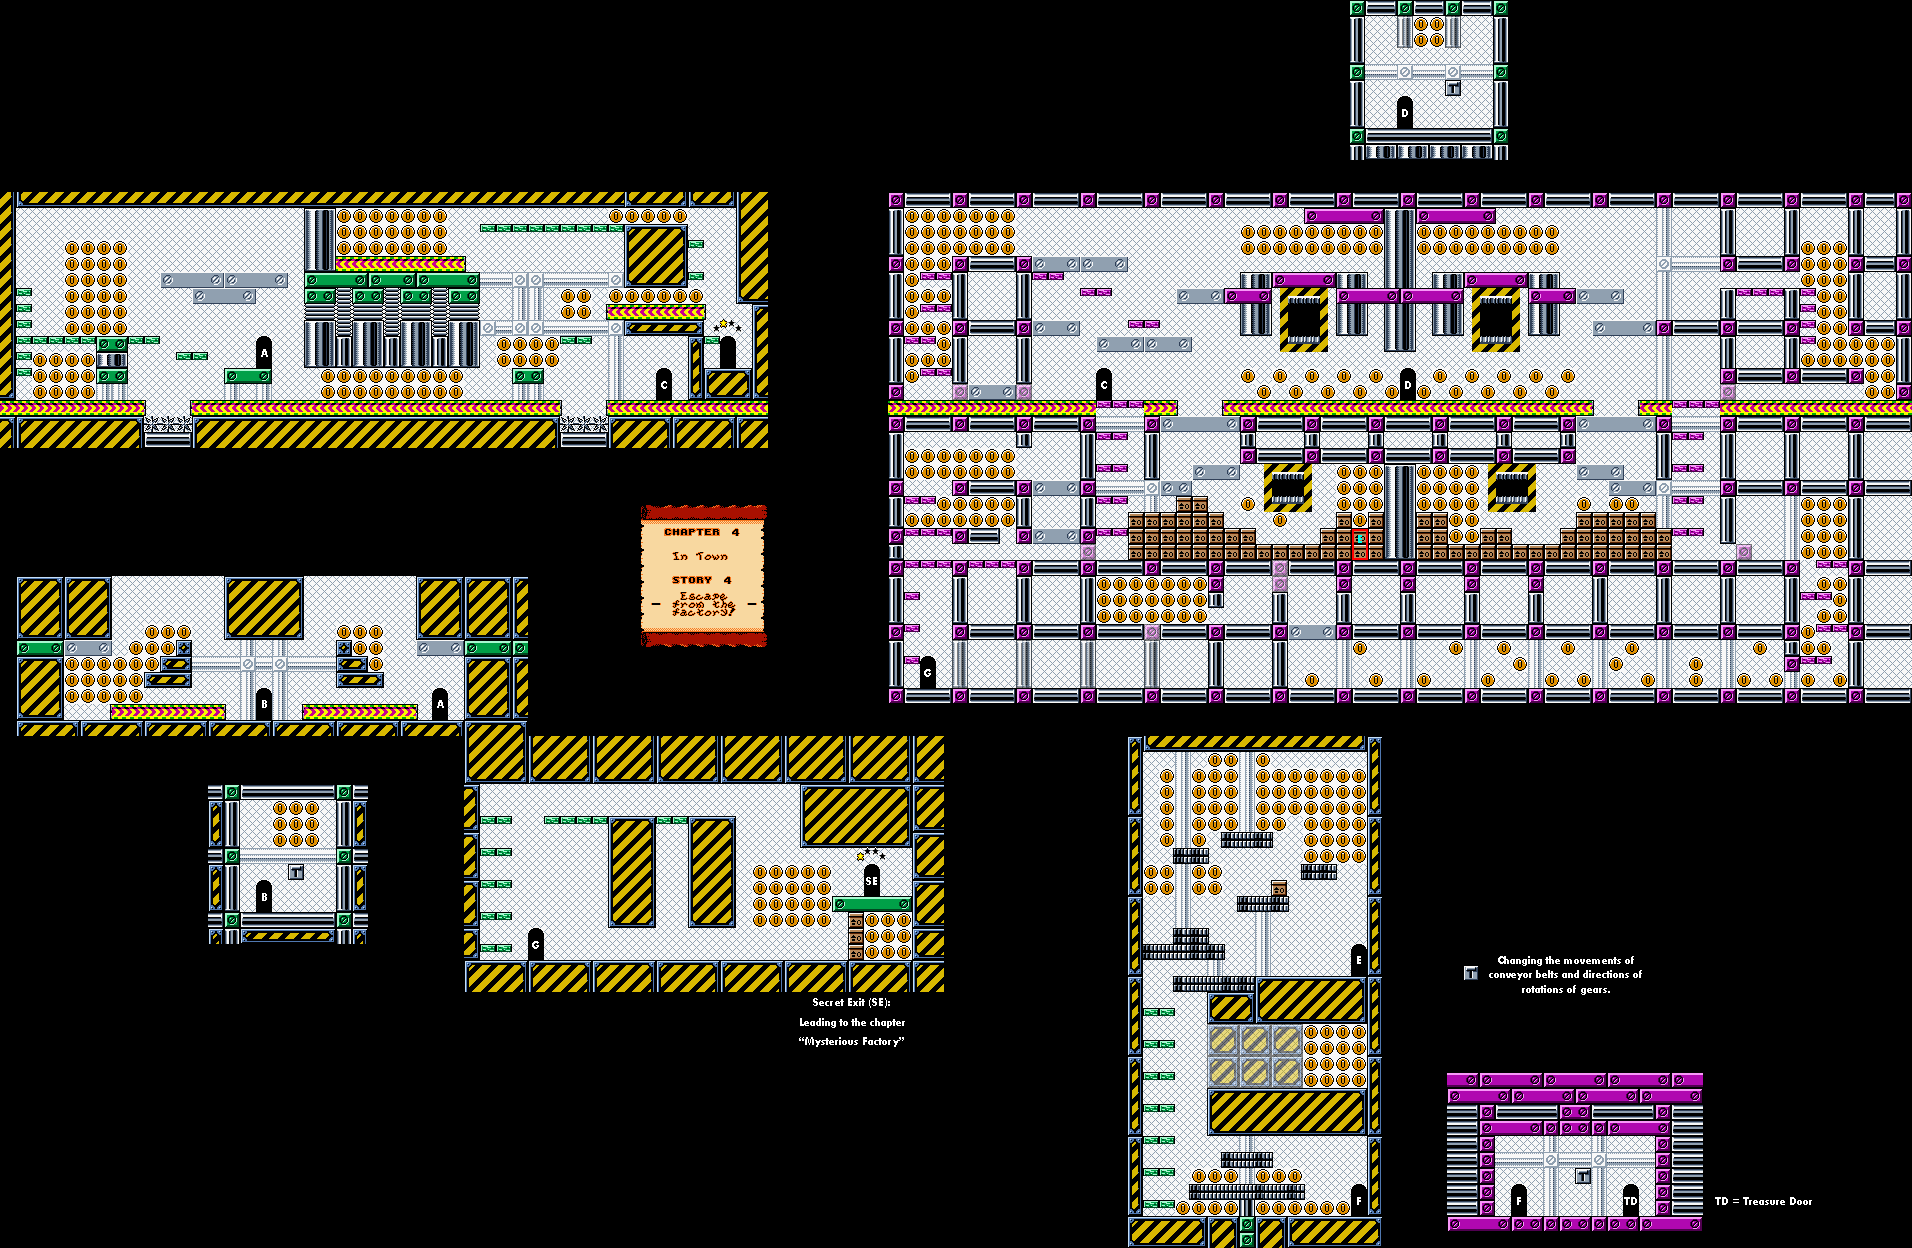
This time around, you'll want to take the secret exit that can be found by breaking through walls to find hidden areas. This will take you to a brand new side-story where Captain Syrup's goon enter the cellar instead of the forest.
Be prepared to ground pound a lot to keep enemies, especially the pelicans, away from you.
The dark areas are lit up with switches that you can turn on by hitting them from underneath. You'll need to do this in order to get through the level. The one near the ghosts has some coins has some coins above it. Hitting that one to turn some lights off, and you'll have to feel your way through the previously lit areas to figure out where the door leading to a previously dark area was. This time around, the formerly dark area will be lit up, and you'll be able to find the treasure room, where you can win a magic torch.
The barrels can be smashed by tackling them or ground pounding them.
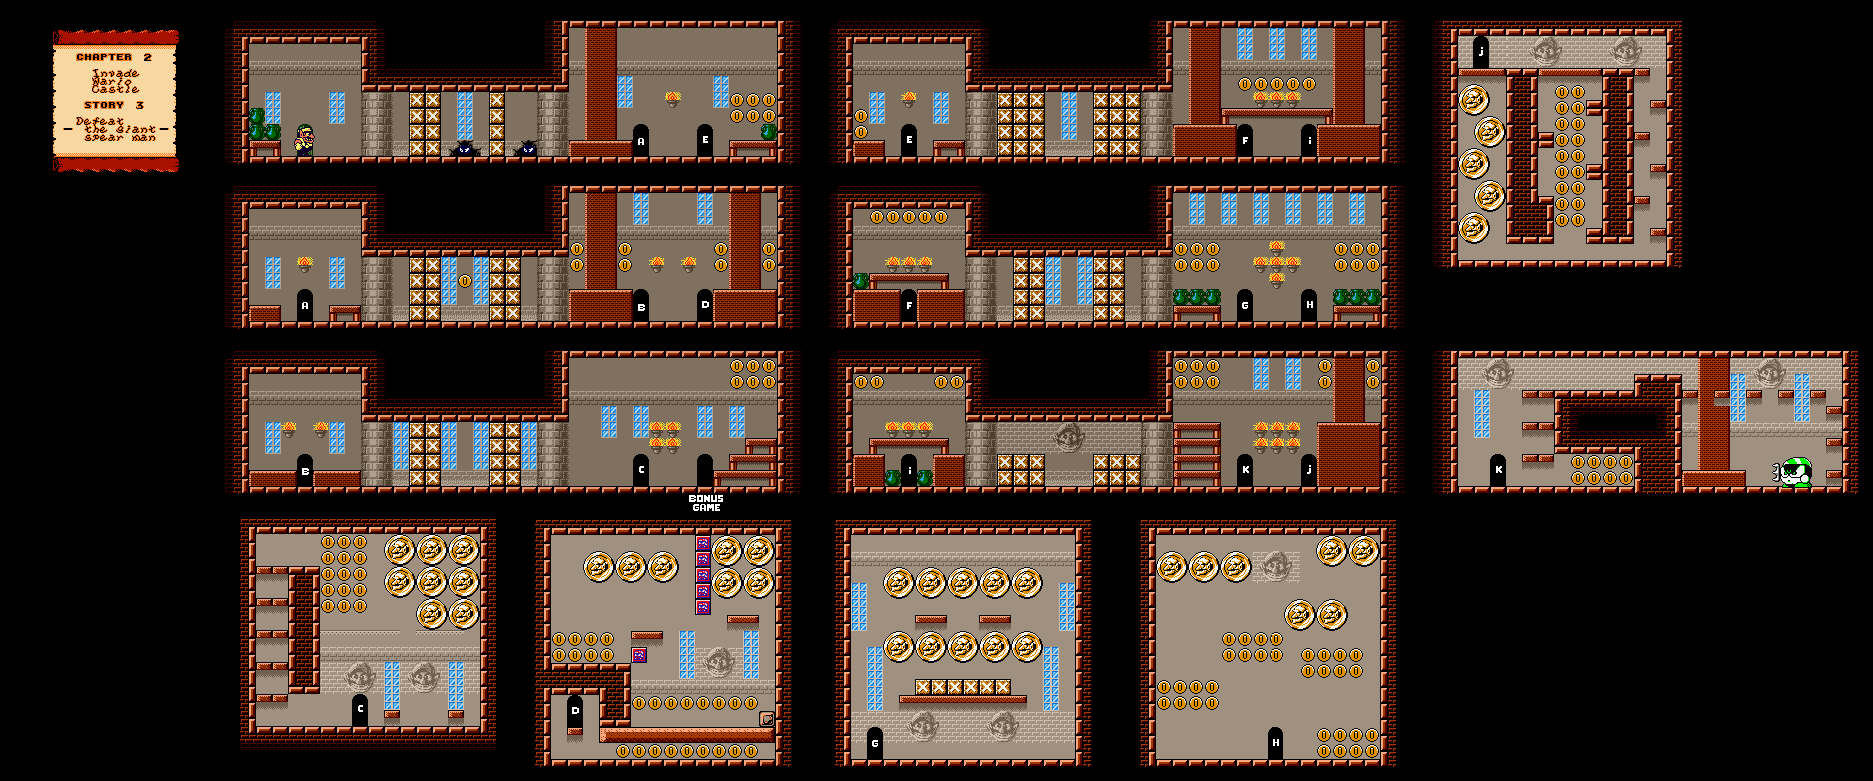
The giant spear man is above where the monsters get aggressive when you attack one of their own. He is defeated the same way you beat him the first two times, which is ground pounding him to death. Don't forget to get that inverted color coin afterwards.
The first room has a couple of penguins and a bunch of coins to collect. You'll need one of the penguins to break the enemy blocks and reach a room with more coins. You'll need to be zapped by the Wizard Goon to become Small Wario so you can high jump and reach the easy-to-miss area to the left of the pool of water. Watch out for the retracting spikes!
Be careful in the room full of pelicans. While you'll need them to get rid of the enemy blocks at the top, you'll be dealing with pairs of pelicans at close range, and you will be spit on if you try to handle two at once. Open those up, then leave and re-enter so you're not losing a ton of coins.
There are some big coins under the room leading to the boss. Once again, watch out for the retracting spikes.
The treasure room is above the second set of breakable blocks in the room before the boss entrance. Beating it nets you what looks like a crown or a knight's helmet.
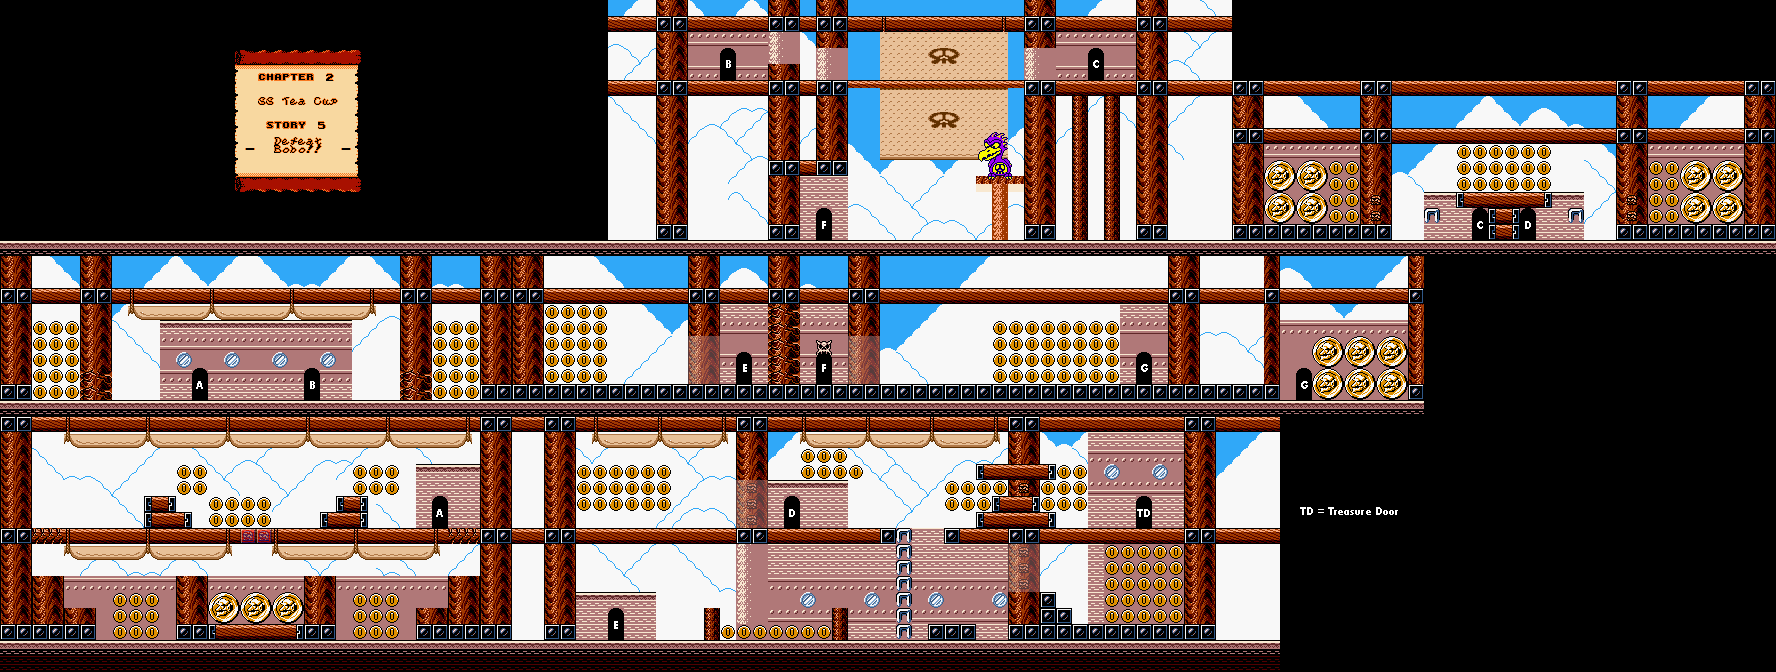
To beat Captain Syrup, you'll need to high jump over the robot Spear Goon. If it runs into you, you'll be launched upwards into the air above the boss battle, and you'll have to go back to the boss and start the whole battle over. It is fast at first, but it slows down over time. When it stops completely, its weapon will be up. Tackle it as Captain Syrup tries to recharge it. After this, it will stomp the ground. Be airborne when it hits the ground so you don't get stunned. You'll have to repeat the process twice. After the third hit, you can grab the robot Spear Goon and throw him at Captain Syrup, but it is anything but easy, as Captain Syrup will try to shoot down electrical balls that travel towards you in an attempt to shock you once they hit the ground. If you get hit, you'll have to face the Spear Goon again. At least you can take your time grabbing the robot Spear Goon, as it can be hard to pick up and it only revives if you miss Captain Syrup. Just one throw into Captain Syrup will do it, and you'll soon get your second ending, where Captain Syrup and her goons are booted out of the castle and Wario goes back to bed. At this point, you're 60% of the way through the game.
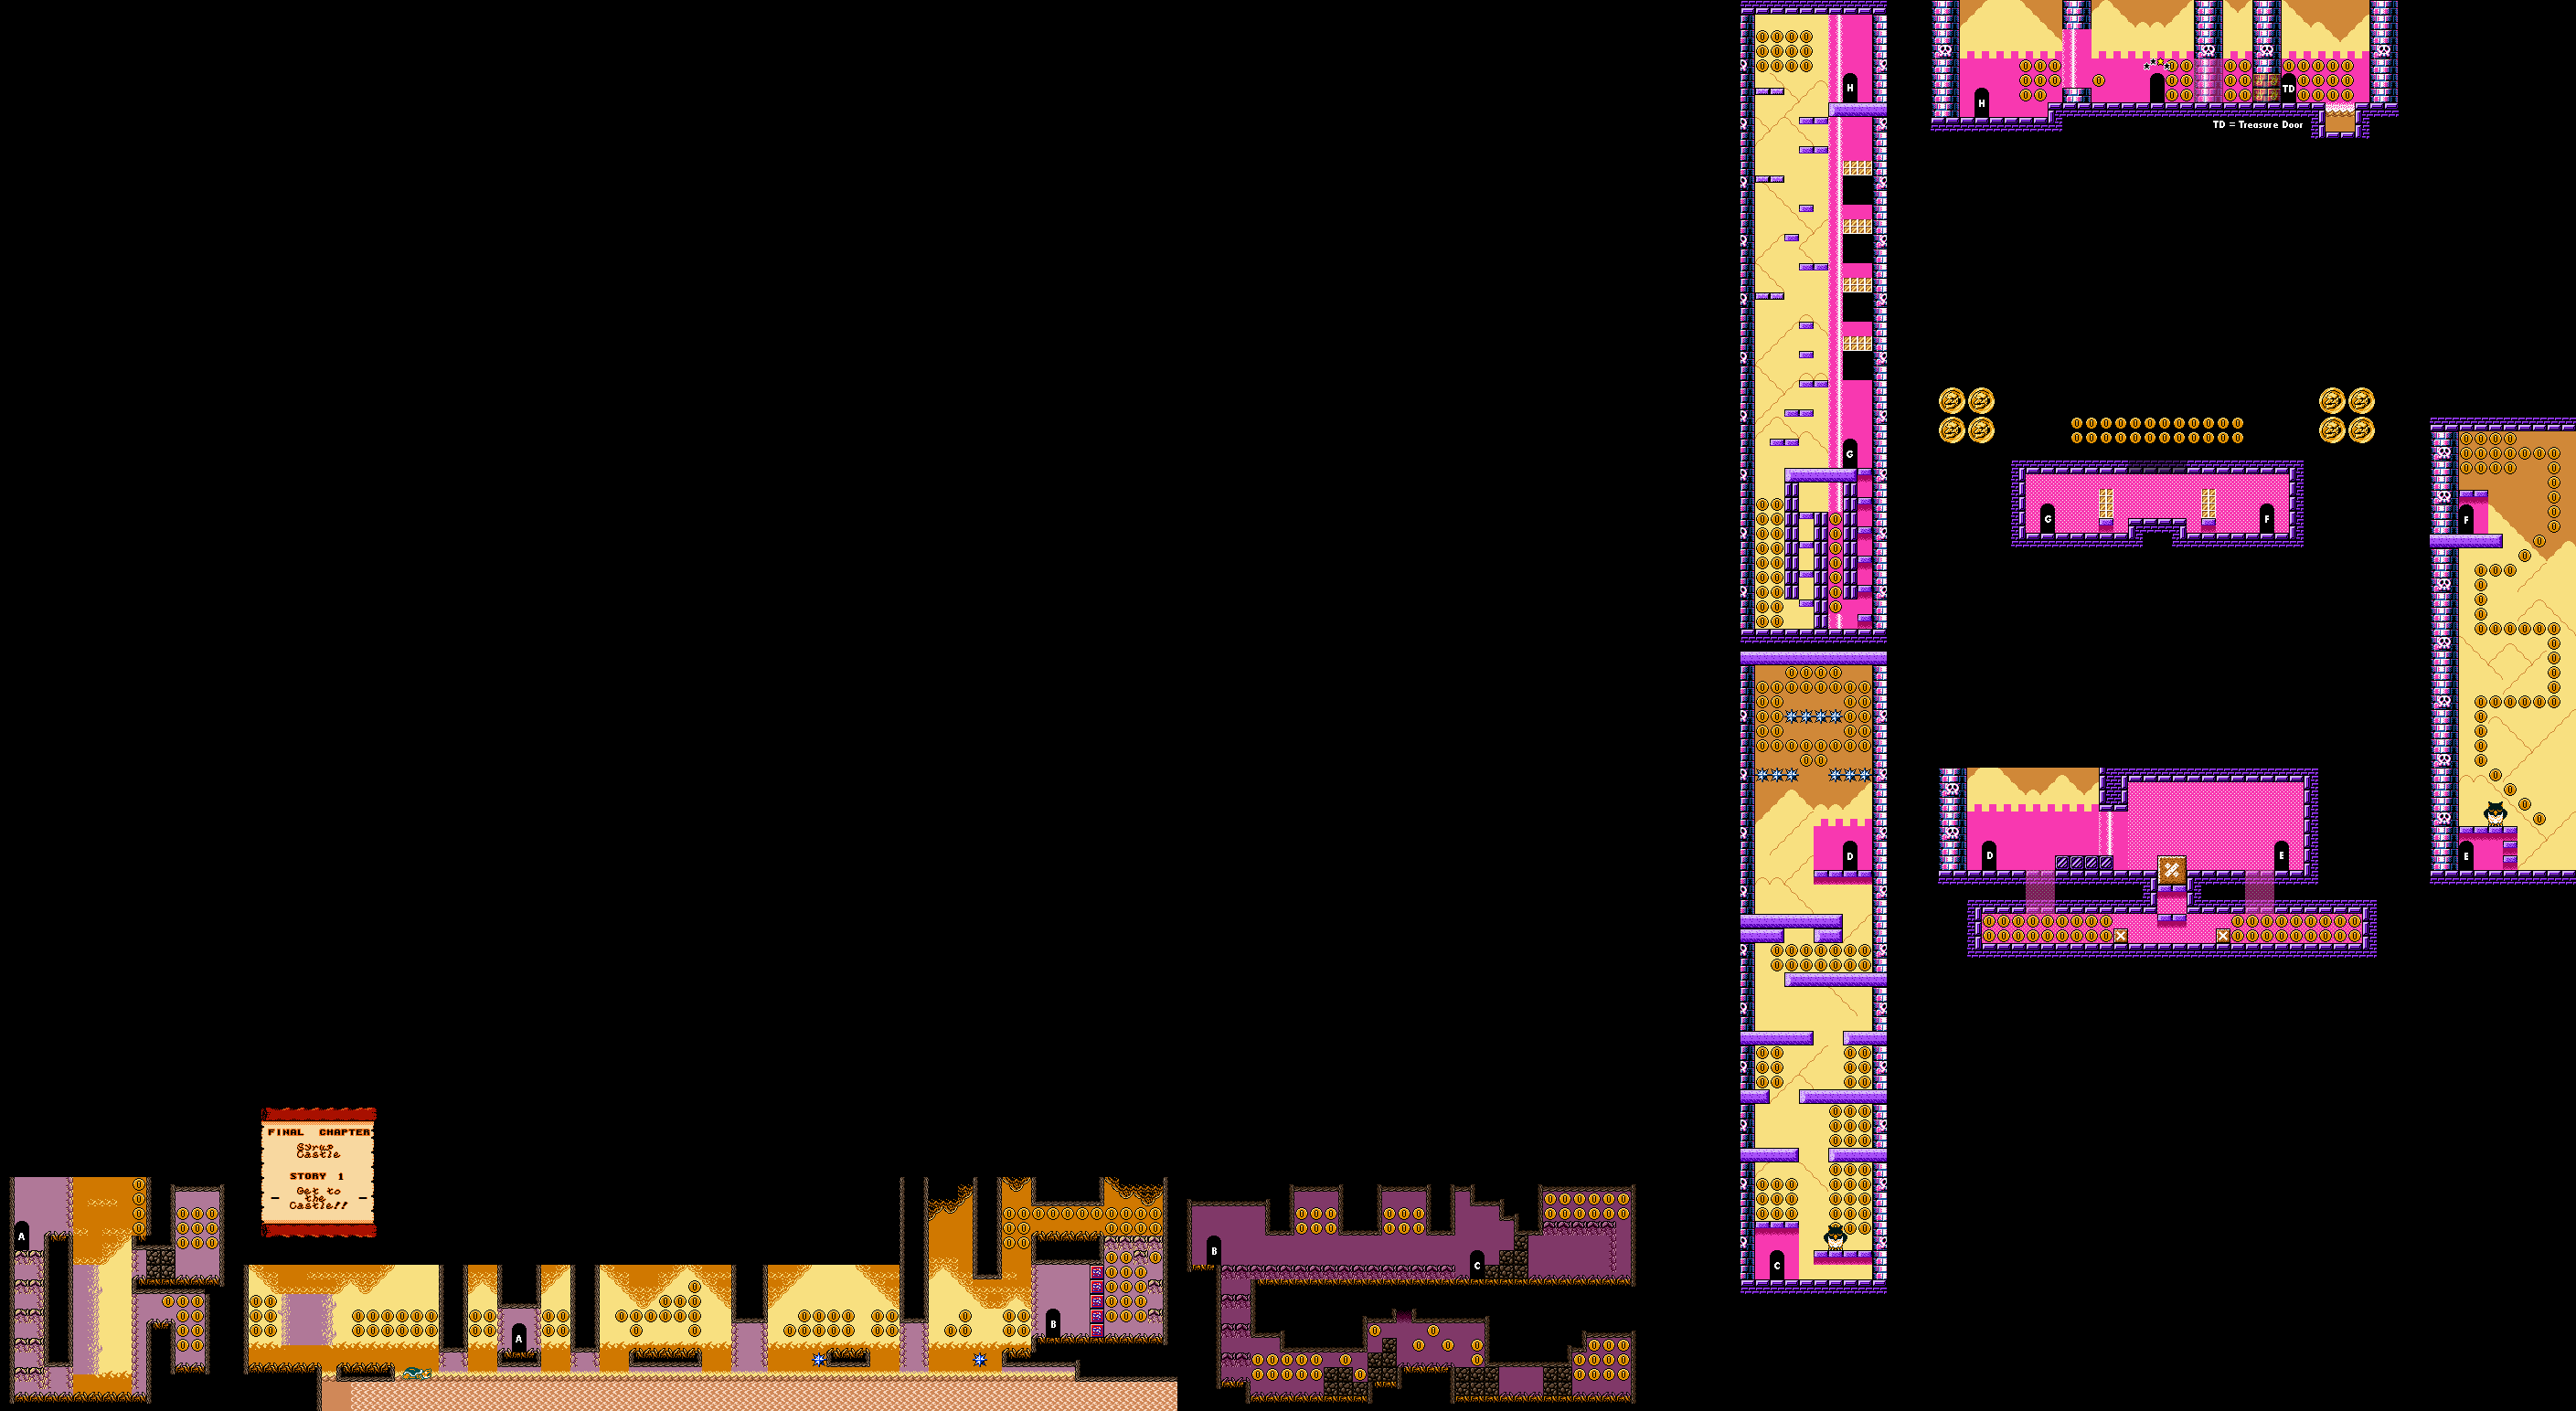
Compared to the last level, this one is pretty open. There is a breakable wall to the left above where you start that leads to some coins, and you can high jump midway through the hidden passage for four big coins. Be careful with the breakable blocks before the next door so that you don't run into spikes or the spear from a Spear Goon.
The next room has quite a few flying spiked skulls as well as a couple of doors. You'll need to go through each one to look for coins as well as to find the treasure room and the exit. The first room on the way will have you rolling down slopes and dealing with bottle throwers to collect all the coins and get to the other side.
Bring a Spear Goon to the enemy blocks in the next new room that you enter to get some big coins, then break all the blocks and destroy the Spear Goons in the room with reckless abandon.
After this, you'll need to watch out for the snowmen as you explore the room and get more coins. There will also be a room where you'll have to go up top for some big coins before you can take out the pelicans and smash all the blocks and vases to clean the room out.
The room with the water also has fire blocks, fire foxes, the treasure room (where you can win a paintbrush) and the exit. It is very much possible to break the fire blocks on both sides if you know how to take advantage of your environment so that you get on the side that you want to be on before you burst into flame.
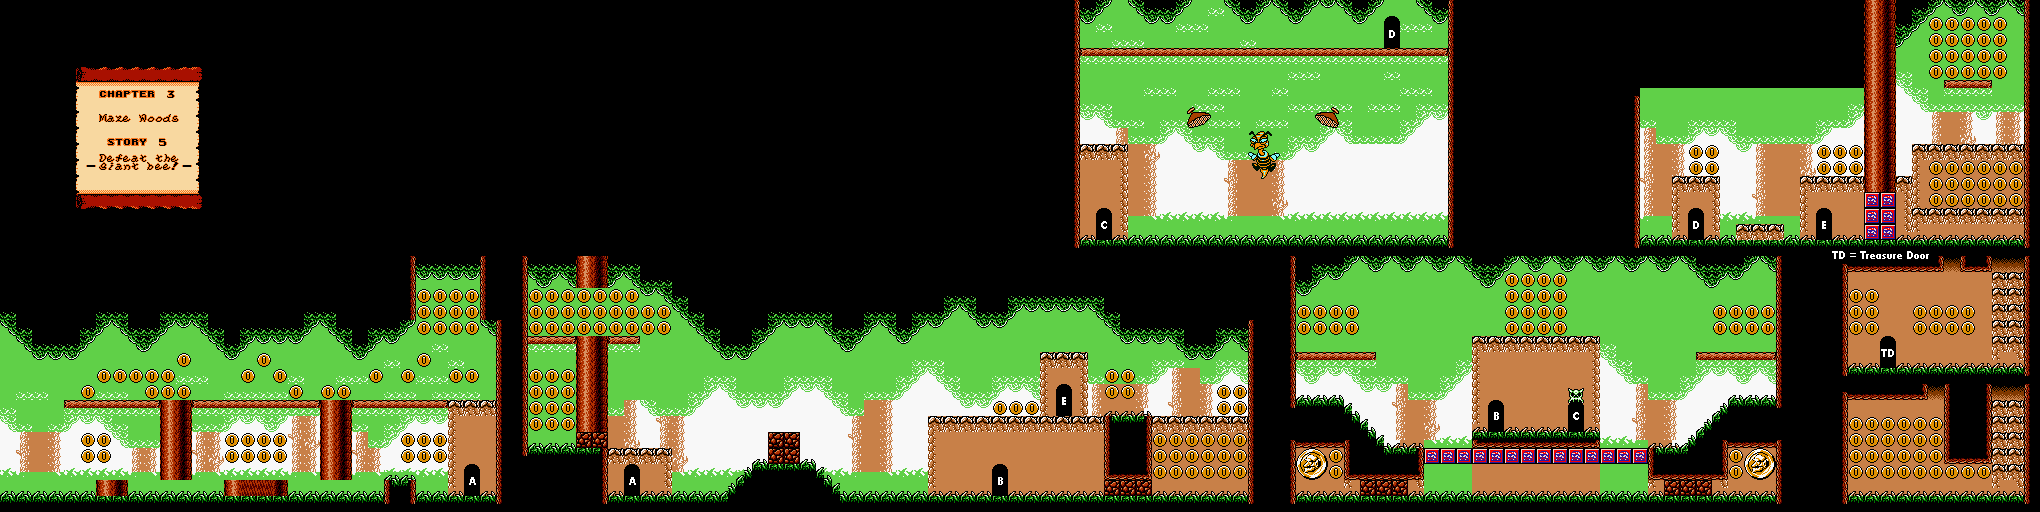
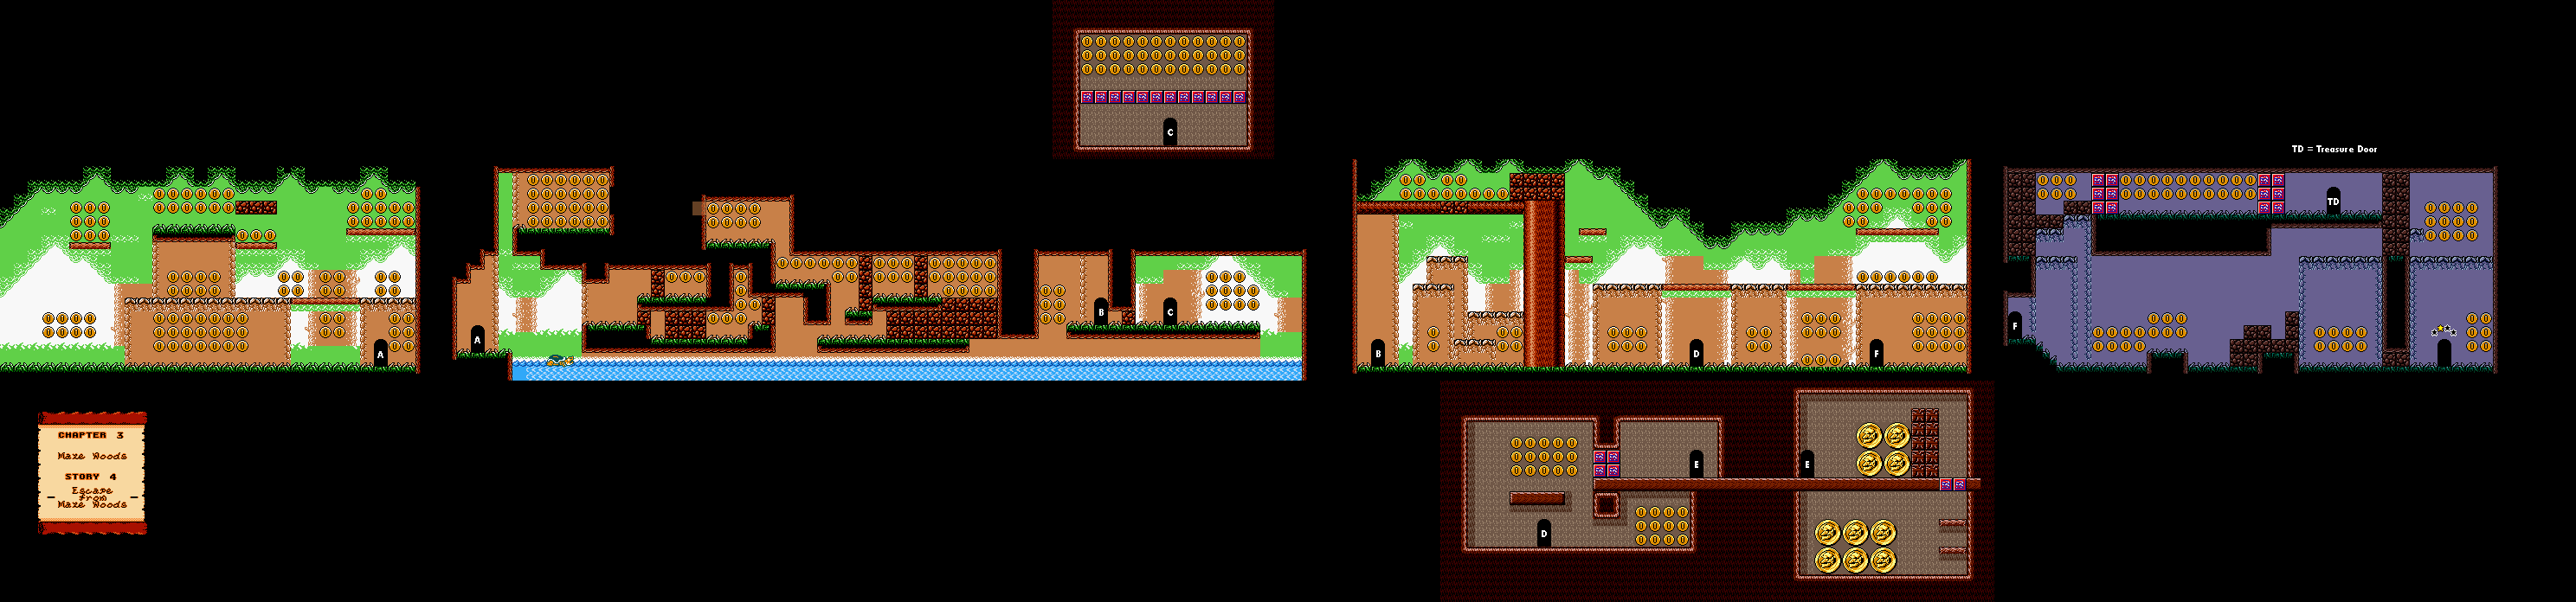
As you play this level, you'll notice that there is a bit of a maze in this level. There are six rooms you'll have to enter, and only one route will take you to the Giant Spear Man. Each room has a different number of torches between the two doors, ranging from one torch to six torches. I shall call each choice between two doors "routes."
The correct route in question is the right door in Route 1, the right door in Route 3, and the left door in Route 6.
To get to the treasure room, the fastest route is the left door in Route 2, followed by the right door in Route 4. Here, you can win a dinosaur egg.
The left door in Route 5, the right door in Route 2, both doors in Route 5, and the right door in Route 6 all lead to coins. What you'll see is what you'll get, and you'll need to do different things to get all the coins, such as bouncing off enemies (in one case doing it while holding onto a throwable block), preserve breakable blocks, traverse a maze full of invisible breakable blocks, and break small chunks out of walls with your tackle to get a few big coins just to get all the coins in the coin rooms.
As for the Giant Spear Man, just keep butt bouncing him to defeat him. And make sure you can easily get to the inverted color coin that he drops when he is done.
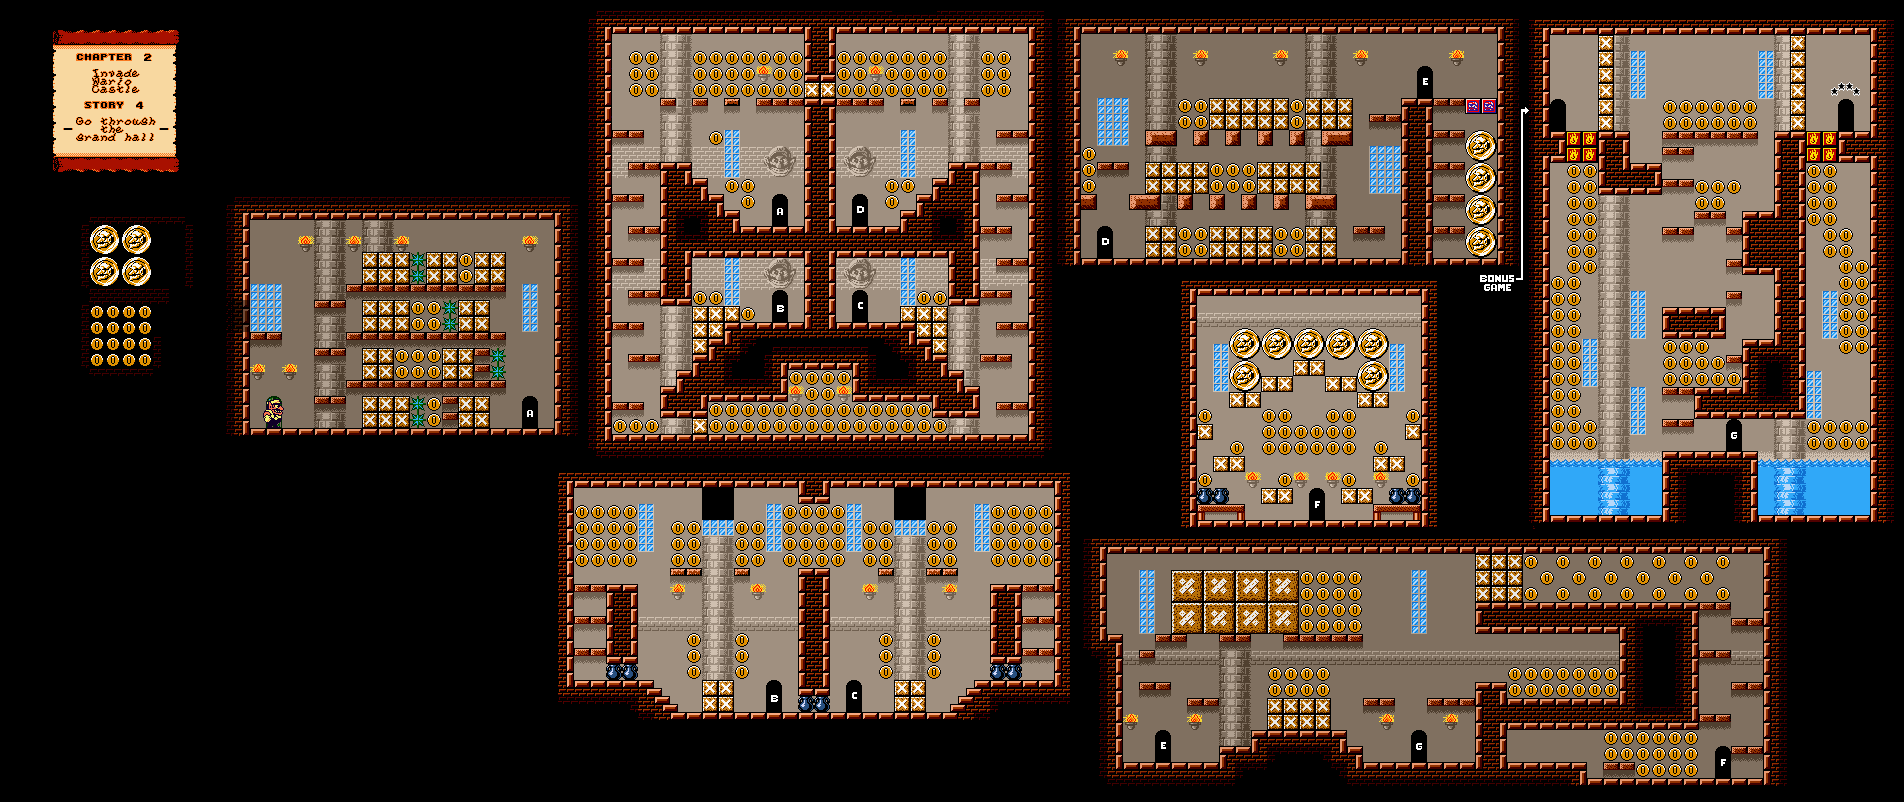
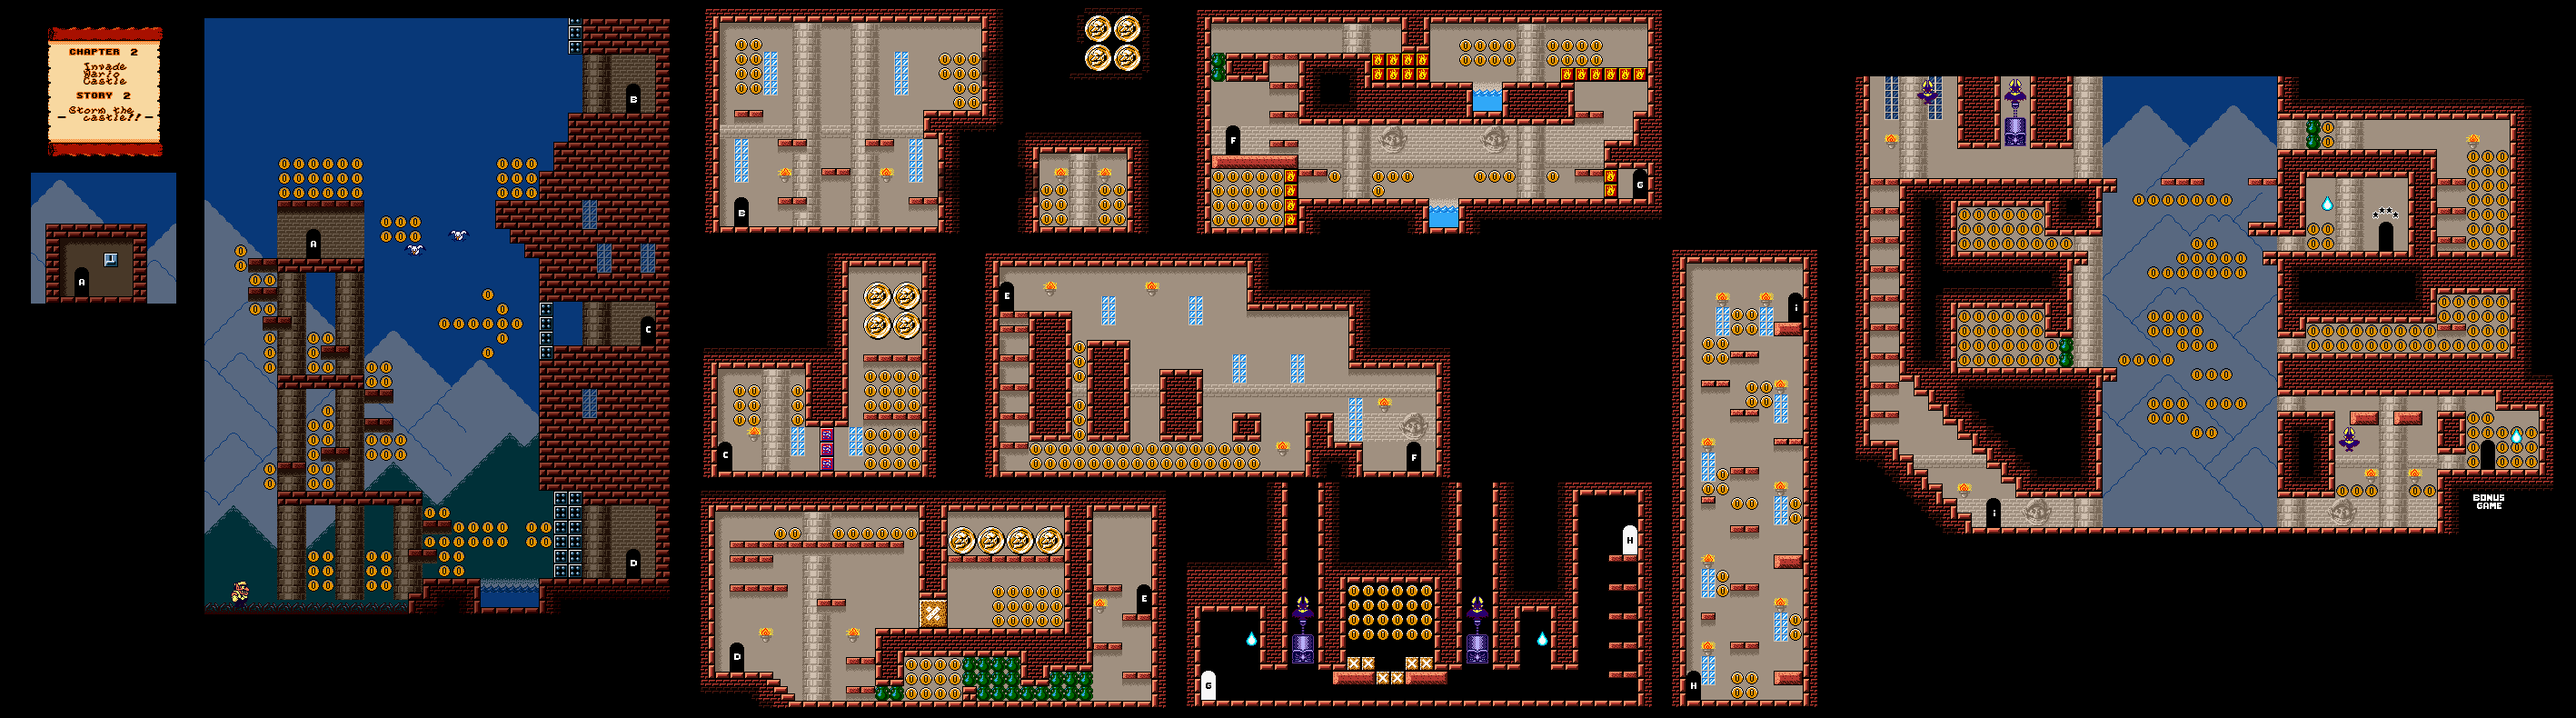
In this entry, we make our way into the castle in this rather short level. The end of this level allows for some fun with Flat Wario, but you'll need to get used to moving around to get to the exit as well as the treasure room.
In order to get into the castle, you'll need to make your way up the tower at the start, go into the door, and hit the switch. Before you do that, jump to the right off the seagulls to get a bunch of coins while avoiding flying spiked skulls. The only breakable walls in the entire level will be to the right of where you enter, and they both just lead to more coins.
With those coins out of the way, you can then lower the drawbridges. The middle entrance leads to two ducks and a couple of big coins if you can use the ducks as springboards, and the lower entrance leads into the castle proper.
Slide down the slope at the beginning to get into the area full of jars so you can smash your way through and continue, then use the Spear Goon in the upper area as a springboard to get a few hard-to-reach big coins.
After an area where you will have to avoid flying spiked skulls to get to the next room, you'll need to set yourself on fire in order to open up the entire room. On the upper-right corner, jump into the wall near the water so you don't fall in. This allows you to get everything in the lower-left corner. In the next room, use the water droplet in case you get smashed, and leave the breakable blocks so you can get all the coins in the middle.
After a climb with a helmet guy and platforms that fall, you'll need to be Flat Wario not just to get all the coins in the room, but to reach the exit as well as the treasure room, where you can win a crystal ball. Don't be surprised if you go have to go down one level at a time just to get to where you want to go.
Once you've played through the main game, you can access the treasure map to replay any level that you've already beaten. This not only allows you to collect more coins, get another chance at getting treasures from treasure rooms and grant you another chance at winning picture panels, but you can re-explore levels to find alternate exits.
The squares represent the levels, while the tiny rectangular panels to the left of them indicate whether or not you've gotten the picture panel for that level. If the square panel shows a treasure chest, that means you have not gotten the treasure for it yet. If you've gotten the treasure for it, you'll get the white square as well as the picture of the treasure from that level. If the panel is black, you have not accessed that level yet. As for the rectangular panel, a white panel means you've gotten the picture panel; a black panel means you haven't.
Aside from powering on and off, you can press A, B, Select and Start simultaneously to soft reset and go back to the title screen to get back to your game.
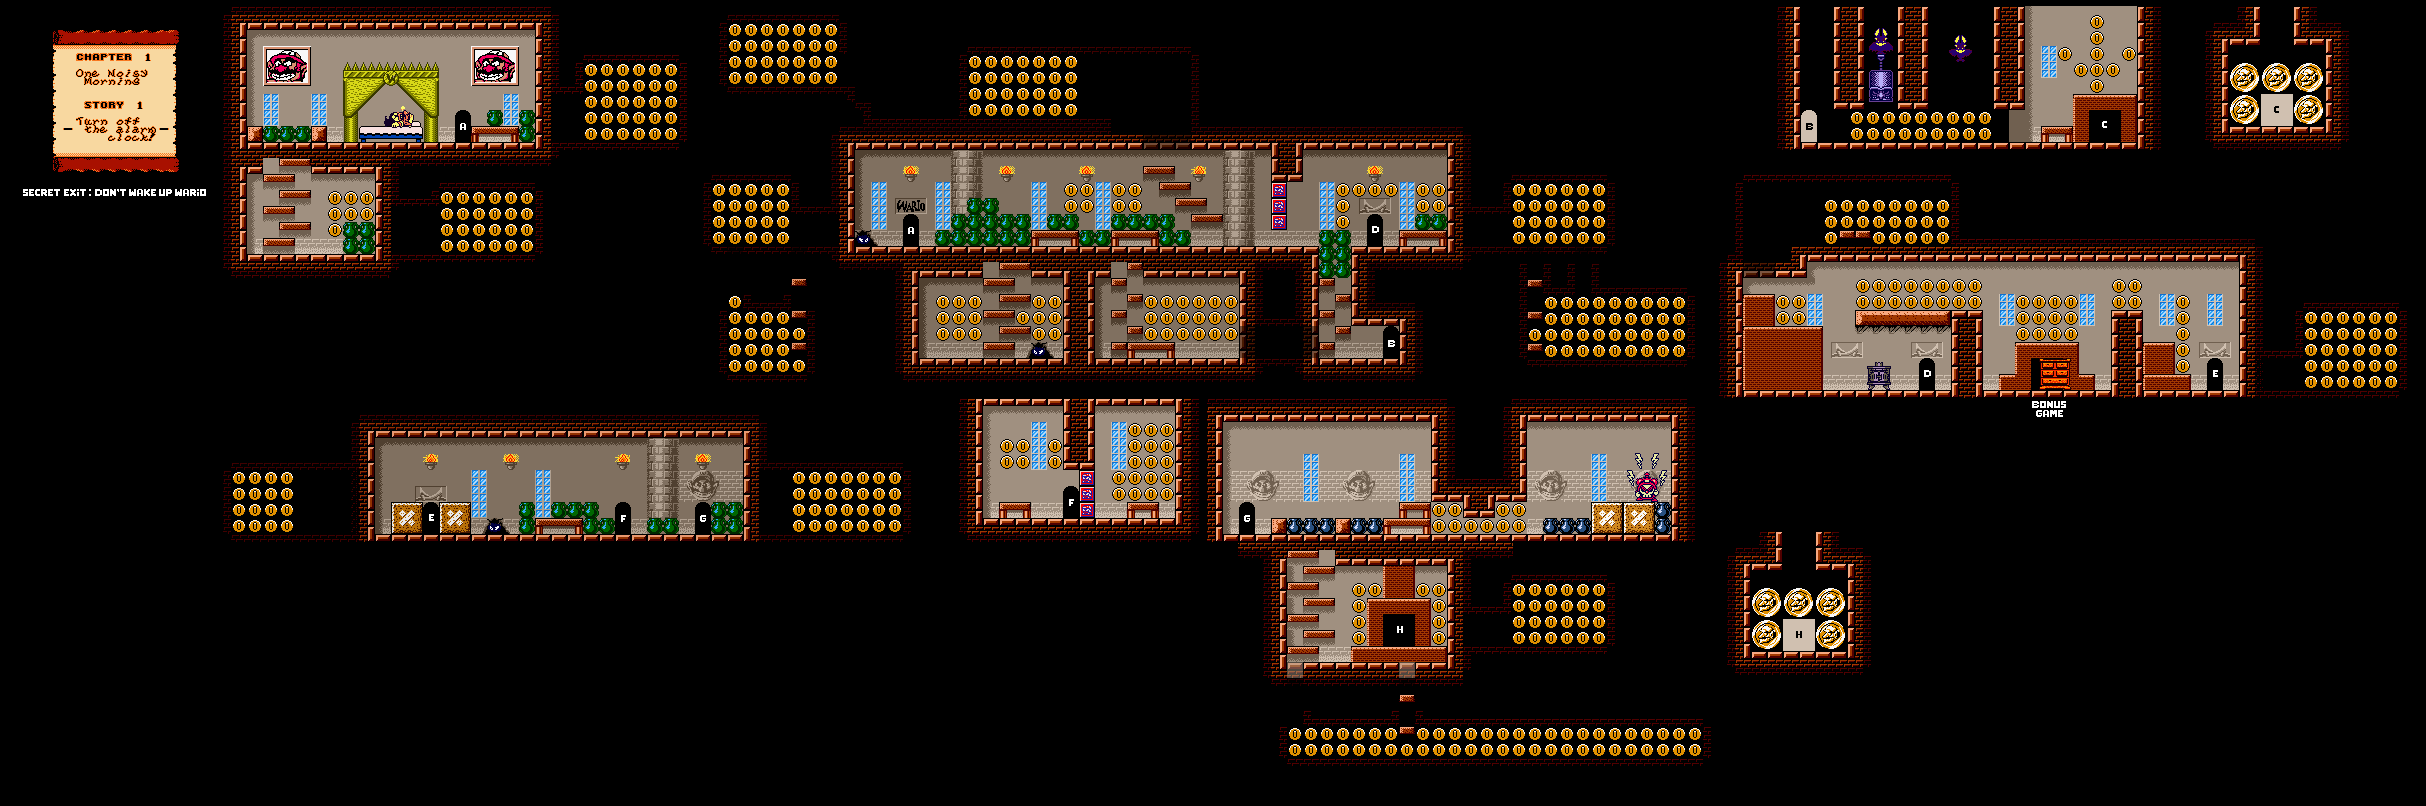
As soon as the level starts, don't do anything. Just let Wario sleep. The music will soon change to tell you that you've cleared the stage. Afterwards, Captain Syrup's goons will show up and pull Wario off his bed and throw him out of the castle. Wario will soon wake up and find out that Captain Syrup has invaded his castle!
Hold and release B with a Spear Goon with your hand at the start to get to the small nook full of coins. You can also do a high jump off a Spear Goon at the far right to get to a bunch of big coins.
After a downward drop where you will have to avoid being stung by wasps while picking coins up, you'll be in a room with a couple of penguins who will get you drunk. You'll have to get a penguin to the door to the upper right to access the treasure room, where you can get a Dr. Mario pill. As for the blocks to the left of where you came in from, you'll need to go up and to the left, tackle the wall, and then drop down and roll down the slope to get . Remember: to roll down slopes, you simply need to crouch while on a slope, and let Wario take care of the rest. Remember that you can jump while rolling, because you're going to have to do that in one of the rooms you'll have to explore to get all the coins around here.
One of the exits out of the room leads to a room with a couple of slopes you'll have to roll down to break all of the blocks. The hardest is the tiny slope in the upper-left corner that you'll have to roll down and jump into a certain part of the wall to get a few big coins. The door in here leads to an area where you'll have to high jump off a mouse to get all the coins.
Another room leads to some monsters that get angry when you attack one of them, a couple of Spear Goons and some coins. Going further from here leads to another area where you'll have to leap on a bunch of rock platforms on the wall while dealing with penguins who want Wario drunk. (Apparently Drunk Wario is called "Crazy Wario" in the West, because Nintendo still wanted to avoid alcohol references even with the ESRB in effect in the late 1990s. Go figure.) This area leads to the exit, and you'll have to roll down the slope to open the path to it. Watch out for the flying spiked skull in case you fall down, and make sure you have the treasure before you leave!
From this point forward in the game, the subgame where you get the picture panel will change slightly. The game will flip panels on the board at 50 coins each until you tell the game to stop with the B button, so you can get through these games slightly more quickly. Make sure you know for certain what the number is before guessing, as usual.
While writing this blog entry, not only did my modem reset and I had to wait two minutes, but my microwave suddenly died right in front of me after putting a pizza in the oven before watching SmackDown. I had to wait for the pizza to get done before pressing the reset switch on the nearby outlet to get it working again so I wouldn't have to plunk down another $60-$80 on a microwave. Just my luck, right?
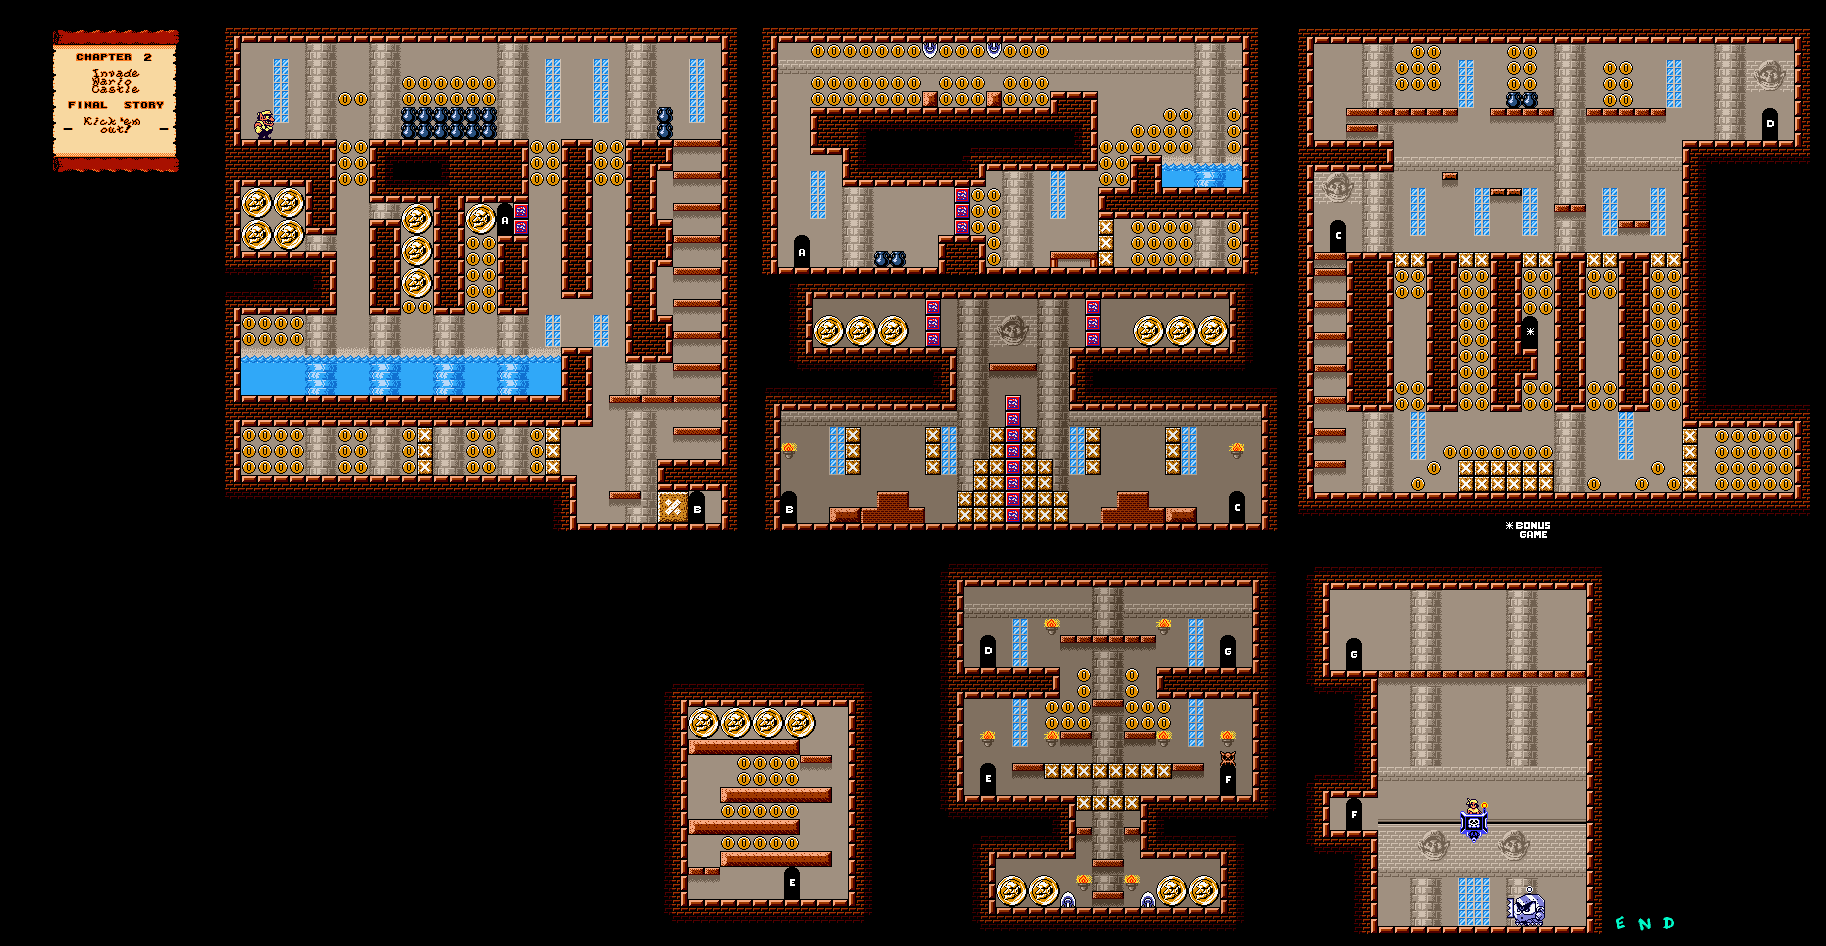
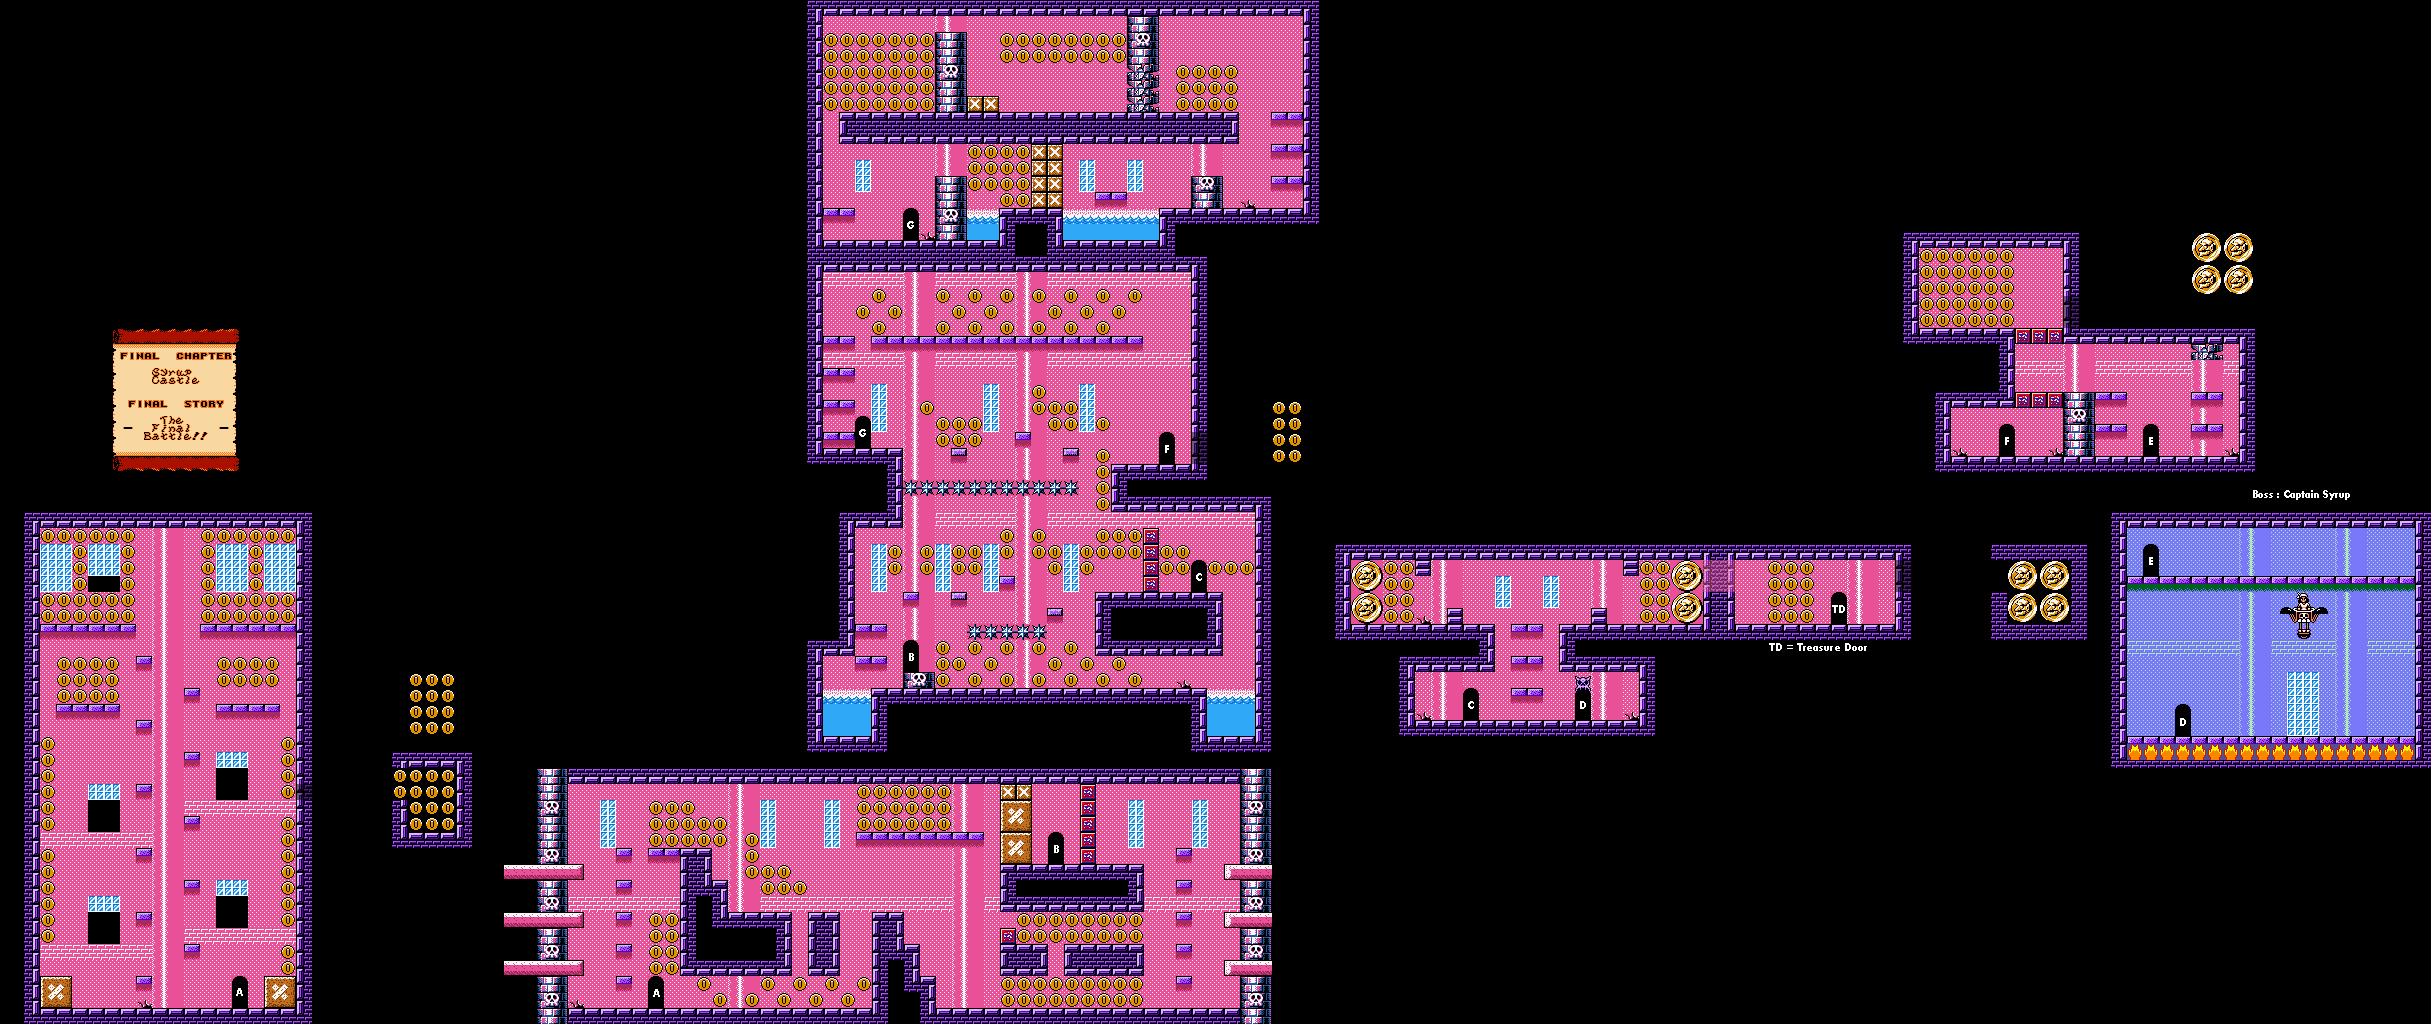
Anyway, we're finally at the home stretch of Syrup Castle. Watch as I have a harder time beating Captain Syrup than I should and almost forget that I have a treasure room to find and win the treasure from in the process!
The guys who throw bottles out of windows will be present at the start of the level. Keep that in mind as you make your way up at the start of the level. Also, there is a gap in the coins on the right side at the beginning, and if you tackle the wall there, you can open up a small gap that you can drop down into from a higher place in a crouching position to find a small chamber of coins. To the left of the chamber, you can high jump up to the top of the small chamber to find even more coins! Sadly, the same is not true of the left wall.
In the next section, take out the snowmen, but save one on the other side for the enemy wall you can break for more coins. The same is true with the next section, where you'll need to throw one of the penguins who will try to get you drunk into an enemy wall to get to the next area.
The spikes that move in and out of the floors and ceilings are back in the next section, so watch out for those and anticipate their rhythm. Remember that you can get under the ones in the floor when they are up. Be sure to tackle the walls on the ends for more coins, especially a few big ones.
The boss room is next, but don't fight Captain Syrup just yet. Instead, let the flames carry you upwards, as this will actually take you to a brand new area. Use the Spear Goons to open up the upper area first, and tackle the wall in the area to the right for more coins. You'll also want to enter the lower area to find another area with spikes and penguins that want you to drunk. The door on the other side of the spikes leads to a room with Wizard Goons. Let them turn you small in order to get all the coins in the room. If you need more, just jump into the Wizard Goons from above or below.
The treasure room is in the upper-right corner of the room with the floor and ceiling spikes. Winning this will net you a crown. I almost forgot to get this!
To beat Captain Syrup, you'll want to jump on the Goons that she sends down at you, then grab them, jump up and throw them upwards onto Captain Syrup herself. As you do this, you'll also want to avoid the fire columns that rise up from underneath the floor, as they will send you out of the battle and force you to make the trek back to the boss room, forcing the final boss battle to restart from the very beginning.
After enough hits, she'll then send bombs down at you. You'll want to catch the bombs out of the air, then throw the bombs at the fire columns when they come up from underneath the floor so that they rise even higher. You'll want the fire column to hit Captain Syrup this way. If the bombs explode at floor level, they will send two fire columns across both sides of the screen, and they can also send you up to the top of the room and force a restart. You only need to hit Captain Syrup twice in this phase, but it can be frustrating. Once you land the second hit, the battle is over, and you'll get the number guessing game like you always do before you roll credits.
Here, you'll get your first of five endings.Wario will get his treasure back from Captain Syrup and her goons, then he will take his treasure back home to his castle by land and by air. After this, you'll find out that you've only completed half the game, collected only half of the treasures and revealed only half of the picture panel! You'll then see all the treasures and picture panels you've gotten, then you'll see the route map for the game. To get the other half, you're going to have to power off or reset (in case you're playing on Super Game Boy) and go through all four of the alternate routes!
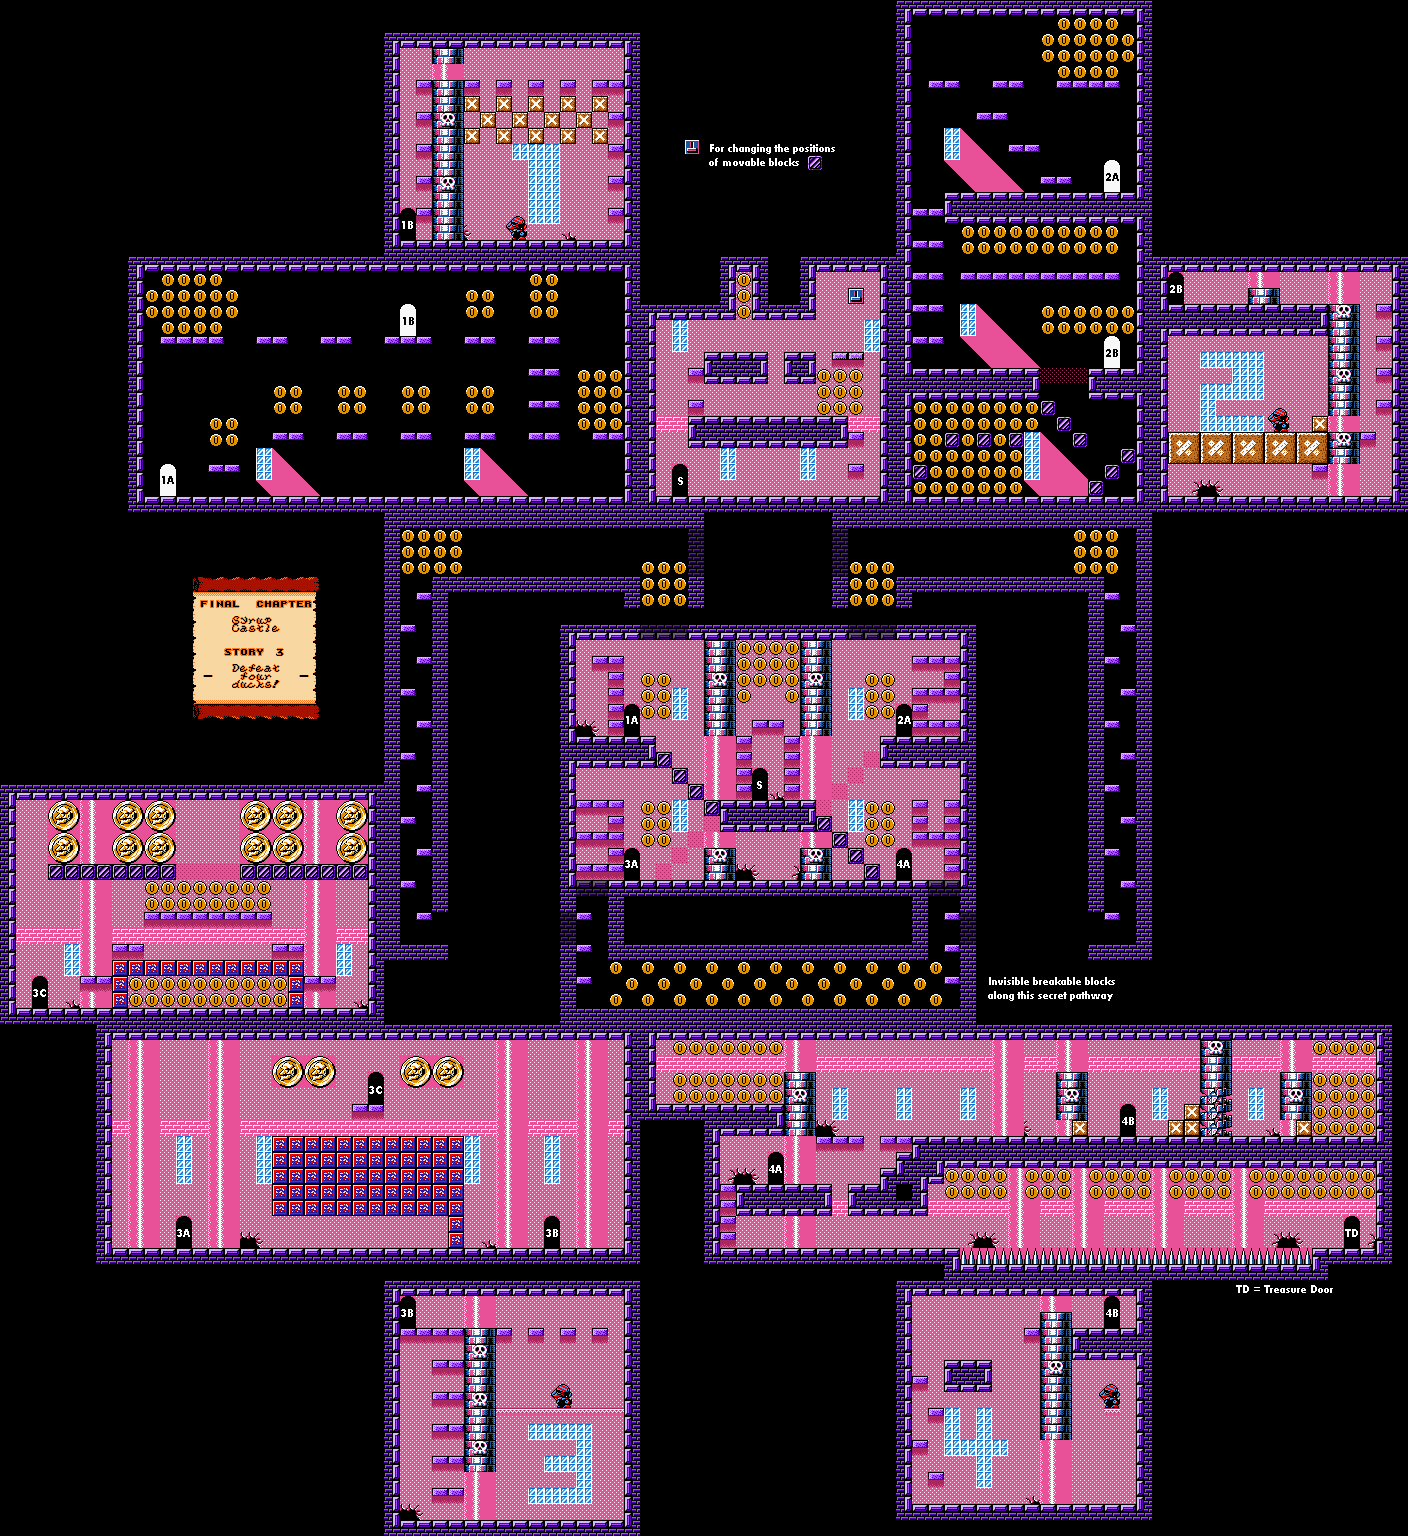
Be ready to butt stomp floors, tackle walls and jump into ceilings...a lot. You'll have to do that to find not just coins, but the rest of the level and a path to the exit, hence the name of the story.
There is one room with a guy with a hammer and a bunch of breakable blocks. Be ready to break some blocks and launch yourself above the rest in the Spring Wario form so you can get some big coins.
The treasure room, where you can win a cracked shield, is in the same maze as the exit. This maze will reveal itself to be a spiral-like path as you break your way through it. Be sure to get to the corners of this maze to get all the big coins in it.
In the main hallway, be ready to butt stomp floors and tackle walls to find some free coins. You'll be able to find a lot before you enter any of the four individually numbered rooms. The door in the center contains a switch that will let you switch from accessing Rooms 1 and 4 and accessing Rooms 2 and 3. Just watch out for those bird enemies.
The first room is full of ghosts who will turn you into Zombie Wario and send you all the way back to the bottom. You'll need to avoid them to reach the first duck and defeat it like you would any normal enemy to get credit for part of your mission objective. The same is true for Mission 2, but you'll need to be Zombie Wario to reach the second duck as well as the treasure trove of coins at the bottom.
For Room 3, you'll need to use the block in the room to get through to the duck on the other side. If you can make a path to the top of the room, you'll be able to get a ton of coins. There are coins above where the two Spear Goons are, but you'll need to have the switch in its default position to get to them. The Spear Goons in the Spear Goon room will be gone permanently if you defeat them (unless you start the level over again).
For Room 4, you'll need to leap on the rats to get past all the spikes. To make your way to the right, you'll need to keep leaping off the left side of the rats; to go left, you'll need to keep leaping off the right side. You'll need to do this to get to the treasure room, where you can win a crystal ball, as well as to get the rest of the coins before the fourth and final duck, which you'll need to bring down with the block in order to defeat it. Once the four ducks are defeated, you'll head on to the next level.
The first section has you breaking through blocks to get to the next section. The guys with the hammers will turn you into Spring Wario if they hit you with their hammers, but you can use the form to get some coins you couldn't usually be able to get. From this point forward, be ready to tackle some walls for hidden coins.
The wizards will turn you into Small Wario. As Small Wario, you can jump up narrow little gaps. Hold Up for a high jump, and make sure you're near the edge when you jump so you can clear the gaps with the water, which will turn you back into regular size if you fall in.
You'll soon be jumping on dresser drawers while avoiding the flying spike skulls. You'll need to go up to enter the treasure in the first of these two sections and get the cloak, while in the second section, you'll need to hit a switch to lower some block projectiles so you can get to the end.
The snowman enemy will spit a snowflake projectile and freeze you, which will send your frozen self backwards until you hit a wall and shatter out of your icy prison. You'll have to use one of them to open up a path leading to the coins on the other side of where the exit is.
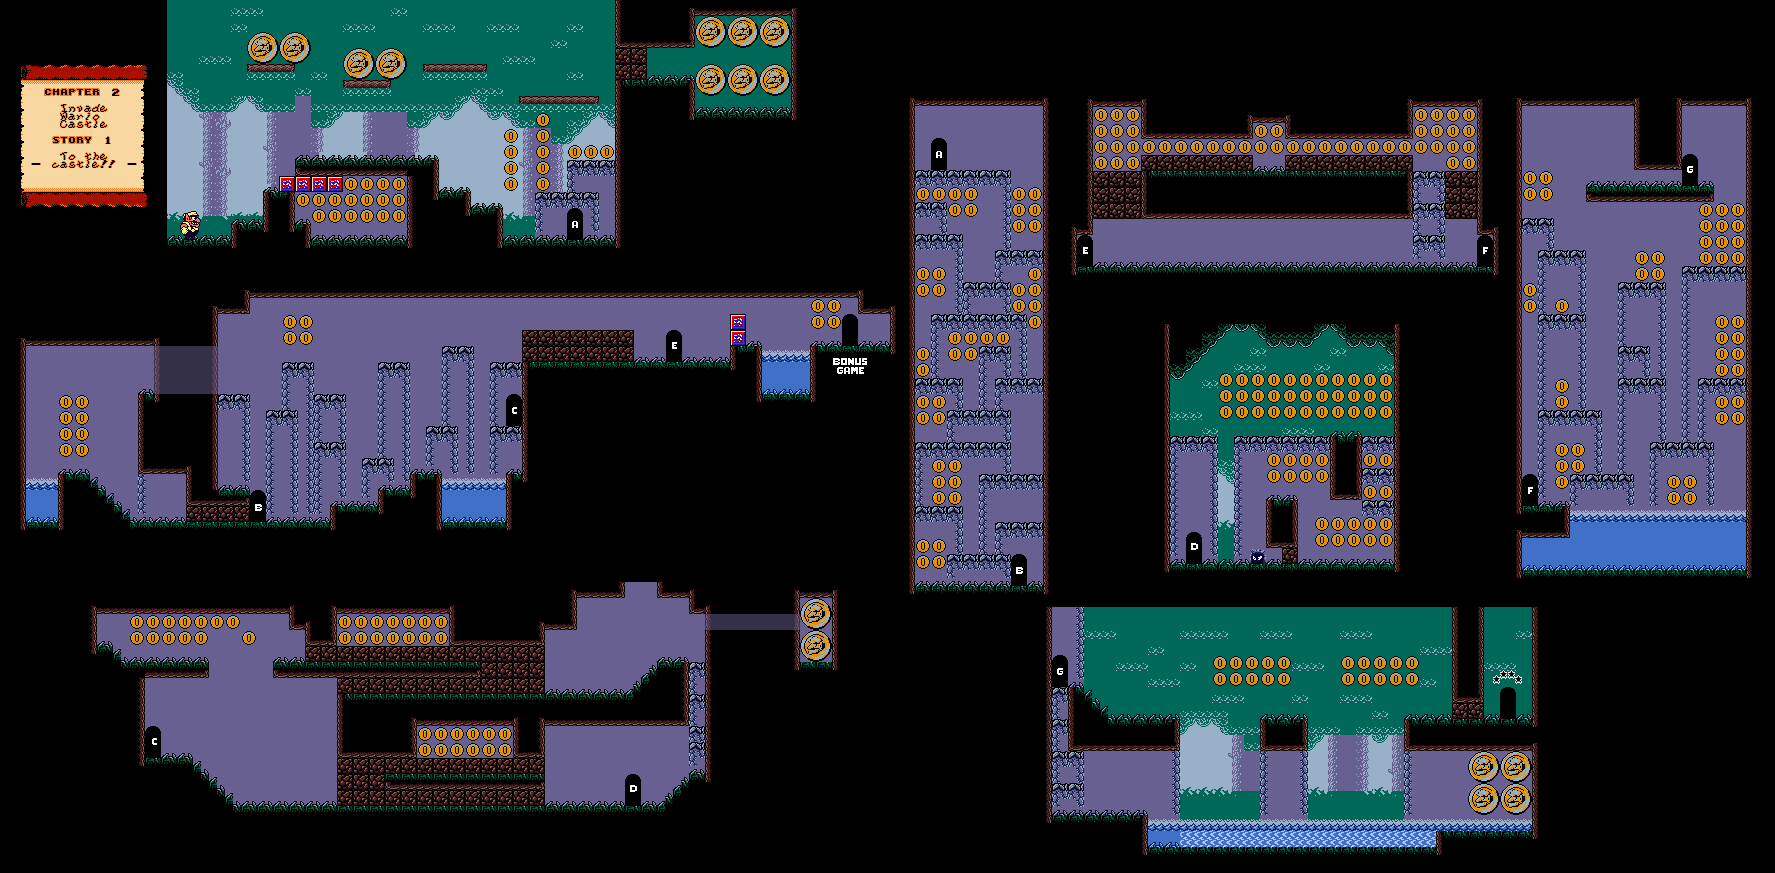
Once again, you're in the forest. You'll need to use the fire-blowing fox to get the coins near the door leading to the next area.
For the area with the monsters that get angry when you tackle one of them, there is a fake floor leading to a lower area where you can find more coins.
You'll then have to fly with the owl. Be ready to get away from the birds when they get ready to attack you. As for the next area, there are some breakable floors that lead to more coins.
You'll then have to fly with the owl again to avoid some spikes. The next couple of areas are straightforward. The area with the Spear Goons has a breakable ceiling that leads to more coins, and you can take out all the bottle-throwing guys easily
Before going to the exit, let the fox set you on fire and go through the wall right of the exit. That leads to the treasure room, where you can win a magic cane.
You'll have to pass by a few buildings and go through one to get to the boss. The treasure room is inside the building that you have to get through, and you can win a scooter for beating the mini-game there. The third outside section is full of birds that will dart at you if you get too close to them.
There are plenty of crates to destroy, and you can break those to get some coins.
Throw at enemy at the walls to the right of the boss door to find the secret area. We won't be using this secret area, as it won't let us fight the boss, which we want to do.
To beat the boss, you'll want to avoid the basketballs that the boss throws at you. If the boss jumps on you, you'll be turned into a basketball and thrown into the hoop unless you can somehow stay away from the boss until you turn back to normal. If you can jump on the boss yourself, you can stand between a brick wall and the background where the buildings are and hold Up while you jump up to sink the ball into the hoop. The first to three points wins. If you lose, you'll be knocked upwards into the area above and you'll have to do the boss battle again.
After the boss battle, you'll follow Captain Syrup and her goons all the way to Syrup Castle...
There are conveyor belts here, and the chevrons very clearly show where they will push you. Also, watch out for spike traps.
You'll need to hit switches in order to switch the direction that certain conveyor belts move in.
If you press Down while performing a tackle, you can do a crouching slide. This can get you past some narrow passages while on some of the conveyor belts.
The guys who throw bottles are back in full force. It's possible to take them out with a jumping tackle if you jump from the right distance. You'll also have to deal with the birds that dart at you when you get near the treasure room.
The treasure room is pretty out of the way and is at the bottom of the room with the birds. You'll win a smoking pipe for beating this. As for getting out once you get the treasure, you'll need to hit the nearby switch in order to get the conveyor belts going in the right direction.
The fun with this level is two-fold. Not only are you running around just to see how to get everywhere, but you'll have to eat cake and get fat just to get the platforms that take you down to the lower levels to work.
There are two kinds of platforms: those that take you up and those take you down. The ones that go up are easy to use, but to use the "down" platforms, you'll need to stand on them after eating a cake from one of the chefs and turning into Fat Wario. While you're Fat Wario, however, you won't be able to use the "up" platforms. You'll have to be normal size to get them to work. And for the love of Pete, don't forget that you can hold Up and jump to perform a high jump even as Fat Wario. That was embarrassing.
The treasure room is on the fifth floor on the right half of the building, and you'll have to get there to win a yo-yo.
The enemies that look like beetles will shock you with an electrical projectile if he sees you. You'll want to stay out of sight and not be level with him, and you'll also want to hit him from behind to get rid of him.
The guy with the hammer will turn you into Spring Wario if he hits you with the hammer. Hold A while in spring form to jump higher than normal. Spring Wario only lasts for a limited time; you'll become normal Wario again after that short period of time.
There are plenty of doors that you can enter throughout the building. Not only will you need them to find all the coins, but you'll also need them to get from one side of the building to the other.
The exit is on the first (lowest) floor. You'll need to reach the floor on the left half of the building with a chef and Fat Wario on a "down" elevator, then go through the water room to get to the other half of the building and get to the exit.
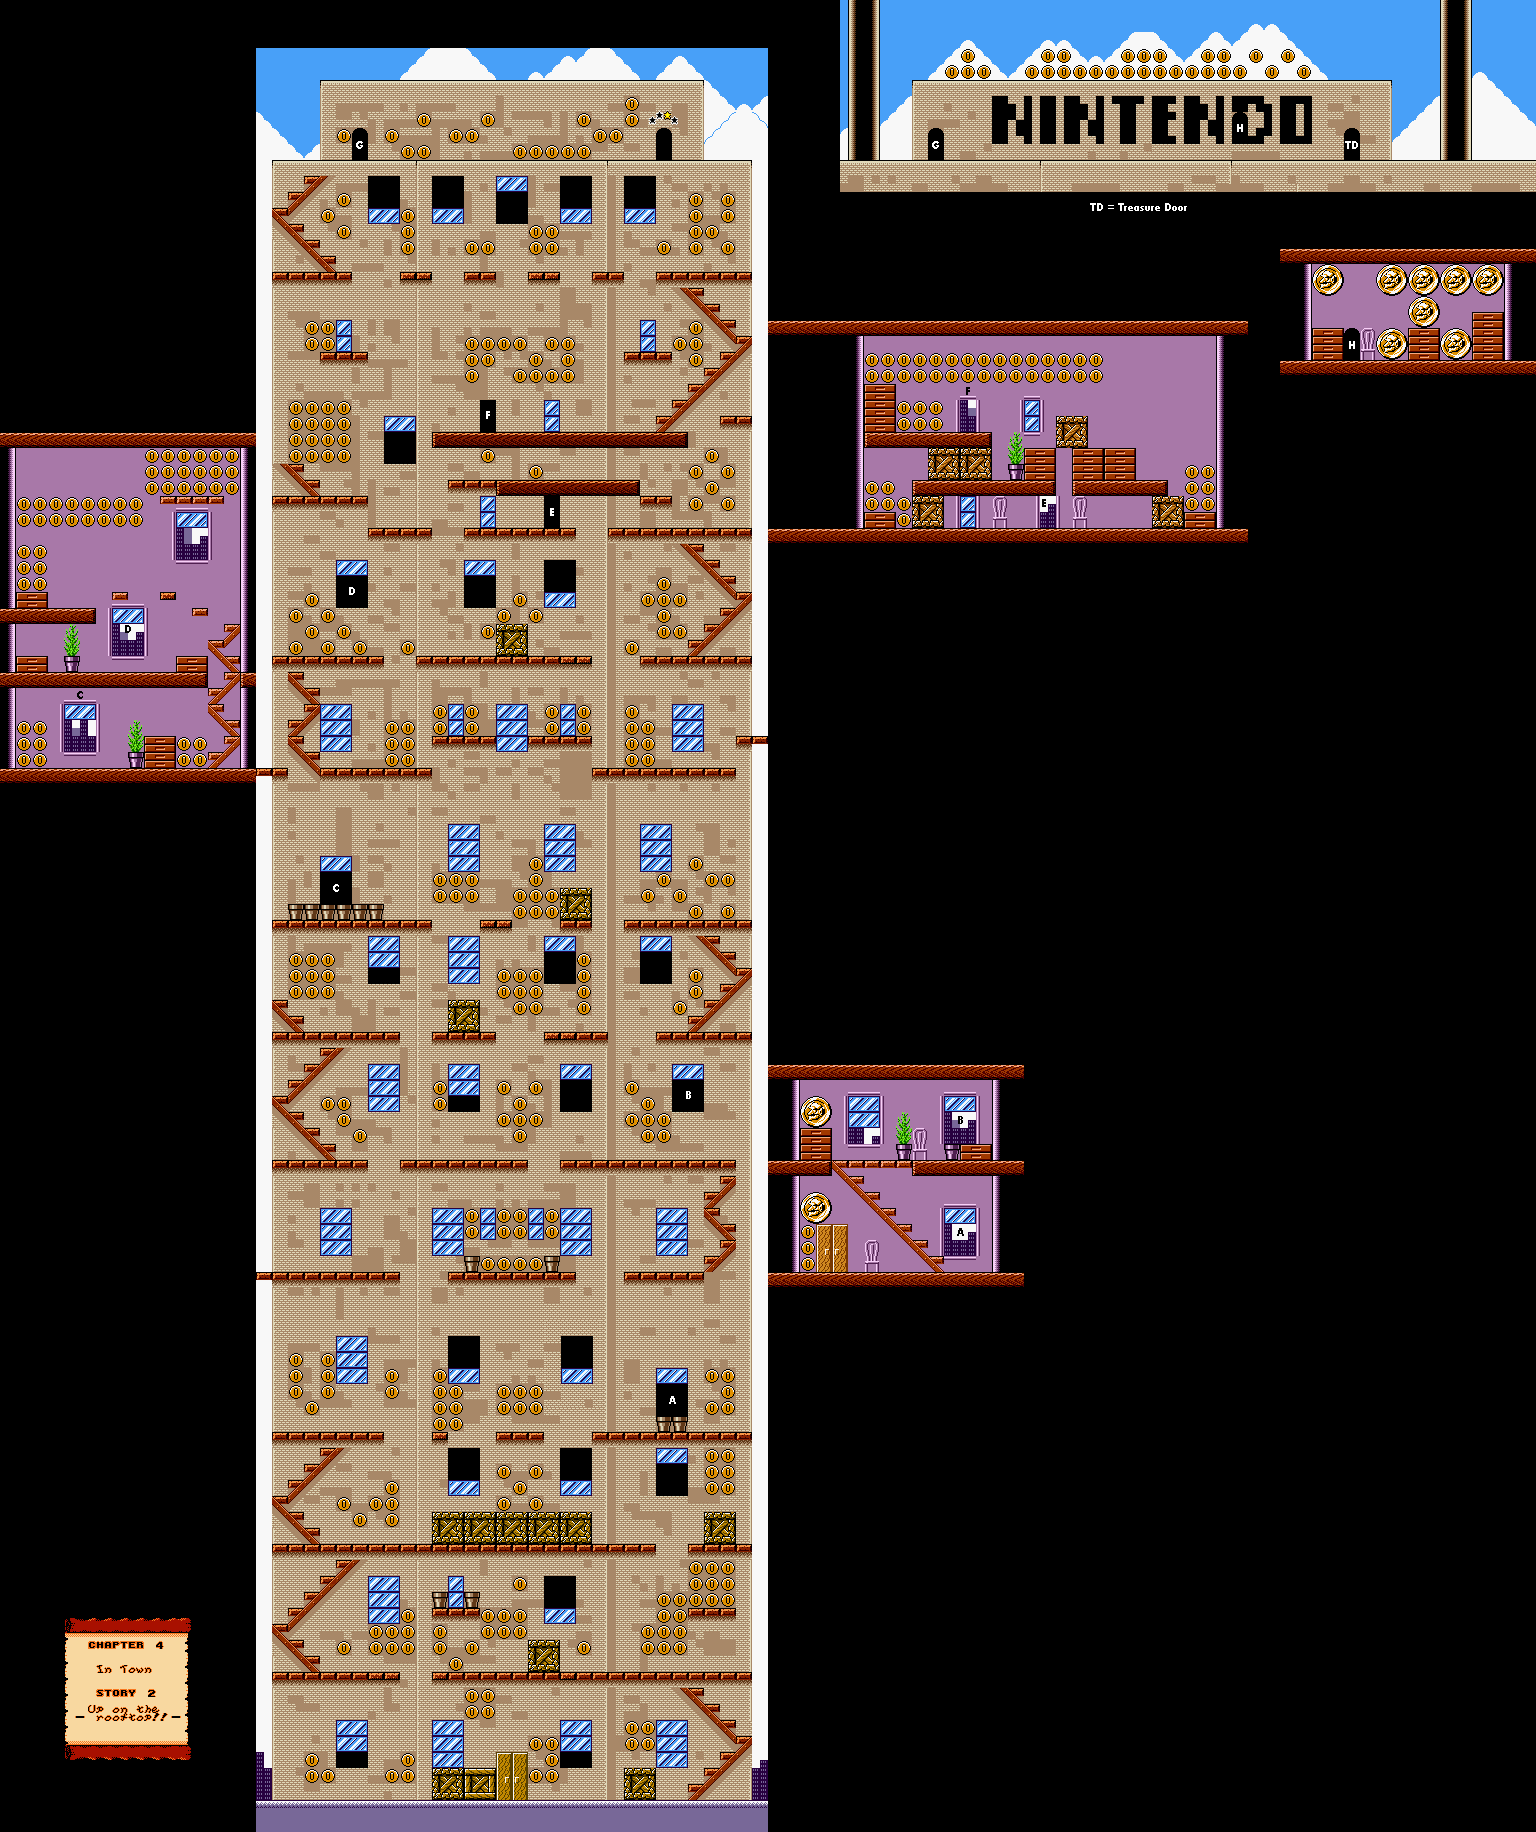
In this level, you'll be in front of a huge skyscraper in the city. The exit is at the top, as is the treasure room, where you can win a vinyl record.. You'll have to enter the other door at the top to access the other side of the roof, where you can see the word "Nintendo," with a door in the D. Use the furnace on the other side of the room to enter that door, where you can get a bunch of big Wario coins.
Be ready to go up and down and all around - and inside and outside - to get to the top and get as many coins as possible. Some of the paths allow you to go back down to previously unreachable areas. Just watch out for enemies, including the football helmet guys and the birds that will dart at you.
The guys in the windows will throw bottles at you and then briefly hide, but if you can hit them with a jumping tackle, you can get rid of them for good.
If any platforms have more dimples than usual, they will fall under your weight when you stand on them, so you'll need to quickly make your move. Those platforms will also be darker than usual, so it's easy to tell them apart from the normal ones.
What you see in the interior rooms is what you get, so don't go look for any breakable walls or ceilings.
You'll need to get to the engine and stop the train by tackling the switch from the left side, but before you can do that, you'll have to get from the back of the train to the front. There are openings in the ceiling where you can move on the top of the train, and while you're up there, you'll be pushed to the left. Mega Man never had this problem. The main enemy you'll be dealing with are the birds that will dart out at you if you get close enough to them, but if you can time your movements, you can jump off them as they attack and get to other train cars. For some reason, you cannot do the ground pound while on the top of the train. To get to the treasure room, you'll need to backtrack to the left near the end at the top of the train and drop down one of the openings leading back down to the train that you would not have been able to reach otherwise. Beating the mini-game will net you an ocarina.
The wasps are back. Get ready to float to higher areas and get a ton of coins. If you crouch walk with the diagonal directions on the D-Pad, you can avoid being stung.
If you high jump off the Spear Goons to the side on the way to the boss entrance, you can get some more coins.
The treasure room is hidden in the door above the one leading to the boss entrance, and you'll have to move into some hidden pits in the floor to get to the room...and more coins. You'll win some bananas for winning the treasure mini-game.
To beat the giant bee, stay away from it, and don't stand underneath it. When it drops down to crush you, jump on its head. When the tiny wasps show up, you'll want to tackle or avoid them. You're better off defeating them, as you won't have to deal with them alongside the boss if you do. If you get stung, you'll be sent back to the top of the room, and you'll be forced to go back to the boss room and start the whole battle over. After jumping on the giant bee's head three times, you'll beat the giant bee and move on to the city, where Captain Syrup and her goons flee to after getting out of Maze Woods.
The wasps will dive at you if you get close enough, and if they sting you, you'll turn into a floating Wario. You'll float until you hit a ceiling, which will cause you to deflate and turn back to normal. This can let you reach areas that you could not normally reach. A jumping tackle can get rid of them, as can flying into them after getting stung. Use the wasps' sting to get all the coins you can.
In the room after the beginning, be ready to tackle a lot of blocks. You'll have to ride on the turtle multiple times. There is a path above the ceiling leading back to the left that leads to more coins. In the brown room to the far right, throw the Spear Goon upwards, then tackle the stove to where you can jump to get all the coins.
In the final room, you'll find the treasure room, where you can win a weird looking face idol, as well as an area you can only access by throwing an enemy through blocks. This will allow you to get some more coins, but you'll need to throw a Spear Goon up there and get up there yourself in order to access those coins. As for the exit, you'll have to roll down the slope and then roll through some blocks in order to reach it.
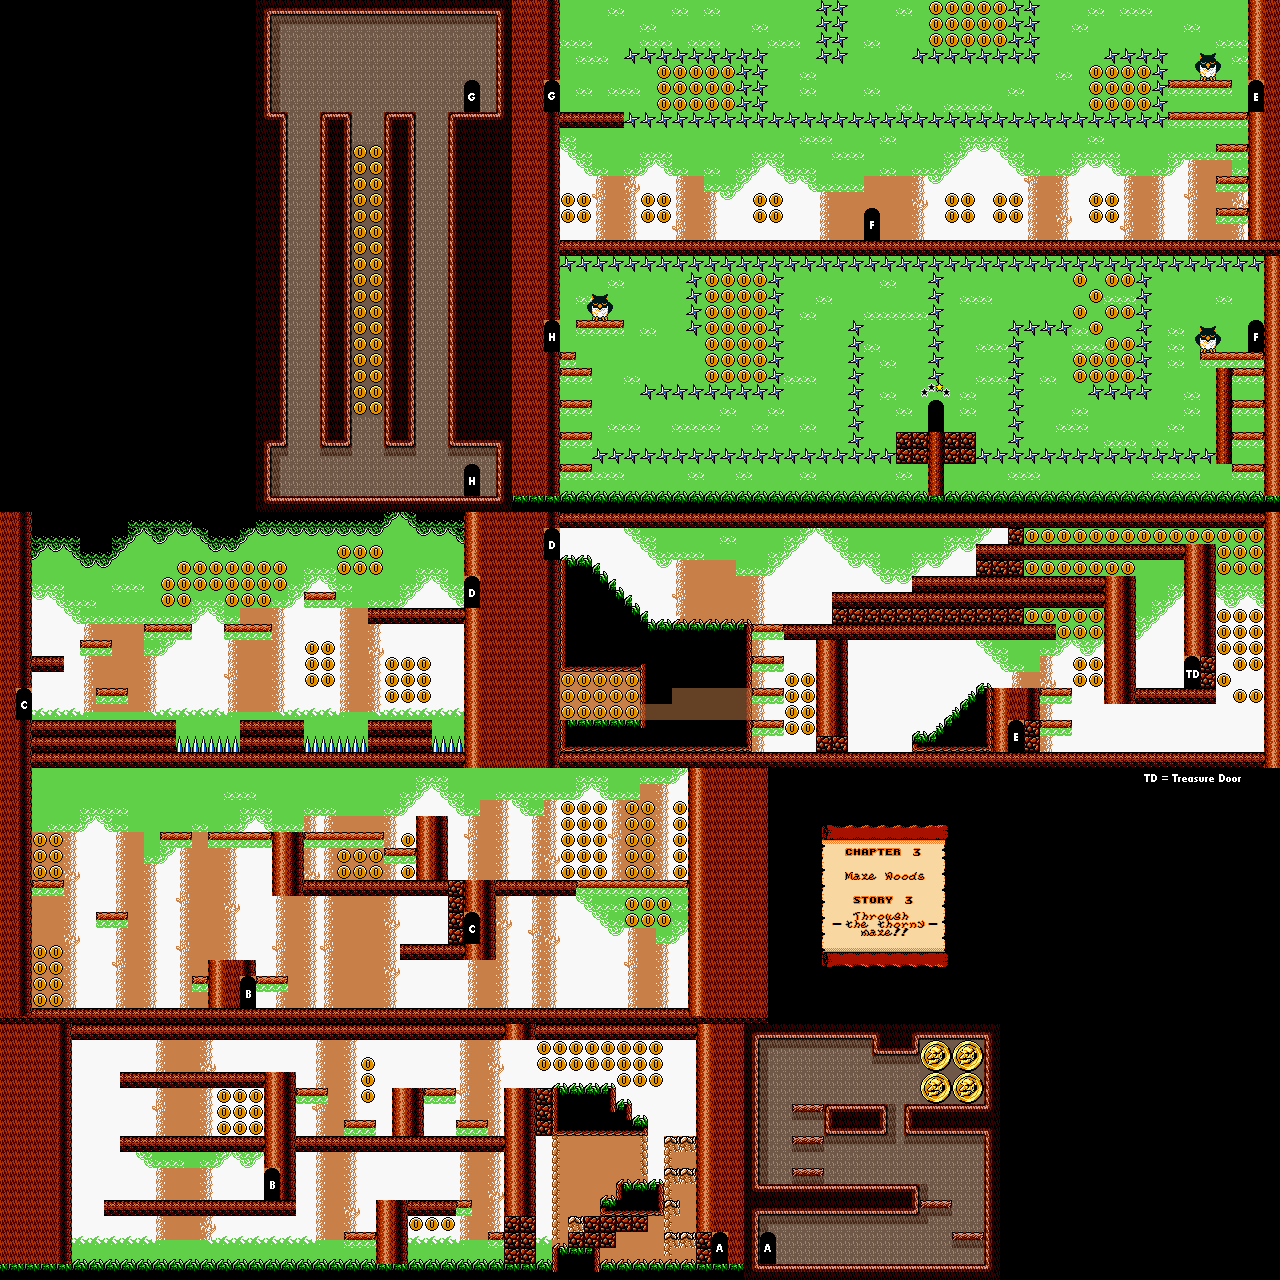
You'll be dealing with flying spiked skulls at the start, so tread carefully as you break blocks and collect coins. The door above the start leads further ahead, and the door all the way to the right leads to more coins. The enemies near the big coin will try to shock you if you're close enough to them and you happen to be in front of them, so sneak up on them and then tackle them to get rid of them.
After some seagull platforming and some flying spiked skulls, you'll have to roll down some slopes and jump up to some areas to break through some blocks to get some coins as well as open the treasure room. The lower room in the slope path area leads to a maze full of spinning stars that will hurt you - hence the "thorny maze" - which you'll have to fly through with an owl. After dropping down the middle path past the door on the other side, you'll be in another owl room. Going to the right of the exit will lead to the bottom of the first owl room, which makes for a nice shortcut to the treasure room, where you'll earn a golden apple, so if you want to get more coins before getting the treasure, you'll be free to do so.
If you go down in the water at the start, you'll find a hidden coin passage. Also, there is a passage you can tackle through to the left after entering the first door that leads to more coins. From there, the trees in the background will tell you where to stand so as not to fall into hidden pits. If you fall into the pits, though, you can get some coins while being carried back by the current.
The turtle will get you across the water. Jump on it to get it moving, and be ready to get off and on it to get from point A to point B.
Halfway through the second turtle area, there is an area in the middle of the current where you can go down and find a hidden area with quite a few coins in it. Hold Down and Right and keep pressing B, and you can get one of the coin caches. Down and Left with B will help you get the other set.
You'll need to turn into Fire Wario in order to break the blocks leading to the treasure room, as well as the next door. At the next door, go into the water, go all the way right and then down. You'll sink below the screen. Keep holding Down and Left while pressing B to get a ton of hidden coins.
To beat the giant spear man, tackle him to turn him upside, then repeatedly ground pound him to damage and eventually defeat him. Don't forget to get the 100-coin coin when you're done.
We meet the owl for the first time in this stage. It won't be the last, and once you get used to flying around on the owl, you'll be able to do it in the more difficult stages.
It's time to introduce ourselves to our new friend: the owl.
By bumping into the owl from below, we can get him to fly, and if we jump into him from below, we can ride him. You can fly around in four directions - up, down, left and right - and you can tap a button on the D-Pad to move slowly in that direction. Press that same button on the D-Pad again and you'll go a little faster. You won't be able to fly in place while on the owl, so if you want to stay in one place, move back and forth. While you're flying around, you can collect coins, but you'll want to watch out for hazards and enemies. Remember that Wario - not the owl - is the hitbox, and if you don't want Wario to get hurt and knocked off the owl while losing a couple of coins, don't let Wario get hit or touch what he shouldn't. Pressing the B button will allow you to let go and drop down to dry land.
If you notice a coin in the water with a little more detail than usual, it's bait from an enemy using a fishing rod. If you get caught, you'll be pulled upwards, but you won't get hurt. The bait coin will come back, and you'll need to do this to get to the treasure room, which will award you a seed if you win. The fish enemies do not have any coins.
The flying spiked skills are indestructible, and you'll want to keep them away from Wario at all costs. They cannot be defeated in any way; only avoided. Some move back and forth, while others move in circles. You'll want to watch where they go and how quickly they do it in order to avoid them as they pass and keep all your coins while getting from point A to point B in one piece.
While beating the boss is easy, getting everything here can be a bit of a challenge. Holding B will all you to throw an enemy at the narrow wall that requires throwing an enemy at it to break it. You'll need to do this to get to the treasure room, where you can win a scroll.
To beat Bobo, stay all the way to the left, then hold Up when he dives down so you can jump on his head when he dives down. When he comes back, go back to the left and duck down to avoid being blown upwards, which will force you to the top of the room and force you to go back to the boss room to start the battle over. The more hits you land, the longer the updraft will last, so keep ducking until you're on the ground. For the third and fourth hits, you'll want to wait for Bobo to make a second dive so that you can more easily hit him. After four hits, Bobo goes down again.
Afterwards, Captain Syrup and her goons escape on a balloon, and they land on Maze Woods, where the chase continues.
The chef walks back and forth with a cake on a fork. If the cake touches you when he throws it, you'll become Fat Wario. This will allow you to break the black cracked blocks from underneath, but you'll move slowly and you won't be able to jump as high. You can still do a high jump, even though it won't be as high, and it can still get you somewhere. You can also move into enemies and bump into them to defeat them. In order to turn back into regular Wario, you'll need to move around in order to work the pounds off; you won't be able to turn back to normal by just standing there.
If you hold Up and press B, you can throw an enemy upwards when you are holding one. If you press Down while holding an enemy, you can drop them in the direction you are facing.
There are a lot of coins to be found in this level, so be ready to look high and low and also tackle some walls. Some walls require throwing an enemy at them in order to break through them and see what i s
If you duck with Down while tackling, you can slide into a narrow corridor.
The treasure here is a wing.
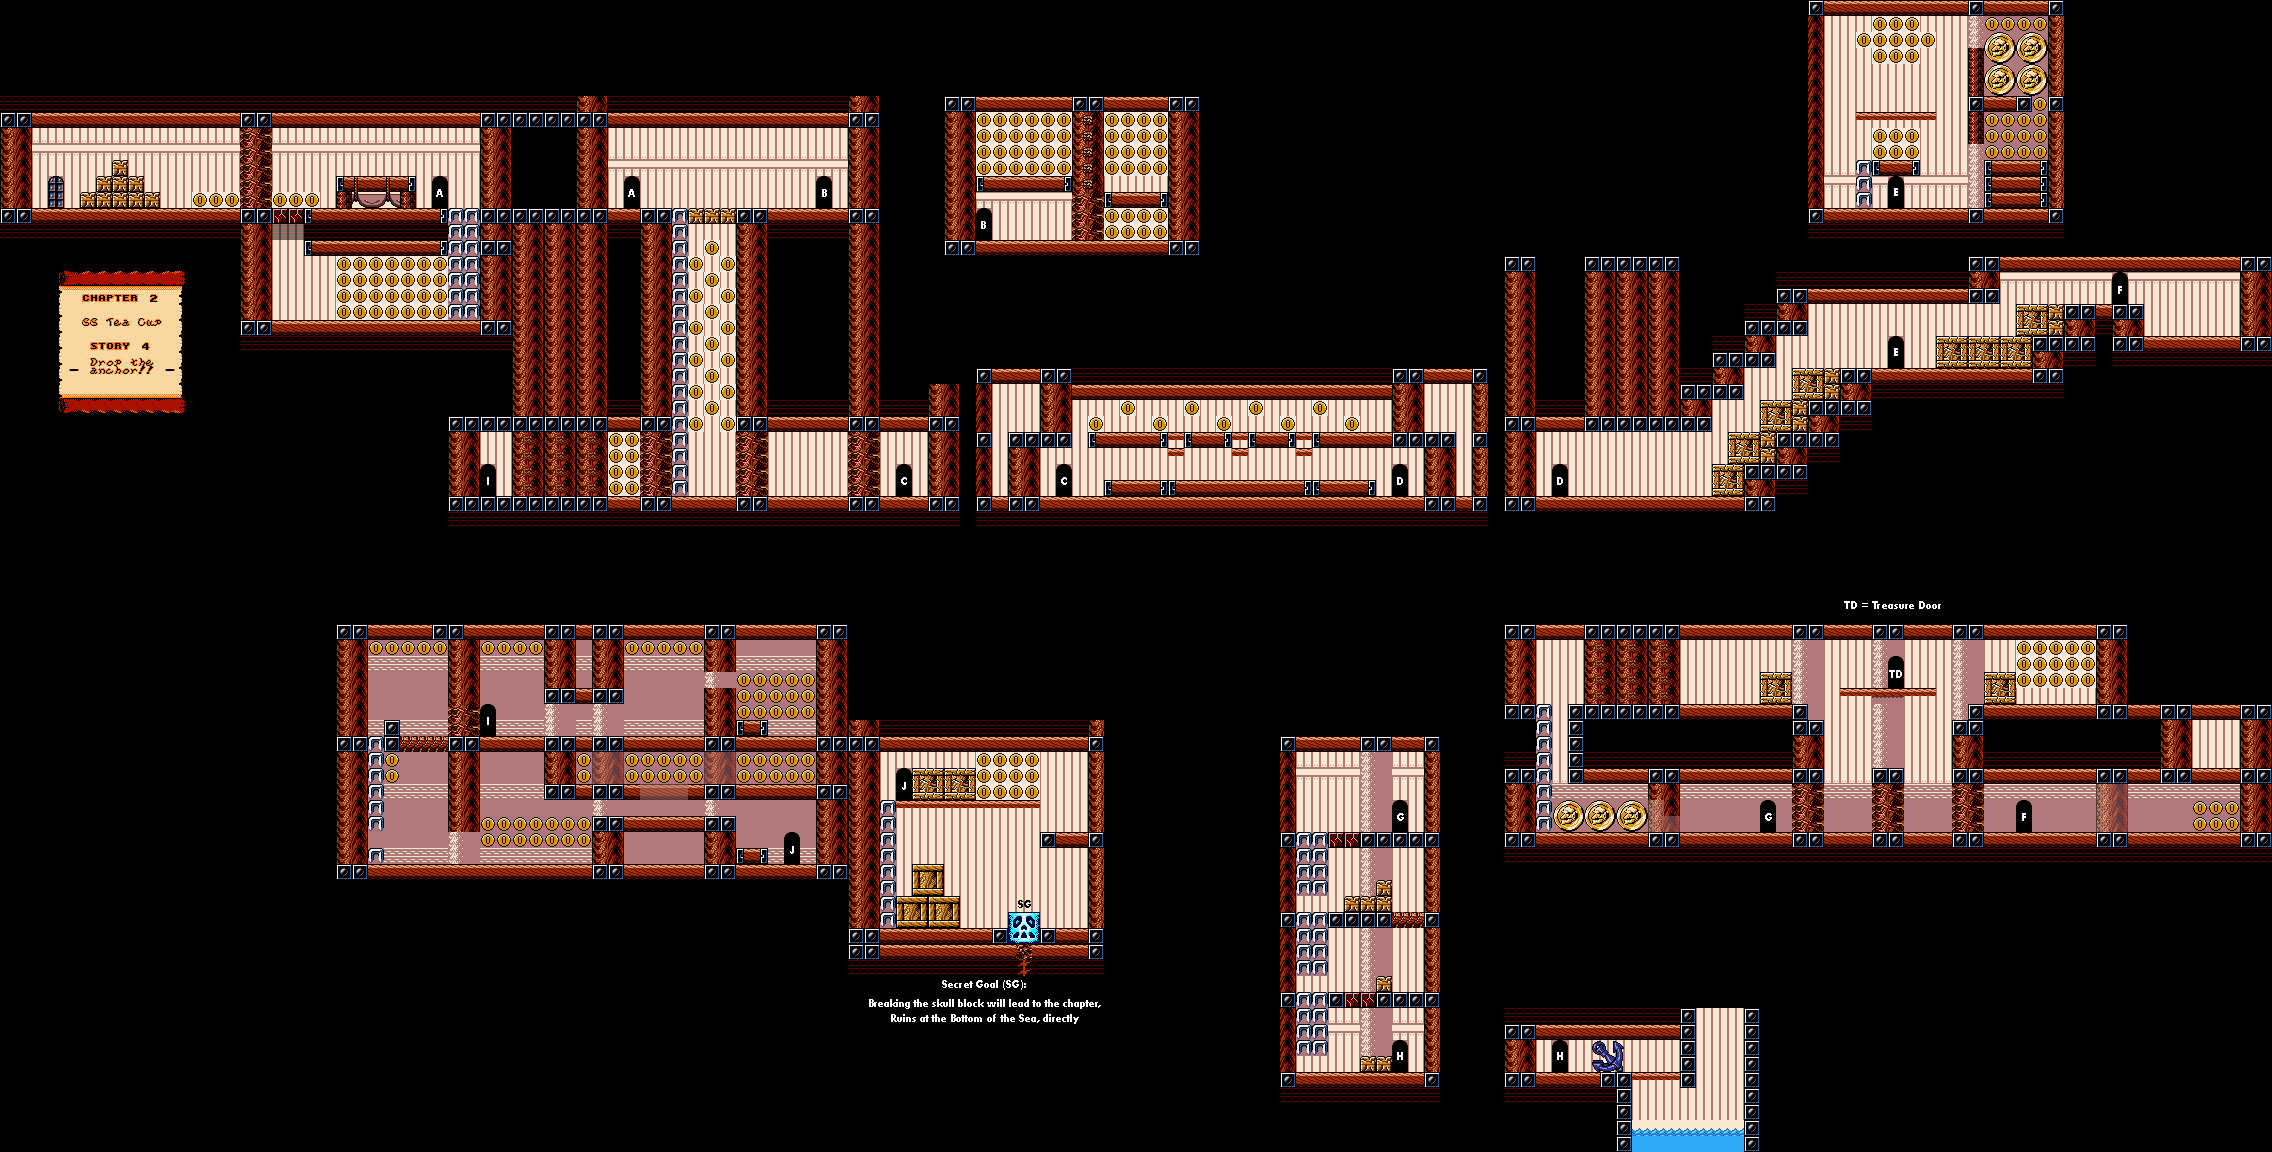
To drop the anchor, tackle it until it falls into the water. This ends the level.
Unlike other levels that we've played so far, this one is pretty linear and doesn't have a lot of deviating paths. Sure, there are a few things here and there, but this one definitely goes from one section to the next in a more linear fashion.
The seagulls act as platforms, but they will fly away soon after you land on them. They return in case you need them again, thankfully.
The monsters with the big teeth can be taken out with a tackle, but if any others are nearby, they will move back and forth and go on the attack briefly. Wait for them to stop before moving on and, when necessary, taking out the next one. If you have to miss collecting a coin to get past them all, so be it.
For the fourth section, take the upper path for a ton of coins.
The eels will try to grab you and drag you down if you get close enough. You won't be able to collect all of them, and you'll actually want the final eel to grab you and drag you down to the treasure room, which contains . This is the only way to reach the treasure room, so you're going to have to sacrifice a few coins in order to get down there.
When you reach the door as the S.S. Tea Cup and enter it, you'll clear the level.
The penguins throw balls with handles at you. If the balls hit you, they turn you into Drunk Wario. Drunk Wario will move opposite the direction that you tell him to go, and he does not jump very well at all. Sometimes, he will stand in place before moving again. If you press B while drunk, you will belch out a cloud, but it doesn't seem to do anything. In order to become sober again, you'll have to fall into a pool of water. And before you ask, the balls were indeed beer steins in the original Japanese version before being censored in the Western releases.
In case you can't get to a cache of coins directly, tackle walls, jump into ceilings and ground pound floors. You'll eventually find a way to get to where you want to go...and a few other places, too!
Once again, you'll need to be Fire Wario to get your hands on a few extra coins.
The little guy with the spikes on his head unless he hits his head on a ceiling or wall, which causes him to ball up. From here, you can defeat him, but you can also pick him up and throw him. You can also jump into him from below to get him to ball up.
You can keep jumping on enemies repeatedly in order to get coins that are in the air. Holding Up on the D-Pad lets you bounce even higher.
The giant chicken is a heavier enemy, and while he can be picked up, Wario will move more slowly while carrying him and will also not be able to jump while doing so.
This is the first level where you'll have to jump after rolling down a slope to get to other narrow areas and roll through the blocks. Doing it here will lead you to some extra coins.
The treasure here looks like a Pegasus Boot.
You'll eventually find the hen, but when you approach her, she will run away. You can bump into her and stun her like you can most other enemies, and you can pick her up and carry her over to the start. When you get back there, throw her back onto her nest to complete the level.
The exploration of our castle concludes with a giant snake. After that, we start chasing Captain Syrup's goons into the outside world where they create even more havoc!
There is a door that I missed, looking at the map. Not surprisingly, it leads to coins.
There's a new enemy here: the zombie. The zombie will not only throw its head at you, but it will also turn you into Zombie Wario. As Zombie Wario, you cannot jump, you can only move left or right, you can fall through thin platforms, and you must move into sunlight coming out of a window in order to turn back into regular Wario. Tackling the zombie from behind only gets rid of it temporarily, you must run into it as a zombie to defeat it.
There is a path that leads to a secret exit; we won't be entering it yet.
The treasure in the treasure room is a glove.
The door with the skull above it leads to the boss.
To defeat the giant snake, you'll need to avoid the snake's bite while ground pounding on its head as it moves around. After three hits, you'll take it down. If you get bitten, you'll be sent upwards and you'll have to restart the boss battle.
After beating the giant snake, Wario finds out that his treasure has indeed been stolen. As Captain Syrup's goons run off with the treasure, they also cause some havoc in the forest, and now Wario has to find his prize hen - which has been scared off by the goons - before continuing on.
When you start the level, you'll be flattened by a bat carrying a huge weight, and you'll be Flat Wario. Here, you can float around and collect all the coins. If you need to get back to where you started, you'll need to hold Up on the D-Pad as you jump up the platforms on the far left. Once you're done, however, you'll probably be wondering how to turn back into regular Wario. Believe it or not, it's the big drop of water that continuously drops from the ceiling. It won't do anything if you're regular Wario, but if you're Flat Wario, it will turn you back to your normal form.
The rest of the level is your usual exploration. You can land on the top of the weights that the bats carry to get to higher heights, and being flat will allow you to avoid falling into narrow gaps. Also, if jumping towards a narrow gap as Flat Wario does not work, try moving off an edge and holding the D-Pad in the direction you want to go. That usually works.
There are some hidden rooms that lead to several big coins. Press Up in the hallways to find these hidden doors.
The treasure room contains a black mantle for a treasure, and you'll need to leap towards the gap leading to the door while flat from one of the lower platforms.