In this entry, we finally take on the dragon itself. Once we win, however, we return to the present day and to C-Island, where the first game began...
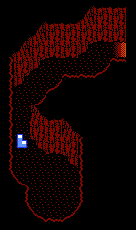
Dragon's Lair Map (by Captain Drake)
There are four hearts at the start to refill your health with, and destroying the bat in the room opens the path to some spike balls to throw as well as a Potion. You can go north for another Potion from here, but thankfully, there is no death trap after this like in the first game.
The Ultra Psychic Shock Wave may be slightly slower and weaker than the Katana, it is still a good weapon. You must have ten hearts to use it or else it will go back to the Super form.
The rock enemies blow up and send smaller boulders flying in eight directions when you destroy them.
The green blob splits into multiple blobs when it takes enough damage. They can also spit two-way projectiles at you if you leave them around long enough without splitting them up.
The triceratops is best taken out diagonally, as it will shoot some fast lasers if you are lined up with them horizontally.
In the room with the light blue blobs, one of the tiles will net you four hearts. Same for the room to the north with the two giant green blobs.
You'll need to be careful as you leap to the tile in the room with the bottomless pit. Once you hit the tile, be careful getting to the moving yellow platform on the way back. You'll need to wait for some platforms to rise out of the pit to get to the question mark sphere and open the path to continue on.
The gold knight with the shield will block your shots if you take them head-on. By shooting at their shields from a distance, however, they will eventually turn around so you can shoot them in the back or sides.
For the room with the marbles, shoot the marbles to stop them.
For the room with the "checkerboard" tile pattern, you will want to go to the third column from the right and hit the tile second from the top. This gives you the question mark sphere to open up the path to the east with. Watch out for the grenades, and watch out for the flames when you go east for the Potion. To open the path to the north, you will need to go to the third column from the left and hit the tile second from the top.
In the room with the two triceratops and the tiles in the four cross patterns, the center left tile in the southwest corner opens up the path to the north. This takes you to the boss; if you go east instead with the path you get after beating the two triceratops, you can get another Potion (watch the flames!) and some more throwing stars.
In the room with the tiles in the shape of four squares in the four corners, the lower-right tile of the southwest square gives you four hearts.
This dungeon has six Potions in all, and I'm now suspecting this is the easier of the two StarTropics games.
To beat the dragon, switch to the Ultra Psychic Shock Wave and keep jumping to hit the dragon in the head from the south end of the room. Besides a fire breath that goes diagonally or vertically, the dragon can also fly around and send fireballs at you. There are also the spikes that sprout of the floor as the battle goes on, but if you attack from a distance with the Ultra Psychic Shock Wave (which you should have no excuse not to have, given that the dungeon has six Potions), this battle is easy.
Follow the path to the exit tunnel and the last Tetrad. You'll get your last two hearts for you maximum health, and if you've found everything, you should have twenty hearts for your maximum health. Afterwards, Mike tries to put the Tetrads together, but nothing happens. From here, follow the path east and go up tot he cliff's edge. Mica will contact Mike, asking him to come back to C-Island. The Oxford Wonder World works its magic once again...
No comments:
Post a Comment