Our adventure takes us into the Eastern Palace for the first of the three Pendants. Afterwards, we take care of some stuff before going for another Pendant.
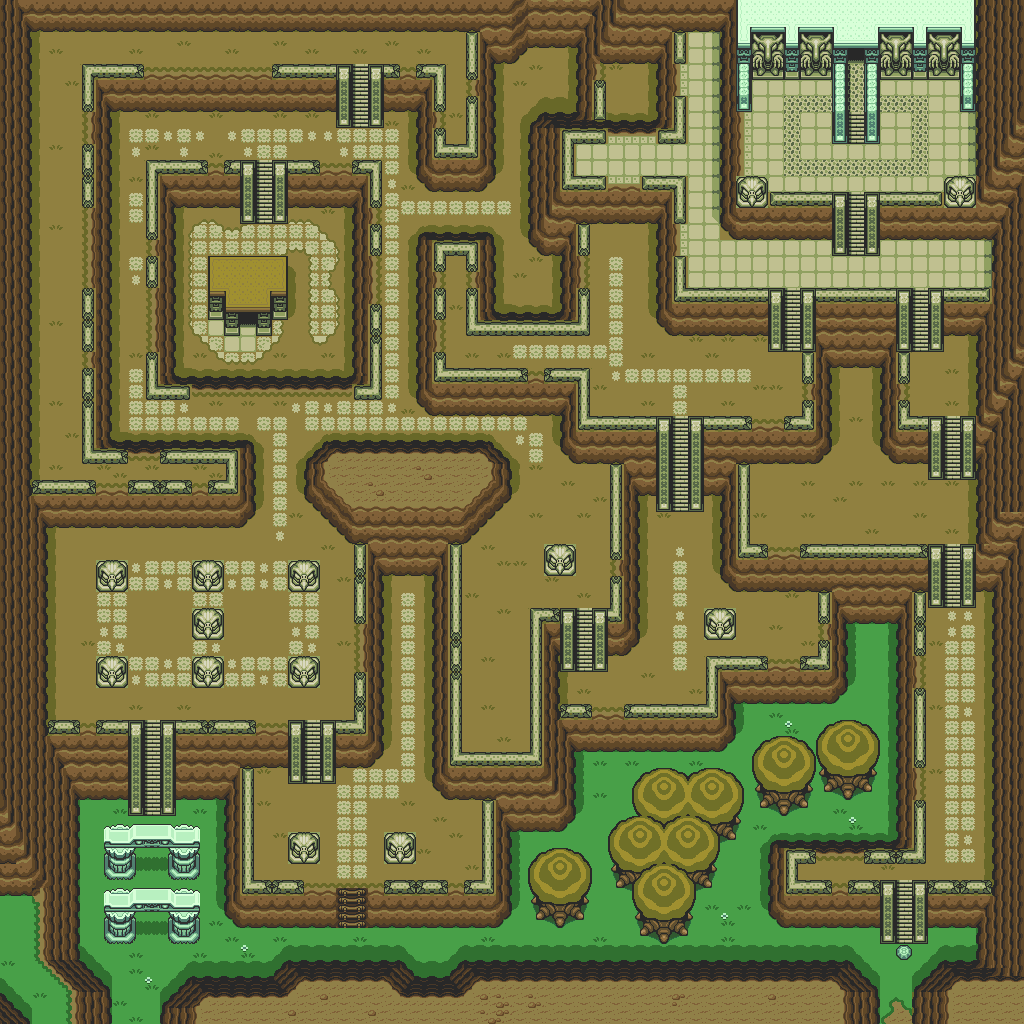
Eastern Palace
Remove the pot near the center door to find a floor switch that will open it.
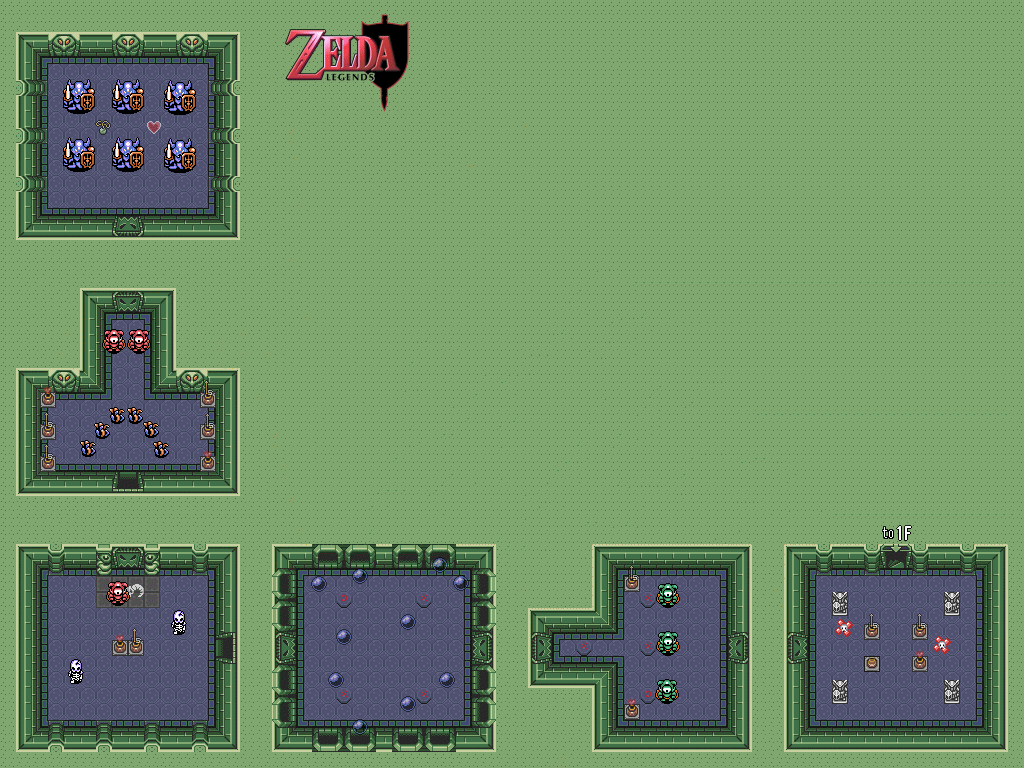
The pink-and-blue seaweed-like monsters are easy to kill.
For the corridor with the balls, there are gaps in the sides that you can stand near. That's good, because there aren't any other way to avoid the big balls that come out of the hole in the wall on the other side every so often.
Pay attention to the floors, as there are floor switches that blend in with the floors. These switches will always open a nearby door.
If you find any keys in a dungeon, use them in the dungeon you found them in. They're there for a reason.
The skeletons jump back when you swing at them. Use the whirlwind slash to kill them. The boomerang will kill them, even if it doesn't stun them, and you can use your normal slash repeatedly if you can back them against a wall.
The Anti-Fairies bounce around the walls at 45-degree angles. Be careful, as you can lose magic power from touching them. If you use Magic Powder on them, you can turn them into Fairies and recover a bunch of health or put on in a bottle. If you have a Fairy in a bottle when you die, the Fairy will come out of the bottle and revive you.
Just like in other Zelda games, there are rooms where you will have to kill all the enemies to move on.
The Compass is used to mark the location of the Dungeon boss.
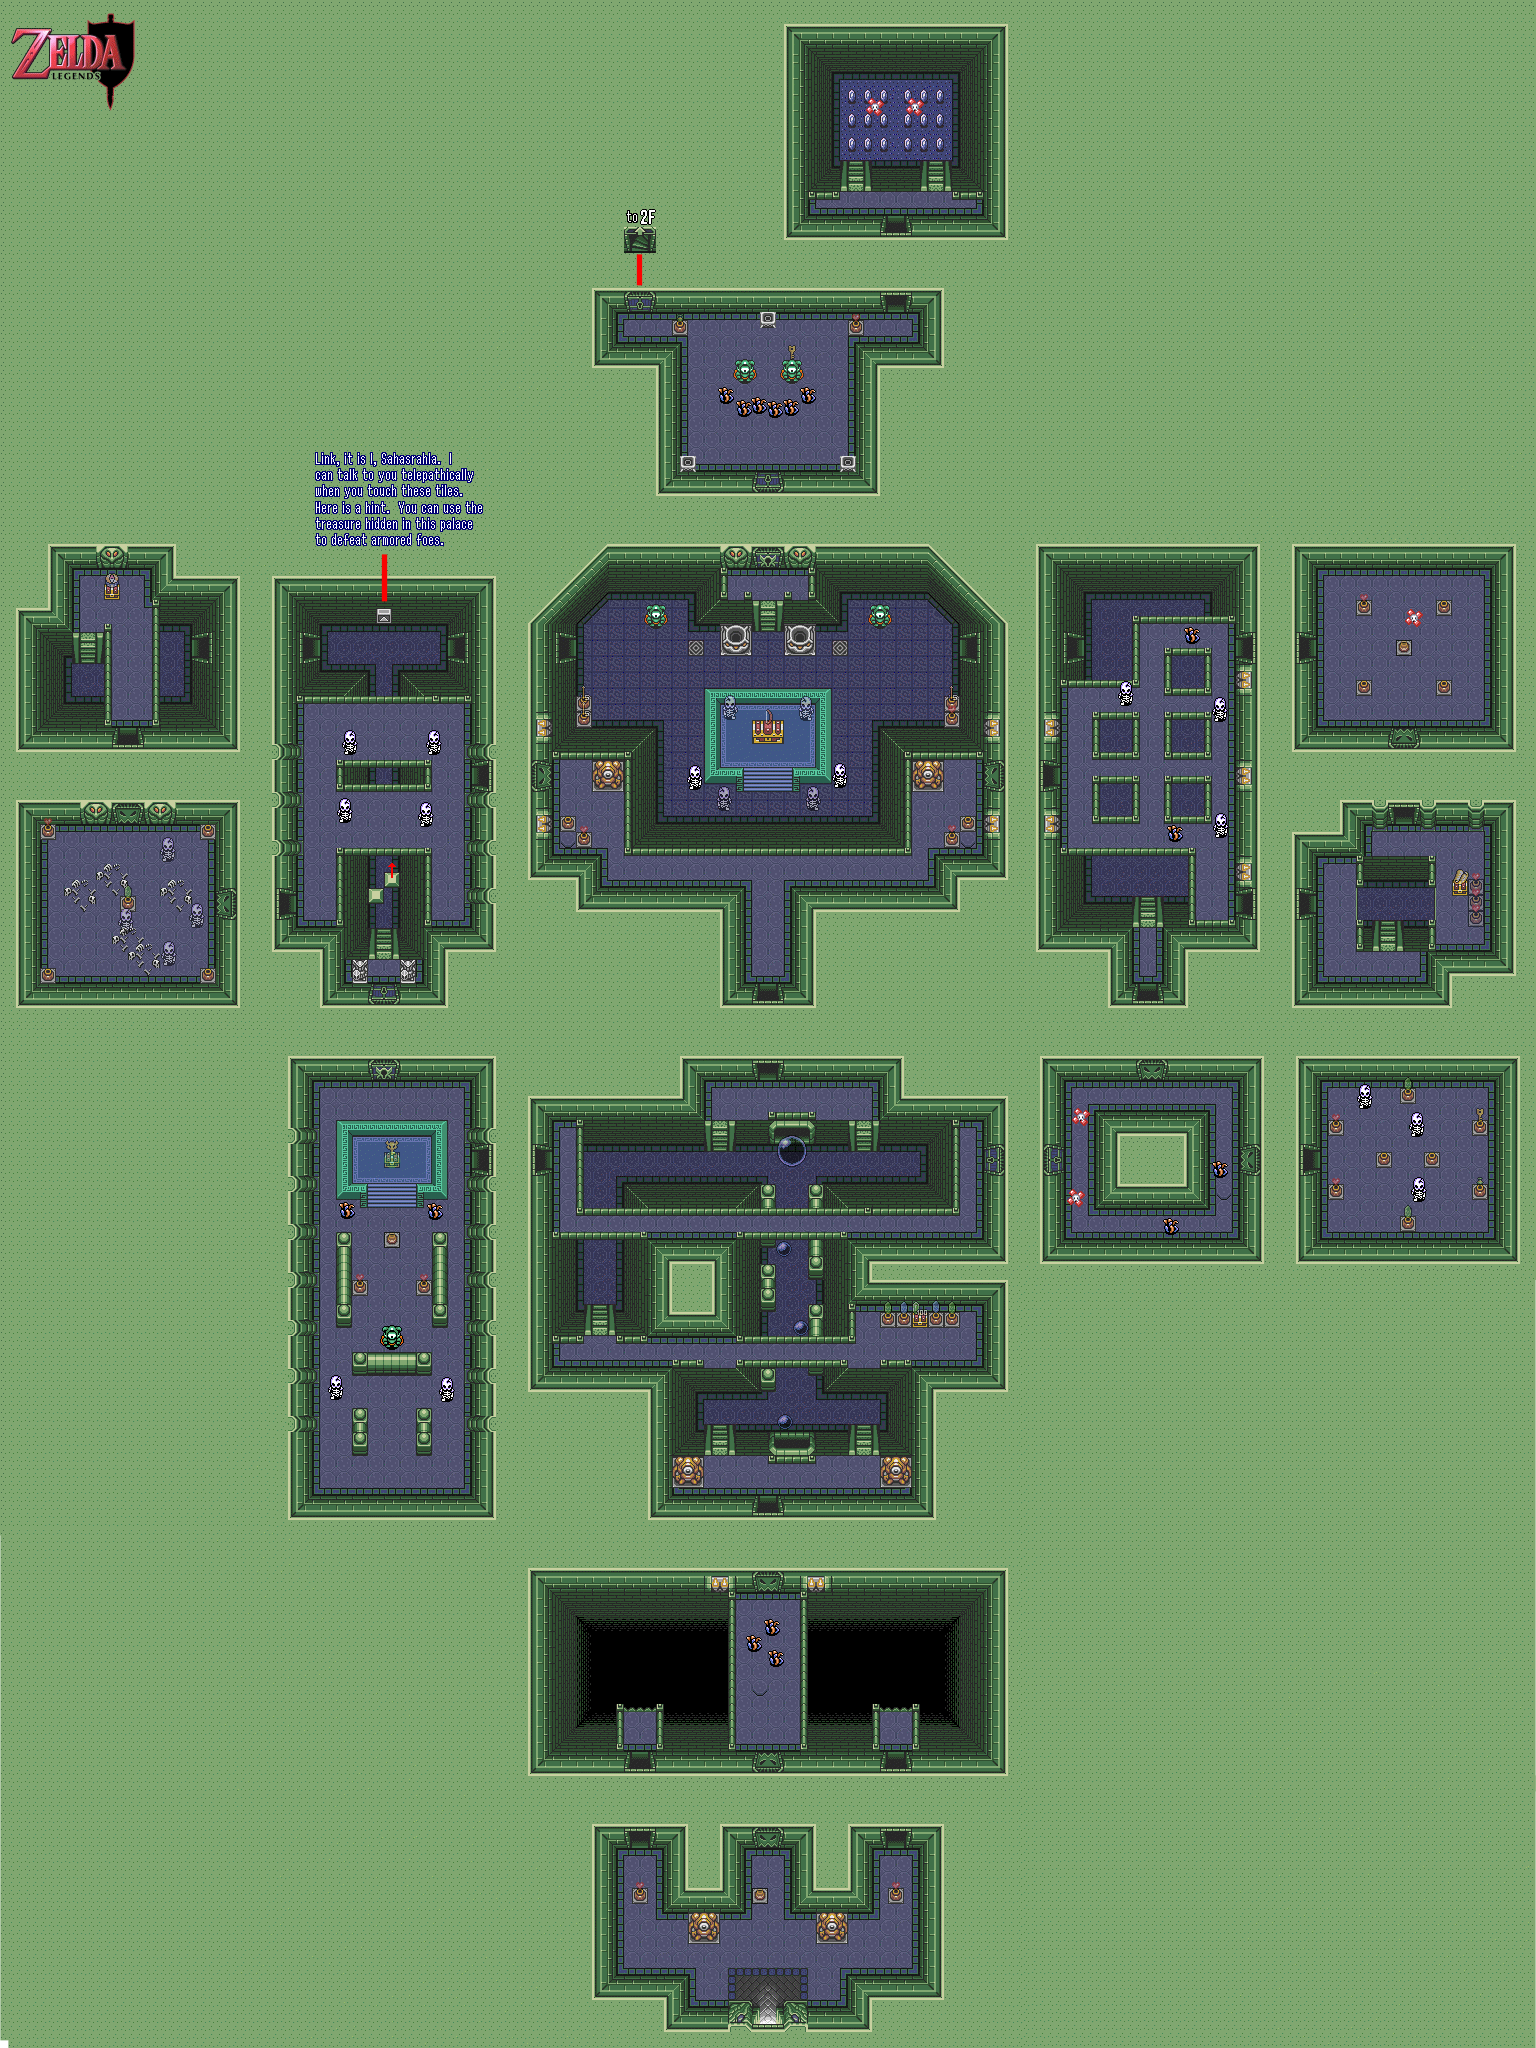
The grey block with the triangle on the wall is a telepathic message from Sahasrahla. Press A when in front of it to read it. He'll tell you the treasure you find here will defeat armored foes.
The Big Chest can only be opened with the Big Key. The Big Chest will contain an item that's not only useful for the dungeon, but also for the whole game! It can also unlock the Big Doors, which are the doors with the huge locks on them.
If you leap into the pots across from the sides of the dais where the Big Door is, you'll find a hidden room with two Faeries. They refill seven hearts of life, but if you catch one with your Bug Catching net and place one in a bottle, set it free and die while the Fairy is still onscreen, you'll be revived and get seven harts back. If you're going for a no-death clear (which gives you a special ending, by the way), keep in mind that any faerie-based resurrections DO NOT count towards your death total. Save and Quits also count as deaths, but only on the Super Nintendo version. GBA players, you're safe.
To get the Big Key, you'll have to kill all the enemies in the room to cause the Anti-Faeries surrounding the pot to split apart in seperate directions. This pot hides a floor switch which, when activated, causes a chest to appear. This chest contains the Big Key..
The armored guys with one-eye wake up when you get near them. You can kill them with a pot, but you'll find another weapon here that will get rid of them more easily.
The Big Chest contains the Bow. Besides using it with the arrows to get rid of the green armored guys in this dungeon, you can also take down anything from a distance.
For the first two rooms on the second floor, you'll have to find the right switch amongst all the fake ones. For the first one, it's the one under the feet of the armored guy in the center. For the second one that has all those balls shooting out of the walls, it's the upper-left switch.
The red armored guy takes two hits with the Bow and Arrow to kill. Unlike their green counterparts, the Bow and Arrow is the only weapon that has any effect on them.
The boss here - or bosses - are six large Armos Knights. They move around in a circle before converging in the center to smother you, then line up at the north wall and move forward in an attempt to charge into you. The Bow and Arrow will kill each one in three hits, and judging by how much space you can find between them, shoot towards the north wall at them and easily knock them back with it, you can kill five of these guys in a matter of seconds.
The one that's left will turn red and try to jump towards you, trying to squish you on the way down. You can time it right by standing in one spot, hitting them just before they jump with an arrow and keep them on the floor for all three hits.
If you use up all of your arrows, you can use the whirlwind slash (Hero's Technique, Master Technique, whatever) on these guys and push more than one of them back if the situation's right while dealing more damage than your regular sword slash.
Whenever you beat a boss, you'll get a full Heart Container which will increase your max life by one heart. After you collect it, you'll get the Pendant of Courage. Head back to Sahasrahla's hiding place.
Also, whenever you beat a boss, your life and magic power are both completely restored.
Stuff
Bring the Pendant back to Sahasrahla. He'll tell you about the Knights of Hylia who protected the Hylia royal family three or four generations ago, who also protected the Pendant of Courage. Unfortunately, they were wiped out in the war over the Golden Land and it is said that from the descendants of the Knights of Hylia, a Hero shall appear. Sahasrahla believes Link is that hero. He asks you to get the remaining Pendants and hands you the sacred treasure that has been passed down by the descendants of the Wise Men: the Pegasus Boots. By holding down A, you can run and perform a devastating dash attack with your sword.
He'll also tell you about a helpful item in a hidden cave on the east side of Lake Hylia before you leave.
Head back to Sancutary. There is a cliff to the left of the Sanctuary. Head to it and use the Pegasus Boots to dash into the large set of rocks. You'll find an underground passage that leads to another Heart Piece.
Northwest of Sanctuary is another entrance to the Lost Woods as well as two guys cutting a tree. Remember this tree for later in the game. There is a cave nearby, but you won't be able to get the Heart Container you see there until later.
Come back to Kakariko Village and chase the running guy with the Pegasus Shoes. He will tell you that using the Pegasus Shoes to run into things such as trees at high speed can be useful. With trees, you may find money, bombs, apples that refill one heart of health or even a swarm of bees.
Using the Magic Powder on the old woman outside turns her into a Fairy that you can use to refill some health.
One of the houses in the village contains a jar with a Cucco inside, and if you use the Magic Powder on the Cucco, you can transform it into a human who will tell you that the Weathercock is always harassing you.
Now that you have the Pegasus Shoes, head back to the library south of Kakariko Village. Use the Pegasus Boots to run right into the bookshelf with the green book on top of it. You'll run smack into the bookshelf and knock the book over, allowing you to finally collect it. This is the Book of Mudora, and it allows you to translate the ancient text of the Hylia.
No comments:
Post a Comment