It's time to start our adventure in the Dark World and rescue the seven maidens!
Just like in the Light World, there are caves in the Dark World that contain larger Fairies who will completely refill your health.
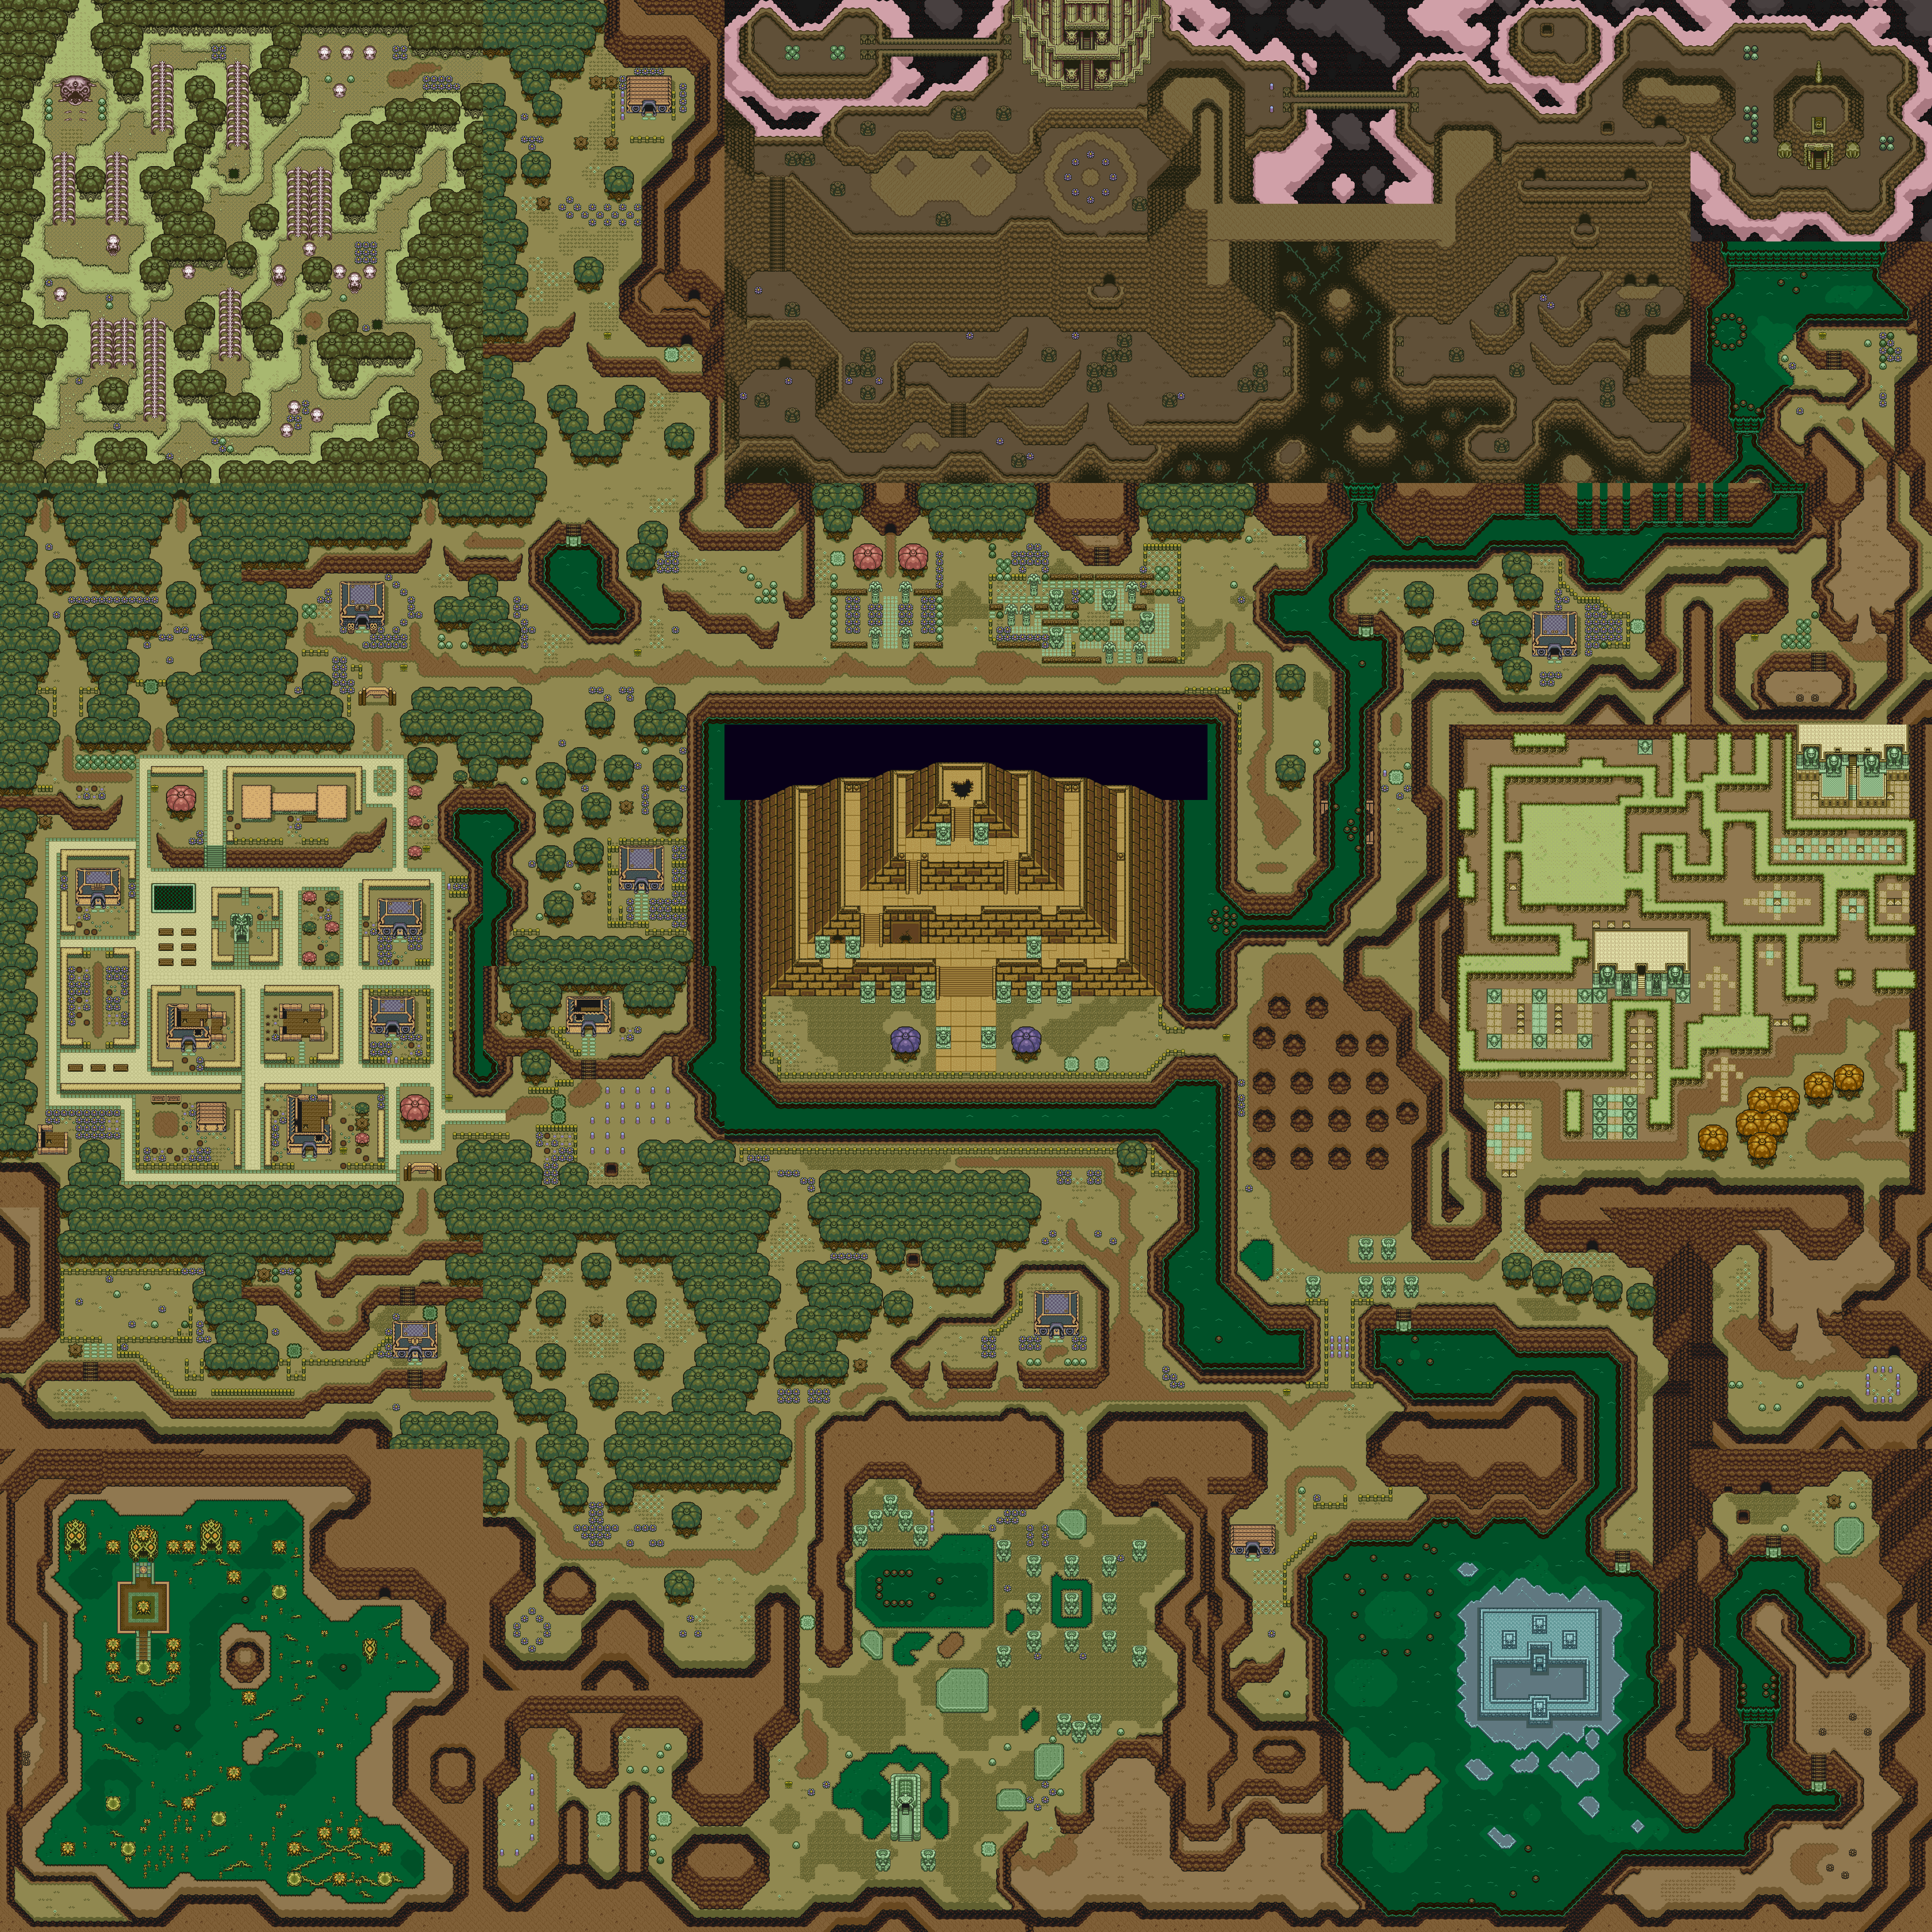
After beating Agahnim, head back to where the lumberjacks were in the Light World. Run into the tree they were cutting with the Pegasus Shoes, then drop down the hole to find four Fairies and a Heart Container.
By going through the gate leading into the inner courtyard of Hyrule Castle, you will be teleported into the Dark World.
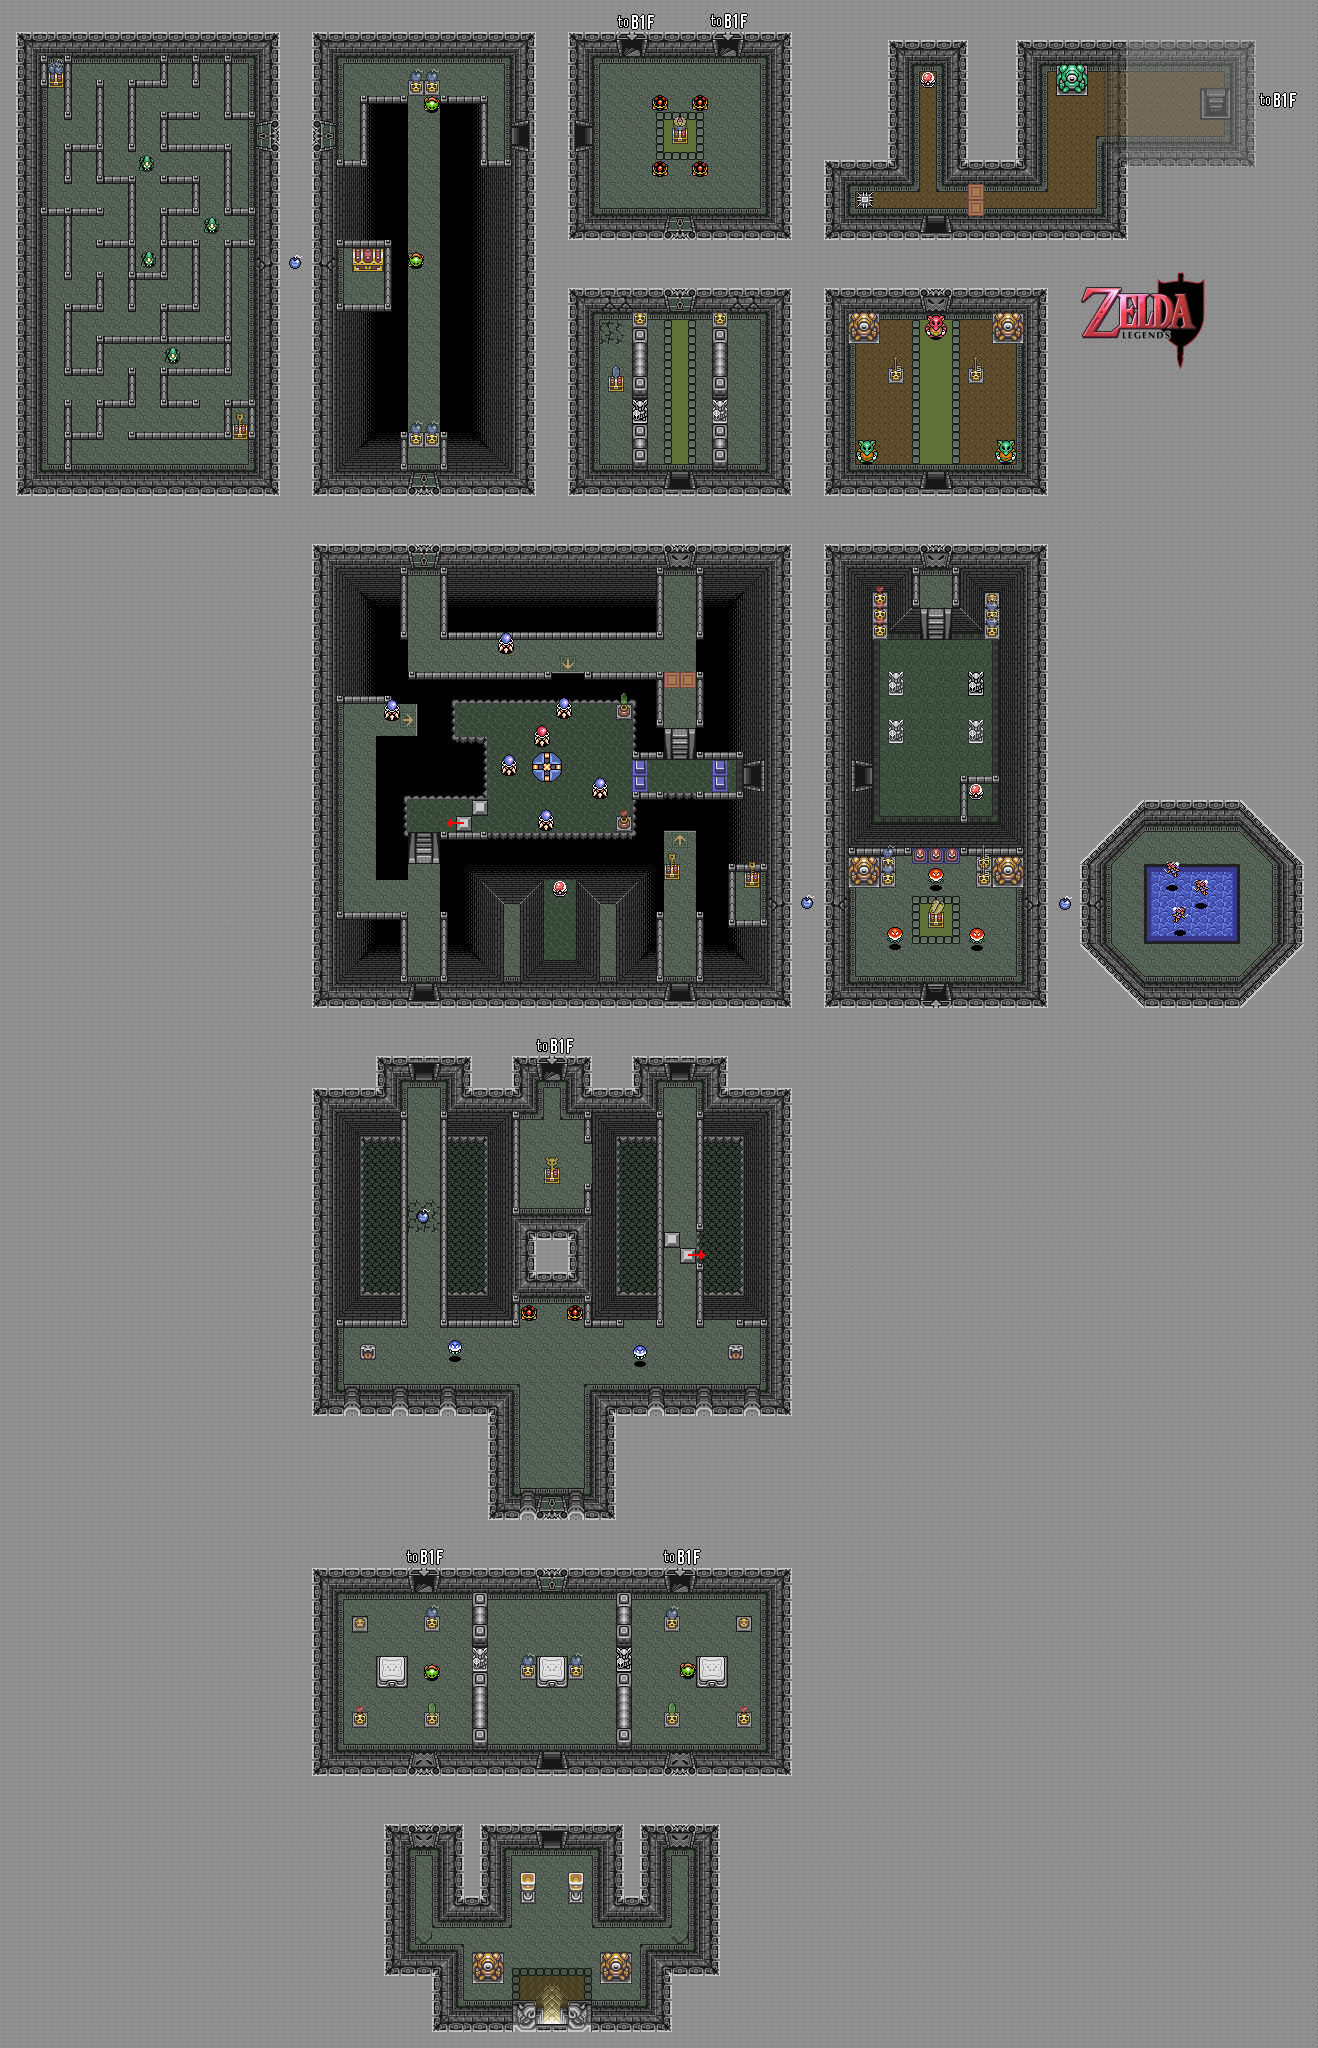
The Palace Of Darkness
The brown lizards with the green masks are Helmasaurs. You won't be able to hit them with your sword at all, so throw a pot at them.
The grey things with the tongue sticking out that are littered throughout the dungeon throw fireballs at you, similar to how the Zoras in this game do it. You can't do anything about them, so avoid and deflect the fireballs as you progress. You'll see these things in the Dark World dungeons a lot.
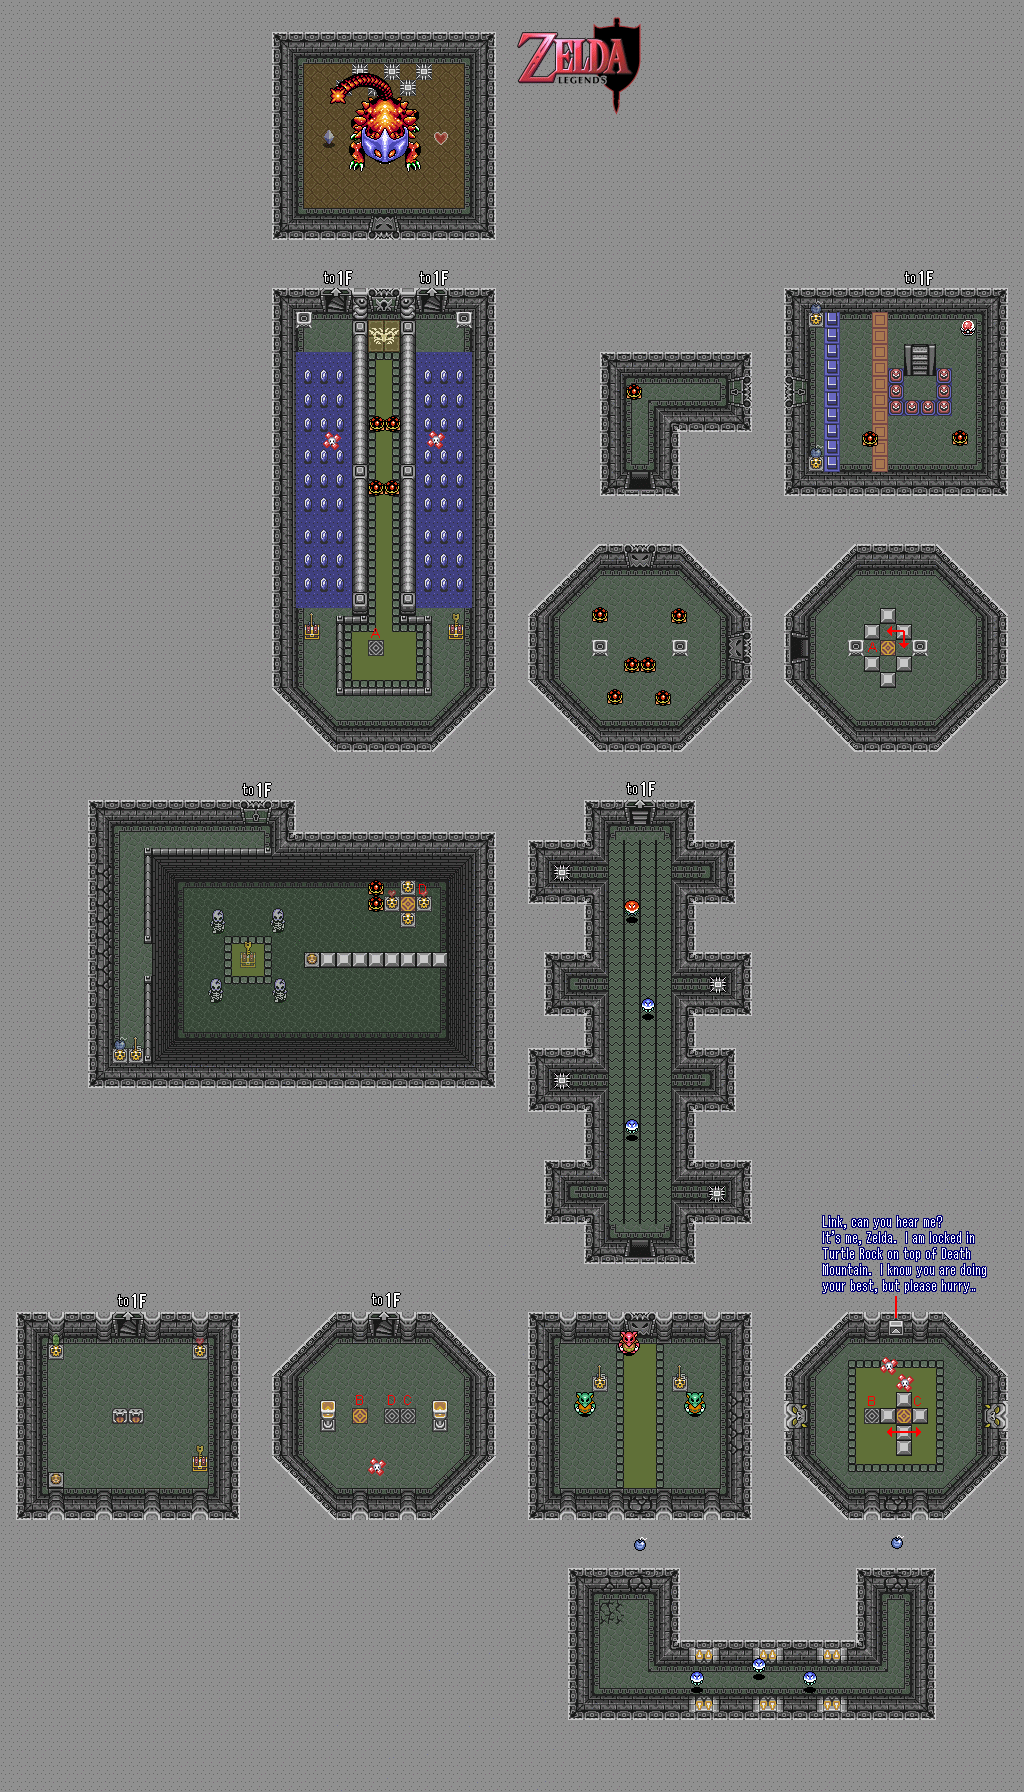
The telepathic message blocks in the Dark World are from Zelda, as Sahasrahla was only able to reach you in the Dark World, and he won't be able to reach you here. (At least it makes sense, as Zelda telepathically spoke to you at the beginning of the game.) She just tells you to hurry, and that's she being held on Turtle Rock.
The flying blue creatures you see will hit you with an electrical shock when they're flashing. Wait for them to stop sparking with electricity (during which they just float in place) before hitting them. If you've got full health, go ahead and finish them off with the Master Sword beams.
Don't bomb the cracks in the walls! You'll turn them into full-fledged pits if you do!
The creatures with the mouse-like faces move when you do. The green ones will move in the same direction as you, while the red ones will move in the opposite direction. Watch out with the red ones, though, as they will fire a fireball at you when it gazes at you, and you can't block it. Destroy these rat humanoids with your Bow and Arrow.
Remember those squares with the spikes on all four sides that you saw in the dungeons in the first Zelda game? Well, they're back, and some of them move on their own accord. They make their in-game debut in this dungeon, and - oh, yes - some of them still do the "Hey, let's double team and try to impale Link when he nears the door" thing, just like you'd expect them to. Hey, this is a Zelda game...
The blue flying creatures also have a red palette swap, and when you hit them, they split into two miniature clones that attack in the exact same way. Once again, wait for them to stop going electric and hit them with the Master Sword beams if you can. If you have a lot of the small ones onscreen at one time, use the Ether Medallion to get rid of them all.
The wall cracks near the map can be bombed. Hit up the left crack for a Key, and the right for three Faeries.
When you enter the middle area at the entrance, you can use the bombs to blow the cracks in the floor up and turn them into pits. Unlike that first one we saw, these are safe and will allow to drop to the basement floor. From here, you can go upstairs and get the Big Key.
Now that you've got the Big Key, drop down to the right. Activate the floor switch under the skull. As you approach the chest that appears to open it up and get the Key inside, four skeletons will drop down from the ceiling. Their bodies will disappear as their heads spin around and float towards you. Whack them with your sword.
You may have notice the red turtles from the last entry. You won't be able to defeat them yet, but there is an item in the Big Chest that allows you to do so.
In the area leading to the basement floor after the entrance to the palace, you can push the statue in the right third of the room to make your way back to the center and explore more of the dungeon.
When you see the arrow tiles on the floor, walk in the direction they point and keep walking when you reach the edge. You'll "fall" in that direction.
When you reach the narrow bridge near the Big Chest, make your way to the other side immediately, as this bridge will quickly crumble and fall into the bottomless pit one floor tile at a time.
You'll then reach another maze where you can only see a few feet in front of you because it's so dark. There will be green palette swaps of the little dinosaurs from the Tower of Hera that spit fireballs at you, but they're easy to take out when you see them, especially if you can still shoot beams out of the Master Sword. The crack in the wall leads to the Big Chest, which contains the Magic Hammer. With the Magic Hammer, you can beat down posts that are blocking your path and destroy certain enemies. You'll be able to break the masks of the Helmasaurs and knock the turtles on their back, making them much easier to kill by normal means. You can also crush pots and skulls, too, making it easier to get the items inside them.
You'll see a red variant of the shelled monsters that pushed you around in the Tower of Hera as well. Unlike the blue ones, which can go down in two whirlwind slashes, these guys take more abuse. You're better off just pushing them into a pit.
You may have also noticed the little brown things with faces that look like smiling moles ducking in and out of holes with a blue trim in the last video. These are posts that you can pound down with the Magic Hammer. Despite being "magic," the Magic Hammer doesn't use magic.
One of the floor switches opens a door, but when you step off of it, the door closes. You'll have to push a statue onto the block to keep it open before you can move on.
There is a green version of the one-eyed creature statues that you've seen throughout this dungeon. Shoot at it with the Bow and Arrow to hit the switch in its eye and cause the wall to move to the right.
The boss is a giant orange Helmasaur. To take its mask off, you'll have to blow it up with some Bombs. As you do this, the Helmasaur boss will spit out a fireball. This fireball splits into three which are set up in a triangular pattern, and in turn each fireball splits into four that travel across the room diagonally.
When you hear the tail swish around heavily, be ready to move! That tail will swing right at you, so you'd better be ready to move to the side.
After you hit the mask with enough Bombs, you'll expose the Helmasaur's face, which also reveals a green orb on its head. Equip the Bow and Arrow and hit the Helmasaur in the green orb with it as you continue to avoid its attacks. You can also use the whirlwind slash to take the boss out in less hits.
When you beat the boss, you'll get another full Heart Container and...a crystal. Pick it up. Inside is one of the Seven Maidens. She'll tell you how this land was the Golden Land until Ganon, the king of thieves, entered this world and claimed the Triforce - the Golden Power - as his own. Yep, Ganon is finally mentioned for the first time (though if you've read the backstory in the manual, it shouldn't be any surprise).
Ganon is using the powers of the Seven Maidens to open a wider gate at the castle. But if the Seven Maidens can get together, they can break the barrier and open up Ganon's hiding place.
You'll then get the location of the six other dungeons, where the rest of the Seven Maidens are held, and you'll be able to go any one of them that you want. Despite being specifically numbered, you can do the other six in any order you want, and you don't need the treasures of one dungeon to complete another (though it is a help in some cases).
The cave to the south of the Palace of Darkness Maze entrance contains a fairy that will completely restore your health. Strangely, it looks exactly the same as all the other fairies in the Light World that do this.
No comments:
Post a Comment