Showing posts with label part 39. Show all posts

Monday, February 23, 2026

PrinceWatercress plays Super Mario Odyssey - Part 39 of 92


We finally get both volleyball Moons in the Seaside Kingdom, then head to the Luncheon Kingdom to continue with the plot and find more Power Moons.


There is a volleyball game near the Beach House. You could use Mario to get the two Power Moons form this, or you could enter the game's two-player mode, have Mario walk onto the volleyball court to get a game started, then take control of Cappy and have him do the work. Just follow the shadow of the ball, have Cappy move onto it, and you'll have a slightly easier time.

Anyway, the next place to go to is the Luncheon Kingdom. They use a volcano to prepare a dish known as Stupendous Stew, which is par for the course for a place called the Luncheon Kingdom. 

The Broodals Are After Some Cookin'


When you reach the Luncheon Kingdom, Cappy will notice that the Broodals have already made it. 

You can move the floating corn cobs on the lava that is all over the level in one of two ways: standing on the edge and jumping so that it rolls where you want it to slowly, or running to the middle and continuing to run. The second way is much faster if you can do, but the first way can be done if you're careful.

The tomatoes turn into pools of lava when hit. If you take control of a Podabo, you can leap out of the lava and into one of these pools of lava. There will be times you will have to do this, and they'll be mentioned. For now, just take advantage of the fact that you can take control of one and move around in and jump out of the lava to get to where you'll have to face the Broodals, who have stolen the Stupendous Stew already. Once again, you'll face Spewart. The same tactics apply, and three hits will seal the deal. Hitting the red jelly beans in the area will give you Hearts.

Under the Cheese Rocks


By beating Spewart, you'll open the path to Peronza Plaza. To get there, you can take the ramps upwards, or you can throw your hat at the fork in the wall, hold Down on the left analog stick when you take control, and then let go to flick yourself up.

By talking to the people around here, you'll find out that a giant Cookatiel is hovering over the giant stewpot on top of Mount Volbono. This is a second helping of the Stupendous Stew that the Volbonions have made, and the people of the plaza are afraid that this second stew is in danger. In order to distract the Cookatiel, you'll need to get a large slab of meat in the distance.

There is a blue stewpot you can throw turnips in. Regular turnips just give you coins, but if you find a golden turnip, throw it in the pot for a Power Moon.

From here, I take a ride through the lava with a Podaboo. It should be mentioned that you can ride in the lava as long as you possess one, and you can jump in and out of the lava. If you land on solid ground, you'll turn back into Mario. Metal grates do not count as solid ground, and you'll go through them both ways; if you want to land on a metal grate, you'll have to leave the Podaboo mid-jump.

By swimming around as a Podaboo, you'll find a way to that giant slab of meat. This way will have more than a couple of Hammer Brothers who can throw pans instead of hammers; their attacks work the same way and can be used to break the cheese walls you'll see on the way. You'll need to use that attack to get Power Moon #2.

Power Moons

Seaside Kingdom


38. Beach Volleyball: Hero of the Beach - Head to the volleyball court near the Beach House, then approach the net to start a game. You'll need to hit the ball 100 times to get this Power Moon. Do yourself a favor: enter two-player mode and do this with Cappy. You can do this with Mario, but it's much easier with Cappy, especially when the ball speeds up.

Luncheon Kingdom


1. The Broodals Are After Some Cookin' - You'll get this one from beating Spewart again (see above).

2. Under the Cheese Rocks - On the way to the big meat slab, there is a giant cheese wall to destroy by possessing a Hammer Brother and attacking the wall. This will reveal some stairs to a cheese block hiding a switch. Throw Mario's hat at the switch to free this Power Moon and unlock more of the kingdom.

6. Piled on the Salt - This Power Moon is on a mound of salt in a high area near the Odyssey.

7. Lurking in the Pillar's Shadow - This Power Moon is in an alcove near the lava in the high areas near the Odyssey.

9. Is This an Ingredient Too?! - There is a stack of crates between two buildings. Breaking them will reveal this Power Moon. Wall kick between the two buildings to reach it.

15. Golden Turnip Recipe 1 - There is a Golden Turnip that can be grabbed and thrown into the blue stewpot in Peronza Plaza. Doing this will net you a Power Moon.

24. Love Above the Lava - For this one, you'll want to make a stack of four Goombas near the Odyssey, then walk on a floating corn cob so that it spins towards a Lady Goomba. This will net you a Power Moon when you reach her.

25. Shopping in Mount Volbono - Purchase a Power Moon in the Crazy Cap Shop in Peronza Plaza with 100 regular coins.

26. Luncheon Kingdom Slots - In Peronza Plaza, there is another Tostarena slot machine house behind a pile of vegetables. The way to play the game is the same as the last two times, but now you need five moons in a row. Doing that will net you this Power Moon.

37. Magma Swamp: Floating and Sinking - Near the Peronza Plaza checkpoint, there is a Hat Door that you can open. Collect the five Moon Fragments in this area while staying in the center of the islands that ascend and decend in and out of the lava to stay safe, and the Power Moon will pop up near the exit.

38. Corner of the Magma Swamp - In the Hat Door area near Peronza Plaza, there are islands moving in and out of the lava near the entrance. Behind the wall is a Power Moon.

41. Fork Flickin' to the Summit - There is a Hat Door in the lava close to Peronza Plaza. Entering it will take you to an area where you'll need to throw your hat and flick your way to the top. At the exit is a Power Moon.

42. Fork Flickin' Detour - Just before the end of where you find Power Moon #41, maneuver your way to the fork on the right, then hold the left analog stick to the left to flick yourself to the right. This will take you to a hidden platform where another Power Moon can be found.

43. Excavate 'n' Search the Cheese Rocks - On the way to the Meat Plateau, you'll find a Hat Door behind a wall of cheese that can only be broken by the attacks of a pan-throwing Hammer Brother. Inside, you'll need to take control of another Hammer Brother and break the cheese walls to find five Moon Fragments for another Power Moon.

44. Climb the Cheese Rocks - Inside one of the walls in the area where you find Power Moon #43, there is a hidden alcove behind a cheese wall that can be broken with a Hammer Brother. Inside is an easy-to-miss Power Moon.

Regional Coins


Saturday, March 8, 2025

PrinceWatercress plays Wario Land II - Part 39 of 51


More coin grabbing fun as we make our way through yet another short maze, which is better than the last one. Love the fish outside of the ruins just being there as some sort of nice touch.


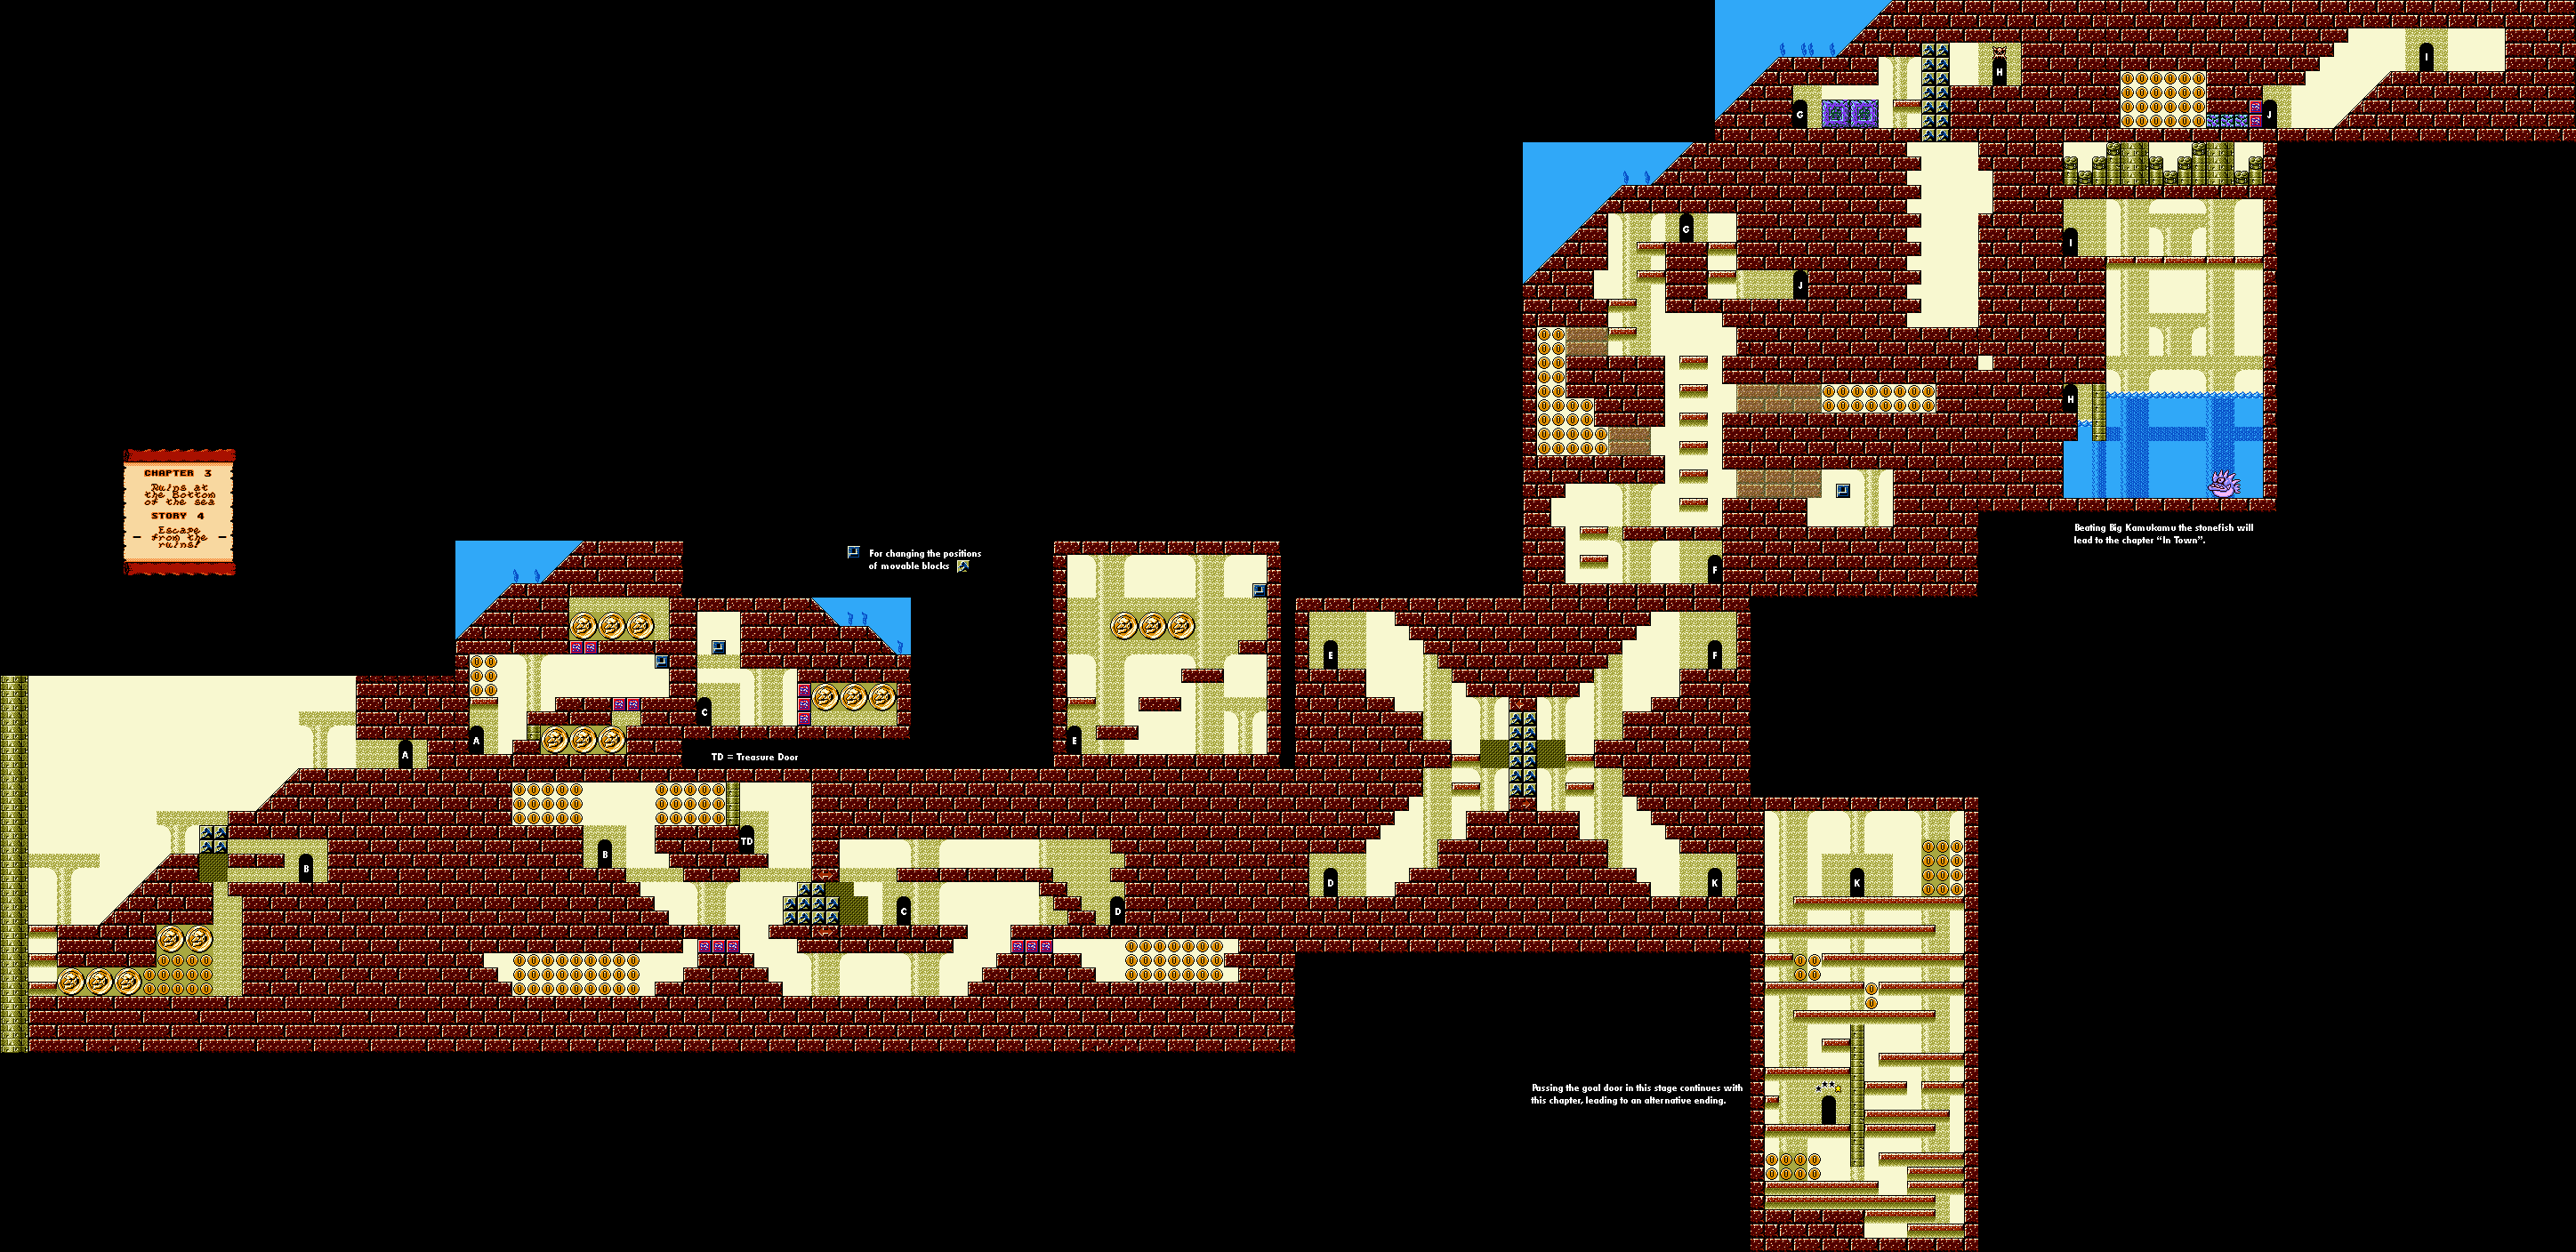
Chapter 3: Ruins at the Bottom of the sea

Story 4: Escape from the ruins!


When you start, go up the slopes and enter the door, then get the coins with the two Spear Goons and hit the switch by jumping into it from underneath. This will move the blocks that were in your way elsewhere.

In the room underneath, you can high jump to the sides to get some hidden coins. You'll also need to hit the switch that you find on the way to the X-shaped room to enter the treasure room, where you can win a lightning bolt.

In the X-shaped room, you'll need to enter the rooms that you see to hit switches and move blocks while avoiding the jumping spiky guys. This will get you closer to the exit.

There is a boss here, but fighting this boss is not necessary; as a matter of fact, fighting the boss takes out of the side story completely. You can let it defeat you to get some extra coins, but I don't go for those extra 24. The real exit you want to take is in a maze full of the hammer enemies, and once you go through that exit, you'll enter the final story. 

Monday, October 7, 2024

PrinceWatercress plays Chrono Trigger (Super NES) - Part 39 of 70


In this entry, we start the side quests, starting with Ozzie's Fort.


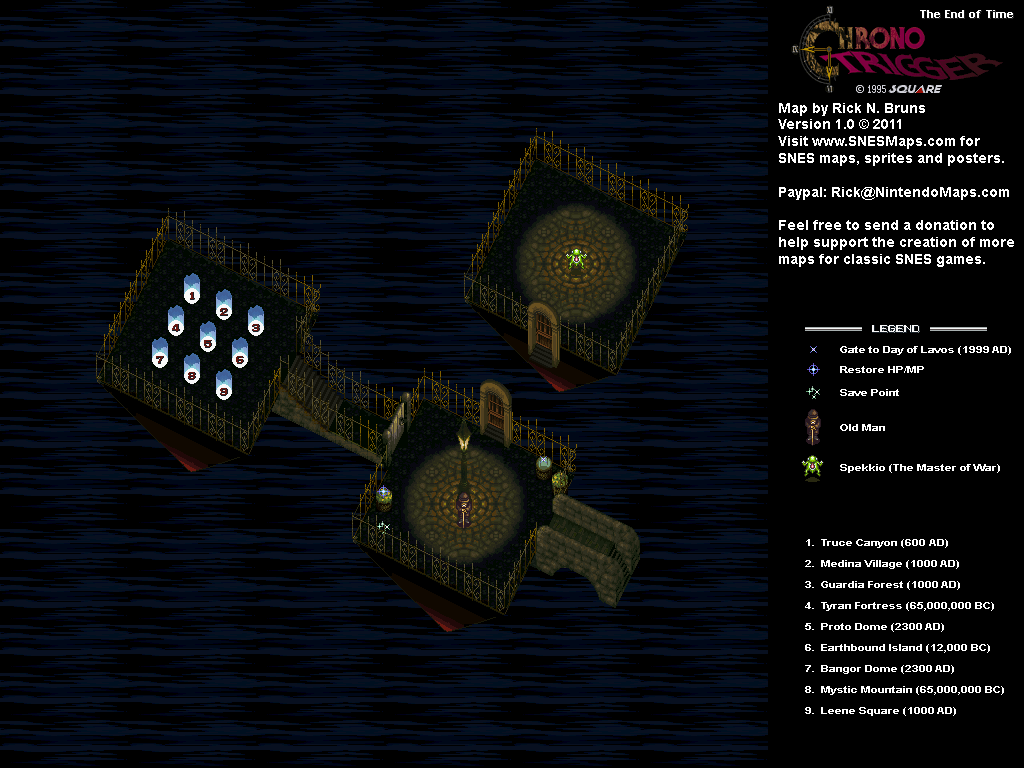
I start the video by introducing who I had yet to introduce to Spekkio as well as Crono's mom. There's some nice, brief, optional dialogue in there.

From here, I head to Medina Village in 1000 A.D. If you head back to Medina Village and head to the village square, you'll find a smaller statue of Ozzie instead of the statue of Magus from earlier.


Ozzie's Fort will be in same location in 600 A.D. as Medina Village is in 1000 A.D., believe it or not. When you head there, you'll be taking on Slash, Flea and Ozzie and nobody else. If you have Magus in the party, everybody will keep mentioning him and calling him a traitor to the Mystics even though he never had any intention of using Lavos to destroy everyone the whole time.

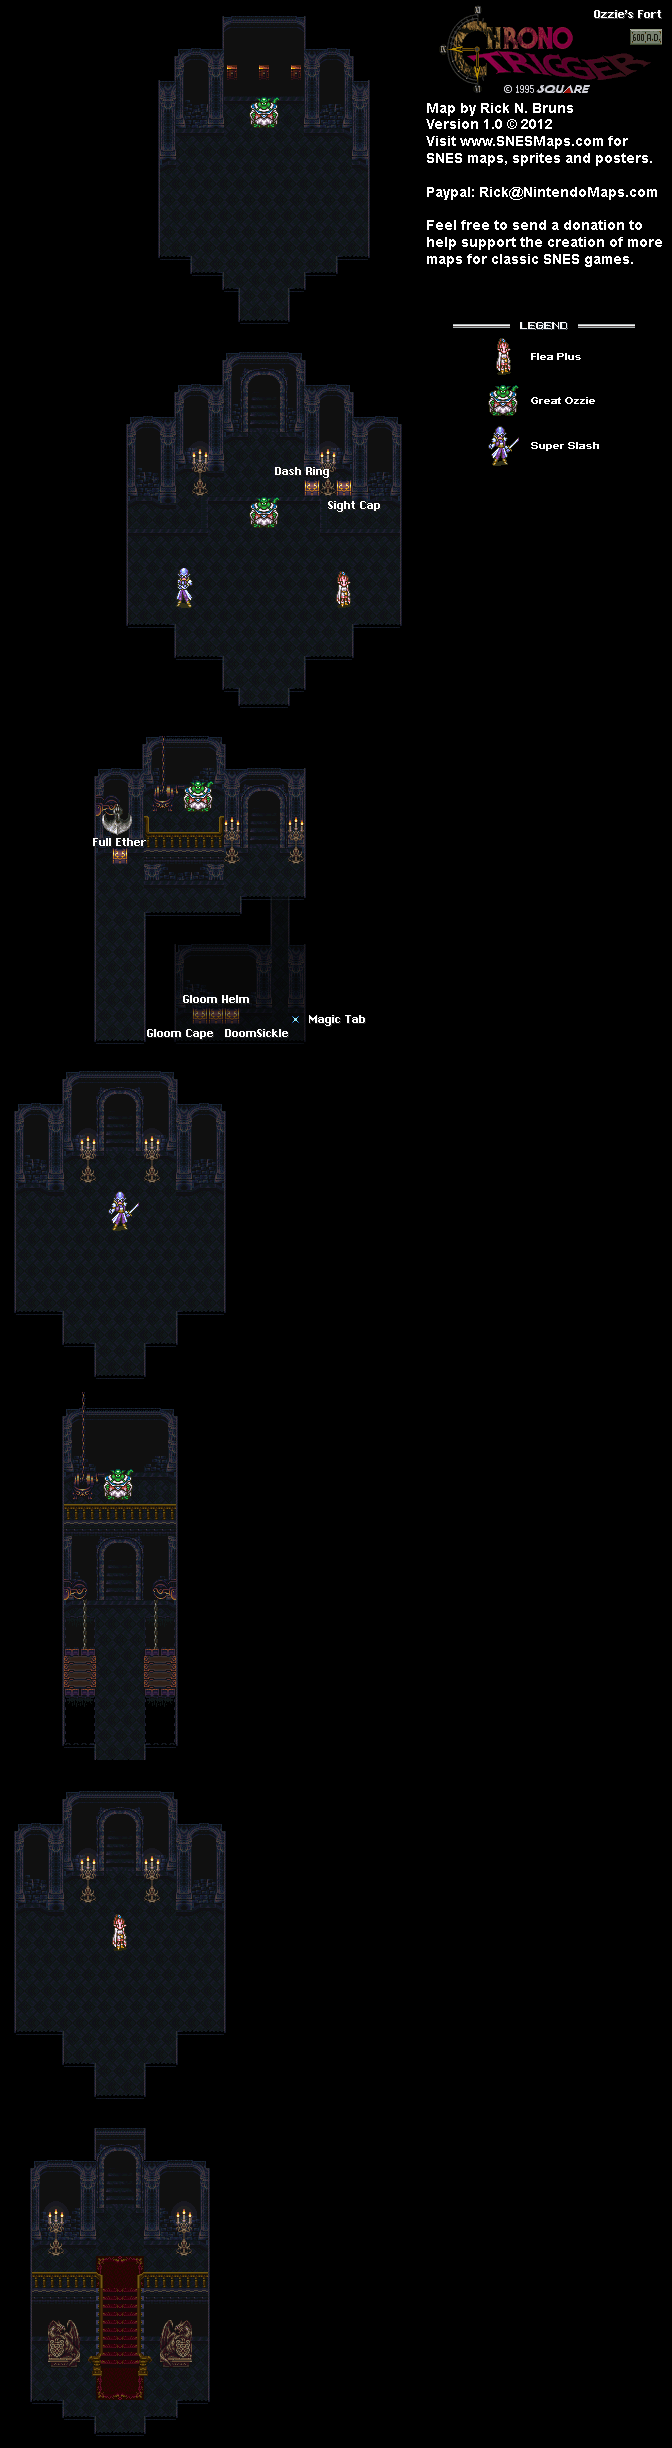
The first room has Ozzie welcoming you to your death - or what he thinks will be your death. You'll then face Flea in the next room. Compared to the first battle in Magus' lair, it doesn't take much for Flea - now known as Flea Plus - to go down. 

In the next room, Ozzie will sic monsters at you, but they will slowly be pushed into the pit and their doom by the conveyor belts. After that, you'll face Slash, now known as Super Slash. Once again, he's pretty weak.

In the next room, Ozzie will tempt you with a treasure chest and a guillotine trap that will absolutely wreck you if you run into it. If you go towards the door, but feel your way around the wall opposite the door, you'll find better treasure instead: the Gloom Cape, the Gloom Helm and the Doom Scythe, which has its attack power upped when one of your allies fall. These three items are the best armor and weaponry for Magus. You'll also find a Magic Tab to the right of these items, too.

When you approach the door, an imp will show up and run towards the treasure chest you left alone only to be destroyed. Ozzie will then disappear.

Finally, you'll have to face Super Slash, Flea Plus and Great Ozzie all at the same time. The three of them will have items equipped that they claim will make them invincible, even though they won't. Super Slash will have the Slasher 2, Flea Plus will have the Flea Vest, and Great Ozzie will have the Ozzie Pants, and if you hit them with Ayla's Charm technique, you'll be able to get them for yourself.

Doing this is easier said than done, however The three of them together have two Triple Techs: Delta Force, which does Shadow Damage on all party members, and Bad Impulse, which does a lot of damage to one of them. Having Ayla and Frog in the party for Slurp Kiss is a nice technique to have if you want to heal a lot of HP in a short time here, as it will make it easier to not only do damage, but get everyone's items with Charm.

The Slasher 2 is a pretty strong weapon for Crono, while the Flea Vest is an accessory that raises the wearer's Magic Defense by 12. The Ozzie Pants has the most defense out of any helmet in the game, but it has an auto-confuse effect and anyone who wears is automatically inflicted with Chaos unless they wear something that nullifies status ailments with it.

You can defeat everyone for more experience, but you can make the battle easier, quicker and more merciful in case you're getting your butt kicked by focusing all your attacks on Ozzie and beat him first. By beating Ozzie first, you'll automatically defeat Slash and Flea. After the battle, you can get a Dash Ring, which increases the wearer's speed by three, and a Sight Cap, which protects from Chaos, from the nearby chests.

After that, you're not done. In the next room, you'll have to face Ozzie - and his barrier - one more time. Instead of hitting Ozzie, hit the switch behind him. This produces a pit in the floor, but it only takes you down to the previous room. When you face Ozzie again, a cat shows up and hits the switch on the right, sending Ozzie plummeting to his death. You won't be seeing him again.

With that, the Ozzie side quest is complete, and you can leave.

Monday, July 1, 2024

PrinceWatercress plays Ratchet and Clank: Going Commando - Part 39 of 54


In this entry, we head to Damosel. We take care of some things here, but we'll eventually return to this place.

First | Previous | Next | End

3:17 - As soon as we head into town, not only are we busting up Protopets, we'll also be fighting some robot bodyguards. The robot bodyguards not only shoot at you, but they can also shoot poison gas bombs that leave lingering poison gas clouds. Besides the lamp posts, you can also destroy the mailboxes for bolts.

5:33 - Be ready to destroy not just the enemies here, but also the spawners that keep spitting out Protopets. As good as the Protopets are for experience, they can be annoying.

8:17 - You can smash the cereal boxes off the shelves. The cereal boxes also look really weird.

9:27 - Destroying all the enemies in the bank without destroying any of the four robot citizens inside will net you a Skill Point. Amazingly, I thought I did not get it here. As it turns out, I accidentally missed an enemy, but the enemy didn't cost me my chance at get it. This also unlocks another outfit for Ratchet.

11:48 - Freezing the water in the fountain leads to a Platinum Bolt.

14:30 - Enemies get dropped off here. Use the Vaporizer on the guys above.

16:58 - Protopets will come out of the cereal boxes here, but the Kilonoids make quick work of them.

23:59 - Use the Thermonator on this pond to reach the end of this route, where you'll meet some guy with a hand puppet who is willing to build a Hypnomatic for you for a fee if you have the parts.

Skill Points:

Safety Deposit: On Damosel, destroy all the enemies in the bank area without any of the tourists in the bank getting killed.

Controls:

As Ratchet:

Control Pad/Left Analog Stick: move
Right analog stick: move camera

X:
  • Jump and double jump (hold button after double jump to use Heli-Pack or Thruster Pack)
  • Wall jump (near certain walls)
Square: strike with wrench
Circle: pull out/shoot currently equipped gun
Triangle: 
  • quick select (hold and use in conjunction with Control Pad or left stick to switch guns; menu can be customized in Quick Select on the pause menu
  • double tap to switch between two most recently equipped weapons/items
  • interrupt on-screen messages

Select: open map
Start: Pause menu
  • Control Pad: select option
  • X: confirm option choice

L1:
  • center camera behind Ratchet (tap button to center)
  • first-person view (hold button and use left stick or D-Pad to look around; let go of L1 to move camera back behind Ratchet)
  • Square: wrench boomerang
  • Circle: fire gun
  • R1/R2: zoom in and out (Pulse Rifle only)
L2/R2: strafe (hold while moving)
L3: see health and Bolt totals
R1/R2: crouch (hold down)
  • Square: wrench boomerang
  • X: high jump
    • long jump (hold crouch button and jump while running to perform)
R3: open map

In water:
  • Square: dive and descend
  • X: surface and ascend
  • R1: accelerate with Hydro-Pack

As Clank:

Control Pad/Left Analog Stick: move
Right analog stick: move camera

When hanging off platforms:
  • Control Pad/Left Analog Stick: move
  • Forward+X: vault up
  • Back+X: drop down

Square: punch
X: Jump (press and hold in the middle of a jump to glide with Heli-Pack)
Triangle: command menu (hold and use in conjunction with Control Pad or left analog stick to choose commands)

Wednesday, May 29, 2024

DeceasedCrab plays Earthbound - Part 39 of 53


We head back to Winters in order to save some people. There's also a hidden item here if you're willing to spend time here and battle.


If you talk to the chewing gum monkey where you rode on Tessie, you'll be able to ride Tessie again.

On your return to Winters, the enemies will be more powerful. The Wooly Shambler can cast Flash Alpha and Shield Alpha, and can fire a beam that do a good amount of damage to one party member. The Whirling Robo can also do the same beam and Shield Alpha spell as the Wooly Shambler, but can also use a Neutralizer to cancel all PSI effects and shoot a beam that causes night-time stuffiness that causes one party member to catch a cold. You'll also meet the Lesser Mook here.

If you have the Pencil Eraser, you can skip Brick Road's dungeon from earlier in the game entirely.

The Arachnid! can be met in the cave leading to the next Your Sanctuary location, which you've been in before. It's weaker than the Arachnid!!!.

Ness learns Healing Theta at Level 53. This can resurrect a downed party member.


At the center of Stonehenge is a patch of dirt. If you approach it, you'll find a dungeon. However, a very large iron eraser will block your path. You'll need to head back to Dr. Andonuts' Lab, talk to the mouse there, and get the Eraser Eraser. Then, you'll have to go back to the iron eraser and get rid of it with the Eraser Eraser.

The Mighty Bear Seven is a more powerful version of the Mighty Bear and does not have any new attacks.

The Mook Senior can cast Freeze Beta, Fire Alpha and Lifeup Alpha. It is very vulnerable to PSI attacks. It can also Diamondize a party member with a glare from its eerie eyes.

Poo learns Brainshock Omega at Level 44, which lets him paralyze all enemies. Poo will also learn Lifeup Theta at Level 46.

The Starman teleports around the dungeon instead of moving around normally, and can appear in the middle of your party. If you know what you're doing, however, you can sneak up on it and get the upper hand. It can cast Magnet Alpha and Shield Alpha, use a Sudden Guts Pill to double its Guts, guard to reduce the amount of damage you do to it, and fire a beam at one party member.

Spicy Jerk heals about 250 HP.

The Atomic Power Robot can fully recover a single enemy's HP (much like Lifeup Gamma), and can fire a beam. It can also fire a beam at one party member.

Paula will learn Shield Beta at Level 51.

Saturday, November 4, 2023

Jerry Martin plays Strong Bad's Cool Game For Attractive People - Part 39 of 53


In this entry, we fight Killingyouguy on the car, then we go back and do some stuff for in-game achievements.


Click on the autopilot, then click on the sawblade (the third option). You'll deploy the sawblade boomerang hubcaps. From here, click on the Sawmerang hubcap at the front of the car. Cutesy Buttons will then show up in a military helicopter (even though it's really a fake one with a painted on Marzipan recorded close up). Unfortunately, the chopper can't get any closer to pick you up.

Click on the autopilot again, then click on the oil spill (the second option). This will cause Killingyouguy to slip on the oil. Use the Sawmerang on Killingyouguy. This will knock him down, but get him further away from the car. From here, click on the autopilot again and select the emergency hatch (the fourth option). Afterwards, click on the front of the car to slow it down. Killingyouguy will catch up, but he will be under the hatch. Click on the roof, then click on the helicopter to get in.

Once in the copter, Dangeresque gives the formula to Cutesy Buttons, who then parachutes off the plane. He then gets a call from Uzi Bazooka, who announces that he has kidnapped Renaldo and taking him to his secret space station on the sun. Dangeresque then jumps from the helicopter back into Brainblow City before figuring out how to get to the sun.

Head left until you get back to the car, then use the Black Metal Detector near the car. You'll get a shotgun bullet autographed by Killingyouguy. From here, head to the Secret Lab.

At the lab, you'll find out that Professor Experimento is being held hostage by Dangeresque's former love interest Sultry Buttons (Marzipan), who is aggravated that Dangeresque left her hanging on a date in Paris to save a bus full of kids. Now Sultry Buttons has drifted to a life of crime stealing the world's rarest jewels, starting with the ruby that powers the satellite. The only way to win her back with another Stickanee flower like the one that he gave her in Paris. Too bad they're now extinct. Sultry Button then leaves, pinning the picture of them in Paris on the wall with her knife. Meanwhile, Cutesy Buttons still has the launch codes for the rocket, and you'll still need to get them back along with the Ruby. You can now head to Cutesy Button's house.

If you click on the knife, you'll take it and put it in the inventory along with the romantic photo. Also, use the romantic photo on the computer, you'll get the Secret Weapon Page for the Space Circus Catastrophe manual.

If you head back to Strongborneo and use the Black Metal Detector near the quicksand, you'll find a bullet with Diamonocle's name on it. Also, if you use the knife on the plants, you'll find the Space Map Page for the Space Circus Catastrophe Manual.

After this, head to Cutesy's Place. If you walk back and forth and keep running into Marzipan until she almost accidentally calls you "Strong Bad," you'll get credit for one of the outtakes.

Talk to Cutesy Buttons and ask about the launch codes (the second option). She will mention that Perducci showed up and offered her a sapling in exchange for the disk with the launch codes, and that he was traveling to Venice. Also, mention the Stickanee plant (the fourth option). She will mention that you can only get a Stickanee plant if you had a sample of the original one.

If you use the Black Metal Detector at the flowers, you'll find Sultry Buttons' monogrammed bullet.

From here, head to the Stickanee tree and use the knife on it. This will get you a sample of the plant. Take the branch on the ground.

CELEBRITY NAME DROPS:
- Sam and Max: Use the phone in Dangeresque's office.
- The Lorax: Look at the Stickanee Tree before taking the flower.
- Tri-Lambda: Use the Evil option while talking to Baron Darin Diamonocle.
- Burt Bacharach: Talk to Perducci at the Old Club.

CHARACTERS NUNCHUCKED:
- Renaldo: Do this in Dangeresque's office after you answer the door at the beginning.
- Dangeresque, Too?: Do this in Dangeresque's office after you answer the door at the beginning.
- Cutesy Buttons: Do this in Dangeresque's office after letting her in.
- Professor Experimento: Do this in Professor Experimento's lab when you first head here.
- Baron Darin Diamonocle: Do this when you unlock Brainblow Prison and go there for the first time.
- Killingyouguy: Do this when you enter the Old Club for the first time.
- Perducci: Do this when you enter the Old Club for the first time.
- Dadgeresque: Do this when you enter Venice for the first time.
- Monster: Do this when you solve the tile puzzle at the start of the Catacombs.
- Kidnapping Victim: Do this after you defeat the monster in the Catacombs.

SPACE CIRCUS MANUAL PAGES:
- Performers Page: Click on one of the flaps on the ruby powered rocket at the lab.
- Cover: Check the center hole after extracting the full heart in the Catacombs.
NEW! Secret Weapon Page: Use the Dangeresque and Sultry Buttons photo on the computer at the lab.
NEW! Space Map Page: Use the large knife on the bushes at Strongborneo.

DANGERESQUE 3 MERCHANDISE:
- Renaldo Sheets: Use the Nunchuck Gun on the rightmost Brainblow limits sign.
- Renald-O's: Use the Formula on the Stickanee tree.
- Dangeresque Figurine: Use the rock on the bottles in the Old Club.

OUT & SPIT TAKES:
- Use the safety scissors on Cutesy buttons before distracting her.
NEW! At Cutesy Button's place, walk towards her until she calls you "Strong Bad."

OUTFITS:
- Monocle: In the tuft of grass next to Brainblow State Prison.
- Fedora: Hanging on the wall of the Old Club.
- Top Hat: Use the rock, then the nunchuck gun, on the Whale.
- Boots: In one of the fallen boxes in the Catacombs.

PERSONALIZED BULLETS:
NEW! Killingyouguy Bullet: Use the Black Metal Detector in Brainblow behind Dangecaresque (the car).
NEW! Diamonocle Bullet: Use the Black Metal Detector in Strongborneo near the quicksand.
NEW! Sultry Buttons Bullet: Use the Black Metal Detector in Cutesy's yard near the flowers.

- Score 15,000 points on Space Circus Catastrophe.

Tuesday, May 2, 2023

PrinceWatercress plays Sly Cooper: Thieves In Time - Part 39 of 48


In this entry, we finally get all of the treasures and unlock all of the arcade machines. Next video, we continue the march to the Platinum Trophy.


The treasures in this game work much like they do in Sly 2: they will be in certain locations in the episodes, and you'll have to go out of your way to find them, interact with them to grab them, and bring them back to the hideout without getting hurt by the enemies. Sadly, there is no way to get them show up on the Select screen map. Unlike that game, where some items were on timers and others were not, all of the treasures are on timers and you'll have a certain amount of time to get a treasure back to the hideout. The amount of time that you get depends on the treasure.

Each episode - not counting the Paris prologue and epilogue - has 12 treasures in all, leading to a total of 60. There are also a few Trophies for going for all the treasures along the way.

I also create some rules of my own for the treasure collection videos as well.

1. There are no practice runs. Everything that is done is done on the fly.

2. You will need all of the costumes before even attempting to get all of these.

3. There is a total of twenty (20) minutes to collect treasures per video. Whether any more time is needed to get one more treasure is a matter of discretion.

4. The timer only starts after exiting the hideout and gameplay begins.

5. In case a return to the hideout is needed to get away from enemies or to switch episodes, the timer is suspended. The timer is only restarted once the hideout is exited again and gameplay begins again.

6. After the twenty (20) minutes are up, we get to read the treasure descriptions and rotate the treasures.

GamesRadar made for some pretty good notes on how to find everything; you can find them here.

9. Jeweled Pillow


This is in a hallway in the northwest, and you may remember passing by this while completing one of the earlier missions. 

10. Le Paradox Portrait


This is behind an archway in the northern part of the city. The earlier you can get to the beach where the hideout is, the better.

11. Miss Decibel Costume


This one is far to the northwest near the palace, and requires the Archer Costume as you'll be shooting a rope arrow across the water to an area off to the side. You'll need the Thief Costume to open and enter the Ancestor Door, and once you get the treasure, you can follow the coastline (and the docks) to get to the hideout, assuming a searchlight guard doesn't pop up to complicate things.

12. Marble Horse Head


To the north behind the palace, there are cage blocks and laser fields you'll have to push back and traverse through with the Jailbird Costume. You'll also need the Sabertooth Costume to get past a pit. Be sure to jump over the lasers. After that, use the Jailbird Costume's ball and chain to open the door and get the treasure. 

Achievements:


Quarter Cruncher: Get all 60 treasures in the game and unlock all six arcade machines.

Controls:


Left analog stick: move
Right analog stick: move camera
X: Jump and double jump (hold X on second jump for hover jets as Bentley)
Square: attack
Circle: 
  • interact (usually with anything that has sparkles) (Sly)
  • steal from enemies (from behind) (Sly, Bentley, any of Sly's ancestors)
Triangle:
  • knock enemies upwards (from behind; press Square to slam enemies down for stealth slam) (Sly, any of Sly's ancestors)
    • press Circle after knocking enemy upward to perform Silent Obliteration (Sly; replaces Stealth Slam; must buy on ThiefNet)
    • press Square for Stealth Slam (any of Sly's ancestors)
  • spin attack (hold to charge) (Sly)
  • throw bombs (Bentley)
  • Thunder Flop (in mid-air) (Murray)
  • spin attack (hold to perform) (Murray)
    • control with left stick (must buy on ThiefNet)
  • Raging Inferno Flop (in air; Murray; must be bought on ThiefNet)

L1: 
  • bomb aim (Bentley)
  • smoke bomb/flash bomb (Sly; must buy on ThiefNet)
  • aim/strafe mode (Carmelita; must hold button down)
    • left analog stick: move
    • R1: shoot (can only shoot in strafe mode)
L2:
  • hold for costume select menu (Sly)
    • hold down to stay in menu; use D-Pad or left stick to make selection
  • hold for weapon select menu (Bentley)
    • hold down to stay in menu; use D-Pad or left stick to make selection
  • hold for fist select menu (Murray)
    • hold down to stay in menu; use D-Pad or left stick to make selection
  • hold for shot select menu (Carmelita)
    • hold down to stay in menu; use D-Pad or left stick to make selection

L3: activate compass
R1: run (hold while moving to perform)
  • Paraglide (Sly; in air; must buy on ThiefNet)
    • Square: Paraglide Dive Attack (during Paraglide; must buy on ThiefNet)
  • Adrenaline Burst (Bentley; double tap to activate; must buy on ThiefNet)
  • Clothesline (Murray; double tap and steer with left stick; must buy on ThiefNet)
  • Cane Push (Sly; double tap; must buy on ThiefNet)
R2:
  • Trigger Bomb (Bentley; must have bomb on field to detonate manually; must buy on ThiefNet)
  • Super Jump (Carmelita; hold and press X to perform; must buy on ThiefNet)

R3: Binocucom
  • Right analog stick: move
  • Left analog stick: zoom in and out
  • R1: take picture (when applicable) (Sly, Bentley)

Start: pause menu
Select: map
  • Left analog stick: zoom in and out, switch between map and status
  • Right analog stick: move map
  • Circle: back

Monday, March 13, 2023

PrinceWatercress plays Blood Omen: Legacy of Kain - Part 39 of 41


In this entry, we head to William the Just's fort in an attempt to end his reign of terror before it starts and ultimately change the present day.


0:00 - Remember the full moon cave from earlier? You have to go into it again and trip the switch to get Secret #98 (see below).

4:07 - It's time to enter the fort. We could do it in the present day, but it would not lead to much. In the past, we can get something done here.

6:23 - Once you save your game at the spire in the first room, go north right after the right turn. Hit the switch between the blades.

7:43 - Use Repel to block all the projectiles and continue north.

8:39 - Keep an eye out for things in this dark room. Red lights will indicate switches. Hit them all, and be sure to use Repel. Once you hit all the switches, go back south to enter the locked door you passed by earlier.

10:00 - From here, go east and down the stairs. You'll see the man in the white robe - whose name with Moebius and has the ability to travel through time - meeting with William the Just. From here, go back up the stairs, go north, hit the switch to the east and continue north.

13:36 - In this room, go straight north and hit the switch to the immediately left to open a door in the southeast corner. In the next room, hit the switch to the right of the door to trigger Secret #99 (see below), then get everything here.

15:20 - Go all the way to the north and hit the switch, then go back, go all the way to the west and go all the way to the north to hit another switch. Finally, go back to the center, hit the switch on the right, then hit the switch on the left a second time to open the nearby door.

16:35 - Have Repel ready before you enter this room to face the enemies. Hit the switch to the east to open a door to a save spire. From here, you can use the enemies to refill on magic, which you're really going to need soon.

19:56 - Here, you'll face William the Jest, who is aware that you're here. He has the Soul Reaver, but if you cast Repel and equip your own Soul Reaver, you can go to town on him without losing a ton of energy. Once he goes down, go north to find another time streaming device. When you leave the room, you'll be back in William the Just/The Nemesis' fort, but back in the present day. The room where the time streaming device was now contains a blood vial.

Secrets

98. - Remember the full moon cave from earlier? You have to go into it again and trip the switch to get Secret #98.

99. - In this room, go straight north and hit the switch to the immediately left to open a door in the southeast corner. In the next room, hit the switch to the right of the door to trigger Secret #99, then get everything here.

Saturday, December 25, 2021

HCBailly and JB play Secret of Mana - Part 39 of 41


Now that we're in the Mana Fortress, we'll be facing a few bosses before facing the Mana Beast.


If you can get your magic to 99 experience points at Level 8 (which is shown in the magic level screen as "8:99"), you can get some alternate animations for the spells at random. 

The Whimper enemies can cast Wall on themselves and Earth Slide on your party, and they have a chance of dropping the Javelin's Orb. The Valkyrian is the best javelin weapon in the game.

There are a few bosses in the Mana Fortress. The first is Buffy, an obvious "Buffy The Vampire Slayer" reference. Buffy can cast Freeze on your party and also petrify them with Leaden Glare. Buffy can also cast Dispel Magic. Since Buffy is a palette swap of the Vampire, it fights more or less the same way. Lucent Beam will do a lot of damage to Buffy.

The Mana Fortress will not drop weapon orbs. To get weapon orbs, you'll have to get them from Mana Fortress enemies at random.

The next boss is the Dread Slime. The Dread Slime will grow as you do damage to it, and it is a palette swap of the Lime Slime. Because of that constant growing, unless you have a lot of Faerie Walnuts and strong magic, you probably won't make it out of this battle alive. Dark Force is the best magical attack you can use against it. Also, Dread Slime loves to use Acid Storm.

Tuesday, December 7, 2021

PrinceWatercress plays Sly 3: Honor Among Thieves - Part 39 of 42


We've had a lot of Master Thief Challenges in the early game, and Episode 3 proves no exception.


Episode 3: Flight of Fancy

Castle Quick Climb

For this challenge, you'll be climbing up the tower much like you did in the main game, but this time, you'll have to do it in a minute or less. As tempting as it might be to leap around in the parts where you have to traverse narrow platforms, don't. You'll more than likely mess up and make it so that you can't recover. Also, when you reach the windows, do not let the Black Baron see you; getting spotted will also end the challenge in failure. As long as you are both quick and careful, you should be able to get through this one.

Muggshot Goon Attack

This one is particularly easy once you get a pattern going. For the rabbit enemies that show up from the left side of Muggshot, you'll want to launch them into the air with Triangle, then knock them back with Square once they are airborne. For the pig enemies that show up from the right side of Muggshot, you'll want to punch them into the nearby fire with Square to immolate them and get rid of them in one hit. I usually go over to the machine to push the engine block into Muggshot once I take care of a pig enemy, as it gets rid of the next rabbit enemy immediately. From there, I'll have all 30 enemies necessary to complete the challenge by the time I damage Muggshot the first time, so I just take care of a few enemies, then send the engine block crashing into Muggshot once I send a pig enemy into the fire. By getting rid of thirty enemies first with the pattern I have set up and then going after Muggshot as soon as I do, this challenge is child's play.

Security Breach

Compared to the main game, this part is a bit crazy in Master Thief Challenge mode. The plane will have half health, and you'll want to watch both screens as you do this, as the enemies show up in uneven intervals this time around as opposed to four on one screen and four on the other. As always, I utilize the front-most traps first to fry as many enemies in quick succession as I can to make getting rid of the enemies that are soon to come easier, and near the end, I was even frying two enemies at the same time with one trap. This one may take a few tries; I made this one look a bit easier than it is and I ended up clearing it on the first try as a result.

Defend The Hangar

For this one, the hangar is at half health. Paying attention to where the arrows are is essential, as you'll want to get rid of all the enemies as quickly as possible. Like last time, the green triangles are the usual foot soldiers, while the red triangles are the heavy machinery that can pack a punch if allowed to attack the hangar. As long as you get a good pattern on turbo boosting as you move back and forth with enemies in your grasp, you should be able to pull through.

Precision Air Duel

For this one, you'll have to shoot down all the black tri-winged planes and only those to complete the challenge. Shooting too many of the blue ones will cause you to fail, so be careful. Keep an eye on your health as well as your ammo, and when you get a bead on one of the black planes, keep it in your sights and make sure your machine gun fire is tearing it to shreds. Like in the main game, there will be a few points where you can reload. The hardest part of the challenge is looking for the last few black planes, especially when the blue planes you're not supposed to shoot down group up and make it harder to explore the area just by holding Square to keep the brakes on while flying around in a circle. I ended up crashing into one of them during my run, further proving how difficult it can be to find one of the black planes when you have one or two left. Just keep a look out and you should be able to beat this one.

Wolf Rampage

For this challenge, you'll need to ride on the wolf with The Guru just like in the main game. The only difference here is that you have only half of a full health bar to work with, and even though you can get health back from enemies, you cannot fill the health bar past the halfway point. Pay attention to where you are going, and make sure you don't run straight into any walls. You can run into enemies to stun them, but you must press Square and attack them to get credit for the kill. As long as you can remember those three things, you're alright, and if you had no problem with this in the main game, you'll have no problem here.

One Woman Army

For this challenge, you'll need to destroy fifteen enemies before you defeat Muggshot as Carmelita. Interestingly, getting the enemies is a little harder than beating Muggshot. Thankfully, the hangars are the best places to find them, as well as the hills near the Black Baron's castle. Also, the flashlight enemies take one hit from the gun, but the minor enemies take two. Once you're done with the enemies, beating Muggshot is simple as long as you jump every once in a while and not just go back and forth, as not jumping makes you an easier target.

Going Out On A Wing

Once again, you have a boss battle where you have a limited amount of time, this time against the Black Baron on the plane. As much as using your push and spin attacks would make sense, especially since you have more powerful versions of them this time around, you still want to wait for Black Baron to rear back for the uppercut, then sidestep and smack him a few times with the Square button. As for the pig enemies, the more powerful versions of the spin attack make it easier to smack them over the edge and even get a health boost if you need it. Once again, when the Black Baron is in the air, be in mid-air when he comes back down so you don't get hit by the earthquake attack. Once you're on the last part of this, henchmen will always show up no matter what, so stay focused on Black Baron and only take out the enemies when you need to, and you should have this one in the bag.

Holland Treasure Hunt

For the start of this treasure hunt, get to the steaming manhole cover near the start. From here, go 29 paces to the south across the bridge. At the cheese, go 10 paces southwest away from it. At the well, take 7 paces away from it to the south. There will be a windmill to the east. Face east and move 9 paces. From here, go 18 paces southwest towards the Black Baron's castle. At the castle, move 13 paces to the east. Finally, move 10 paces southeast towards the windmill on support beams to complete the challenge.

Wednesday, November 3, 2021

HCBailly plays Final Fantasy II AGAIN - Part 39 of 65


Our trip to Mysidia introduces us to a bunch of new enemies...and a bunch of glitches.


There is a bug with Aura in the Famicom version where it grants your weapon the ability to exploit a certain creature type for additional damage depending on how high the level for the spell is, and for each level you gain for it, you can exploit an additional creature type in addition to the one it's supposed to work on. At Level 8, it is supposed to make you strong against undead-type enemies, but that does not work.

Walking to Mysidia introduces you to new enemies. The Ghosts are Rank 5 Undead, Spellcaster, Magic Beast and Earth-type enemies, and are weak to fire. They will cast Scourge, so make sure you have a Gold Shield on hand to protect against it, and they can drain your HP with their physical attacks. They can also cast Curse, Stun, and Mini on you at high levels, too.

The Flying Rays (FlyngRay) have no special abilities or status abilities to inflict, but they are Rank 5.

The Mantis is Rank 5 and weak to Ice. 

The Vampire Girl (VmpGirl) are Rank 5 can cast Temptation on the party and Charm them. They are Undead, Spellcaster, Magic Beast and Earth-type enemies, and Fire is particularly useful against them.

Mysidia


Ask around, and you'll find out that the Black Mask is on a small island in the middle of the sea. This is how you're supposed to find out about the Black Mask, which we got earlier in the game. You'll also find out that it is time to break the seal on the nearby tower, and that you'll need the Black Mask and the White Mask in order to do it and get the Crystal Rod. You'll also learn that a statue of a goddess beneath the city watches over the Crystal Rod, and that Minwu went to this tower.

In the stores, you can buy the Flame Spear, which is much more powerful than the Demon Spear. The Demon Spear is still useful for certain monsters, however. You can also buy the Ice Shield in this town as well as the Thief's Gloves, as well as spells from previous towns. However, this is the only one to have Barrier (which gives resistance to elements depending on the level), Wall (which protects against black magic and enemy skills up to the level of the spell), Swap (which swaps HP and MP with the enemy, assuming the enemy has MP) and Holy (a powerful non-elemental White magic attack that kills off the undead).

Barrier has two bugs in the Famicom version. It is supposed to give you Ice resistance at Level 8, but it doesn't do that, and the elements that the game tells you that you are protected against are out of order.

Holy's base power level is 15 instead of 10, and is useful against enemies that absorb elemental damage.

Thursday, February 11, 2021

PrinceWatercress plays Sly 2: Band of Thieves - Part 39 of 49


In this entry, we trek into a perilous bear cave for radio transmitters, then infiltrate an RC car combat club to find out where the battery is. 

Treasure of the Video

Jeweled Chalice - This one is at the top of the lighthouse. Once you get this, climb all the way to the spire at the very top of the lighthouse and Paraglide in the direction of the safe house. Once you land, run to the safe house. Despite the strict time limit, you should be able to make it.

Bearcave Bugging


You'll be playing as Sly for this one.

The wild bears in the area have been tagged with radio tracking devices, and if you can get enough of these devices, you can bug Jean Bison's cabin. You'll have to crawl into a nearby cave, get near the bears and press the Circle button when the mouths are open so you can steal all six radio transmitters.

Not only will you have to avoid putting your weight on the ice on the ground in anyway, you will also have to climb on icy walls to get to some of the bears. There is a hook on the wall near the start, but you're better off taking the long way back. If you mess this part of the job up even after you're done with it, you'll have to start all the way back at the entrance to the cave with zero transmitters and you'll have to get them all over again.

Once you're out of the cave, you'll be using the L3 button to figure out where to place the transmitters. Once you find a spot, walk up to it and you'll place the transmitter. This shouldn't take long.

RC Combat Club


You'll be playing as Murray for this one.

The Guttural Roar is used to scare enemies away. This does use special weapon energy, and while it trips the enemy alarm, enemies will run away from you rather than towards you.

There is a cabin where several off-duty guards meet and conduct an RC car combat club. Murray will have to enter in disguise and become part of the group to find out where the battery is.

When you enter the cabin, Murray will hide, and Sly will show up to knock an old moose head to the ground so that Murray can wear it. This is much like the sawmill mission, as you will have tread on some dangerous hardware and crawling underneath some sawblades to get to the old moose head. Wait for the sleeping guard to fall asleep briefly so you can avoid the flashlight. When you reach the platform, crawl underneath the tables to get to the moose head, then press Circle to knock it down.

Murray will meet with the club for an RC car duel. Use the left analog stick to street. Up is forward, down is backwards, and left and right turn. Hold X to accelerate. If you pick up ammo, press Square to fire the turret. While you're not moving, you can use the left stick to aim the turret before firing.

When you bring the opponent's gauge all the way down, you'll find out where the battery is and complete the mission.

Now that we're done with the second leg of the episode, it's time for the third leg. In order to win the Lumberjack Games, we'll have to cheat. Murray will need to lure a bear into destroying the nearby oil mains. Once that's done, the oil will ignite and create enough of a whirlwind to allow Sly to Paraglide over to an eagle's nest and get a Canadian eagle egg. As for the battery, it will have to be modified to be used as a hiding place. Grapple lines will have to latched onto the battery from local boats, then the gang will have to break into the lighthouse and break the power flow to the battery so it cannot recharge.

Controls

D-Pad/Left Analog Stick: move
Right Analog Stick: move camera
X: jump and double jump
Square: Horizontal Attack
  • horizontal attack (as Sly)
  • slam enemies launched into the air from behind (as Sly)
  • hook punches (as Murray)
  • Thunderflop (as Murray; in mid-air only)
  • crossbow swipe (as Bentley)
Triangle: Vertical Attack
  • vertical attack (as Sly; used to knock enemies into the air)
  • downward dive (as Sly; in mid-air only)
  • uppercut (as Murray)
  • drop bomb (as Bentley)
Circle: Action button (near blue/green/purple sparkles and character icons)
  • pickpocket (as Sly)
  • stomp (as Murray; use Square to throw object/enemy)
R1: hold to run

Select: Gadget Grid
  • Control Pad: highlight gadget
  • X button: confirm gadget
  • L1, L2, R2: assign gadget to button pressed

L1, L2, R2: use gadgets assigned to button pressed

Start: pause menu
  • Control Pad: select menu choice
  • X button: confirm choice
  • Start: un-pause game

L3 (press the left analog stick): locate beacons for mission objectives

R3 (press the right analog stick): Enter and exit Binocucom for first-person view
  • Left analog stick: look around
  • Right analog stick: zoom in and out (with up and down on right stick)
R1: 
    • take pictures with spy camera (as Sly; when applicable)
    • shoot sleep dart (as Bentley)

Hacking mini-game controls:
  • Left analog stick: move
  • Right analog stick: aim and fire gun

Thursday, July 9, 2020

PrinceWatercress plays Terranigma - Part 39 of 50


In this episode, we head to China to continue our journey. 


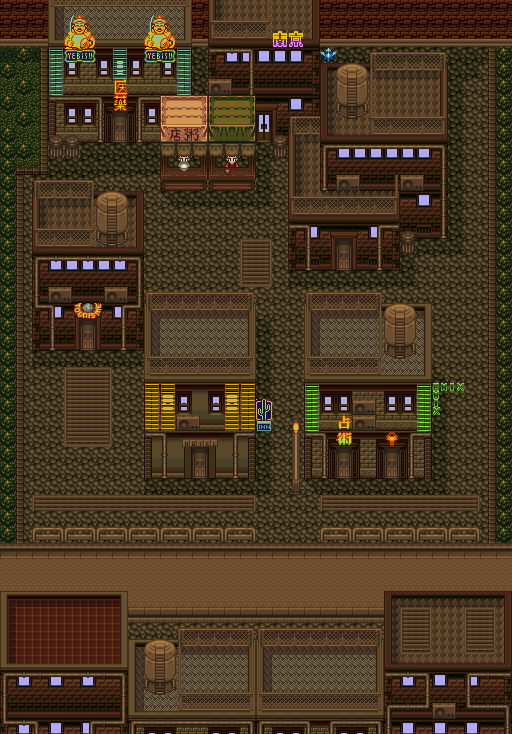
From here, you want to go to China. Head down to the southeastern coast, which is close to Neotokio. There will be a castle of sorts and two spaces worth of buildings near a port. This in Yunkou.

Yunkou


Yunkou is not a big place. You'll enter and exit from the sides of the road, and all the buildings will be to the north of it. Also, everyone speaks in broken English, and it's unclear to me whether or not if this is actually in the original Japanese version of this was done on purpose with the English translation that only officially made it to Europe.

The inn is close to where you enter from, and if you go downstairs from the entry level, you'll find out that Fyda is lying in a bed and has somehow become sick with a mysterious illness. The girl nearby will tell you that nothing tried so far has been able to help her.

To the left of the inn is the tourism center. You'll also learn about the nearby Dragoon Castle, which is no longer open to the public after somebody bought it.

To the right of the inn is the fortune teller and the Magishop.

Behind the building that is behind the fortune teller and Magishop is Magirock #78, which is tucked away in a corner. If you enter said building and enter the room on the left, you'll meet a couple who have abandoned their child in exchange for food during the worst of times and have no idea where she is, and they want to see her again. You'll find out that their daughter's name is Chija. If that name sounds familiar, that's because you met her in the Nomad's village. Go talk to the father again after you've talked to him and the mother, and Ark will tell him where Chija is. They'll head straight to the Nomads' village upon hearing this.

To the left of the couple with the missing daughter is a door that can be easy to miss and is right next to a trash can. This is Lon's, and Mr. Lon is not in the mood to speak with anybody. If you go upstairs and talk to him, he'll tell you his business is finished.

To the left of Mr. Lon's are two booths as well as the medicine house. The booths just sell you drinks for 10 Gems. In the medicine house, you can talk to the doctor here. You'll find out Fyda has a fever and bad dreams, and the only hope for her is Ginseng...but the only way to get it is through Mr. Lon, and he's out of business. If you go back to Mr. Lon (you'll have to press A at the door) and talk to him, ask for the Ginseng. He'll ask if you want to make a deal. Say yes. He'll tell you about his younger brother, Wong, who used to run the business with him until someone bought Dragoon Castle and also a lot of other things to store there. He then asks you to check on Wong, and he wants to stop him if he's doing anything bad. Say yes, and he'll give you the Ginseng. Talk to Mr. Lon again, and he'll tell you that he thinks Wong is at Dragoon Castle.

From there, head back to the doctor and hand him the Ginseng. He will tell you to make it into a drink that Fyda can drink so her sickness can be cured.

Go back to the inn and give Fyda the Ginseng. You'll then see a flashback to when King Henri attacked the village of Storkolm and how she had to kill in order to find the treasure for the king. You'll also learn that King Henri raised her since she was an orphan, and that she is protecting Elle because it is the last request of her parents.

When she is about to kill Princess Elle's parents, Ark shows up and the screen goes black. Fyda blames herself for all of Princess Elle's misery. When she says that you think of her as vicious, you have a choice between staying silent and saying that's not true as she protected Princess Elle as promised, even though it doesn't absolve her of the crime. Tell her that this is not true. After Ark asks Fyda who will protect Elle, you'll be back in Yunkou. Fyda will tell you to hurry to Dragoon Castle.

When you leave the inn, you'll meet Perel. He'll tell you he knows that you're helping Will and has decided to join you. When he asks if you've discovered anything, say that you have. Perel will tell you that it is time to hit Dragoon Castle with a full frontal assault.

Head to the Nomad's camp near Louran and head back to the upper-right tent where Chija was, and you'll find out that she is gone that that people who claim to be her parents came for her. You'll be told that she's probably back with her parents in Yunkou.

Head back to where you met Chija's parents. Talk to them, and they'll tell you that there is still a gap between them and Chija, but they intend to fill this gap slowly without hurry. Your reward is Magirock #79. If you talk to Chija, she thanks you.

Wednesday, May 15, 2019

HCBailly plays Final Fantasy IV (Super Famicom) - Part 39 of 70


That doctor is one crazy dude...


You'll eventually come across a locked door. The door to the next floor will be to the east of that; you'll have to head to the top floor first.

The White Moose are susceptible to Piggy as well as ice spells. You may see them with a Chimera; destroy the Chimera first if they do.

The Medusa can be easily hit with Piggy.

At the top floor, you'll meet Lord Rubicante as well as a doctor. Rubicante will mention that Eblana Castle, the castle of ninjas, has already fallen. He leaves, then leaves the doctor in charge. The doctor then turns around to see you after hearing Rydia and Rosa, and you'll learn his name is Lugeie. He then sends his "son" after you, who is really a Frankenstein-like monster named Balnaba. Balnaba will attack the doctor first before attacking you.

Defeat Doctor Lugeie first; otherwise, he will fuse with Balnaba and keep the battle going. He'll also keep oiling Banaba, which has an Esuna-like effect, and if he stops oiling Balnaba, Balnaba self-destructs, doing a bit of damage to one of your party members and ending the battle early.

After that battle, Lugeie will then fight you again, this time for real. He will transform into a robot and hit your entire party with poison and sleeping gas as well as shoot a beam at individual party members. For some reason, Poison will override the Berserk status, so don't use Berserk. Instead, hit Lugeie with your most powerful attacks, and remember to keep your party's HP high.

Also, Poision keeps Yang from using the Build Up command.

For some reason, Lugeie has a Medic spell, and if he uses it, he casts Esuna on the entire party. Why? I don't know.

When you beat Lugeie a second time, you'll get the Lugeie Key. This allows you to open the locked door on the fifth floor. As Lugeie lays dying, he tells you that the Tower of Bab-il connects both the underworld and overworld and that Rubicante has already taken all the crystals. He also reveals that the Dwarves will still be killed by the Giant Cannon. He then dies.

The locked door on the fifth floor leads to the Giant Gun controls. You'll fight the three Goblin Captains at the control - which ends up being an easy battle - then the Goblin Captains will destroy the controls. Yang will then smack you so hard that you get sent backwards out of the room.

Monday, June 4, 2018

HCBailly plays Terranigma - Part 39 of 75


It's time to explore Sylvain Castle. It's pretty expansive.


Sylvain Castle by xyzbiliu.

Sylvain Castle


From the entrance, take the left path. When you enter the door to the north at the end, there will be some new enemies: a spider (known as a Chakra) hanging by a thread that will also lunge at you from the ceiling, and a skeleton. Be careful when you destroy the skeletons, as they blow up and send bones flying in eight directions as a last-ditch maneuver.

You'll then end up in a dark dungeon full of bats and Chakras. Use your dashing attack to make quick work of the Chakras. At the end is a Stardew.

From there, head to the middle of the entrance room and go up the stairs. You'll fined the paintings that you heard about in Litz with the eyes cut out. If you examine them, you'll notice that one of the jewels is missing in each portrait.

From the portrait, go to the west and go up the stairs. Go north, and you'll enter a chamber where a spirit will ask for its children back. You'll then see two skeletons, and if you kill them, you'll free two souls. The soul on the right was once an attendant to the Queen, who loved her three sons. You'll learn she used the year of their deaths as an important number. The soul on the left was also once an attendant, and that all three children died young.

Leave the north chamber, then head to the door to the east. Follow the path to the library, where you can get a lot of clues on stuff.

One of the books in the lower center bookcase will tell you about four men. The first man had clear blue eyes. The second man had black eyes. The third man had "eyes that burned with passion," meaning he had red eyes. The fourth man had a brown false eye. This is a reference to the portraits we saw earlier.

You can also find a castle renovation work order to the left of the portrait hint. Inside the work order is a request to make the main chandelier operable for repelling intruders via a numeric panel on the winch system.

The bookcase in the lower-left corner of the library has a sewer renovation work order to enable the exchange of moat and fountain water for repelling intruders via a stone serpent with a switch to change the waters of the sewer. This explains the purple water that Yomi stops you from entering.

From left to right on the middle bookshelves, there is an old soldier's diary with an entry on the new heavy armor and morning stars that have just arrived and made the required armor. To the right of that is another entry written in distant Scandia, where Storkolm was discovered, and that a small treasure has been hidden there. To the right of that is a journal of Columbus' voyage to find a new continent, which mentions that Columbus allowed three princes on board reluctantly.

The red skeletons break apart when attacked, and come back together after a few seconds. They'll stop doing that if you kill them.

The upper-right-most book describes Columbus' return. It explains that Columbus returned in the year 286, his ship in tatters, and without the three princes aboard. The Queen blamed Columbus for the princes' deaths and jailed him. Remember the number "286."

In the upper-left-most bookshelf contains mystical lore. It explains the world is steadied by a balance of light and dark, and that a hero will appear to restore the balance should it be disturbed, and fight courageously with a weapon first held by man. This will be referred to off and on throughout the game.

Head back to the fork and enter the south entrance. You'll see a few chandeliers as well as some treasure chests that you won't be able to access yet. Head to the east and enter the door there.

In the Chapel, head north on the middle path, fight off the Chakras and enter the door. You'll enter the chapel itself, where you'll fight four skeletons. Kill them all to reveal a soul. Talk to the soul, and it will ask to come with you until it gets its body back. Say yes.

Leave the chapel and head north down the path to the west. Walk across the tightropes and jump from one rope to another to reach the other side. You'll have to time your movements carefully to keep from falling into the pits over and over, since you'll need to do it in order to get Magirock #51. You'll also find a STR Potion on the way as well.

You'll then end up in the Royalty room. Magirock #52 is near the bed to the west of where you entered. The second path to the west leads to a chest with 651 Gems. The door in the lower-right corner leads back to the chandelier path. The third path to the west leads to the outside of the castle. head to the right to find a chest containing a VestArmr. Equip that.

Friday, March 2, 2018

skorch82 plays Brave Fencer Musashi - Part 39 of 70


Wait, there were chapters in this game? Well, that was one long chapter...

Chapter 4: The Duel at Dragon Island


Finally, the town music is normal again.

The C-Drinks are now replaced with EX-Drinks, which restore more HP than C-Drinks.

Remember that one part of the forest where the stream of water was running in a circle. Use the Water Scroll on the Water Crest there, and you'll finally drain the water there. Open the chest and you'll get a pair of Glasses. Take them back to the appraiser. You'll find out these are the L-Goggles (Legendary Goggles), and with these, you can identify items without the help of the appraiser.

Remember the Water Crest that was in the well. Head down there and use the Water Scroll there. One side of the well will drain into the other, allowing you to refill the well.

When that happens, you'll meet Ben and Ed. They're part of the Thirstquencher Empire, and they're the ones that took the bell. They'll get angry with Musashi. You'll be seeing them again soon enough.

Thursday, August 31, 2017

Dilandau3000 plays King's Quest VI: Heir Today, Gone Tomorrow - Part 39 of 43


This video's got more fooling around than any real progress.

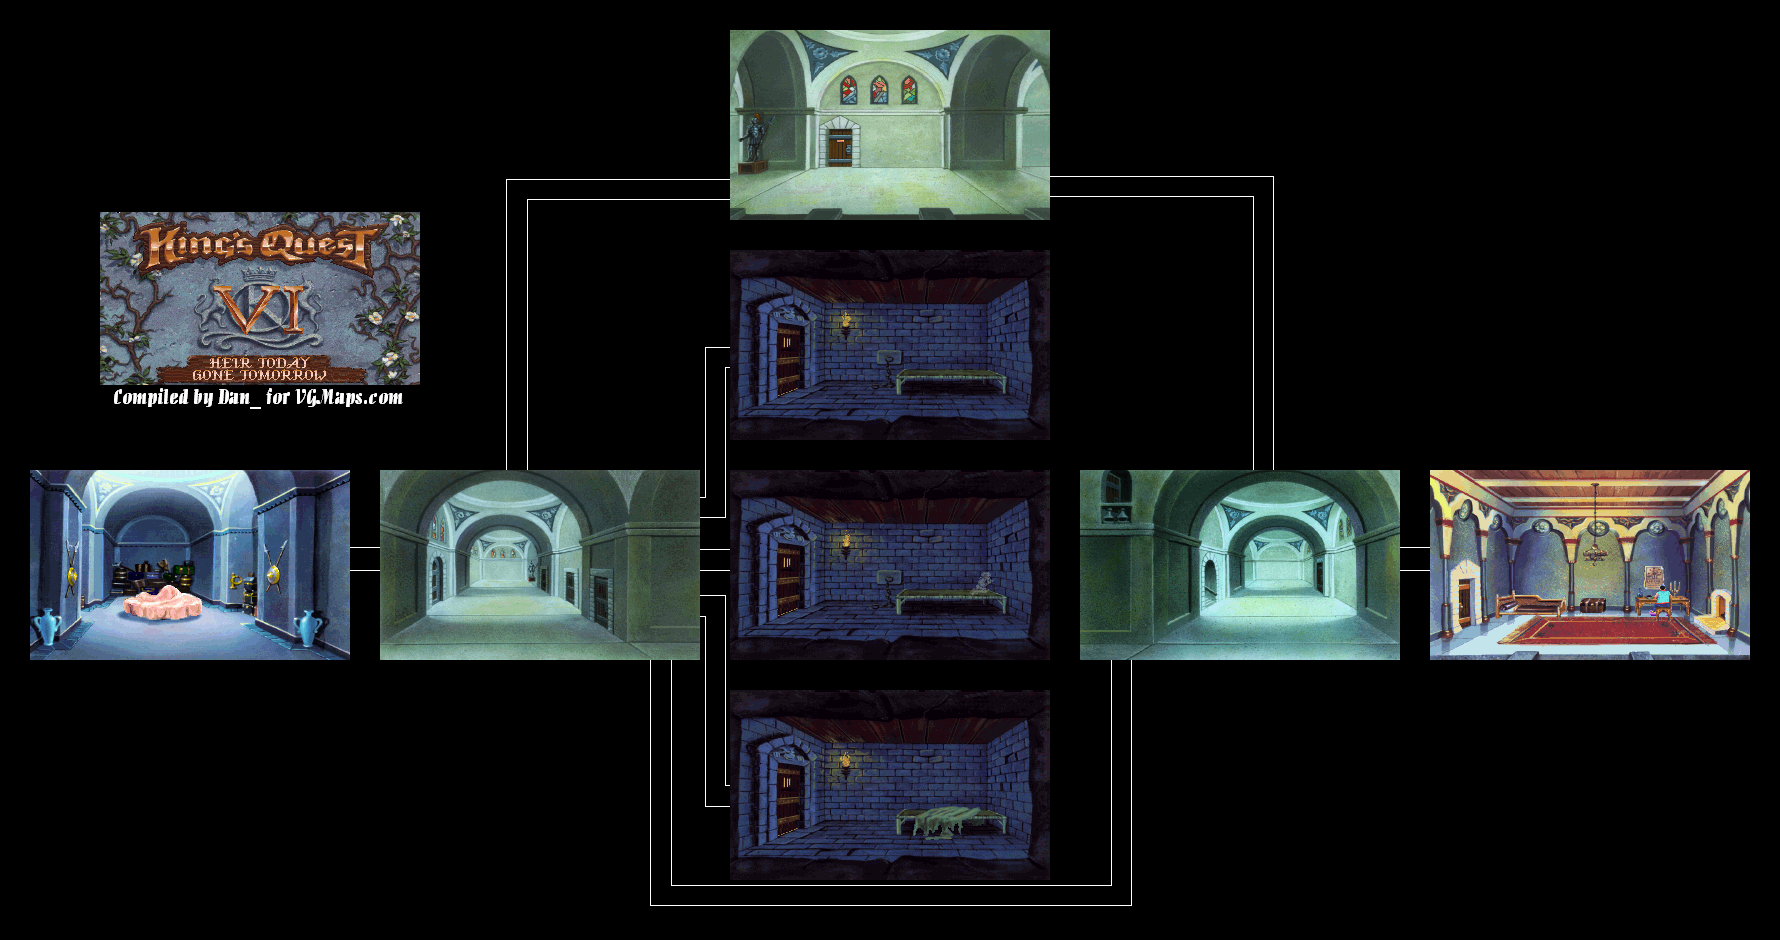
All maps by Dan_.


All three dungeons are completely identical, although one of the cots has a sheet over it.

Once you're out of the dungeon, go east. Go up the stairs and peer through the keyhole on the upper level door. If you hear voices from the door at the upper level, head into the lone door on the east wall. You'll meet Jollo! He'll tell you Cassima is upstairs, and if you can find something incriminating that can be used against al-Hazred, you could be able to stop him.

Give him the replica of Shamir's lamp you got from the lamp trader. Jollo will tell you it's an exact replica, and that he'll take care of the magic lamp swap.

Leave Jollo's room and head north from there. You'll be in a short hallway with one door. If you use the eye on it, you'll notice the plaque on the door reads "Guard room." If you use the hand on the door twice, you'll be thrown in the dungeon and your game will be finished...almost! Jollo frees you, but tells you to be careful as he may not be able to free you this time...and if you actually do this again, you'll be proven right...almost. Use the Skeleton Key from the Realm of the Dead. If you do it a third time, though, you're screwed.

Saturday, February 18, 2017

Chilean Retrogamer plays Wario Land 2 - Part 39 of 57


Another spear man?!? *sigh*

Chapter 3: Ruins at the Bottom of the sea

Story 2: Defeat the giant spear man


0:06 - Shortly after we start going down, we find a hidden coin room.

0:50 - We find another coin room here.

1:20 - Time to start going down again. We then drop down to another area.

1:37 - Going to the right takes you...

2:01 - ...here. The treasure room is halfway down this underwater shaft. Win it to get a scepter.

3:20 - After the treasure room, keep going down. You'll end up in another simple vertical shaft that takes you...

3:46 - ...here. This takes us back to the fork in the road that took us to the treasure room.

4:02 - Let's go left this time.

4:11 - More water...and more bubbles. Take your time here.

4:28 - This area will take you back to the start. Remember where that coin room was? Well, let's head back to the breakable blocks there and destroy those to go further down.

5:23 - Heading left at this fork takes you...

5:42 - ...here. Watch as Wario wakes the owl...then conveniently decides not to use it.

5:51 - After this, it's back to the start. Let's head back to that fork in the road...

6:10 - ...and go left again to get the rest of the coins. That's what I thought, Wario.

6:21 - "I lied!"

6:45 - After heading back to the start and making it back to that fork yet again, Wario finally goes right.

6:54 - After taking out some enemies, we find a door that leads...

7:17 - ...here. Gee, Nintendo, you couldn't make this any easier?

7:41 - Another picture piece.

Thursday, June 9, 2016

angryponcho plays Spyro 3: Year of the Dragon - Part 39 of 41


We're ending this game already? Well, damn.


Dino Mines


There is a red building in this level that you'll have to jump to the rear of, even though you can't seen the ground behind it (though you may see the gem there. You'll have to go to the left of it, and jump to whatever is behind it from the back corner. This leads you to a few gems you'll be needing as well as a Dragon Egg.

Midnight Mountain


Now that you've gotten everything, look for Moneybags. He shouldn't be too hard to find. He says we won't be needing any of your money since he's going to sell a Dragon Egg at Avalar.


Spyro isn't too thrilled about this...so you now get to chase him around the level like one of the thieves. Unlike the thieves, however, you can flame him multiple times. Everytime you flame him, you'll get all of the gems you paid him for random stuff throughout the game back. When he gives up, he'll give you the Dragon Egg before retiring to become a haiku poet in Crystal Swamp...then runs straight into the portal for Crystal Islands. wut

Anyway, enjoy this Dragon Egg...because it's the very last one.

The portal that was once shut to you will now be open. Go ahead and go in there already!

Super Bonus Round


Welcome to the Super Bonus Round! When you step out of the building at the start, Bianca shows up again. This time around, you'll be reclaiming the Sorceress's hidden treasure, which has been stolen by thieves. If you can get the treasure, you can keep it.

You won't be able to access certain parts of the level until you have 16000, 17000, 18500 and 20000 gems for each respective door. You have the Gem Compass, go use it.

For 16000, you'll get a Challenge Portal. Hunter will tell you how Bianca was freaking out when you were about to fight the Sorceress, then he lets you ride an old submarine. Ride it, and take out the other seven submarines to get the gems. Head back to where you entered the water from and you'll be done with this part.

The submarine here works just like the one in Spooky Swamp. Keep close to the subs so the three green circles turn red, allowing your missiles to lock on.

You'll now be able to open the 17000 door. This time, it's a skateboard level. Remember that souped-up skateboard race from earlier in the game? Well, it's that time again, and this time, the course has much less room to manuever in. Land tricks to increase your turbo boost and take out the yetis of the Sasquatch Six to ensure victory and more treasure.

You'll have over 18500 now. Check out the rest of the track without a board to get the rest of the gems here, then head out.

The 18500 door will open up a combination power-up: Superfly plus Superflame. Amazing how you don't see the power-up spires that often compared to the second game. Anyway, you can now take out the seven sheep saucers that are flying around in the level. This time around, the Superflame projectiles have heat-seeking capabilities, so if you see a saucer, go nuts. One of the fireballs will eventually hit the saucer you have in your sights.