Here is all the music from Soul Blazer.
Showing posts with label Soul Blazer. Show all posts
Showing posts with label Soul Blazer. Show all posts
Thursday, July 26, 2018

Wednesday, July 25, 2018
HCBailly plays Soul Blazer - Part 33 of 33
Enjoy your ending.
The game ends with the sun setting and everyone in the world takes the time to admire it. A light ray shot into the sky, but nobody notices. (This is implied to be Blazer.) We then see Lisa one more time, standing all by herself, admiring the sunset. The credits then roll.
After the credits, a year passes. The Master realizes that Blazer still has feelings for Lisa, and sends him down to Earth to live as a human being, and loses all memory as soon as he touches down. Lisa shows him around the village in an attempt to make new memories with him, and the game ends.

HCBailly plays Soul Blazer - Part 32 of 33
In this entry, we beat Deathtoll and finally see the ending.
To beat Deathtoll's second form, destroy the blue fire jets that come out of the ground, and attack Deathtoll's head with the Magic of Phoenix will avoiding the fireballs Deathtoll spits out of his mouth. You need not hit the gem in the center of his head when it opens up; anywhere on the head will do. Be sure to also watch out for the lasers that come out of the diamonds in the staves that he holds up, too. Thankfully, those lasers only travel at 45 degree angles. And of course, come here with a Medical Herb.
Once you beat Deathtoll, that's it. The World of Evil is sealed, as it is a dark world that exists in the back of creatures' minds, and as long as inventions exists, it will be continuously opened up until it is sealed up. The voice that tells you to find reasons for all feelings, connections and existences to be wise like the Master. The World of Evil then disappears, and you'll be back at the shrine.
The Master will thank you, and asks you to go through the world and meet all its creatures.
King Magridd thanks you. He tells you that in the human world, if a person kills one man he is murdered, but if he kills 1000, he is a hero. He became a king by this theory, but he felt lonely, and even if he had people around him he felt alone. Now he realizes no man can live by himself. He will spend all the money he received from Deathtoll to construct and build a great town to compensate the people he defeated, but also a town where people won't have anything to fear and can believe in themselves. There will also be statues of you and Dr. Leo on the center of town to tell every generation about your great accomplishments.
The doll tells you that Dr. Leo can pass away peacefully. Tools exists to be used by human beings, and they are happy if they are helpful to humans, and hurt if they are used in the wrong way. They would like to tell human to use them responsibly, but they cannot. Dr. Leo understood their feelings, and they hope they made Dr. Leo happy.
The king of the gnomes at the Home of Mountain Souls is glad you are back. He misses Dr. Leo very much, and says the value of life depends on the number of days spent with fulfillment. He feels that Dr. Leo's life was more fulfilled than many others.
The queen of the mermaids will thanks you for bringing peaces back to St. Elle's. She feels sorry for Lisa, who she says must feel lonely due to Dr. Leo's passing. Lue the Dolphin has returned to his hometown along with his friends, and he is also going to be married to a female dolphin named Lala.
Turbo's grave in GreenWood is still there, Blazer tries to imagine Turbo, who says that good rest comes after an honest life just like good sleep comes after hard work. Turbo says he will rest peacefully along with Dr. Leo.
Lisa is still in the highlands village, sleeping. Blazer uses the Dream Rod to talk to her. In her dream, she tells you that she will stop feeling lonely eventually, and that she knows the key to happiness lies in patience, not in haste. She asks Blazer not to stay with her, but to return someday. And of course, when it comes to promising you'll come back...but thou must. Blazer is gone by the time she wakes up.
Tuesday, July 24, 2018
HCBailly plays Soul Blazer - Part 31 of 33
In this entry, we get the Red-Hot Ball and earn the privilege of summoning the Phoenix.
The World of Evil
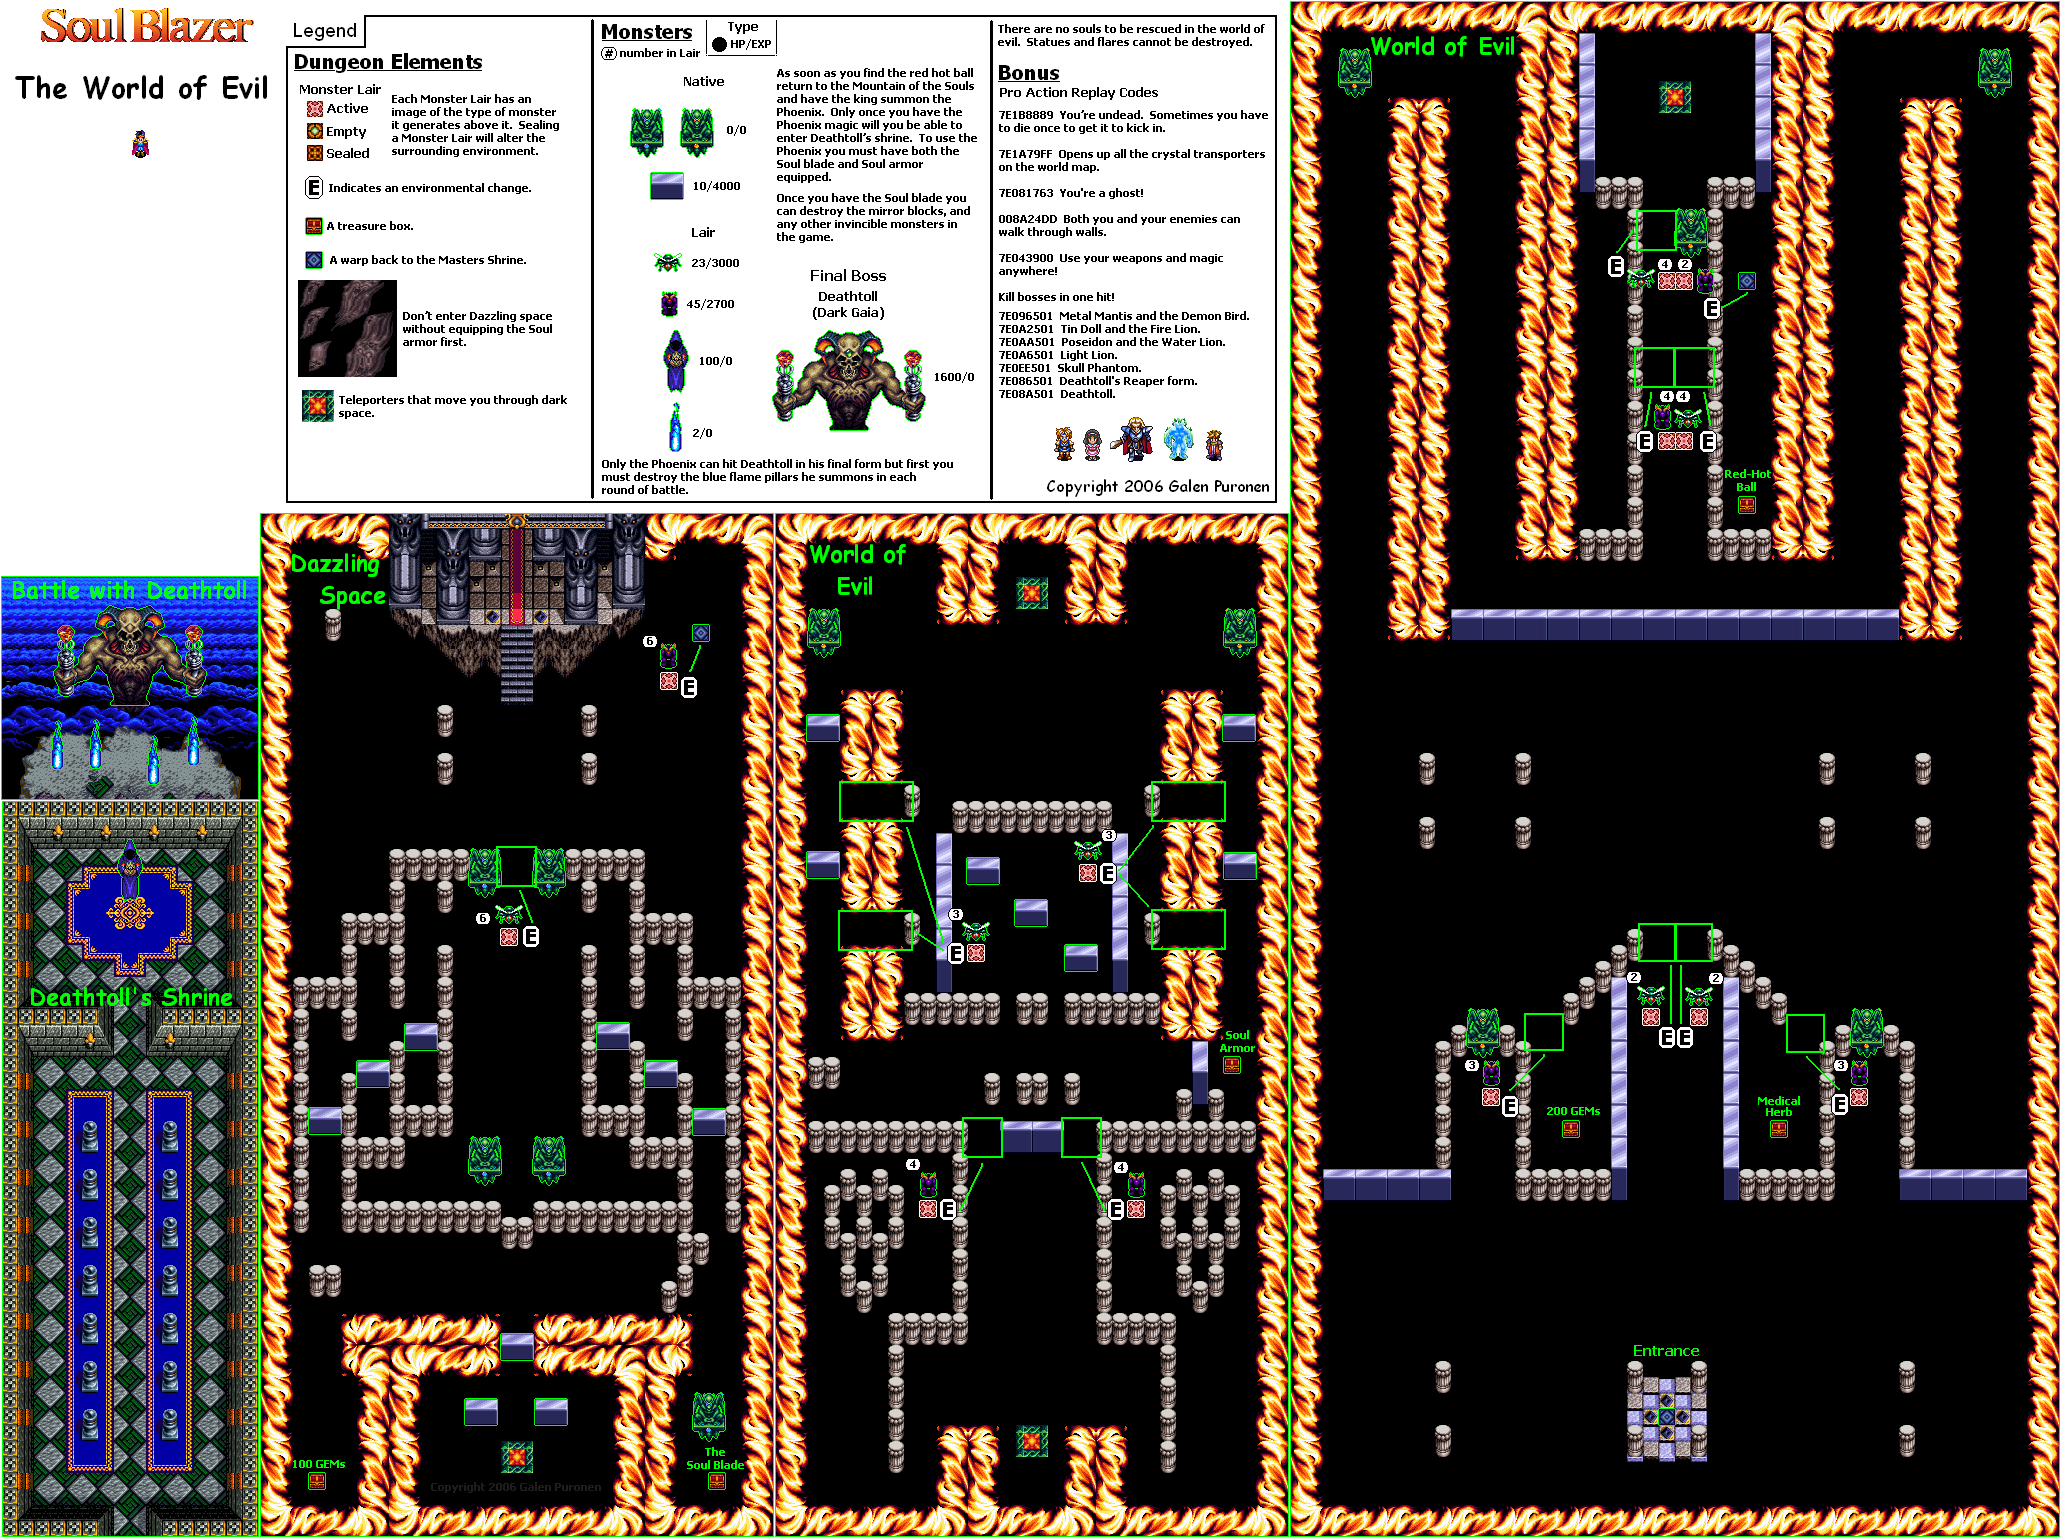
Since there isn't much to mention here (aside from using Light Magic or Magic Flair to take care of enemies stuck between pillars), I should mention that I love the space theme going on with the floor. Same with the fire walls.
Believe it or not, there are flying wall panels blocking your path. These are indestructible and can run you down, but the frames of animation on these things are very good for 1992. Keep on keepin' on, tumbling walls. Keep on keepin' on.
The Soul Armor is the strongest armor in the game, and it will enable you to walk in space.
The parts with the black floors are outer space. If you do not have the Soul Armor equipped at this point, you will take damage. You will see warped looking faces fading in and out in the floor as you are in these areas.
The Soul Blade is the final weapon in the game. With these, you can finally destroy those tumbling wall panels...and do it in one hit. Awesome.
When you trigger the teleportation tile in the third section, take it and step on the left panel in the shrine. This will take you to a chest you could not reach earlier that contains the Red-Hot Ball, the final item you need to summon the Phoenix.
Head back to the mountains. There's one thing left to do.
Soul of Mountain House
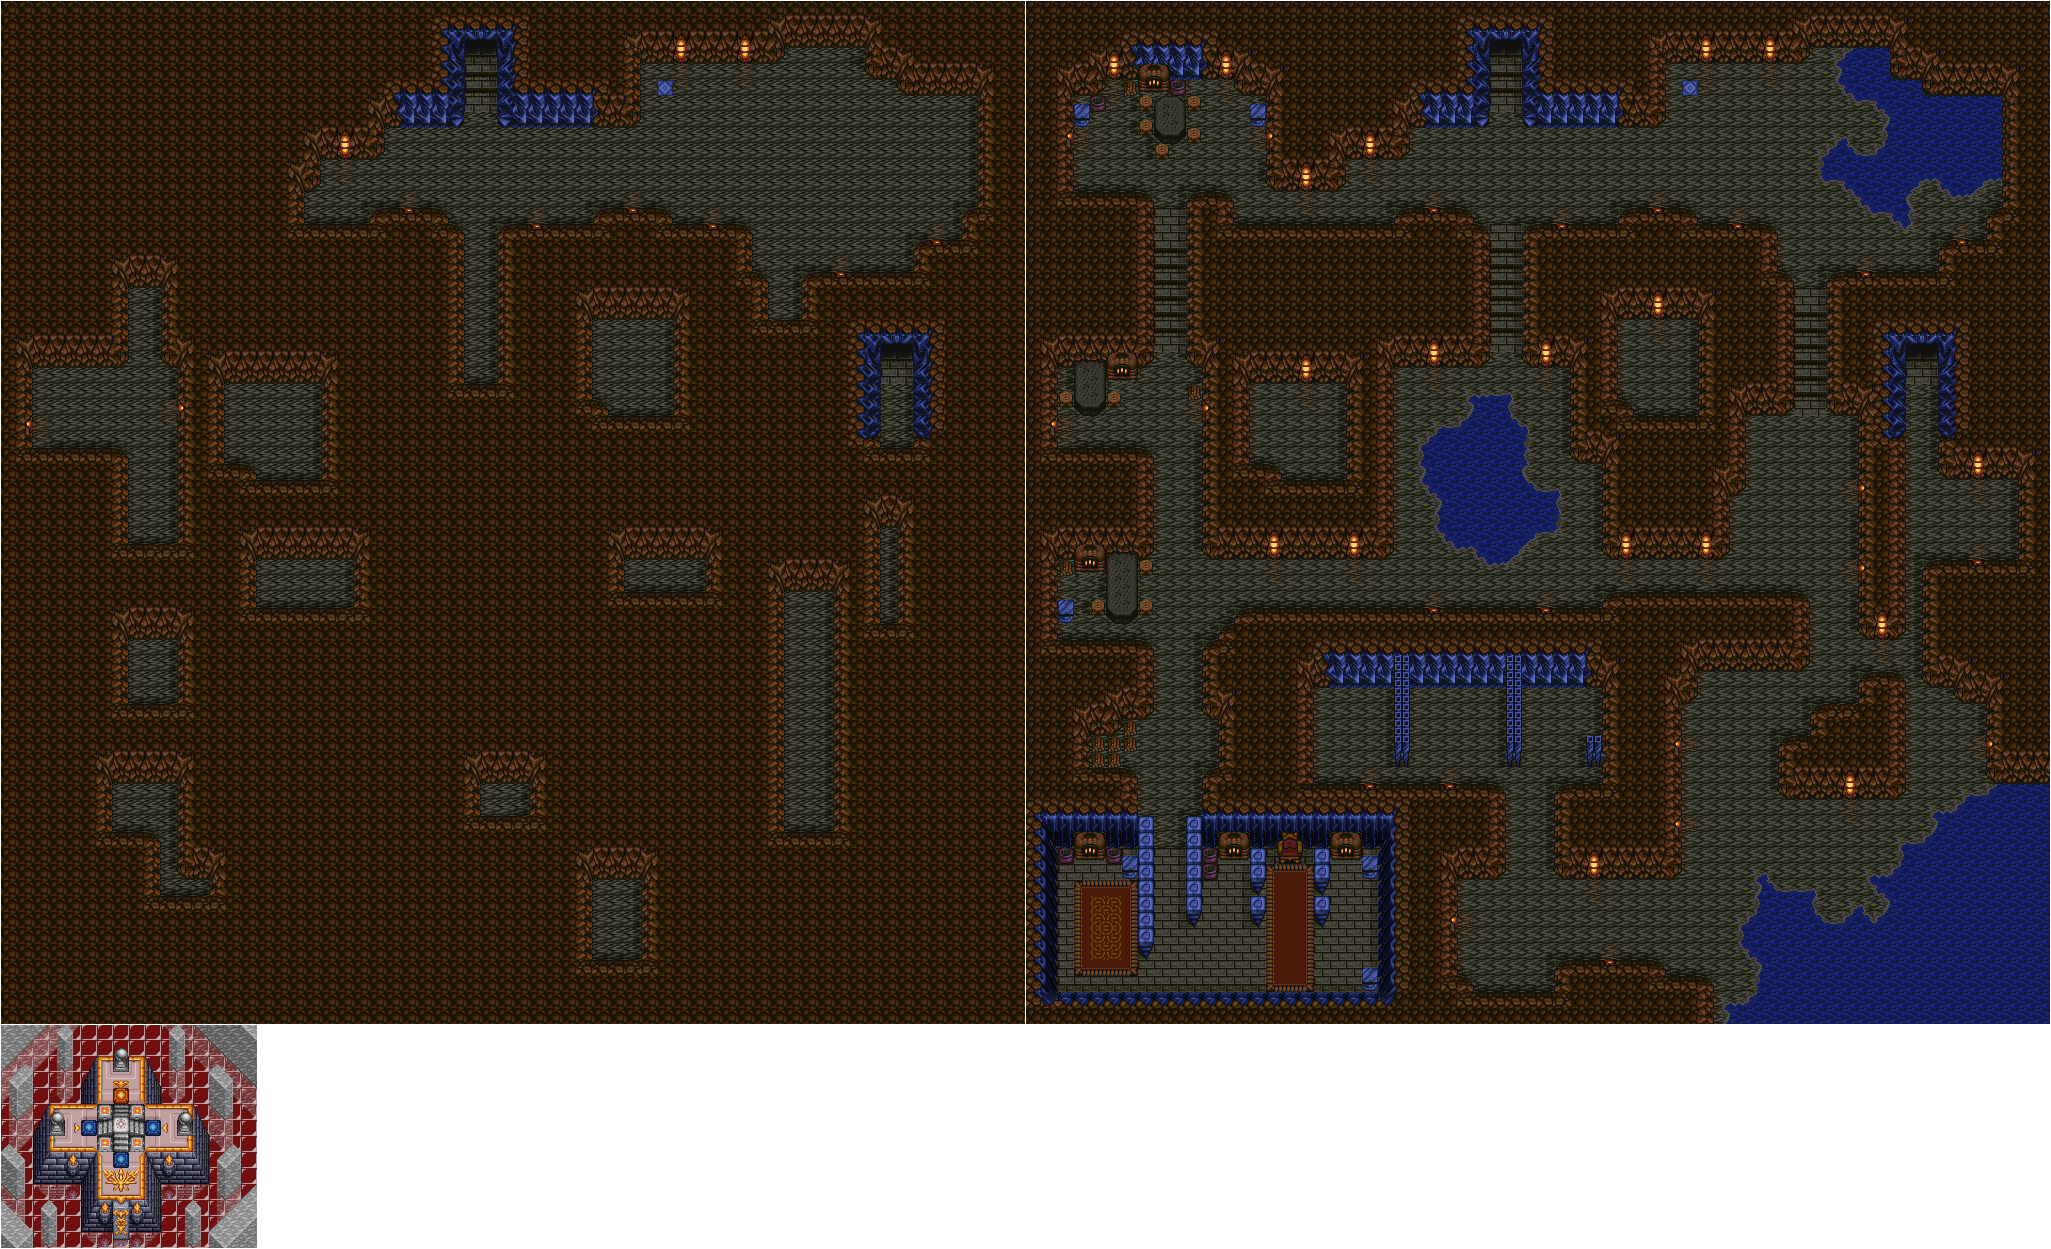
Go talk to the King. Since you have all three Red-Hot Items, he will summon the Phoenix. You will receive the Magic of Phoenix. You will then get a message from the Phoenix, who lives on the Mountain of Souls and will help you revive the world and protect the peace.
As soon as the Phoenix is called, Deathtoll's shrine will show up in space. Head back there with the Soul Blade and Soul Armor equipped, and the Phoenix will be able to help you. Be sure to equip the Magic of Phoenix, too. This is it.
Back to the World of Evil
The Magic of Phoenix is a simple firebird-shaped projectile that shoots forth whenever you swing the Soul Blade and have the magic equipped. It costs 2 gems per projectile, but you should have the Magic Bell at this point to negate that and effectively break the game.
In Deathtoll Shrine, it's just a trip to the north. You will see a cloaked figure that talks about the poor creature that repeats transmigration of the soul and cannot die before putting you in a deep sleep. This figure will then try to shoot projectiles at you.
Believe it or not, this boss is really easy. Just stand in the upper-left corner, face right and keep attacking with the Magic of Phoenix.
The boss here then talks about people believing that being constantly reincarnated means everlasting suffering, and that being alive is suffering for some creatures. It then changes into its second, real form: Deathtoll.
HCBailly plays Soul Blazer - Part 30 of 33
This is it. We face another boss, meet King Magridd, find out what's going on and take the final stone necessary for the World of Evil.
The Airship
If you talk to Lisa, she just keeps crying.
Get on the airship, equip the mobile key and plug it in at the steering wheel. Time for a boss fight.
Equip the Power Bracelet, then get to the bottom of the airship and avoid the fire. A flying creature will eventually show up. When it gets near, slash at with the sword. Your best bet is to stay at the bottom at the sides of the airship and avoid the fire, then slash at the boss when it flies on-screen.
This boss has a lot of HP, so be ready for a fight. When you get close to the end of the battle, hold out your sword with the shoulder buttons to hold the sword out and drain its HP.
When you beat this dragon-like boss, you will release King Magridd. He says he knew what was happening, and that there was nothing he could do to keep the Queen from passing away.
Go back to the steering wheel and you'll head back to Magridd Castle. Talk to Lisa, and she will thank you for staying with her after Dr. Leo passed away. She then tells you that she has seen you fighting monsters in her dreams, and has a few questions for you. When she asks if you are a real human being like her, it will not matter what you answer. She will then try to say she loves you and to say goodbye, but she knows she will cry and asks you to leave while her back is turned.
Head to the right and then take the teleporter title back to town.
Magridd Castle
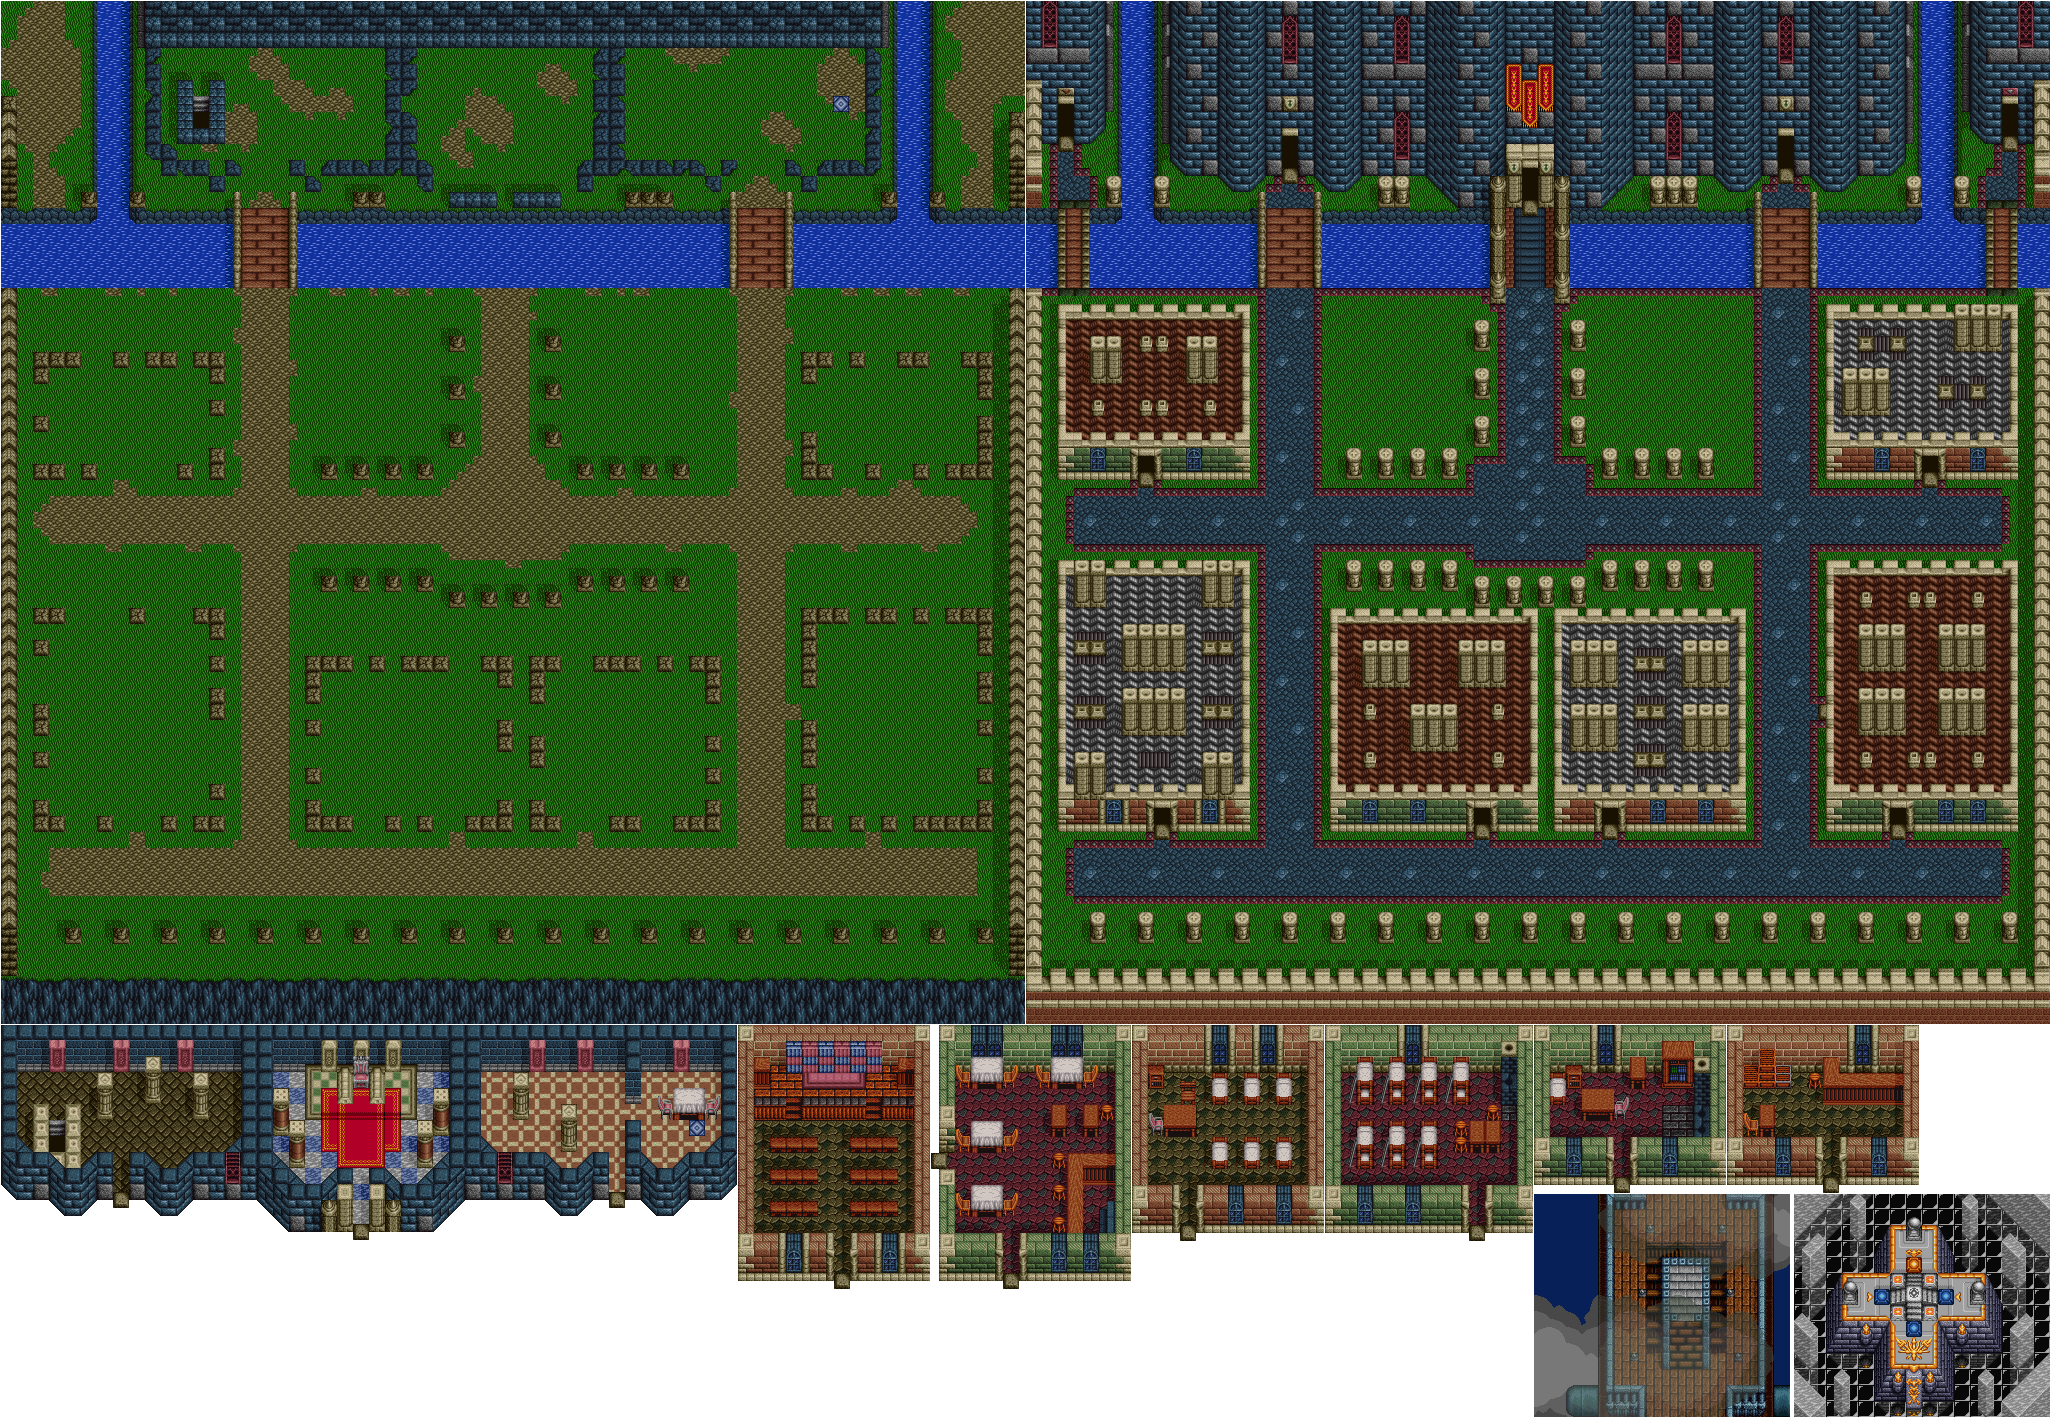
King Magridd, when you talk to him, says he has failed as a king, as he ordered people to be loyal to him and killed anyone who wasn't. He considers himself a coward for summoning Deathtoll to impress Queen Magridd, only for the Queen to be captured by her own desire and pass away. He apologizes to Dr. Leo, and gives you the black stone, saying this is all he can do for him.
Back at the Queen's house, go to where she was standing and interact with that spot to get the Super Bracelet, which increases your offense and your defense.
Before we go to the World of Evil at the very top of the map, it's time for some backtracking. To GreenWood we go!
GreenWood
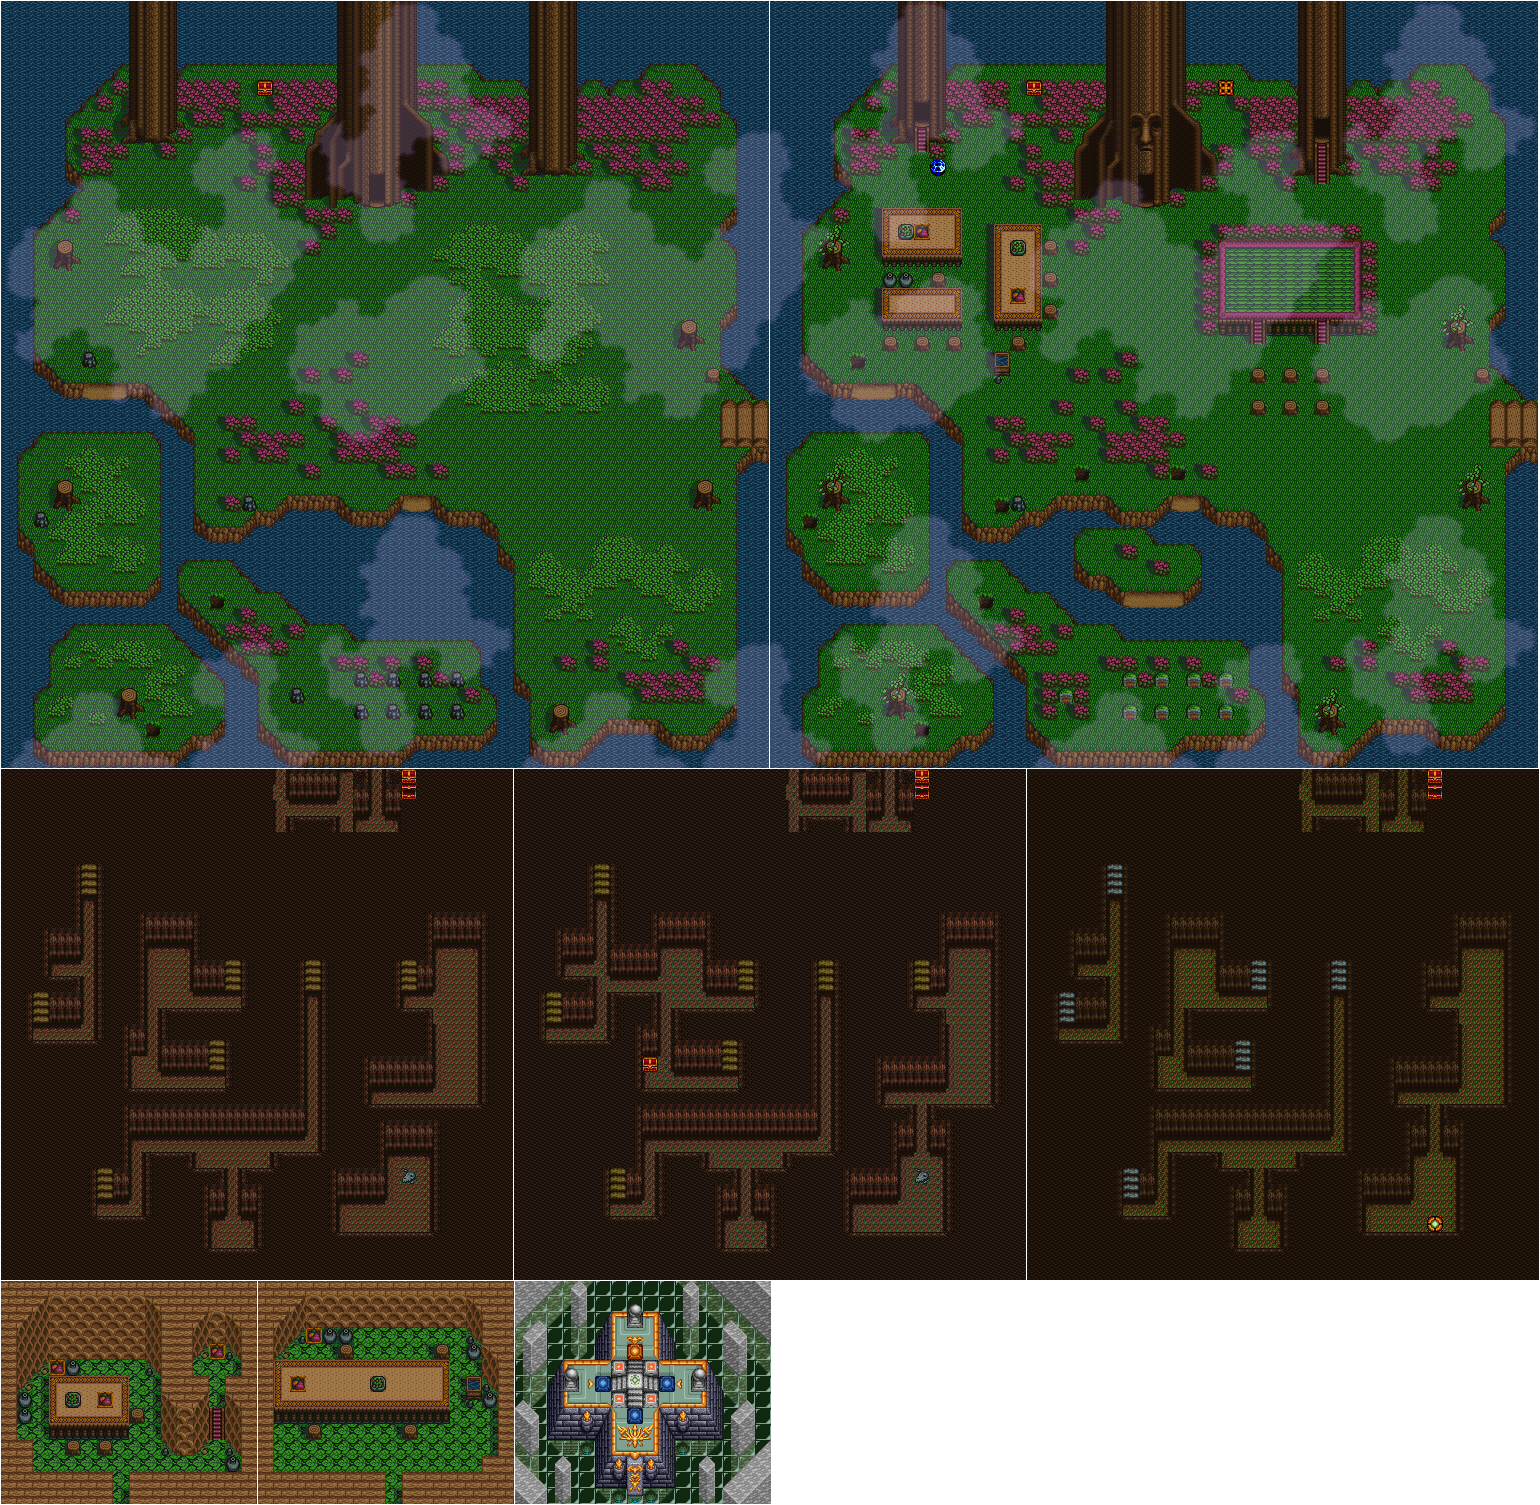
Go to the gem with the fairy once you get all the emblems.. You will get the Magic Bell, which allows you to cast magic without using any gems.
Now it's time to enter The World of Evil.
The World of Evil
When you enter the shrine, the six stones will shine and enter the nearby aurora. You will be told that you will still need the three symbols to summon the Phoenix for help.
In The World of Evil, there are a few enemies that you can destroy, such as flies that fly around and demons that can shoot energy beams at you. The statues that shoot fireballs at you cannot be destroyed.
There are no souls to free here, only areas to open up as well as a teleportation title to open up.
You can find gems here, but you should have the Magic Bell at this point.
Despite looking like they are made out of fire, the walls cannot hurt you if you touch them.
Monday, July 23, 2018
HCBailly plays Soul Blazer - Part 29 of 33
"Multipass."
Now that we have the VIP pass, it's time to head into the right tower.
Magridd Towers
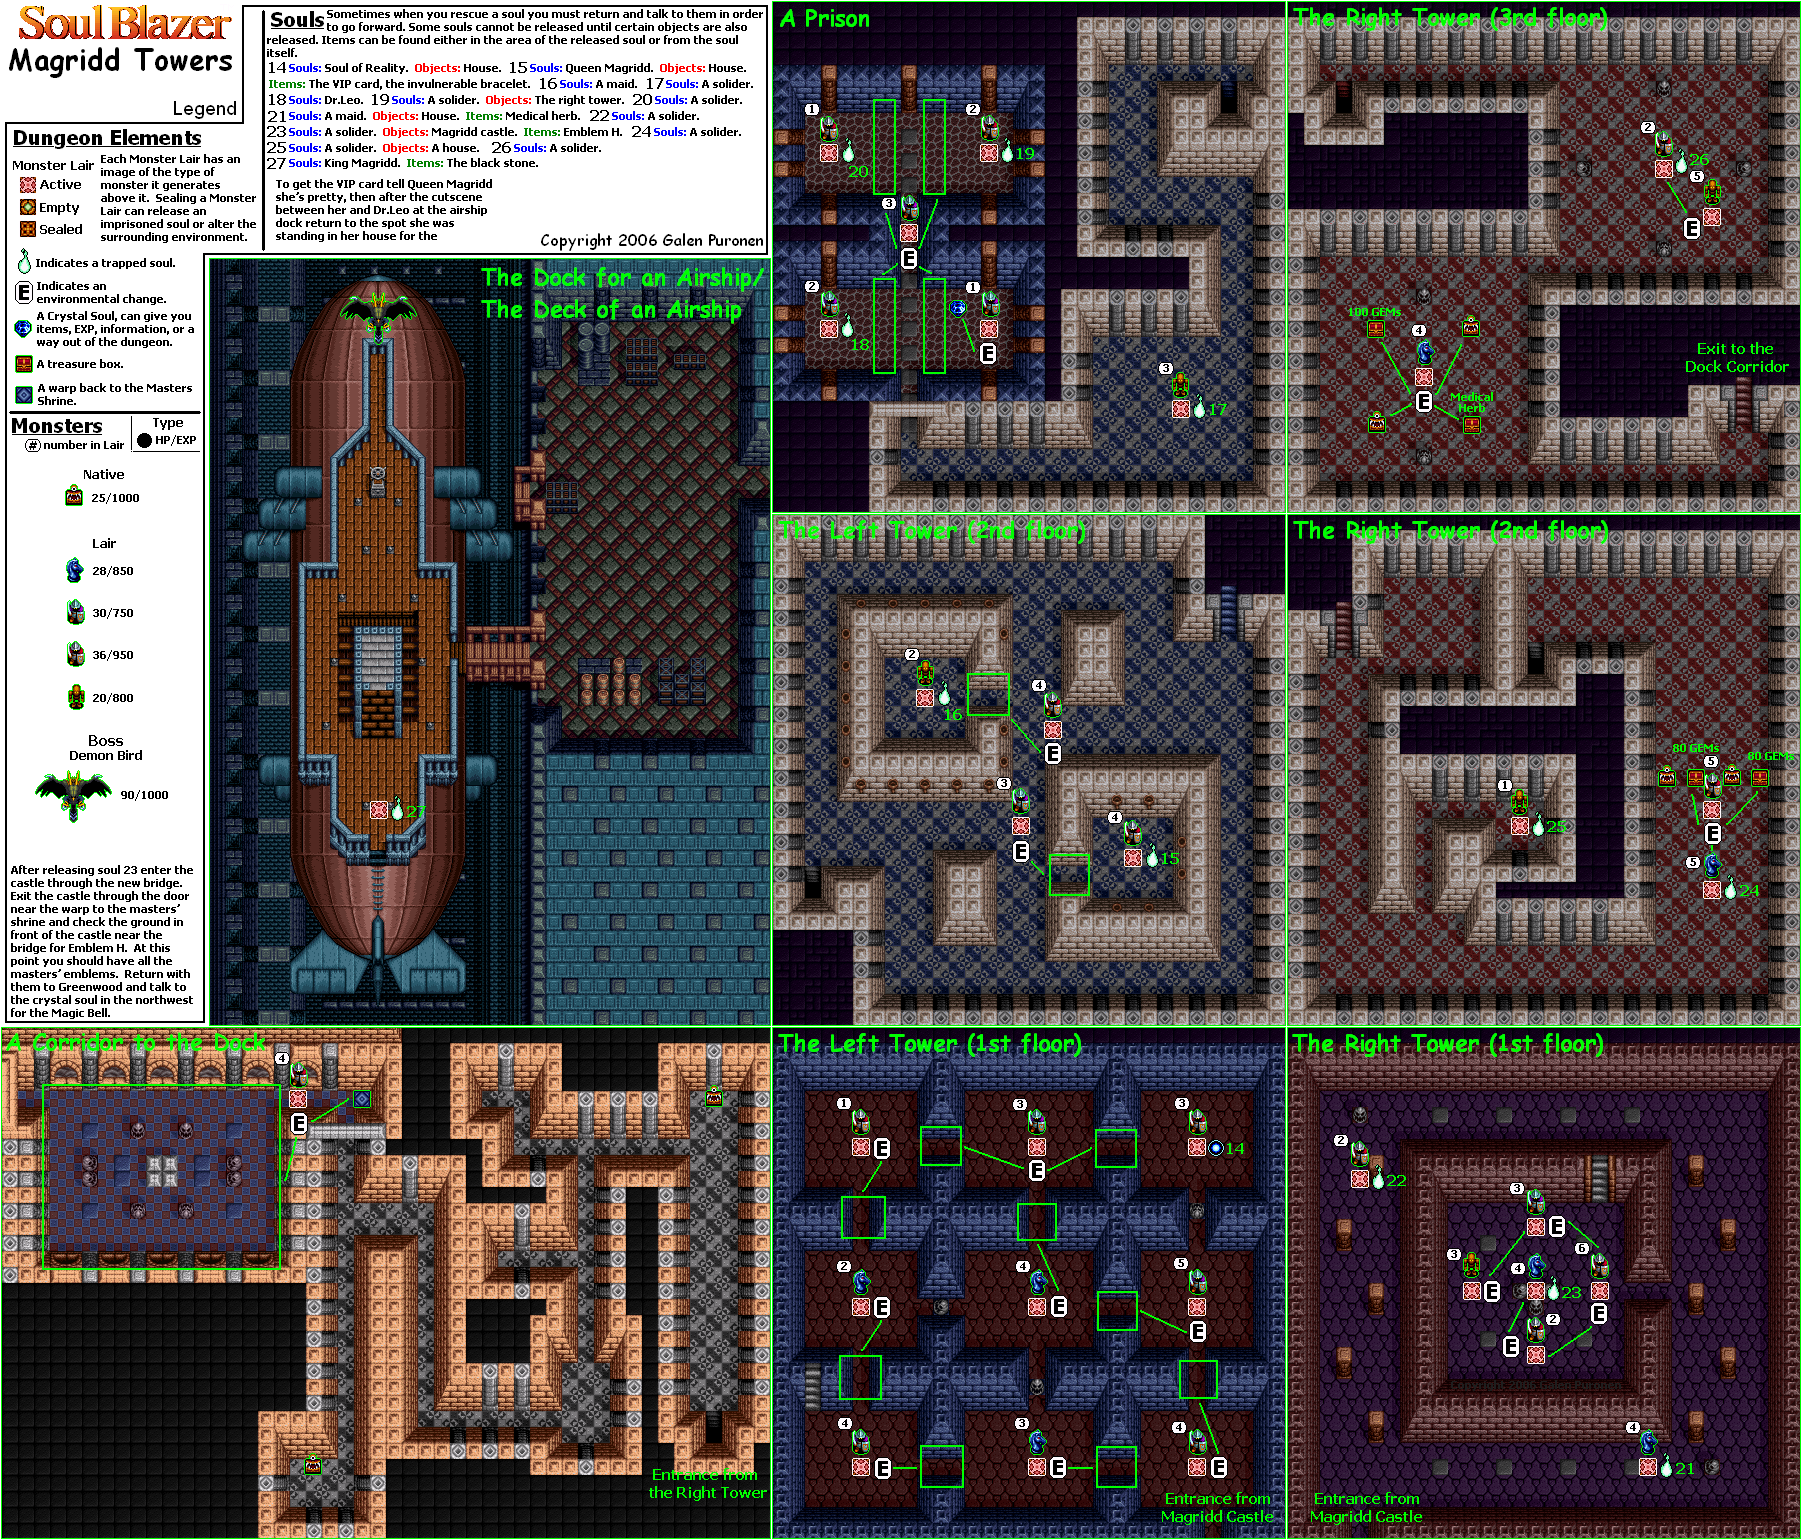
The right tower has the same enemies as the left tower.
On the first floor, you'll release the soul of another soldier, another maid (and a building) in the southeast corner of the castle grounds, and a soldier that comes with the entire castle.
The second floor brings back the Mimics. Yes, there are Mimics in this game. At least the real chests give you gems.
On the second floor, you'll release another soldier (with yet another house).
The third floor is more of the same that you've come to expect from the towers at this point.
On the third floor, you'll release another soldier near the moat. You'll also find 100 gems, a Medical Herb and two Mimics.
The fourth floor is a set of narrow corridors. At the end, you'll find a teleporter pad that takes you back to the shrine. Might as well talk to the villagers here.
Magridd Castle
You can find the Master's Emblem H to the right of the castle entrance, now that you have released it. You now have all the emblems!
The maid in the restaurant will give you a Medical Herb if you need one.
One of the soldiers you just released will tell you how to find Master's Emblem H if you haven't already. Another recently released soldier will tell you he just lost the key to the airship and cannot find it.
The soldier guarding the castle will say that if King Magridd does not come back, he will be crowned the next king. Sure you will...
Back to the Right Tower
West of the teleporter tile is the airship. Talk to Dr. Leo. He will tell you that the tones you collected are keys to opening up The World of Evil, and the origins of power for machines that beckon evil. He will tell you that King Magridd holds the last stone, and that we have to free him to get it. We must go to the World of Evil and defeat Deathtoll.
Before the airship can start, one of the nearby soldiers is killed. Queen Magridd shows up with her own personal guard and kills the other one for calling her out on destroying the world. Dr. Leo calls out Queen Magridd for her actions, says she took everything from him, and that she is dirties than evil...meaning that the King didn't do it after all. It was the Queen.
Lisa is brought out by one of the soldiers, and Queen Magridd tells Dr. Leo he still has to work for her. Dr. Leo asks for Lisa to be released, as he cannot bear to see her get hurt and because she has nothing to do with what is going on. Lisa is released, and Dr. Leo whispers to the hero to stay behind him. He then gives you the airship key, and goes willingly and quietly...almost. He sacrifices himself to kill Queen Magridd.
Dr. Leo tells the hero that he feels he was born in the wrong generation, as scientists are supposed to invent machines in order to make people happy. However, an unexpected scientist may ruin the culture. Some people thinks happiness comes quickly, but he believes happiness comes with patience. He apologizes to Lisa, and tells her he is simply going to sleep. When a scientist with his knowledge is needed, he will be back. He whispers to Lisa to not go too fast when it comes to making herself happy.
HCBailly plays Soul Blazer - Part 28 of 33
It's time to make some headway with Magridd Castle, and also do a little bit more backtracking at the same time.
Magridd Castle
Now that you have the Platinum Card, you can now enter the castle's towers. We'll be starting with the left one first.
Magridd Towers
The knights (the chess pieces) shoot out spikes. Strangely, they move around in a way similar to their respective horse head-shaped chess piece known everywhere.
The purple soldiers will swing their swords at you. The red soldiers can throw boomerangs.
On the first floor, you'll be able to release a soldier (and another building, from which they will call you and tell you that they know everything about the castle) Go talk to this soldier before you go further into the left tower, and the soldier will tell you he is from the sky, like you. He knows about all of the invisible passages in Magridd Castle. You will get the Soul of Reality, which allows you to see them.
Magridd Dungeon
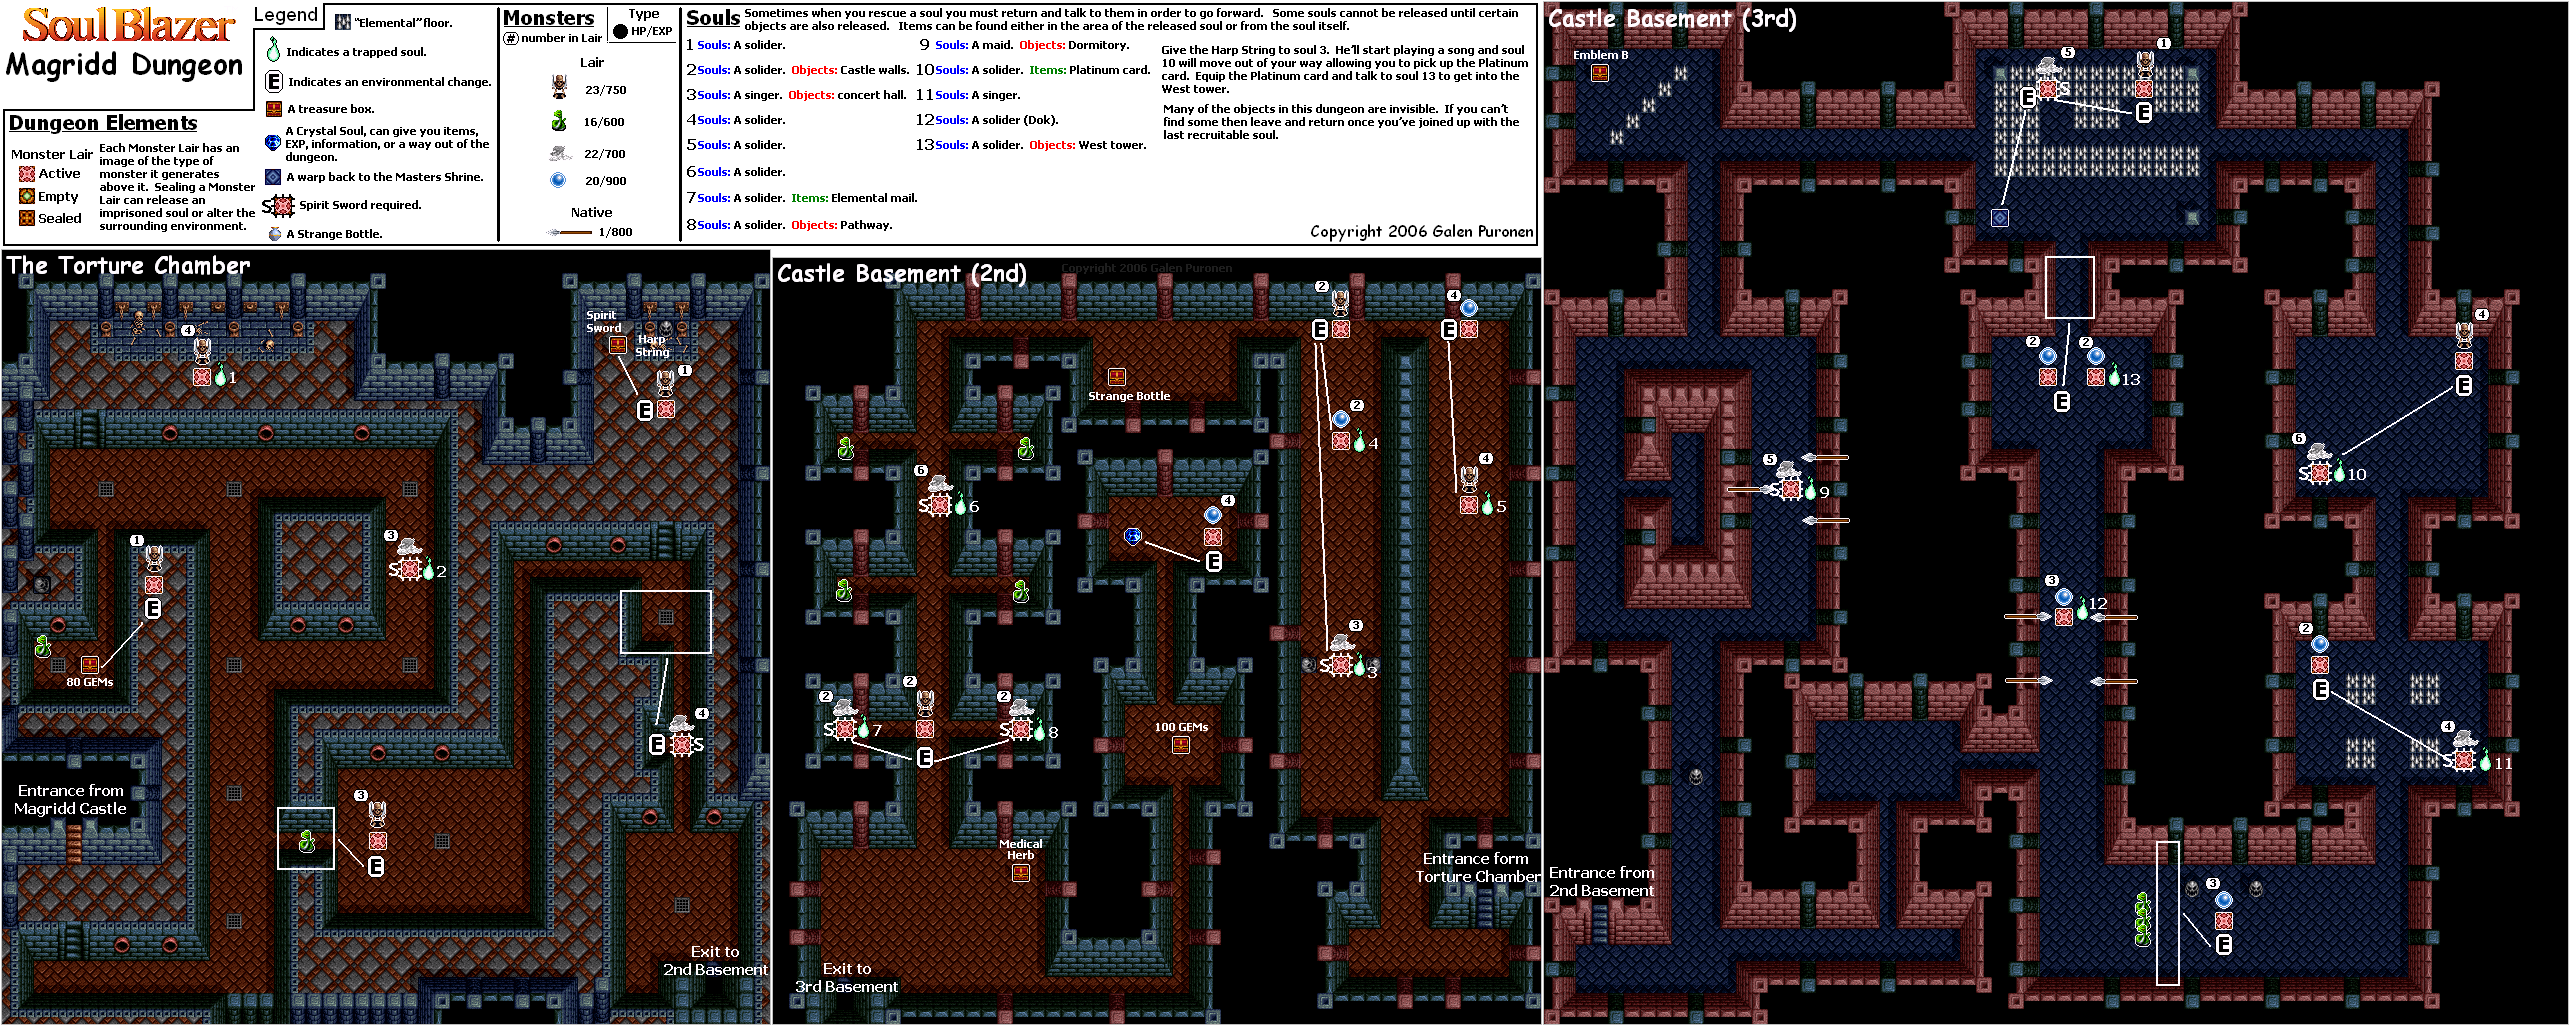
Before continuing any further, head to the third level of the dungeons. You'll be able to find Emblem B in a hidden chest.
On the second floor, near the entrance to the third floor, you'll be able to find a chest containing 100 gems. North of that is a hidden passage leading to one more monster lair. This releases a gem that tells you about the Zantetsu and Spirit Swords and where they are located.
You will be able to use the Recovery Sword at Level 22. This sword allows you to restore health as you defeat enemies At Level 22, your health bar changes to a light blue. This means you have more than 50 HP. You will get a new color for every 10 HP you reach on your maximum HP.
Back to the Left Tower
On the second floor, you'll need the Soul of Reality to get to the monster lairs.
Here, you'll be able to release the Queen and the building she is in. If you come back and talk to her, she will give you a gift. You'll also release a maid in the theater.
On the third floor is the prison. The robots can be easily destroyed. Here, you'll release a soldier in the dormitory, Dr. Leo on the airship (who also asks you to release the two soldiers who promised to come with him), a gem, one of the soldiers that promised to come with Dr. Leo, and another soldier guarding the right tower, which conveniently comes with him. Finally, we've freed Dr. Leo! At last!
Be sure to destroy all the enemies near the bridge before touching the monster lair that gets rid of it.
Back to the Castle
When you talk to the guard at the right tower, he will tell you that the tower is connected to the airship's dock at the top floor. To get up there, however, you will need a VIP card. To get it, talk to the queen. When she asks if you think she is pretty, say yes. She will give you the VIP card.
The soldier at the dormitory will tell you the maid was just removing dirt from her eye. The maid will say the same thing.
The maid at the theater just talks about how she finds music weird.
Sunday, July 22, 2018
HCBailly plays Soul Blazer - Part 27 of 33
After heading to GreenWood for an important treasure item, it's back to the castle.
Light Shrine
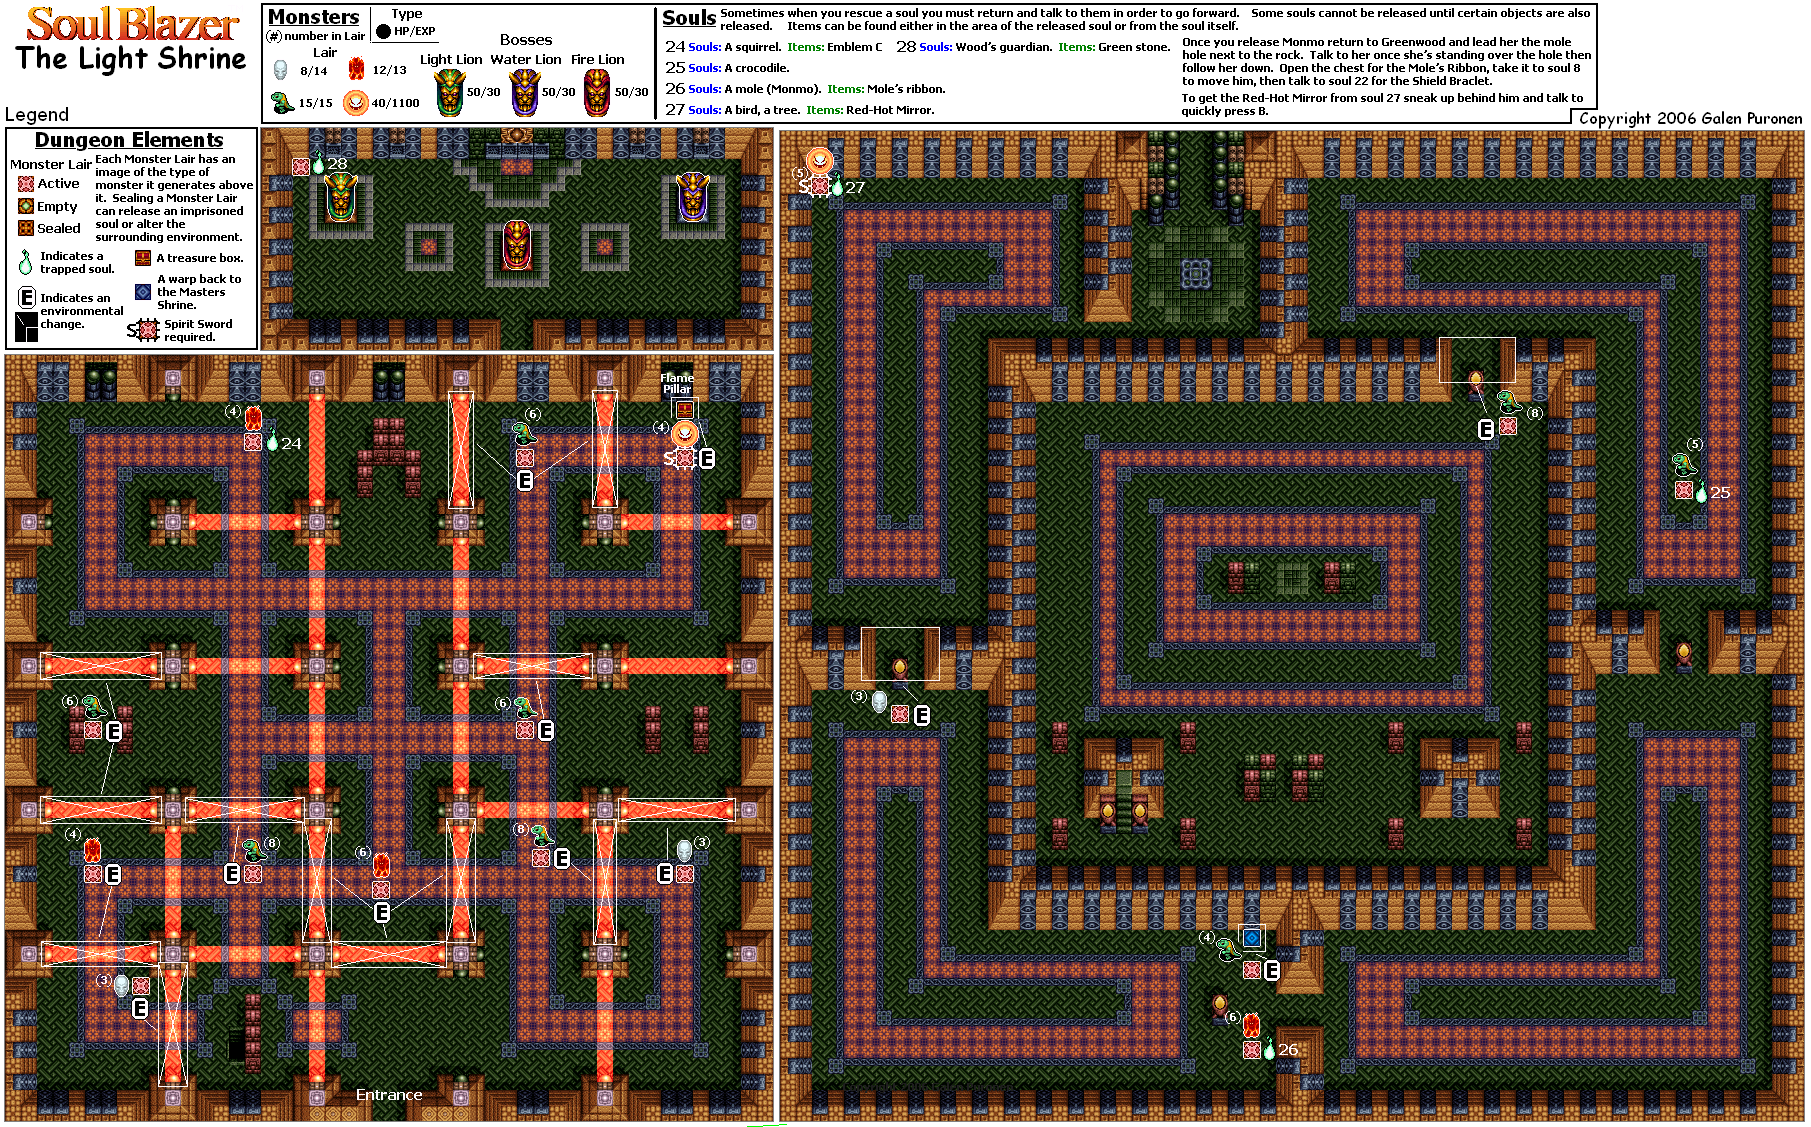
Head back to the Light Shrine. Now that you have the Spirit Sword, you can kill off the circle-shaped spirits that bounce around the walls in the dark areas. Be sure to equip the Light Armor, as it keeps those enemies from damaging you. Thanks to the Spirit Sword, you should be able to destroy these things in just a few hits.
By killing these things, you should be able to release the soul of another bird in GreenWood in the dark basement. If you try to talk to it, it will fly away. Approach it from behind instead. You'll get the Red-Hot Mirror, which you'll need to release the Phoenix.
Killing all those spirits with the Spirit Sword in the maze area will award you with the Flame Pillar, yet another spell you can cast. This spell makes four pillars of fire rise around you, and can do quite a bit of damage.
That's all for GreenWood. Time to head back to Magridd Castle and go to the third floor of the Magridd Dungeon.
Magridd Dungeon
The third basement floor introduces spears that jut in and out of the walls. Keep away from them as you take on the enemies.
Here, you'll be able to release the soul of a maid (and another building along with her), a teleporter tile that takes you back to the shrine, another soldier near where the singer is, another singer in the southeast corner of the Magridd Castle overworld, another soldier who will tell you that Dr. Leo is in the prison of the left tower, yet another soldier that comes with a tower on the west side as well as a bridge.
Magridd Castle
Head back to the tower to the west that you just released. This leads to the prison that you were just told about, and if you do not bear a Platinum Card, you are not allowed entry.
The soldier in the theater you just released in the opera house, you'll find the Platinum Card, but you cannot get it. Talk to the singer in the opera house to get him to sing, then that soldier will move. Interact with the spot where the soldier was standing, and you will get the Platinum Card.
The maid that you just released is in the soldiers' dormitory, which you have just released along with her. She is taking care of them.
The singer in the southeast corner of the Magridd Castle ground will tell you a friend who defied King Magridd and tried to save Dr. Leo. That friend was taken to the torture room in the first basement of the castle, and never came back. He then tells you of a harp string received from this friend, which allows for the playing of great music.
HCBailly plays Soul Blazer - Part 26 of 33
We start our adventure in the Magridd Castle in this entry!
.png)
There is nothing more to do in Dr. Leo's Laboratory, so it's time to go to Magridd Castle. Don't forget to save.
Magridd Castle is in the northeast corner of the overworld map.
Magridd Castle
There's not much of anything here. Time to head down the stairway to the west.
Magridd Dungeon
The piles of bones are skeletons who will come to life when you get close. Keep swinging as soon as they get up. (The piles of bones would later be used in Illusion of Gaia.)
The snakes will lunge back and forth, but you should be able to take care of them easily. The snakes are not part of monsters and will re-spawn.
You'll be releasing the soul of a soldier near the entrance in the overworld who will you that there are many ghosts in the torture room. He'll ask you to first look for the Spirit Sword. Thankfully, it's just to the east of where you released him from. Hope you're Level 19. Equip it, and you'll be able to take out the ghosts that fly around. Sometimes they will disappear when you try to hit them. If they do, they'll reappear nearby.
There are some stones with scary faces that will shoot fireballs at you.
Interact with the skeleton near the Spirit Sword to find a harp string.
You'll also release the soul of another soldier on the roads of the Magridd Castle grounds.
Taking the stairs in the southeast corner of the dungeon leads you further into the dungeon. The glowing balls can easily be destroyed with Light Arrow.
When you enter, there will be a monster lair that releases a soldier. However, the game will tell you that the solider cannot be recalled. You will have to release a certain building first in order to get that soldier back, and until then, the soldier is in the form of a spirit. There is one you can release from the lair to the left, however. To the south of that is the soul of a singer, which also releases a theater, which in turn will allow you to release the soldier. This singer will tell you that they cannot play harp without harp strings.
You'll also release two soldiers near the moat as you are in the basement. One of them will tell you there are many thorns in the basement, and if you free the soldier right in front of where he was captured, you will be able to get the Elemental Mail.
You'll also be able to release a soldier lying on the ground, as well as another soldier who comes with a well-paved road.
On the lower-left corner of the second level is the third level. But we have other things to do.
Back to the Castle Grounds
One of the soldiers will tell you that his uncle is the architect Gaudi. He knows a few things about architecture and will show you something later.
The soldier lying on the ground is sleeping. Use the Dream Rod on him to go to the Dream World. Here, you'll see a conversation between Dr. Leo and a soldier, where Dr. Leo says he has been haunted by a monster called "research" that kept him from paying attention to his wife and daughter. He was able to invent things, only to invent something that was evil and summoned Deathtoll. It was then that he realized that tools are built to make peoples' lives easier. However, when tools start to use people, their culture declines and they become unhappy. When he heads to the World of Evil, Deathtoll will be called, and he does not want to believe that this beautiful world will be destroyed.
Dr. Leo asks to be let off the airship somewhere. The soldier admits that Dr. Leo may be right, but he has to carry out his orders and make sure he is taken to the castle and not allowed to escape. He must think of only the present, not tomorrow, and he must do his job or be punished. He asks Dr. Leo to understand this.
When the soldier wakes up, he says that he has had the same dream as Dr. Leo. If he had releaed Dr. Leo, the world would not be in the shape that it is in right now. He does not know who to obey anymore. He then tells you about the thorns in the basement and gives you the Elemental Mail. Be sure to equip it.
The soldier in the theater will tell you that one of the soldiers betrayed the King and is trying to escape with Dr. Leo. Since you have the harp string, talk to the singer with it equipped and he will tell you about a girl who took care of him in the Grass Valley Highlands: Lisa. He never told her his true feelings for her, however. You then get some music.
The two soldiers near the moat are more or less forced to say King Magridd is the greatest man in the world, or else they will be punished.
Saturday, July 21, 2018
HCBailly plays Soul Blazer - Part 25 of 33
We're just about finished tying up some loose ends in Dr. Leo's lab. After this, Magridd's Castle is the only place left to go...
Dr. Leo's Laboratory

The plant in the bedroom will tell you it is an Actinidia, and allows you to take some of its leaves. You'll receive some Actinidia leaves. These leaves emit a special scent that attract cats.
The cat in the attic says the room belongs to a doll named Marie who told it a lot of things about foreign towns, and that a girl named Lisa took care of Marie.
The chest of drawers in the attic will ask you to store Medical Herbs in the drawer. If you do, the chest will be happy.
Use the Actinidia leaves to attract the cats in the lab out of the room. If you talk to the cats after this, they'll say the smell is pleasant. From there, you can talk to the mouse and enter the hole, this allows you to talk to the mice in the one area you couldn't get to earlier. One of the mice will give you the Magic of Spark Bomb, which works like Magic Flair in the form of four mines you can lay on the ground. The other two mice don't say anything else, but if you leave through the hole on the right side of the mouse hole, you'll be able to talk to a plant that can give you a Medical Herb.
The stairway leading downwards that was released in the second set of town models leads to the Power Plant.
Power Plant
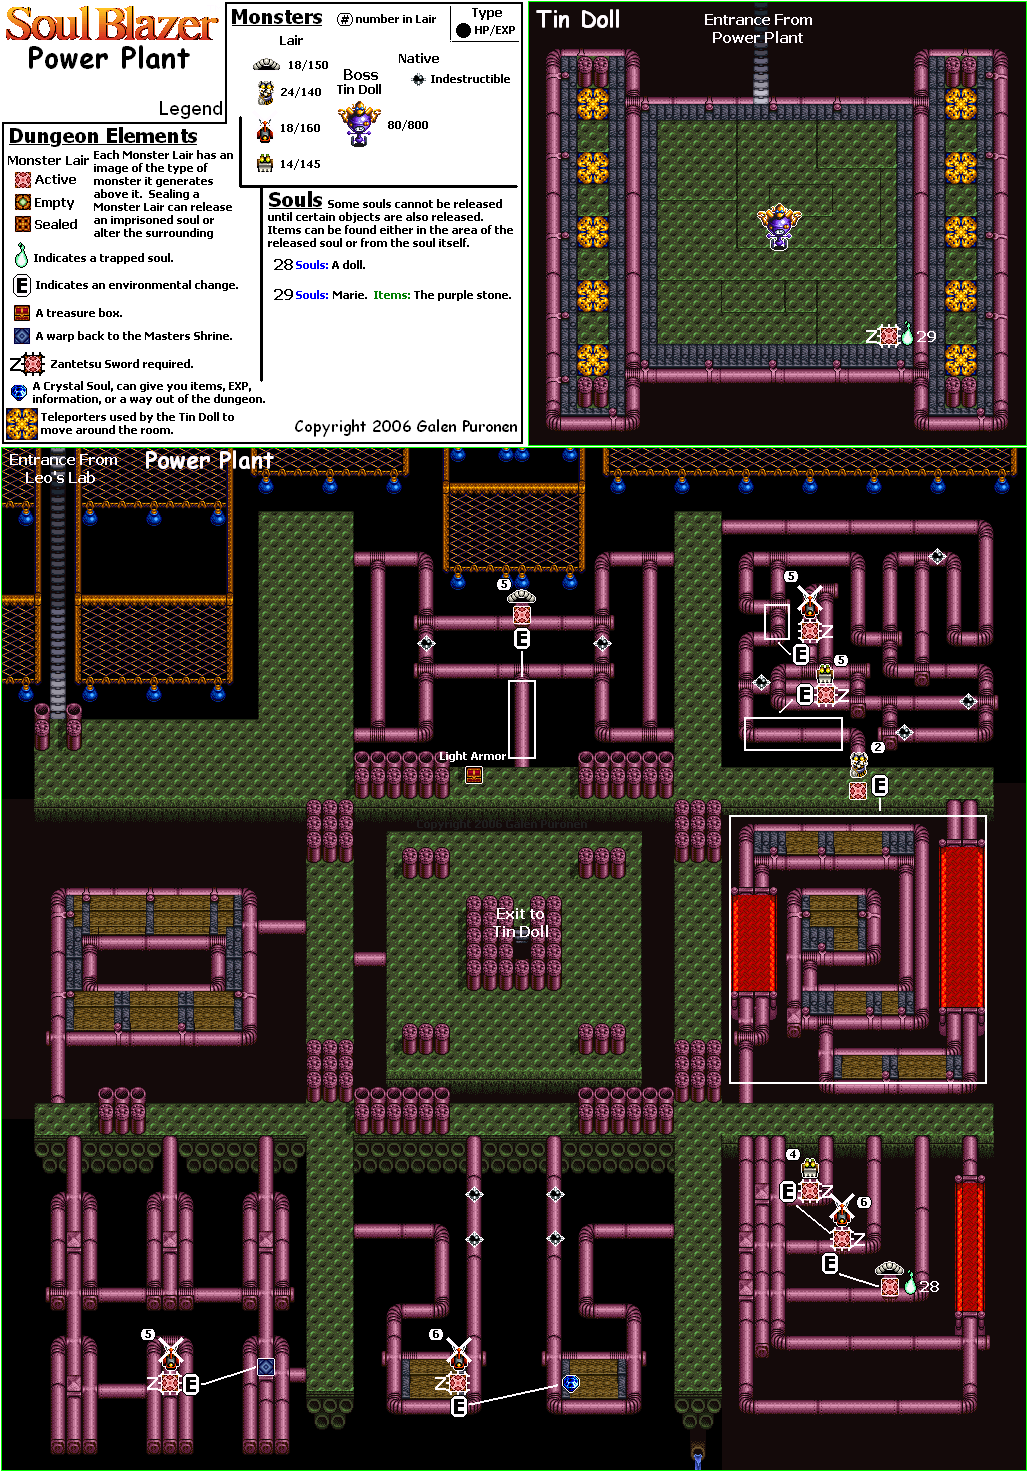
This place looks much like the basement, but you now have a few added obstacles. There are spiked balls that will circle around the pipes in certain parts of the pipe mazes. Wait for them to go under the pipe before moving forward.
The Light Armor can be found at the beginning. Be sure to equip it. You'll still need the Ice Armor for the "lava" areas, though.
You'll be able to release the soul of a doll in the "church" room as well as another gem that will give you teleportation back to the lab as well as some experience points. You'll also be able to reveal another teleportation panel back to the shrine.
The stairway leading downward leads to the boss. The boss here is the Tin Doll, which will shoot rockets, shoot out fireballs, move really fast and run quickly to a nearby teleporter. When you see it, quickly destroy it with your sword. When it heads to the teleporters to the side, this is your cue to anticipate where it is going to go.
Back To The Laboratory
When you beat the Tin Doll, you will release Marie. Marie will give you a Purple Stone when you talk to her. Marie will tell you there will be no revival of the world until Deathtoll is destroyed, and that the Purple Stone will grant you enter to Magridd Castle, where Dr. Leo is being held.
If you talk to the doll in the "church" room, the doll will tell you about the machines that Dr. Leo made.
HCBailly plays Soul Blazer - Part 24 of 33
Time to go through the other set of models so we can finally uncover what it is that's shooting things at us.
Town Models
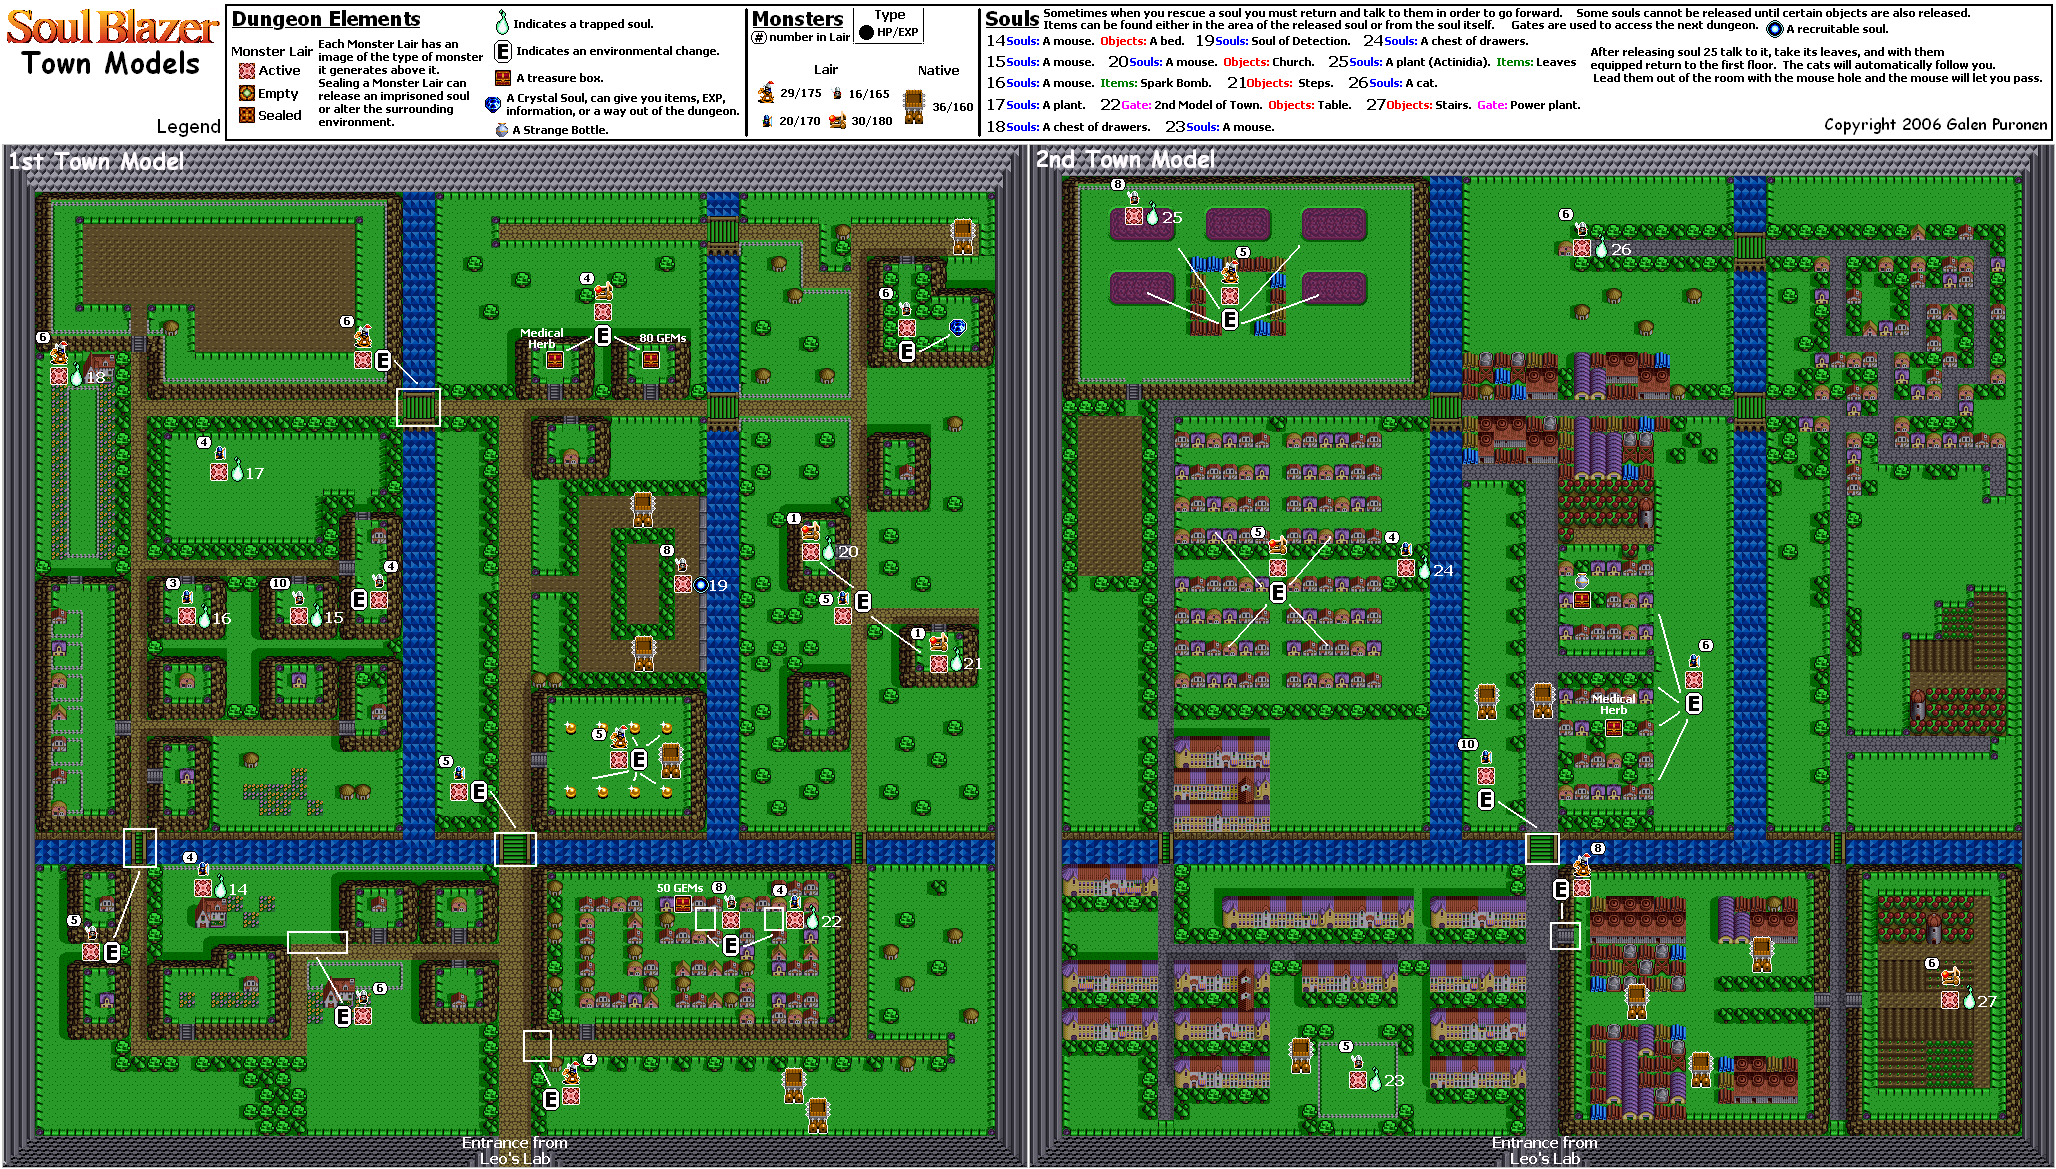
The monster lair near the eight houses will replace the eight houses with gems when stepped on, giving you some much needed ammo for your magic.
You'll need to use the Light Arrow magic to get rid of the enemies trapped around the houses. Taking these enemies down will give you a chest with 50 gems and also reveal another town model that you'll have to explore.
Dr. Leo's Laboratory
The mouse in the bedroom north of the town models will tell you to use magic to take out enemies you cannot reach, which is advice you already know. The stairs in this area lead to an unfinished looking room that serves as an attic.
The mouse in the room that looks like the inside of a church is a literal church mouse. Talk to this mouse, and the mouse will move out of the way, telling you that if you stand there, you will be purified. If you stand there and interact with the statue there, you will be healed.
The drawer in the teleporter tile room will start jumping around if you talk to it. Thankfully, it is only exercising because its back hurts.
The plant close to the dining room door will tell you that if you can get the Soul of the Great Door, you will be able to see the invisible catapult enemies in the town models. It also tells you to listen to what the cat on the dining room table says.
Back on the second floor, talk to the door that leads to the "church" room. This door will give you the Soul of Detection, which allows you to see the invisible catapult enemies in the town model areas. That's good, because it's time to go to the town model on the right, which hasn't been explored yet.
Town Models
Posting the maps again, because the first one is the one on the left and the second one is the one on the right. For this one, follow the map on the right.
The Soul of Detection has a slightly trippy distortion effect to it. If you see any catapult enemies in the immediate vicinity, the Soul of Detection will reveal it. The Soul of Distortion will also reveal guard towers. Well, that explains why we were being shot at with spikes. (The sudden explosions were by the catapults.)
As you go through the second set of town models, you'll be clearing out quite a bit of the "town" to uncover more monster lairs, a Medical Herb and even a Strange Bottle.
You'll release the soul of a mouse in the basement (in a spot you can't access...yet), a plant in the bedroom, a chest of drawers in the unfinished attic, a cat in the attic and a set of steps in the teleporter tile room leading into the basement.
Friday, July 20, 2018
HCBailly plays Soul Blazer - Part 23 of 33
I told you that town model would come into play quickly...
Dr. Leo's Laboratory
The cats will tell you that there is a second floor and an attic.
The plant will tell you that Dr. Leo's room is on the second floor, and that there are two town models inside. Many creatures were swallowed into the models. To the north of the plant is a rat, who will ask you to get the cats out of the room so it can move outside.
The door to the left of the cats is locked. You will need a key from the basement in order to open it. Thankfully, we have it. Just walk away and then walk back into the door with the key equipped to open it.
The cat on the dining room table will tell you that there are some very talkative doors in the house, and that you should talk to all of them. The dining room chest of drawers contains the Mystic Armor, which gives you longer post-hit invincibility when damaged by enemies. Also, if you push the drawers to the left by walking into it from the right, you will receive Master's Emblem G.
Upstairs is the second floor. Walk into the town model to enter it.
Town Models
The rocking horse knights will charge at you when they see you.
The tiny blue soldiers will shoot at you with bows and arrows.
The tiny white soldiers will strike at you with swords, and are very fast.
You'll be able to release the soul of another mouse (and a bed), a chest of drawers near the teleporter tile, two mice in the attic, a plant in the dining room, a mouse in what looks like a chapel that also gets released with it, a great door leading into the chapel, and steps in a bedroom near the mouse and the bed you will also release here.
The great door will tell you that it can see catapults attacking you. These are the invisible enemies you will see in the model town area. Use your Light Arrow magic to take down the invisible enemies from a distance.
Thursday, July 19, 2018
HCBailly plays Soul Blazer - Part 22 of 33
Now that the backtracking is done, it's time to really get down to the nitty-gritty and travel through Dr. Leo's lab proper.
Laboratory Basement
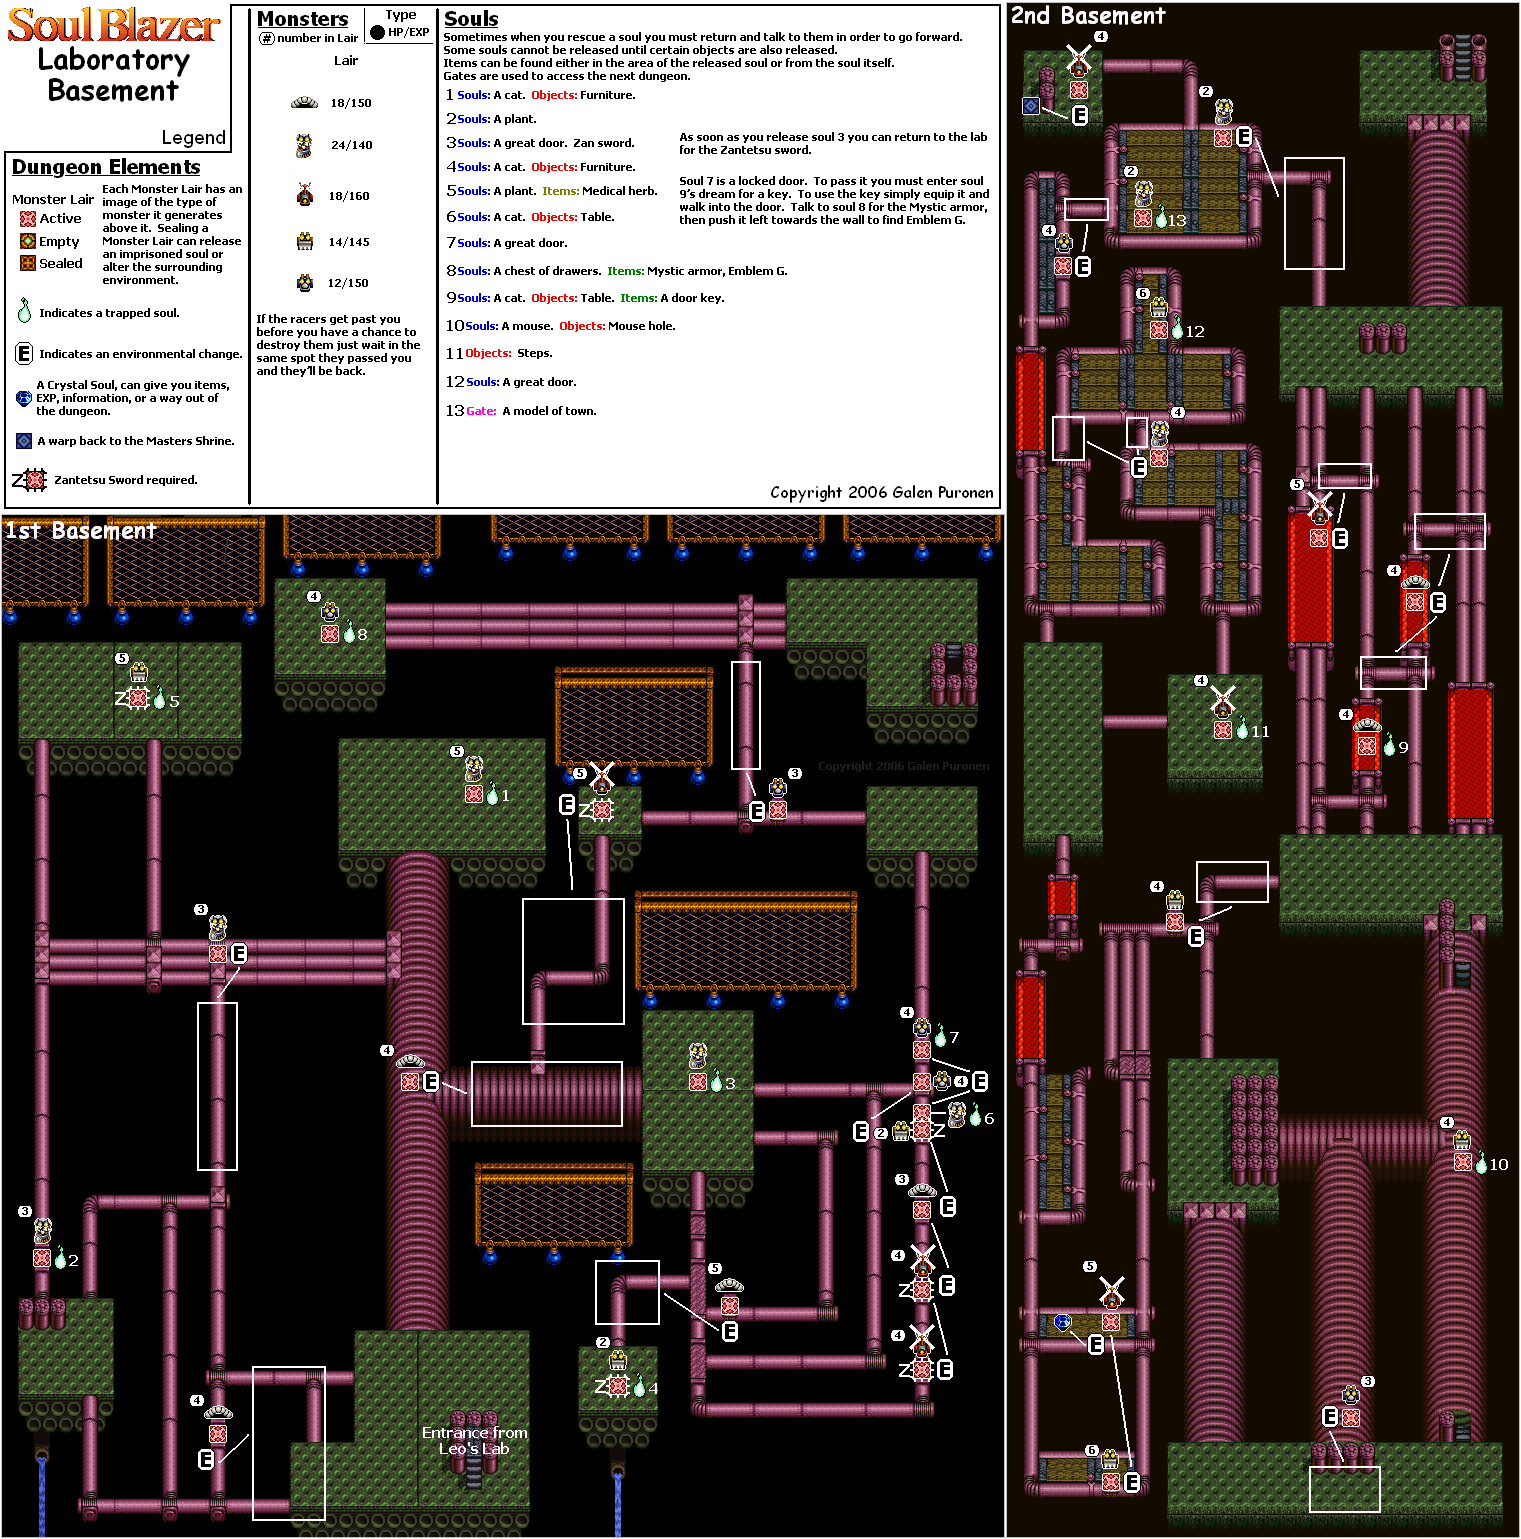
We have more things to release in the basement: the soul of a cat in the lab, a dining room table with a cat on it, a great door leading to said dining room, a chest of drawers in the dining room.
As you go through this area, you'll be making your way through - and revealing paths for - a maze-like system of pipes you'll be walking across. At least you can't fall off the edges and down into the background.
At the northeast corner is a set of stairs going lower. If the robot maids to the west don't show up, just go down the stairs, go back up and head west. They'll show up again.
Apparently the bulldozer enemies can travel over pits to get to you.
Use the Ice Armor to get past the hot areas that will drain your health. Yes, those fiery areas from the Fire Shrine return in the downstairs area, where you can release the soul of a sleeping cat (along with chairs and a table), and a mouse in the lab.
Not gonna lie, the translucent effect your character has when in the tunnels is pretty nice. You'll need to travel through them to open up a path further into the downstairs area.
You'll eventually release a blue gem that will give you experience and teleport you back upstairs, another great door, as well as some stairs that will take you to the attic of Dr. Leo's house. You'll also release the soul of a town model, which will come into play a little bit later. Also, you'll be able to take a teleporter back to the shrine.
8:17 - Oh hey, it's Beetlejuice.
Dr. Leo's Laboratory
The door in the attic leads to the town model. Don't touch the model yet.
Use the Dream Rod on the sleeping cat. You'll see Dr. Leo for the first time, as well as what happened when one of King Magridd's guards came to his laboratory and summoned him. Dr. Leo knows what evil is behind the King's decision, but the guards do not care and will only do what King Magridd tells them to do. We also find out that Dr. Leo's daughter Lisa is involved in this somewhat, most likely as a hostage.
When the cat wakes up, the cat will tell you that it was hiding under a table the whole time, and gives you a door key.
HCBailly plays Soul Blazer - Part 21 of 33
Backtracking time!
Grass Valley Highlands
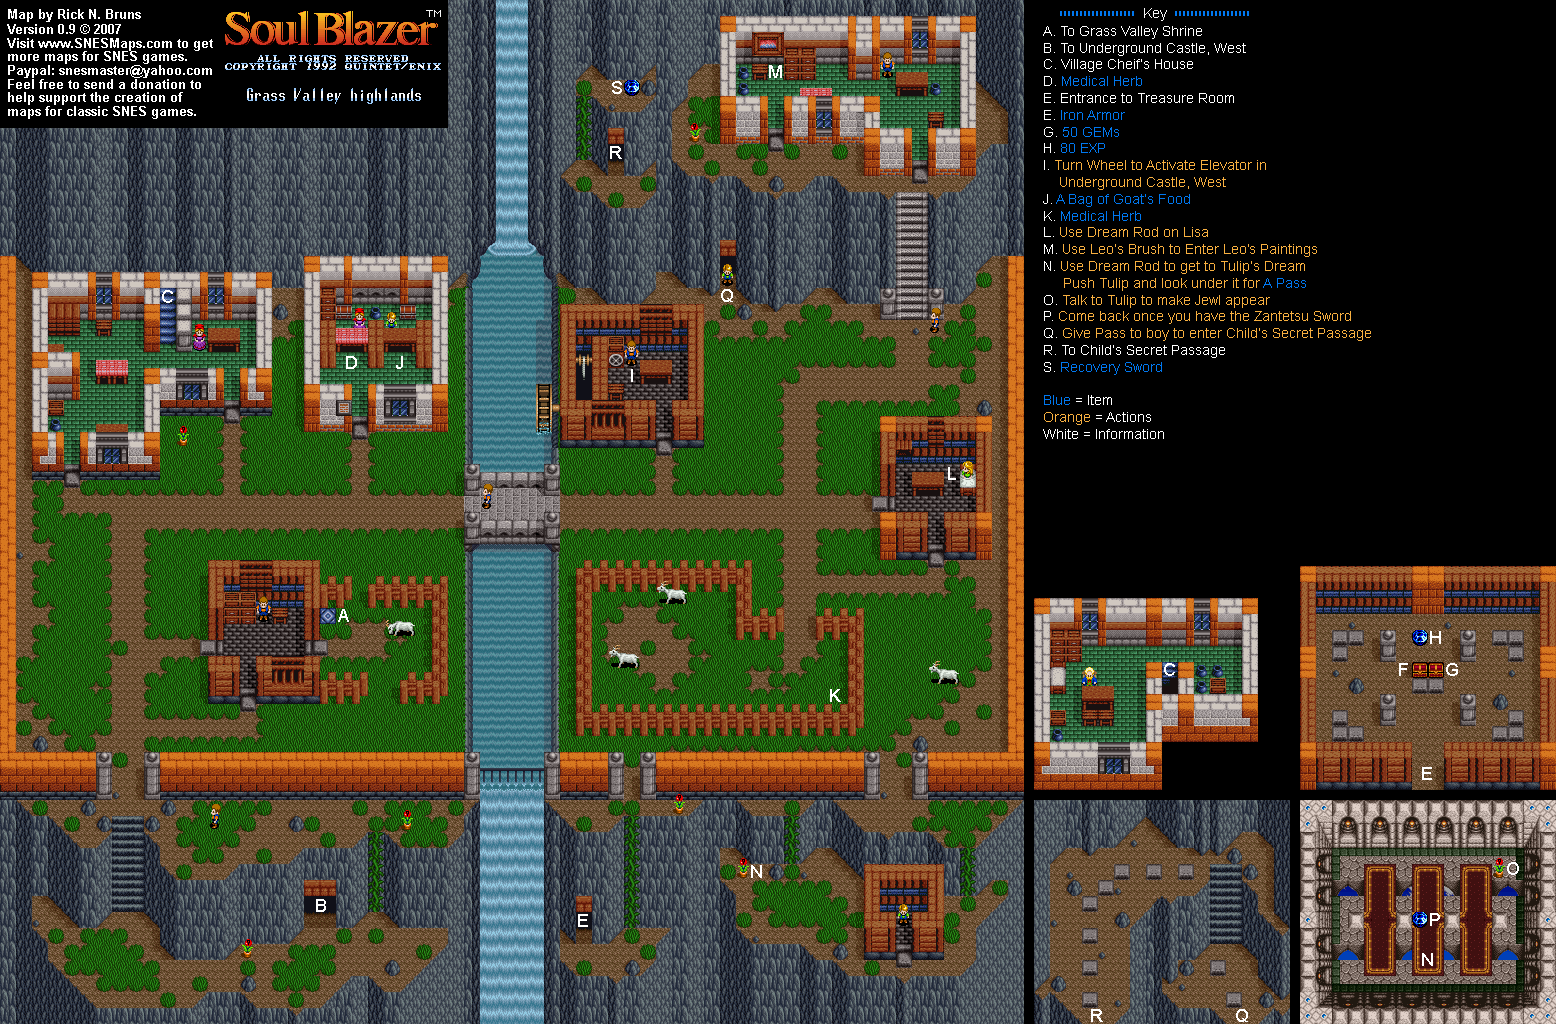
The gem that we managed to reveal the path to in the last entry will give you the Recover Sword, which drains health from your enemy.
There is also a Strange Bottle along the path to the gem. Be sure to pick it up.
Also, the vine that didn't seem to lead to much led to something after all. At the left-most end of the cliff behind the brick wall is Master's Emblem A.
The backtracking isn't done yet. Time to head back to GreenWood and head to the Fire Shrine!
Fire Shrine
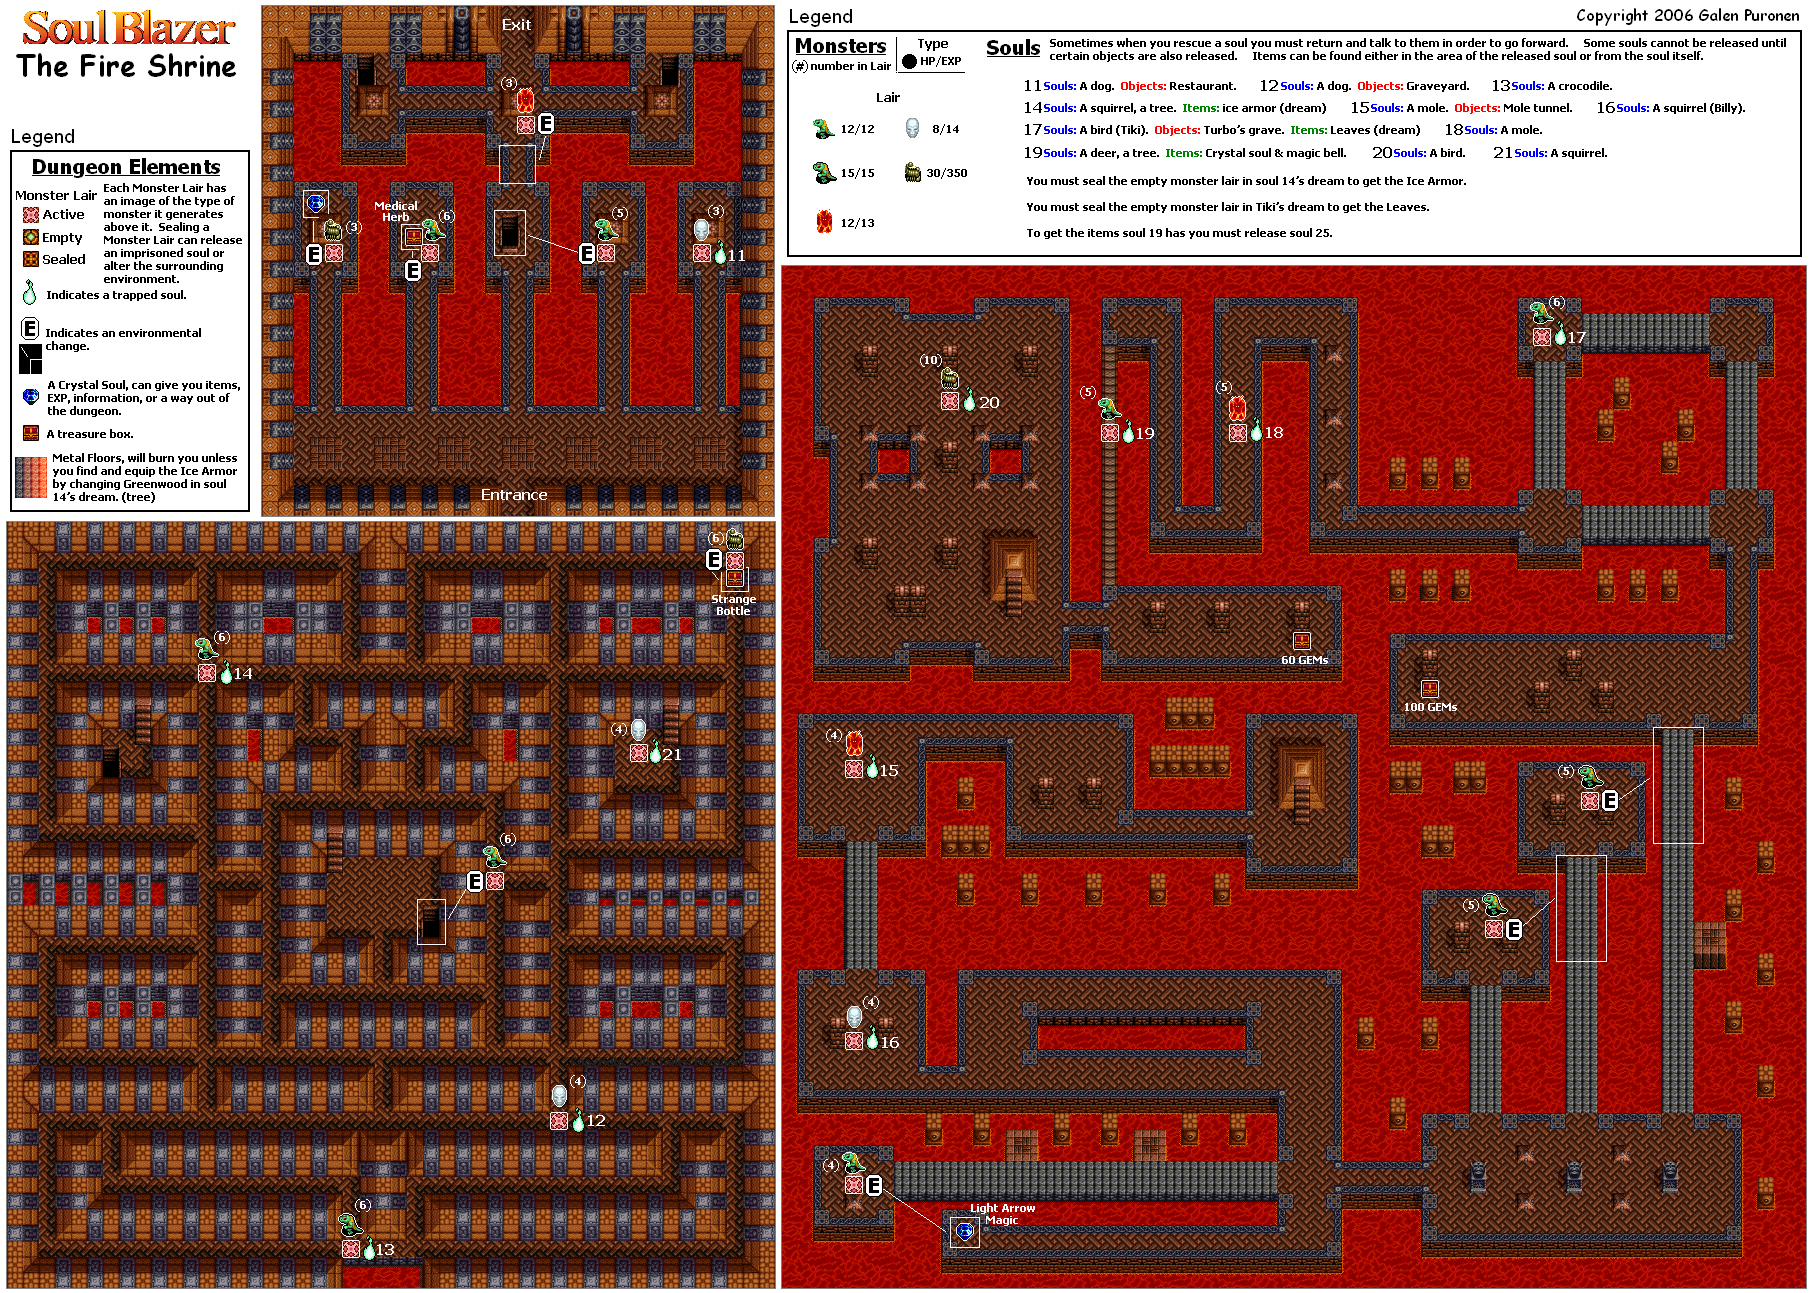
Remember the metal scorpions at the entrance? Kill them to release a gem that gives you experience.
But, wait! There's more! Remember the maze with the metal scorpions? Go through that and kill them all. The lair is at the northeast corner. It releases a chest containing a Strange Bottle.
Going downstairs where all those platforms that heated up were has some metal scorpions. Kill them all, and don't forget to equip the Ice Armor. Their lair will release a bird in Greenwood in the northeast corner of Greenwood behind the flowers.
And with that, you're done with all the lairs. Use the gem you just released to return to GreenWood (and get one experience point over and over again just by talking of it). The bird you released will tell you about the Phoenix and the three symbols you have to collect. Talk about pointless.
Head back to St. Elle.
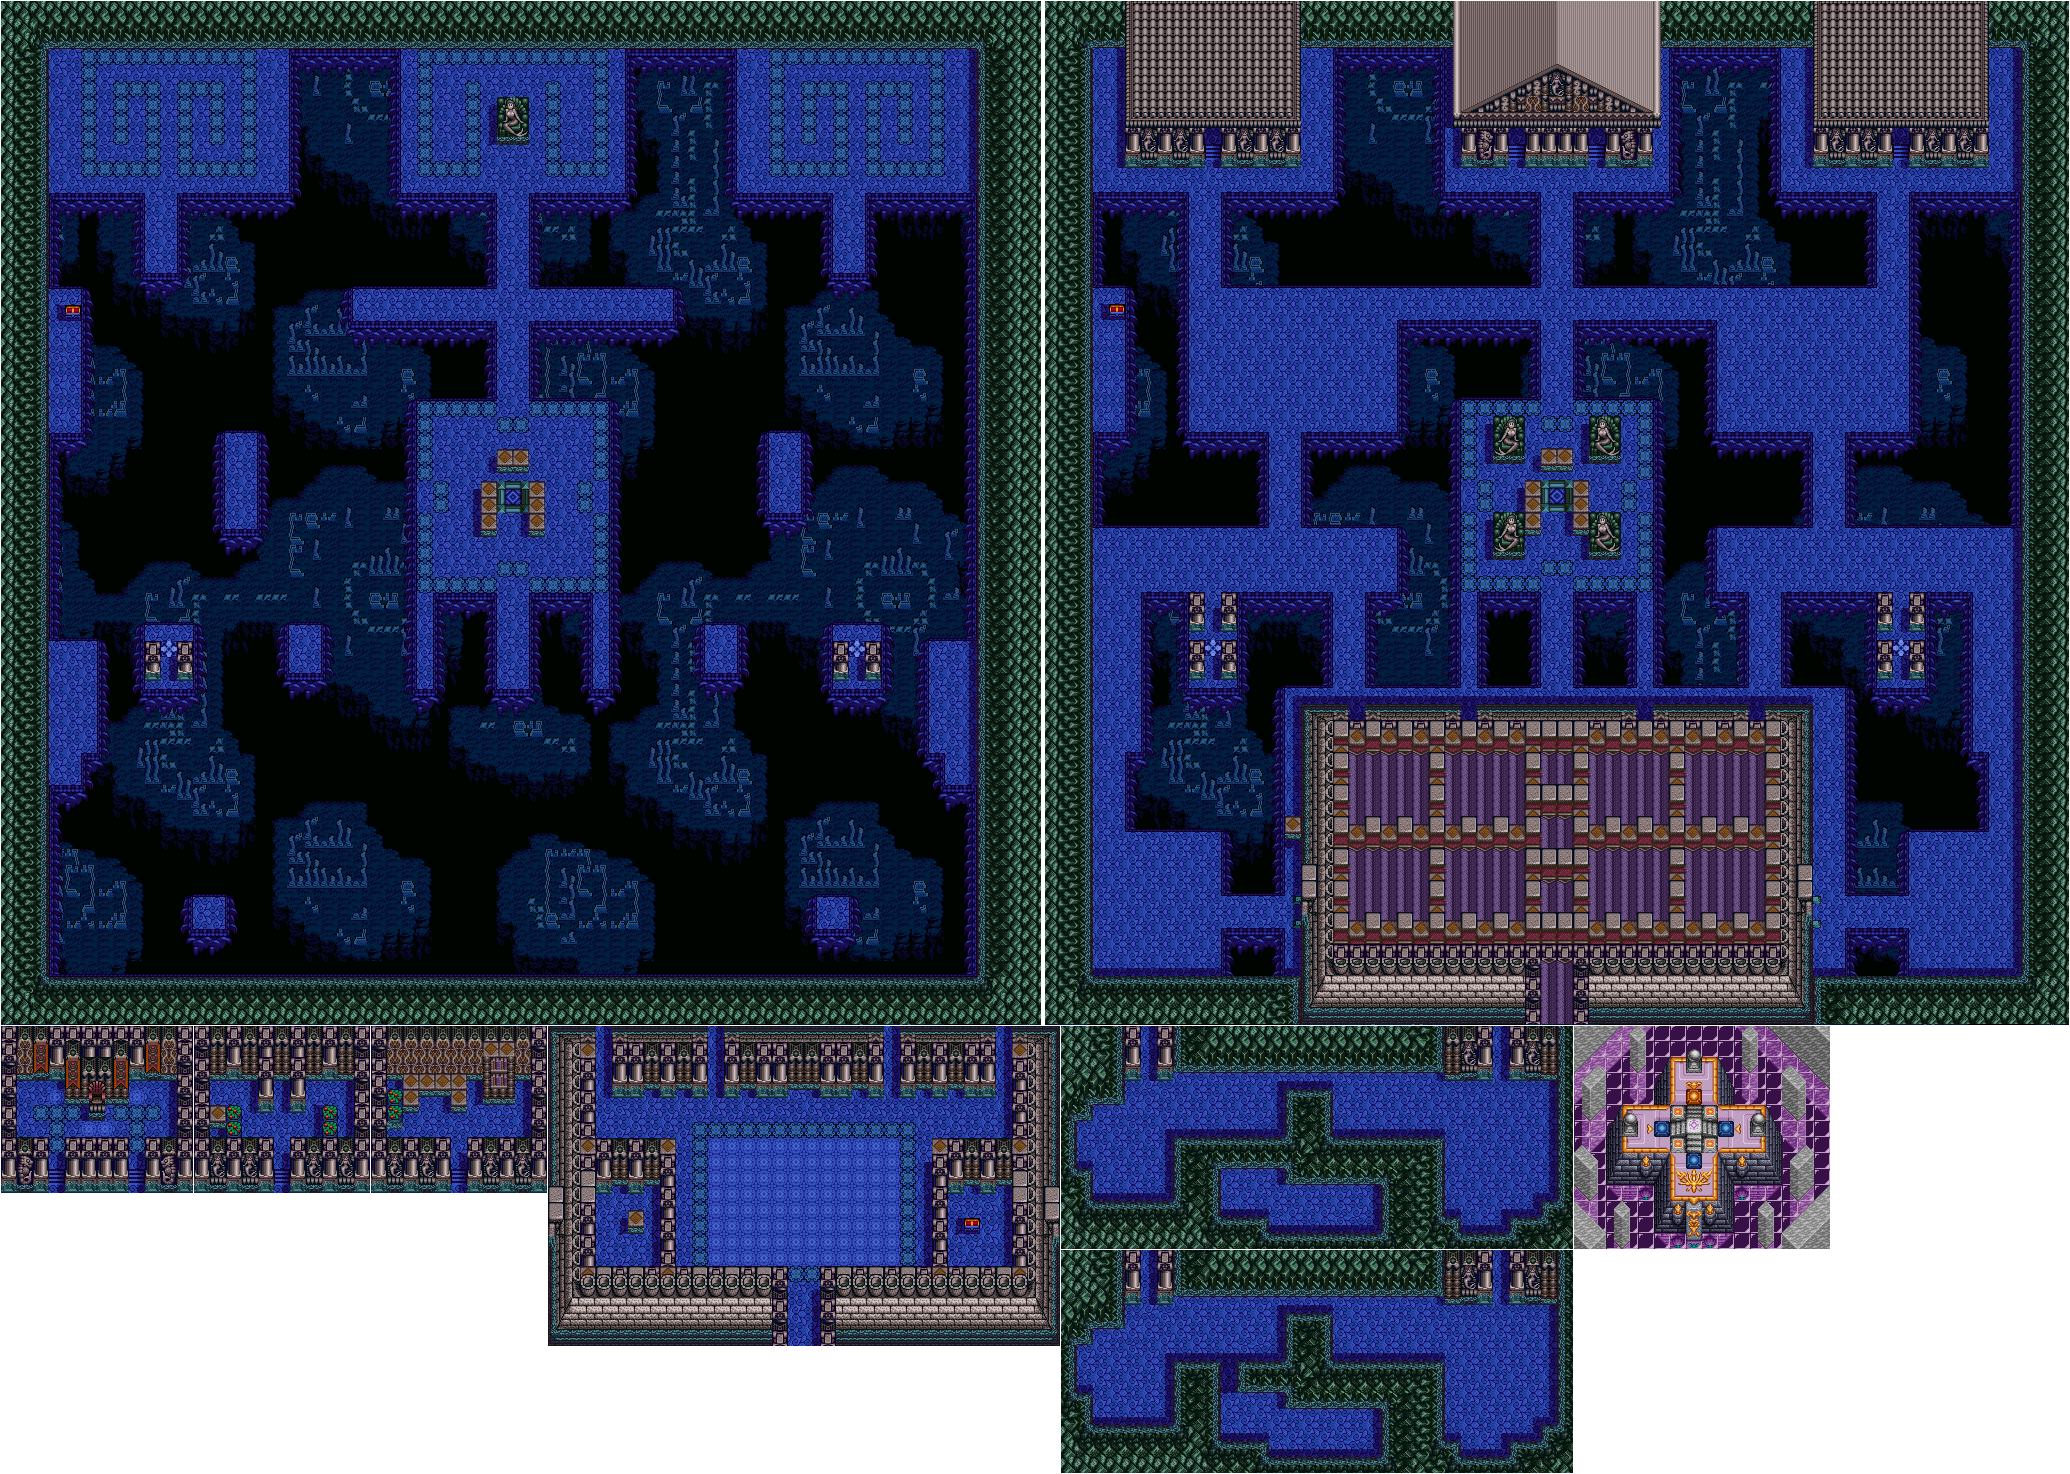
St. Elle's Seabed

The next enemy you'll now be able to destroy are the gray monkeys. Don't forget to equip the Bubble Armor so you can breathe underwater. The only remaining spot for destroying these enemies should be Durean.
Durean
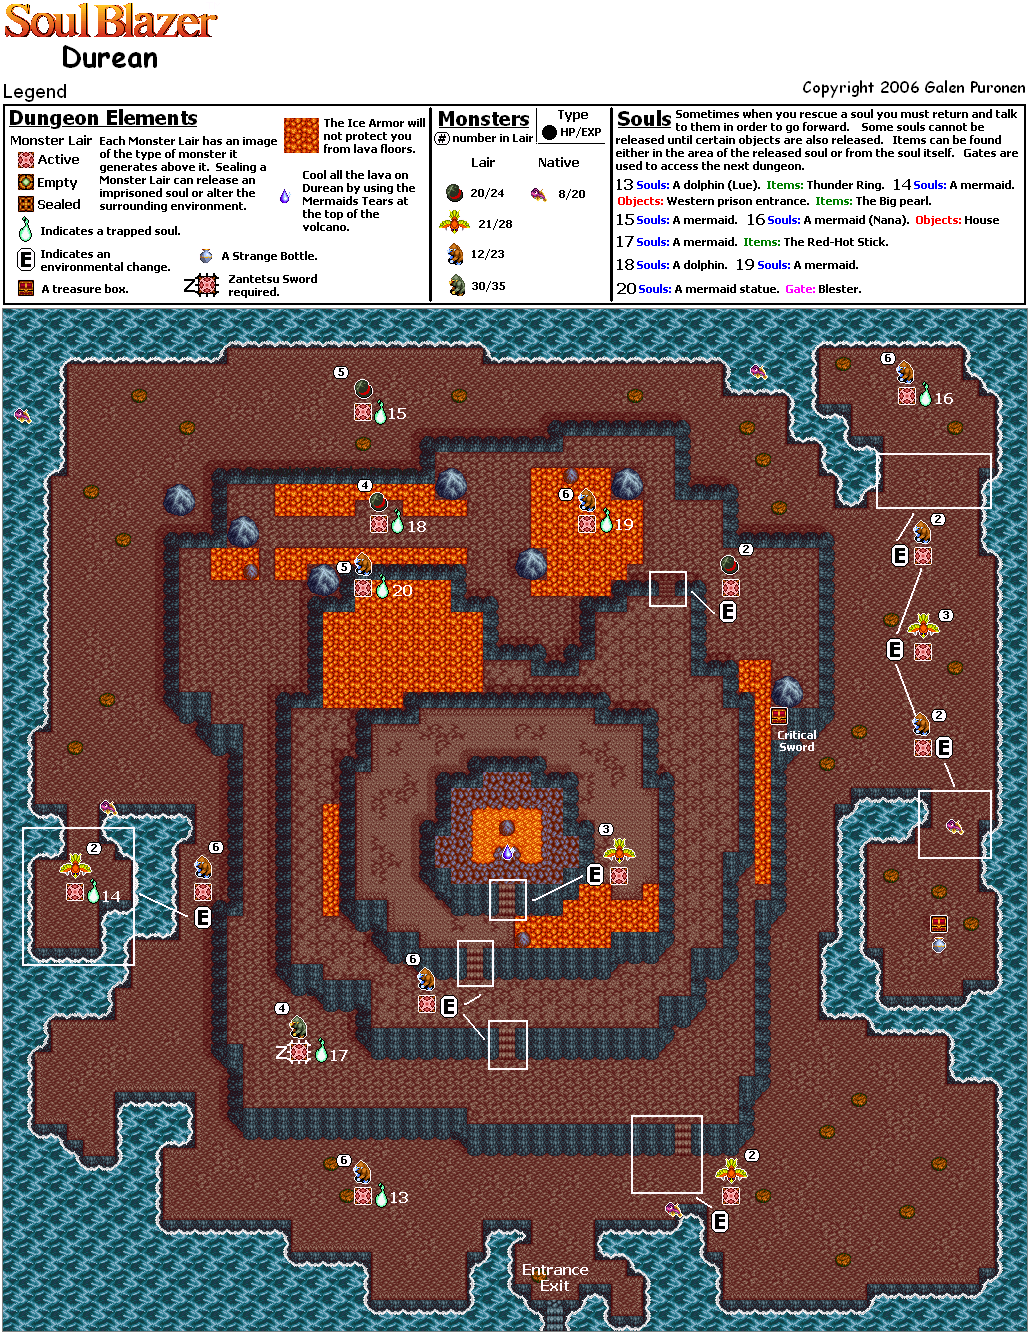
Destroying the gray monkeys here will release the soul of another mermaid. If you talk to this mermaid, you'll get the Red-Hot Stick, one of the three magical items necessary to summon the Phoenix.
That's it for the backtracking. Time to head back to Dr. Leo's Laboratory.
Dr. Leo's Laboratory
Go ahead and head back to the basement.
Laboratory Basement
You'll be able to release more souls as you go up and down the pipes and open up more areas, such as the soul of two plants as well as one of a cat.
The miniature bulldozers will charge at you when you get close enough, but they only have a limited range and slowly move back into place afterward.
The helicopters can land on the ground and move around. Reaching their lairs, however, can be quite troublesome, and hitting them can be a pain because they move quickly in the air - faster than they do on the ground.
Wednesday, July 18, 2018
HCBailly plays Soul Blazer - Part 20 of 33
It's time to take care of some loose ends before heading to Dr. Leo's laboratory!
Lune
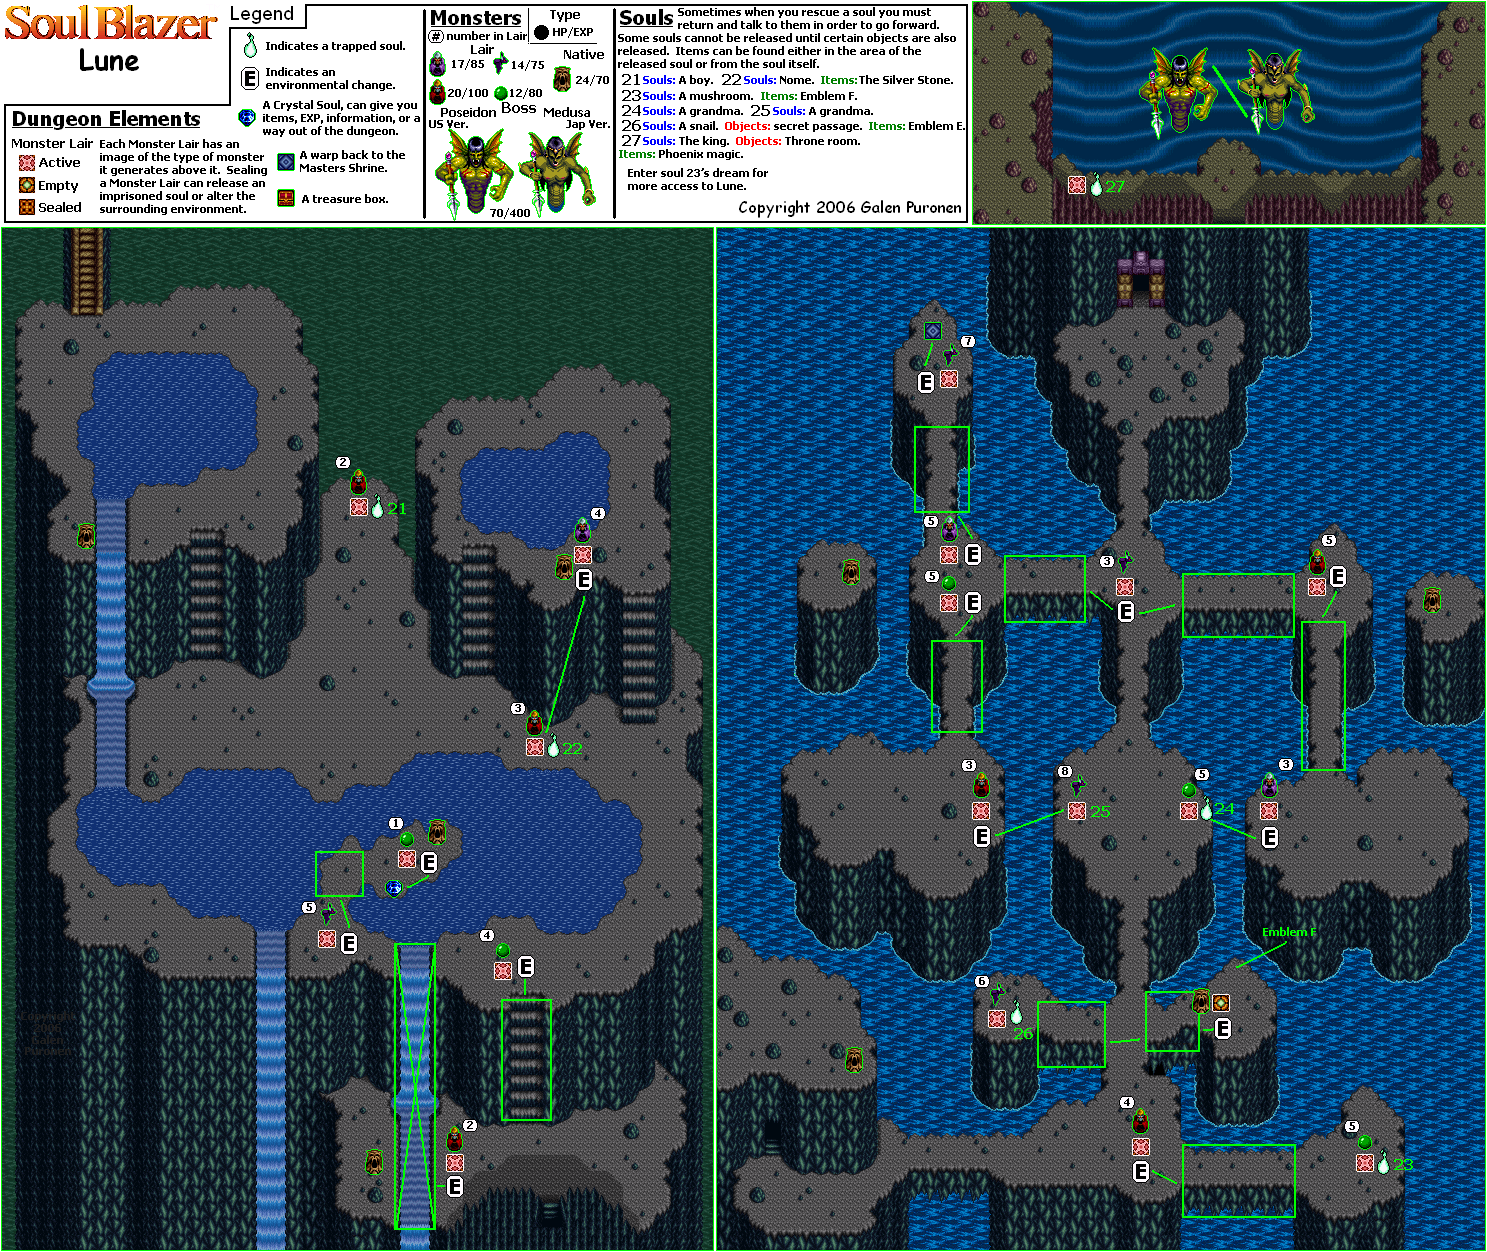
Go back to the area you opened up in the dream world and interact with where the mushroom stood there. You'll find Master's Emblem F.
To the left of that you will find a monster's lair that will release the soul of another snail...but that snail is in an area you cannot yet access.
There is nothing left to do, so head to the doorway to the north. There you will face yet another boss.
To beat Poseidon, stay away from the spear so you can avoid the three-way shots and the fireballs. After the three-way shot, hold out your sword with L or R and stand in the center so you don't get stabbed. When two fireballs are shot out simultaneously, dodging will be easier if you are in the center of the room, since you can walk back and then walk forward. If you're at the sides, you'll have to move towards the center and walk backwards into the partitions in the back wall.
If a boss has more than 50 HP, their health bar will be a different color. Poseidon's health bar starts out green, but then turns light blue before becoming the regular blue color.
When you beat Poseidon, you'll release the King and open up the throne room.
Soul of Mountain House
To reach the snail you freed after entering the Dream World, there is a hidden path in the wall south of the teleporter pad leading to the shrine. The snail will give you Master's Emblem E if you speak to it.
The snail in the jail is Nome, who used to live in Dr. Leo's house. Nome will tell you how Dr. Leo was asked by King Magridd to build the machine that called upon evil, and that Dr. Leo refused and was sent to Magridd Castle. Nome also tells you that Dr. Leo gave him and three other people four stones and told them to run away. The stones are keys to the World of Evil, and the rest are located in Dr. Leo's Laboratory and in the Castle of Magridd. Nome will give you the Silver Stone and tells you to head to Dr. Leo's lab.
The boy in the jail tells you that there is a house in the desert to the southwest, and that there are mechanical monsters in this desert that cannot be destroyed by normal swords.
The throne room is south of the Grandpa near the logs. The Grandmas near the King will be able to call the Phoenix is you can collect the Master's three symbols.
Talk to the King. The King will apologize for treating Nome poorly and putting him in prison for telling him that monsters would invade the mountain. He will tell you to talk to Nome, and also tells you about the three Master's items that will summon the Phoenix: the Red-Hot Mirror, the Red-Hot Ball and The Red-Hot Stick. He asks you to bring them all to him if you find them.
It's time to head to the next area. Don't forget to save.
To the east of St. Elle's (and southeast of the mountain) is Dr. Leo's Laboratory. Time to head there.
Dr. Leo's Laboratory
Dr. Leo's Laboratory is run down and has holes in the floor. The door in the room you arrive at will tell you that there are machines lurking around that only the Zantetsu Sword can destroy. The door then opens. If you face left in a doorway, you can talk to a door again.
To the left after that door is a set of stairs. Go down.
Laboratory Basement
You want to go north immediately, take out the worms, step on the lair, go to the right, take out the robo-maids and step on the monster lair there to release the soul of a Great Door. This allows you quick and easy access to the room with the chest containing the Zantetsu Sword. You'll need to be Level 16 to equip it.
The worms are very easy to take out. Just stand in front of the lair and keep swinging. The robo-maids are pretty hilarious, but they stop being funny when they shoot you with an eight-way soapy bubble shot. No, seriously. That is what their projectiles are.
As you go through the basement and step on monster lairs, you'll release the souls of other doors that will let you enter other areas.
After getting the Zantetsu Sword, you'll want to go all the way back to the Grass Valley Highlands and take the shortcut to Leo's Paintings.
Leo's Paintings
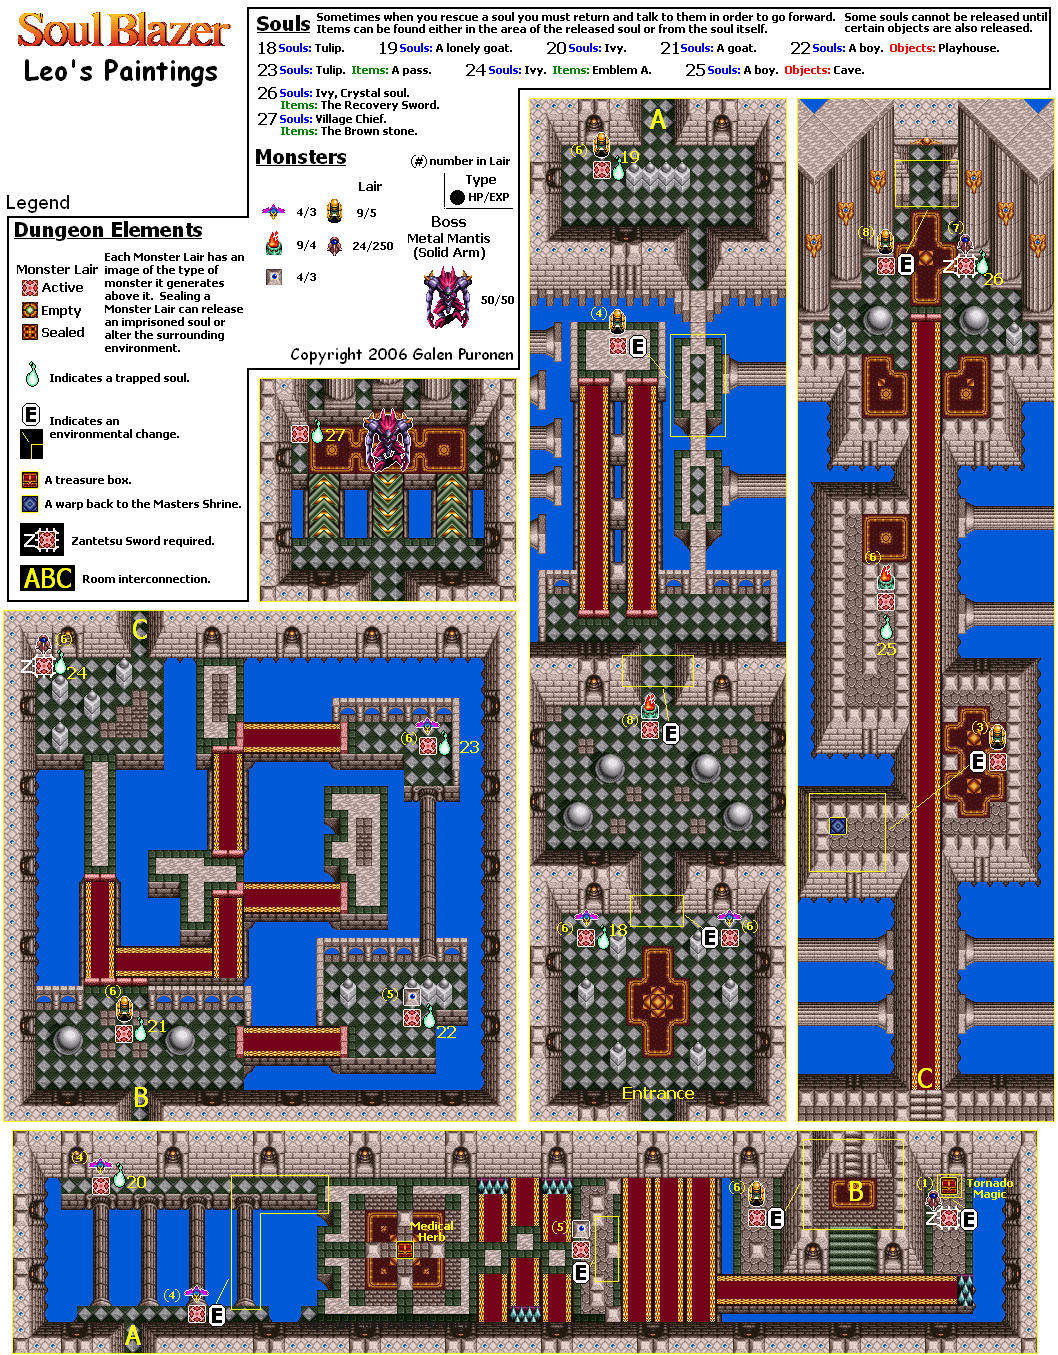
With the Zantetsu Sword equipped, you can kill the mental enemies near the room leading to Solid Boss. This will allow you to release another ivy ladder that leads to another gem.
To the south of that, there are more metal monsters to kill. Go back to where you came in from and step on the monster lair to release yet another ivy ladder that doesn't seem to be very useful.
South of that is a monster lair that releases a chest that gives you the Tornado magic. It's just a tornado that shows up and randomly moves around.
HCBailly plays Soul Blazer - Part 19 of 33
It's time to head to Lake Lune and free the last of the mountain souls!
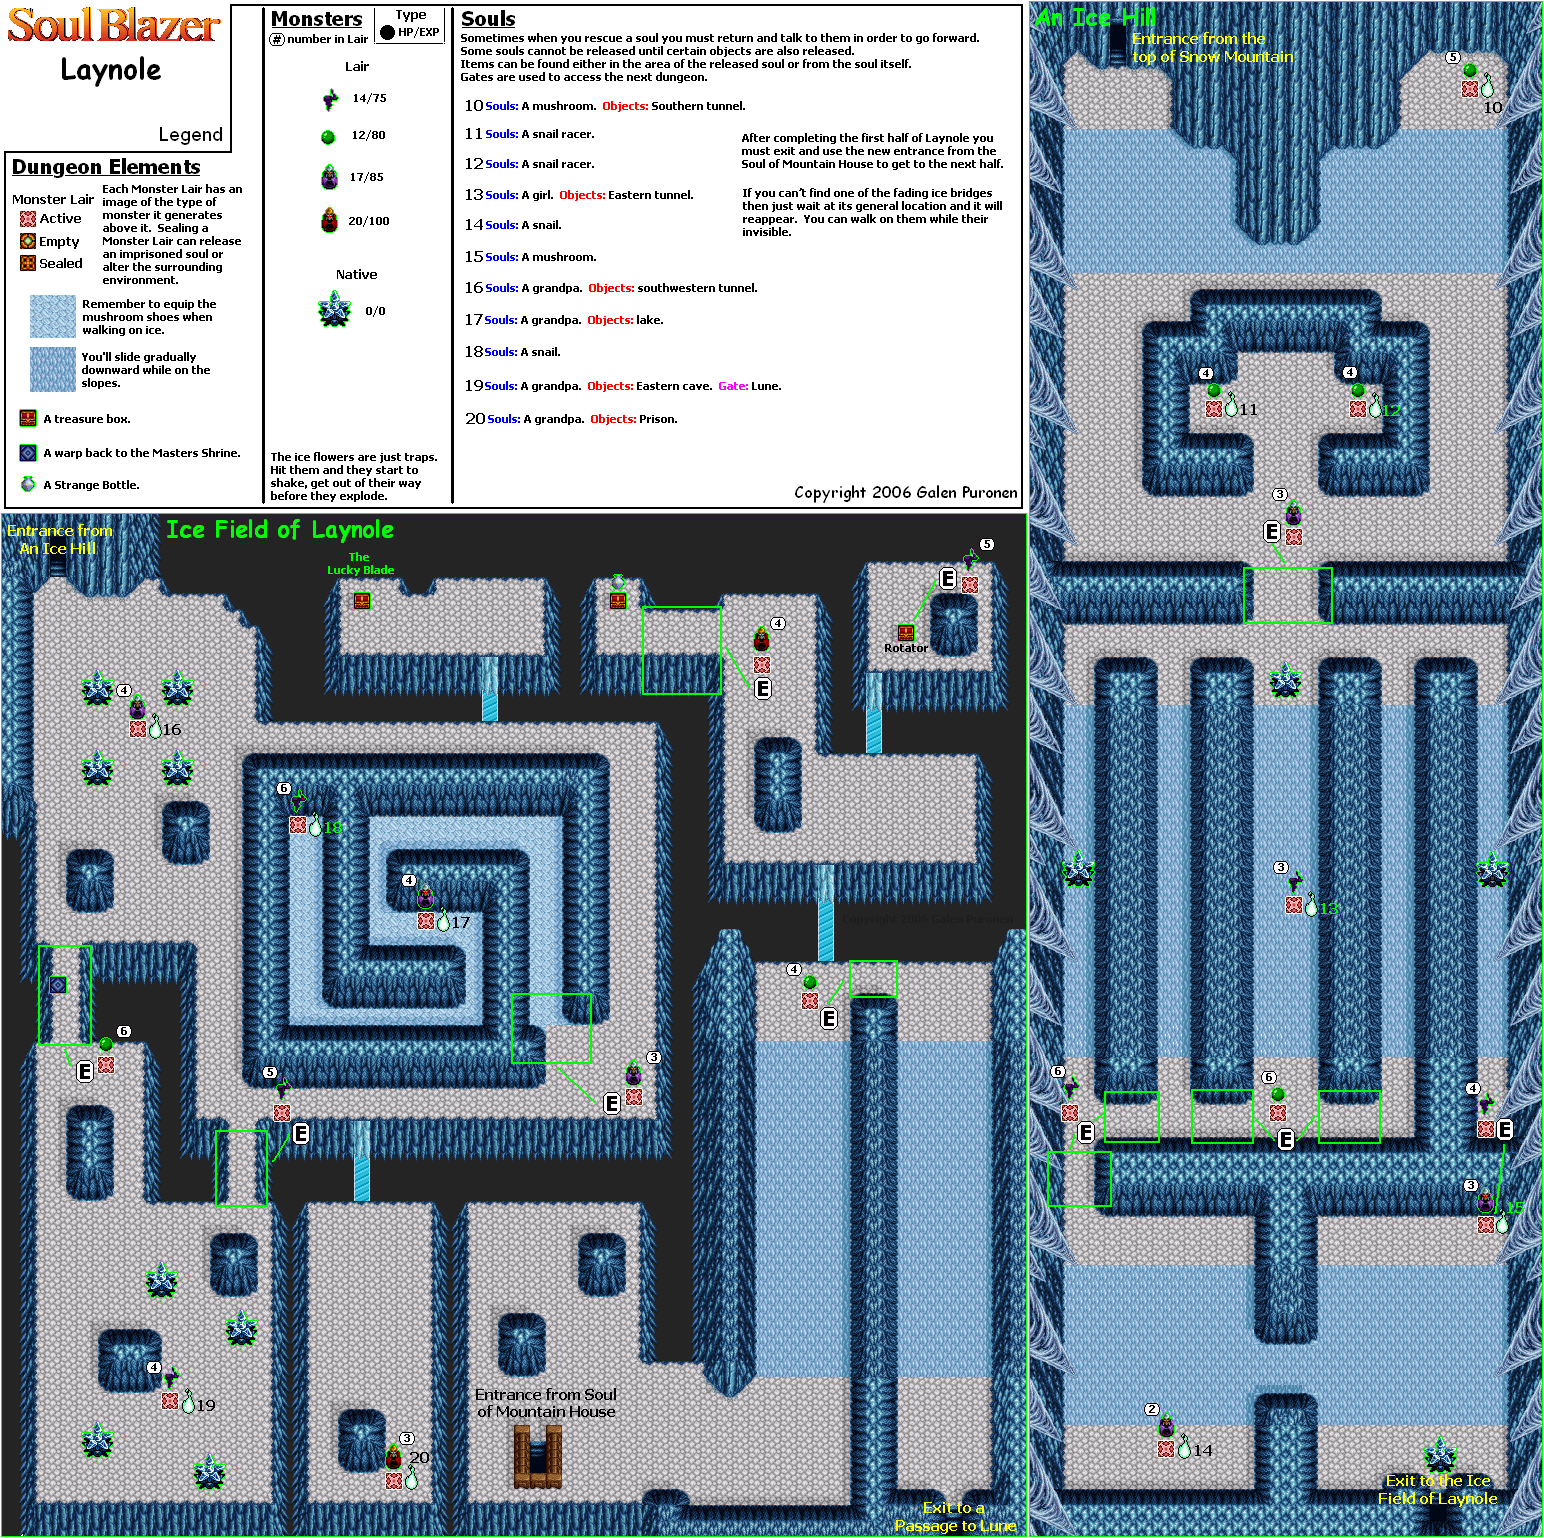
Lune
The statues don't come from monsters, but they can make spikes appear around you.
The first soul you'll free will be a boy who is in the jail. You'll also release a snail named Nome, who is also in jail.
The Rotator Magic consumes 1 gem for every fraction of a second you hold the button. It allows the Soul of Magician to create a trail of destructive fire as it moves, destroying anything fairly near you. It works very well in narrow areas where you don't have a lot of room to move around, as well as against those pesky bats.
You'll eventually head to a lower level. Here, you will release another mushroom (this time in the jail area). You'll also release two Grandmas near the Grandpa standing near the logs, as well as another teleporter title that takes you back to the shrine.
Soul of Mountain House
The two Grandmas that you freed will ask you to save the King.
The mushroom in the jail area is sleeping, so use the Dream Rod on it. You'll be back at Lake Lune in the Dream World, where the mushroom tells you that its real home is in Lake Lune and that the wind carried its spores to the Soul of Mountain House. There will be a Monster Lair to stand on. Head back on the regular path and you will eventually head back to the real world.
Tuesday, July 17, 2018
HCBailly plays Soul Blazer - Part 18 of 33
We've made it to Laynole, where invisible bridges abound and wizards shoot projectiles at us!
Laynole
As you continue on, you'll be able to release the soul of a Grandpa (who is standing next to some firewood). You'll also be able to find another teleporter title that will take you straight back to the shrine.
There is an bridge that fades in and out between two monster lairs that leads to some Red Wizards. If you wait around, it will eventually show up, but you can walk on it while it is still invisible if you know where it is. The Red Wizards are like the regular Wizards, except they are wearing red. Destroying them will allows you release another Grandpa as well as what looks like a jail.
Be sure to equip the Mushroom Shoes before entering icy areas, as they are still a few areas around here that are slippery. That way, you can open up a whole lot of Soul of Mountain Home as you release another Grandpa, as well as the Grandpa's snail.
The Lucky Blade requires you to be Level 15. It's even stronger than the sword that you have now.
Soul of Mountain House
When you have all three snail racers near the mountain entrance, they will be ready for a race.
If you talk to the Grandma just southwest of the entrance to the mountain, she'll tell you that she can still cast magic. This will allow you to talk to the mushroom in a room that you won't be able to normally access. Talk to the mushroom, and the mushroom will tell you that if you see a sleeping mushroom to return to the same place you found it in its dream. Walk up to the torch on the north wall to leave.
The Grandpa will tell you to explore Laynole carefully. It's a hint about the invisible bridges mentioned earlier in this entry.
Talk to the snail near the lake with the boy, and they will eventually walk around together. To the right of that, talk to the girl and you'll get the race to start. It isn't really important, though.
The mushroom near the jail will tell you that there is a jail here, but that there are no bad people around. The Grandpa at the jail will tell you about the Lucky Blade. Believe it or not, the Lucky Blade gives you more gems when you destroy enemies.
Use the Dream Rod on the sleeping old man to the right of the jail area. You'll see the old man's dream at the mountain, where he tells a girl that he buried Magic Armor, 50 gems and a medical herb in the mountain. You'll probably have already found it by this point, though.
The passage with the blue border leads to the underground lake Lune. Entering it will take you to another part of Laynote that you wouldn't normally be able to reach otherwise. By fighting monsters and looking for invisible bridges, you'll be able to get another Strange Bottle and the Rotator Magic.
HCBailly plays Soul Blazer - Part 17 of 33
Our mountain trek continues as we make our way into Laynole!
Soul of Mountain House
The girl near the entrance to the mountain tells you that it is quite warm inside the mountain. At least they don't freeze to death in here.
The grandpa to the left of the mountain entrance will ask you to sit across from him when you talk to him. When that happens, just stand across from him on the other end of the table. The grandpa will ask you questions about human beings.
The grandpa to the south of that one will tell you that his wife was able to use magic at one time.
South of that are the boy and girl staring next to each other. They don't tell you anything important, though.
The boy near the lake will give you the Mushroom Shoes, which allows you to stay in one place on the ice due to the snail goo on the bottom of them. You will still slide down slopes, though. To use the Mushroom Shoes, just equip them like you would any other item.
The mushroom to the right of the snow mountain entrance will tell you that the people here grow up really, really fast, which makes what the boy and girl staring at each other not sound so weird, after all. Despite their short lives, they enjoy each moment.
The snail jockey near the teleporter tile just tells you his snail's name is Legend.
Snow Mountain
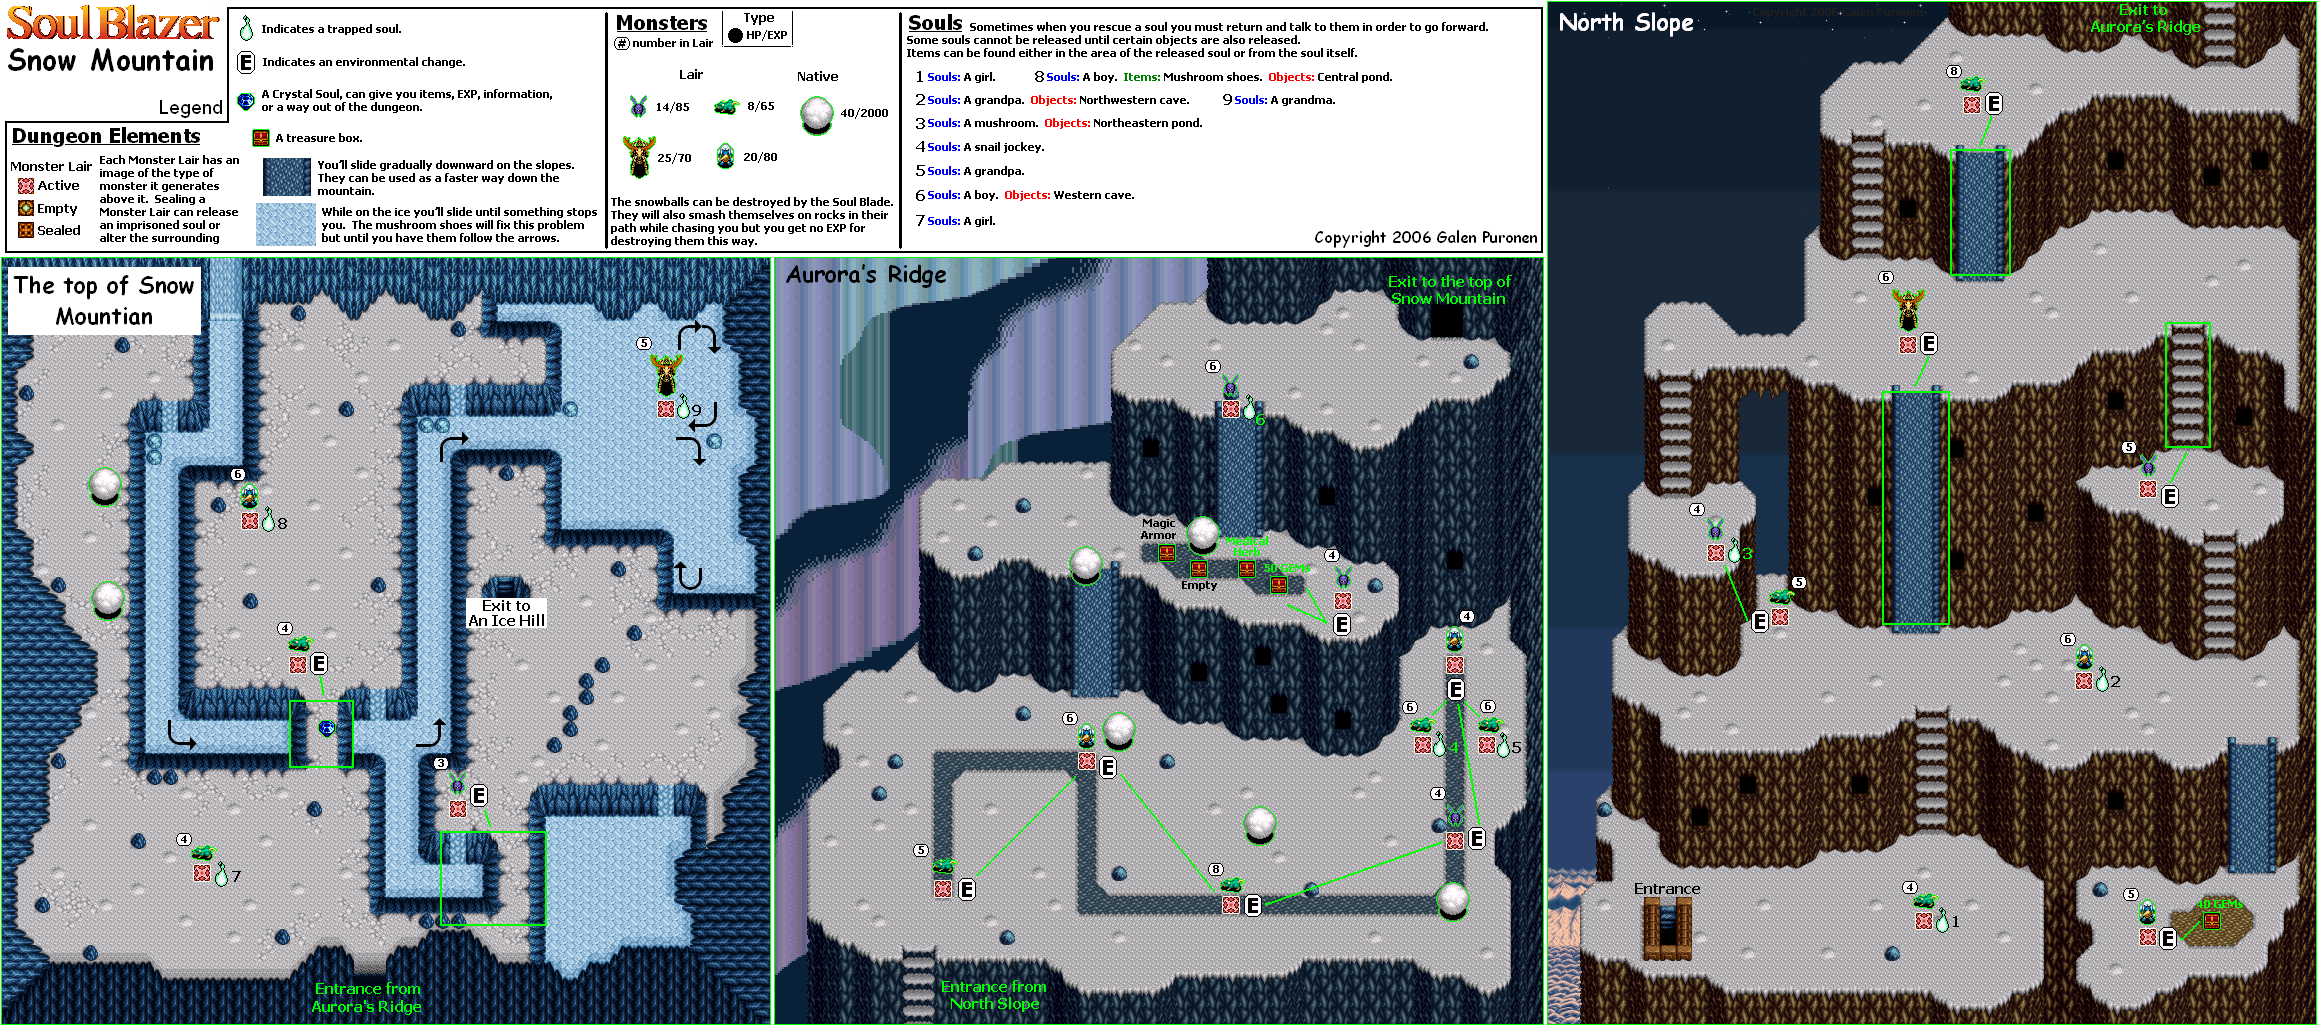
Now that you have the Mushroom Shoes, equip them as an item at the mountain summit. You'll be able to walk on the ice, step on a cleared-out Monster Lair and free the soul of a Grandma.
You'll also be able to reach a part of the summit that you wouldn't be able to reach otherwise, which has a path that leads to an underground area.
Laynole
Remember, the slopes will still cause you to slide downwards even with the Mushroom Shoes.
The green slimes bounce around and can be hard to hit without taking damage sometimes. Face it and swing from a distance.
The monsters that look like yetis in purple capes are wizards who spin around and teleport everywhere. Get ready to strike at close range when you see them teleport back on screen. Watch out for the projectiles that they can shoot at you. Amazingly, Magic Flair can make taking them out easier.
Here, you'll be able to release the soul of two mushroom, two more snail jockeys, another girl and a snail.
The crystal that looks like a Christmas tree made out of icicles can be safely destroyed with magic. When destroyed, it shoots out shrapnel in eight directions at a short distance.
Use Magic Flair to take care of the bats that fly around in a circle.
Monday, July 16, 2018
HCBailly plays Soul Blazer - Part 16 of 33
Now it's time for (not so much) fun in the snow...
There is nothing else to do here. Head back to the shrine and hit the north tile to save your game and return to the overworld.
You'll want to go to the snowy mountains all the way up north. That's our next world.
Soul of Mountain House
Might as well go to the tile to the south to enter the next world. When you do, go west and enter the stairs you see to the north. We're going right into the thick of it!
Snow Mountain
You'll be fighting a few new enemies here. The rats will burrow through the snow and then pop up when they're near you. They are only vulnerable when they have come out from underground. You'll release the soul of a girl not long after you come here.
The flies can pop up in groups, will shot projectiles at you from a distance and can fly towards you if you're close enough. Take them out with the Light Arrow magic.
The yetis will lunge forward when they swing their clubs. If they see you, start swinging.
You'll release the soul of a Grandpa. The humanoids you'll be freeing here will either be children or old people,
The slopes can be slid down. You can travel up them, but your speed will be slower going up a slope than it would be going up a flight of stairs.
The monsters that look like they have antlers are evil reindeer. They awaken when you get close, so take advantage of their waking up to get a few shots in and even kill them completely. If left free to attack, they will leap around slowly and shoot their head around in a circle. You'll eventually release a mushroom.
The first part is called the North Slope, while the next part is called Aurora's Ridge due to the Aurora Borealis in the background. Here, you will meet another new enemy: the snowballs. These things will follow you when they show up, and to get rid of them, you'll have to get them to move into one of the numerous rocks in the ground. To do that, however, you have to let them become their biggest possible size before the rocks can make them crumble.
As you go through Aurora's Ridge, you'll open up a road with every sealed monster lair you step on, which leads to even more monster lairs to empty out.
You'll release a snail and another Grandpa as you follow the path. The snail is saddled and ridden on by one of the inhabitants of the village for this world.
You'll find a few chests that give you 50 gems, a Medical Herb, nothing and Magic Armor. The Magic Armor cuts the necessary amount of gems needed for your current magic by half in addition to being stronger than the armor you've got on right now.
To take care of the bats on the slope, use Magic Flair. This will help you release the soul of a boy and open up even more of Soul of Mountain Home.
You'll eventually reach an opening in a wall. This will take you to the top of Snow Mountain. Here, you'll release the soul of a girl near where you released the boy's soul.
The ice on the lower level will push you in one direction, leaving you able to only move in one direction at a time. By moving around, you'll be able to figure out where to go to access more of the area.
You will also release the soul of another boy (and bring back a lake). If you talk to him at the Soul of Mountain Home, he'll give you the Mushroom Shoes if you talk to him.
You'll also release another blue gem worth some experience as well as teleportation back to Soul of Mountain Home, also known as the Mountain of Souls.
HCBailly plays Soul Blazer - Part 15 of 33
We're almost done here! All we have to do now is kill the boss and get out of here!
St. Elle's Seabed Sanctuary
The angelfish in the upper-left corner will jump if you talk to it.
The mermaid in the temple in the upper-right corner will give you a Medical Herb if you need one.
St. Elle's Seabed
The Ghost Ship is to the upper-left. You'll have a few monster lairs to deal with on the way there, but you're going to have to deal with manta ray projectiles as you make your way through this maze.
There is a chest to the east of the entrance to the maze that contains the Power Bracelet, which will double the amount of damage you will dish out. You'll be able to tear through enemies with this.
You'll be able to release the soul of another angelfish just east of the entrance.
The pathway opened up in the dream world is in this area. Enter it to find a monster lair full of the spiked hermit crabs. Inside this monster lair is four chests: Emblem D, 80 gems, an empty chest and a Medical Herb.
You'll also be able to free the soul of another dolphin in the temple north of the dancers and you'll also find another teleport tile back to the shrine. The third tile is now activated.
North of this teleport tile is a rope. Here, you'll face a boss: the Skull Phantom.
Ghost

Watch out for the worms that pop out of the floor. The debris they create when they shoot out of the floor can also damage you.
The Skull Phantom is easy when you know what to do. Stand just across from the right side of the left-hand stairs and swing away. Use the Light Magic to kill the hands, and swing your sword repeatedly when the skull is near. If you're standing in the right spot, the skull's fireballs will never hit you at all. If you need to, use the Shield Bracelet.
Step on the monster lair to release the Queen and her temple. The Queen will thank you for releasing her, and ask you to return to the palace.
The chest on the ship contains one gem. There is a reason for that, as you'll soon see.
Head back to St. Elle's. You're done.
Back to St. Elle's
The angelfish near the statues will tell you that if you travel across the coral reef, you will find a small creek.
The dolphin in that northern temple is sleeping. Use the Dream Rod to enter the dream world version of the Ghost Ship Go north, and you'll see a conversation between a father and a son. The son will ask how long since the ship sank, and says that he is hungry. You will learn that the child's name is Servas, and that the dad believes in reincarnation.
If you talk to them, they will hear the Master calling. Servas will say he put one gem in a treasure chest, and that he hopes someone will find it.
If you talk to the dolphin after being booted out of the dream world, the dolphin will tell you that it keeps having the same dream.
Talk to the Queen. She will tell you that this all started when she saw the Blue Stone, and that one glances caused desire and hatred to overwhelm her. After that, the creatures disappeared and monsters took over. The Queen will then give you the Blue Stone, and ask you to go to other regions to rid them of monsters.
Subscribe to:
Posts (Atom)