Both Japanese and American commercials are included. The Game Boy Advance port commercials are also here.
Showing posts with label Final Fantasy. Show all posts
Showing posts with label Final Fantasy. Show all posts
Tuesday, December 8, 2015
Commercials for the first six Final Fantasy games
Both Japanese and American commercials are included. The Game Boy Advance port commercials are also here.

Wednesday, December 2, 2015
Xavier Woods plays the Final Fantasy victory theme
Holy shit, The New Day is hilarious.
Also, this was a pretty good promo on a whole.
Tuesday, June 17, 2014
Monday, June 16, 2014
HCBailly plays Final Fantasy - Part 38 of 38
Well, we're finally getting done with this game. I hope you enjoyed this as much as I have.
All maps by x_loto.
Temple of Fiends Revisited
Map
The last room in the game is circular in size and has a zillion columns in the way, setting up the room in a Star of David pattern. In the center is the final battle...
Wait...
Garland?
Apparently, when you defeated him, the Four Fiends sent him back 2000 years into the past. From there, he sent the Fiends to the future (your present day) to let the Time Loop go on...so he could live forever! Then he becomes a demon known as Chaos.
The Final Boss - Chaos
Oh, boy. Chaos is just deadly. He has the Crack spell, for one, which can cause instant death on the entire party (unless you're well protected with ProRings and/or Ribbons). Inferno can do anything from 50-100 damage. He can also cast Fir2, Ice2, Lit2...and Cur4. He can refill all his hit points. Nice. What a jerk.
Cast Fast on everybody, and use Fade whenever you need to. Knights and Masters should just Fight, while Wizards should use spells to both cause damage and cure. (Be sure to use Wall and Nuke!)
When you beat him, the Light Warriors return to the past and everything is right again. You did it!
...and this is why time loops suck.

HCBailly plays Final Fantasy - Part 37 of 38
We're done with the boss rush already?
All maps by x_loto.
Temple of Fiends Revisited
Map
No sooner do you reach the exit to the room after the Lich rematch that you fight Kary. Again.
First, let's go south and get the treasures first. The only useful thing you'll find (besides another Katana, if you missed the first one) is another ProCape. If you have another Mage in your party, equip it.
These are the last chests in the game, so we won't have to worry about treasure hunting anymore after this.
Boss: Kary
You definitely want to cast Afir on the first round, as well as Fast on everybody.
From there, have your best offensive fighters strike the boss, and let your healers heal. Kary can still be able to deal some damage, but with Afir it's not going to be as bad.
Yeah, I know, I cut and pasted the strategy from last time. At least Kary (Kali - yeah, I finally found out what her name should be) can't cast Mute this time around and has 100 more HP from last time like Lich does. She's still not much stronger, and using the White Shirt to evade some of Kary's attacks makes this even easier.
The Worms are very easy to destroy with physical attacks.
The exit to the next step is blocked by a rematch with the Kraken.
Boss: Kraken
Use the White Shirt as an Item in battle in the first round. He still hits eight times in one physical attacks. There's no need to cast Alit if you have the White Shirt, as Kraken's Lit2 attack will only do very meager damage if you've used the White Shirt first.
Okay, okay, I lied. There's one more chest in the second-to-last floor. It contains the Masmune (Masamune), which anyone can equip (including wizards!). If you have a Knight that has Xcalber equipped, give it to the Red Wizard if you have one.
Anyway, going to the right of the stairs that were past Kraken will take you to the battle with Tiamat.
Boss: Tiamat
Tiamat's Thunder isn't that bad, even with ALit cast. Too bad her defense is quite high.
If you have a Master, he'll really come in handy. By now he should be able to deal 10 or 11 hits in one attack on Tiamat.
Yep, more cut and paste. He's not that much different from before, especially if you use the White Shirt in battle.
Sunday, June 15, 2014
HCBailly plays Final Fantasy - Part 36 of 38
Laugh if you want, but this whole "2000 year time loop thing" made sense in 1987.
All maps by x_loto.
Temple of Fiends
Map
When you enter the room where you fought Garland, you'll find a Dark Crystal along with five bats. Talking to these bats will tell you what you need to do. These must be the lost warriors of Lefein.
Anyway, hit the dark crystal and you'll go back 2000 years. The only way out of here is with the Exit spell, so keep that in mind.
Temple of Fiends Revisited
Map
I wanna think this is from either Romancing the Throne or The Jewel of the Nile. Not sure.
Anyway, as you run around 2000 years in the past, you'll come across some of the strongest enemies in the game. This includes some old favorites, such as the Sorcerers from the Ice Cavern.
When you enter the room in the center of the second floor, you'll be fighting against the Phantom. The Phantom isn't too hard, but it can use Stop to paralyze your party. If anyone is wearing the Ribbon, it isn't going to work.
Go up to the stone plate in the room and press A to reveal a gate. Use the Lute in the Item menu to reveal the staircase below the gate.
When you're about to reach the second basement floor, you'll fight the Lich. Again. Yep, it's a boss rush.
Boss: Lich
The Lich has 100 more HP than last time, he's more than likely going to hit you first, he's weak to fire and he can also cast Nuke, which can cause some massive damage (almost 400!). Guess what? You're also much stronger compared to the first time around the block, so you should be able to survive this. Maybe.
HCBailly plays Final Fantasy - Part 35 of 38
HERE COMES A NEW CHALLENGER
All maps by x_loto.
Floating Castle
Map
The last floor is a bridge. There's a 3 in 64 chance that you'll meet up with WarMech (War Machine) on this bridge...and WarMech is insane.
Guess what? HCBailly actually freakin' meets it.
(Optional) Boss: WarMech
WarMech is just nasty. Not only does he have a physical attack as well as Nuclear (both of which can cause painful amounts of damage) it also replenishes 100 HP every round you don't take it out (and the game doesn't tell you). AFir's not going to help at all against Nuke, so don't even bother.
If for some reason you can get the first strike, cast Fade on it with the White Wizard. Otherwise, cast Fast on your party members and keep everyone healed up.
If you can somehow manage to beat it, you'll get 8000 XP and 32000 G, which is a lot for any monster in this game.
After that, all that's left is to cross the bridge and fight Tiamat.
Boss: Tiamat
Tiamat's Thunder isn't that bad, even with ALit cast. Too bad her defense is quite high.
If you have a Master, he'll really come in handy. By now he should be able to deal 10 or 11 hits in one attack on Tiamat.
When you're done with Tiamat, you'll be able to restore the Wind Orb and teleport out of here.
Crescent Lake
Map
Talk to the Circle of Sages again. This time, you'll have to head back to the Temple of Fiends as it is in the center of the Four Altars...and in order to keep all of this from happening [b]again[/b], you'll have to go back in time 2000 years to stop a time loop from repeating itself. Not surprisingly, you're currently at the end of the time loop.
Dwarf Cave
Map
Go back and see Smith again, and give him the Adamant. You'll get Xcalber (Excalibur). Give it to the Knight.
YOU HAVE 20 SECONDS TO COMPLY
Saturday, June 14, 2014
HCBailly plays Final Fantasy - Part 34 of 38
We go through even more of the Floating Castle in our attempt to hunt down Tiamat!
All maps by x_loto.
Floating Castle
Map
The ProCape (Protect Cape) are the only shield item that White and Black Wizards can equip, so give it to one of them. And for Pete's sake, if you get the Cloth, toss it.
If you talk to the robot on the third floor, you'll find out that you can view the world from the window next to him. When you do, you'll find out that the energy of the four orbs is flowing into the four altars...and into the Temple of Fiends. Oh, snap!
The Katana is only useful if you have a Ninja in your party, as it's the strongest weapon for him in the game.
For the fourth floor, go right two intersections and down two intersections. There. You're done with this really confusing maze.
The WzVamps are like the Vampires, except slightly stronger. They can cast AFir, but due to buggy programming, it doesn't do anything for them (their Fire weakness supercedes AFir's effect). It also only works on one enemy as opposed to the entire enemy party. They can also cast Dazzle, but at this point everyone is a walking tank that's resistant to most status ailments.
Harry! I've reached the top!
HCBailly plays Final Fantasy - Part 33 of 38
A floating castle is a castle that floats.
All maps by x_loto.
Floating Castle
Map
The Bane Sword casts the Bane spell when used as an Item in battle. The Black Shirt casts Ice2, while the White Spell casts Invs (and works like the Gold Ring, making that item redundant).
The GrNaga (Grey Naga) and Air are pretty ordinary monsters. They're not really weak to anything, though they are pretty tough. Ditto for the RockGols (Rock Golems). The GrMedusas (Green Medusa) are weak to fire, but since they're probably the weakest enemy in the Floating Castle, you probably won't be using a spell charge on them at all. Just don't get Stoned. If you can land Bane on a Manticor, great. Use the Bane Sword to try to take them all out, then use physical attacks on the rest. Just watch out for the Poison ailment that comes with their Stinger attack.
The triangles on the floor act as stairs. The direction they point indicate whether they go up or down a floor.
The Opal Shield, Opal Gloves ans Silver Helmet are useless, so drop them if you need the Item space. You'll also find one more Ribbon here.
The chest in the lower right hand corner of the second floor contains the long-awaited and much-needed Adamant. Remember Smith the Blacksmith from the Dwarf Village? Now you do.
Friday, June 13, 2014
HCBailly plays Final Fantasy - Part 32 of 38
We enter the Floating Castle and begin to hear what is probably the most sci-fi-ish music I've probably ever heard in an NES game.
All maps by x_loto.
Mirage Tower
Map
The second floor is a maze, which makes it harder to get to the top floor. Once again, if you can get to the middle, you'll be able to find a lot of gold as well as a few weapons.
The Chimeras are weak to ice, but you probably won't be using Ice spells on them unless you're fighting them in groups. The Catmen can Poison you with their physical attacks...and you'll usually be fighting these in groups!
Give the Dragon Armor (just like Opal Armor, but also protects against Fire and Ice attacks) and the Sun Sword (higher attack, but Hit Rate is slightly less) to the Knight, if you have one. Thor's Hammer casts Lit2 when used in battle as an Item, so give it to one of your mages!
If you talk to the robot on the second floor, it will tell you that a robot escaped with a Cube to the west.
When you walk into the room at the top floor, you'll fight a Blue D (Blue Dragon). It uses Lightning attacks, but it is weak to Fire. If you need to, use Fir3 on it at least once. Be sure to use ALit as well. When you beat it, stand in front of the teleporter title and use the Cube as an Item. Colors will gather and swirl inside the Cube, and you'll be in the Floating Castle.
Floating Castle
Map
Slime - just like Scum, weak to fire, use Fir3
Once again, you have a ton of treasure hunting to do.
The EvilMan doesn't cast spells very often, but he can cast Nuke...so be careful. Use the Fade spell if they team with BadMen, who are basically the same as the EvilMen. They can also cast XFer, and unlike your version of the spell, theirs actually work. -_-'
The Nitemares from the Castle Ordeal are back with a vengeance, too. Keep some Ice spells ready!
HCBailly plays Final Fantasy - Part 31 of 38
We finally enter the town of Lefein and head into the desert!
All maps by x_loto.
If you're looking for Lefein, it's that town south of Gaia, surrounded by forest.
Lefein
Map
Aside from a White Magic shop and Black Magic shop, there's really nothing here.
As you talk to the people, you'll be able to learn about the Floating Castle (and that you'll have to go through the Mirage Tower to get there) as well as what Lefein used to be: a very advanced civilization in its own right that even built robots and caused a castle to float in the air.
You'll also learn that a great power controls the Four Fiends, and that the last one, Tiamat, has taken the power of the Wind Orb for her own. To make matters worse, she's taken over the Floating Castle. Five of their greatest warriors tried to do something, but they now live on as bats.
Be sure to talk to the guy near the entrance next to the water. He'll give you a Chime that allows you to enter the Mirage Tower.
Now, about those magic shops. The Black Magic shop sells Nuke, which is basically the Ultima of Final Fantasy. The White Magic shop sells Lif2, which basically combines Life and Cur4 - a wonderful combination! Both are Level 8 spells, and these are possibly the best uses for the Level 8 spell charges in the game.
Mirage Tower
Map
The Mirage Tower is in the desert just west of Lefein. Thankfully, there's one green spot near the mountains where you can land the airship on, since you can't put the airship down in the desert. You'll have to walk from there, and you'll be meeting some new enemies on the way there, such as the Ankylo (Ankylosaurus), which have a few hundred HP. If you can score a critical hit on one, that's great.
You'll have to enter the door to your north in order to find any treasure. All the treasure is located in the center of each floor. You'll have to travel in a circle on the "edge" of the tower in order to continue on, so be prepared to fight a lot of enemies if you're going to go for everything.
The Guards are hard to take down with physical attacks (it'll take a few strikes) but they're weak to Lightning, so those Zeus Gauntlets will definitely come in handy.
You'll find the Aegis Shield in the center of the entry level. The Aegis Shield is just like the Opal Shield, but it also protects whoever equips it from Poison as well as Stone, since the NES version considers Stone to be a Poison-elemental attack. (The Aegis Shield would protect against Stoning in later Final Fantasy games.) You'll find the Vorpal, but you probably won't be needing it if you're strong enough. The Heal Helmet casts Heal in battle when used as an Item, just like the Heal Staff.
Thursday, June 12, 2014
HCBailly plays Final Fantasy - Part 30 of 38
RELEASE THE KRAKEN!
All maps by x_loto.
Sea Shrine
Map
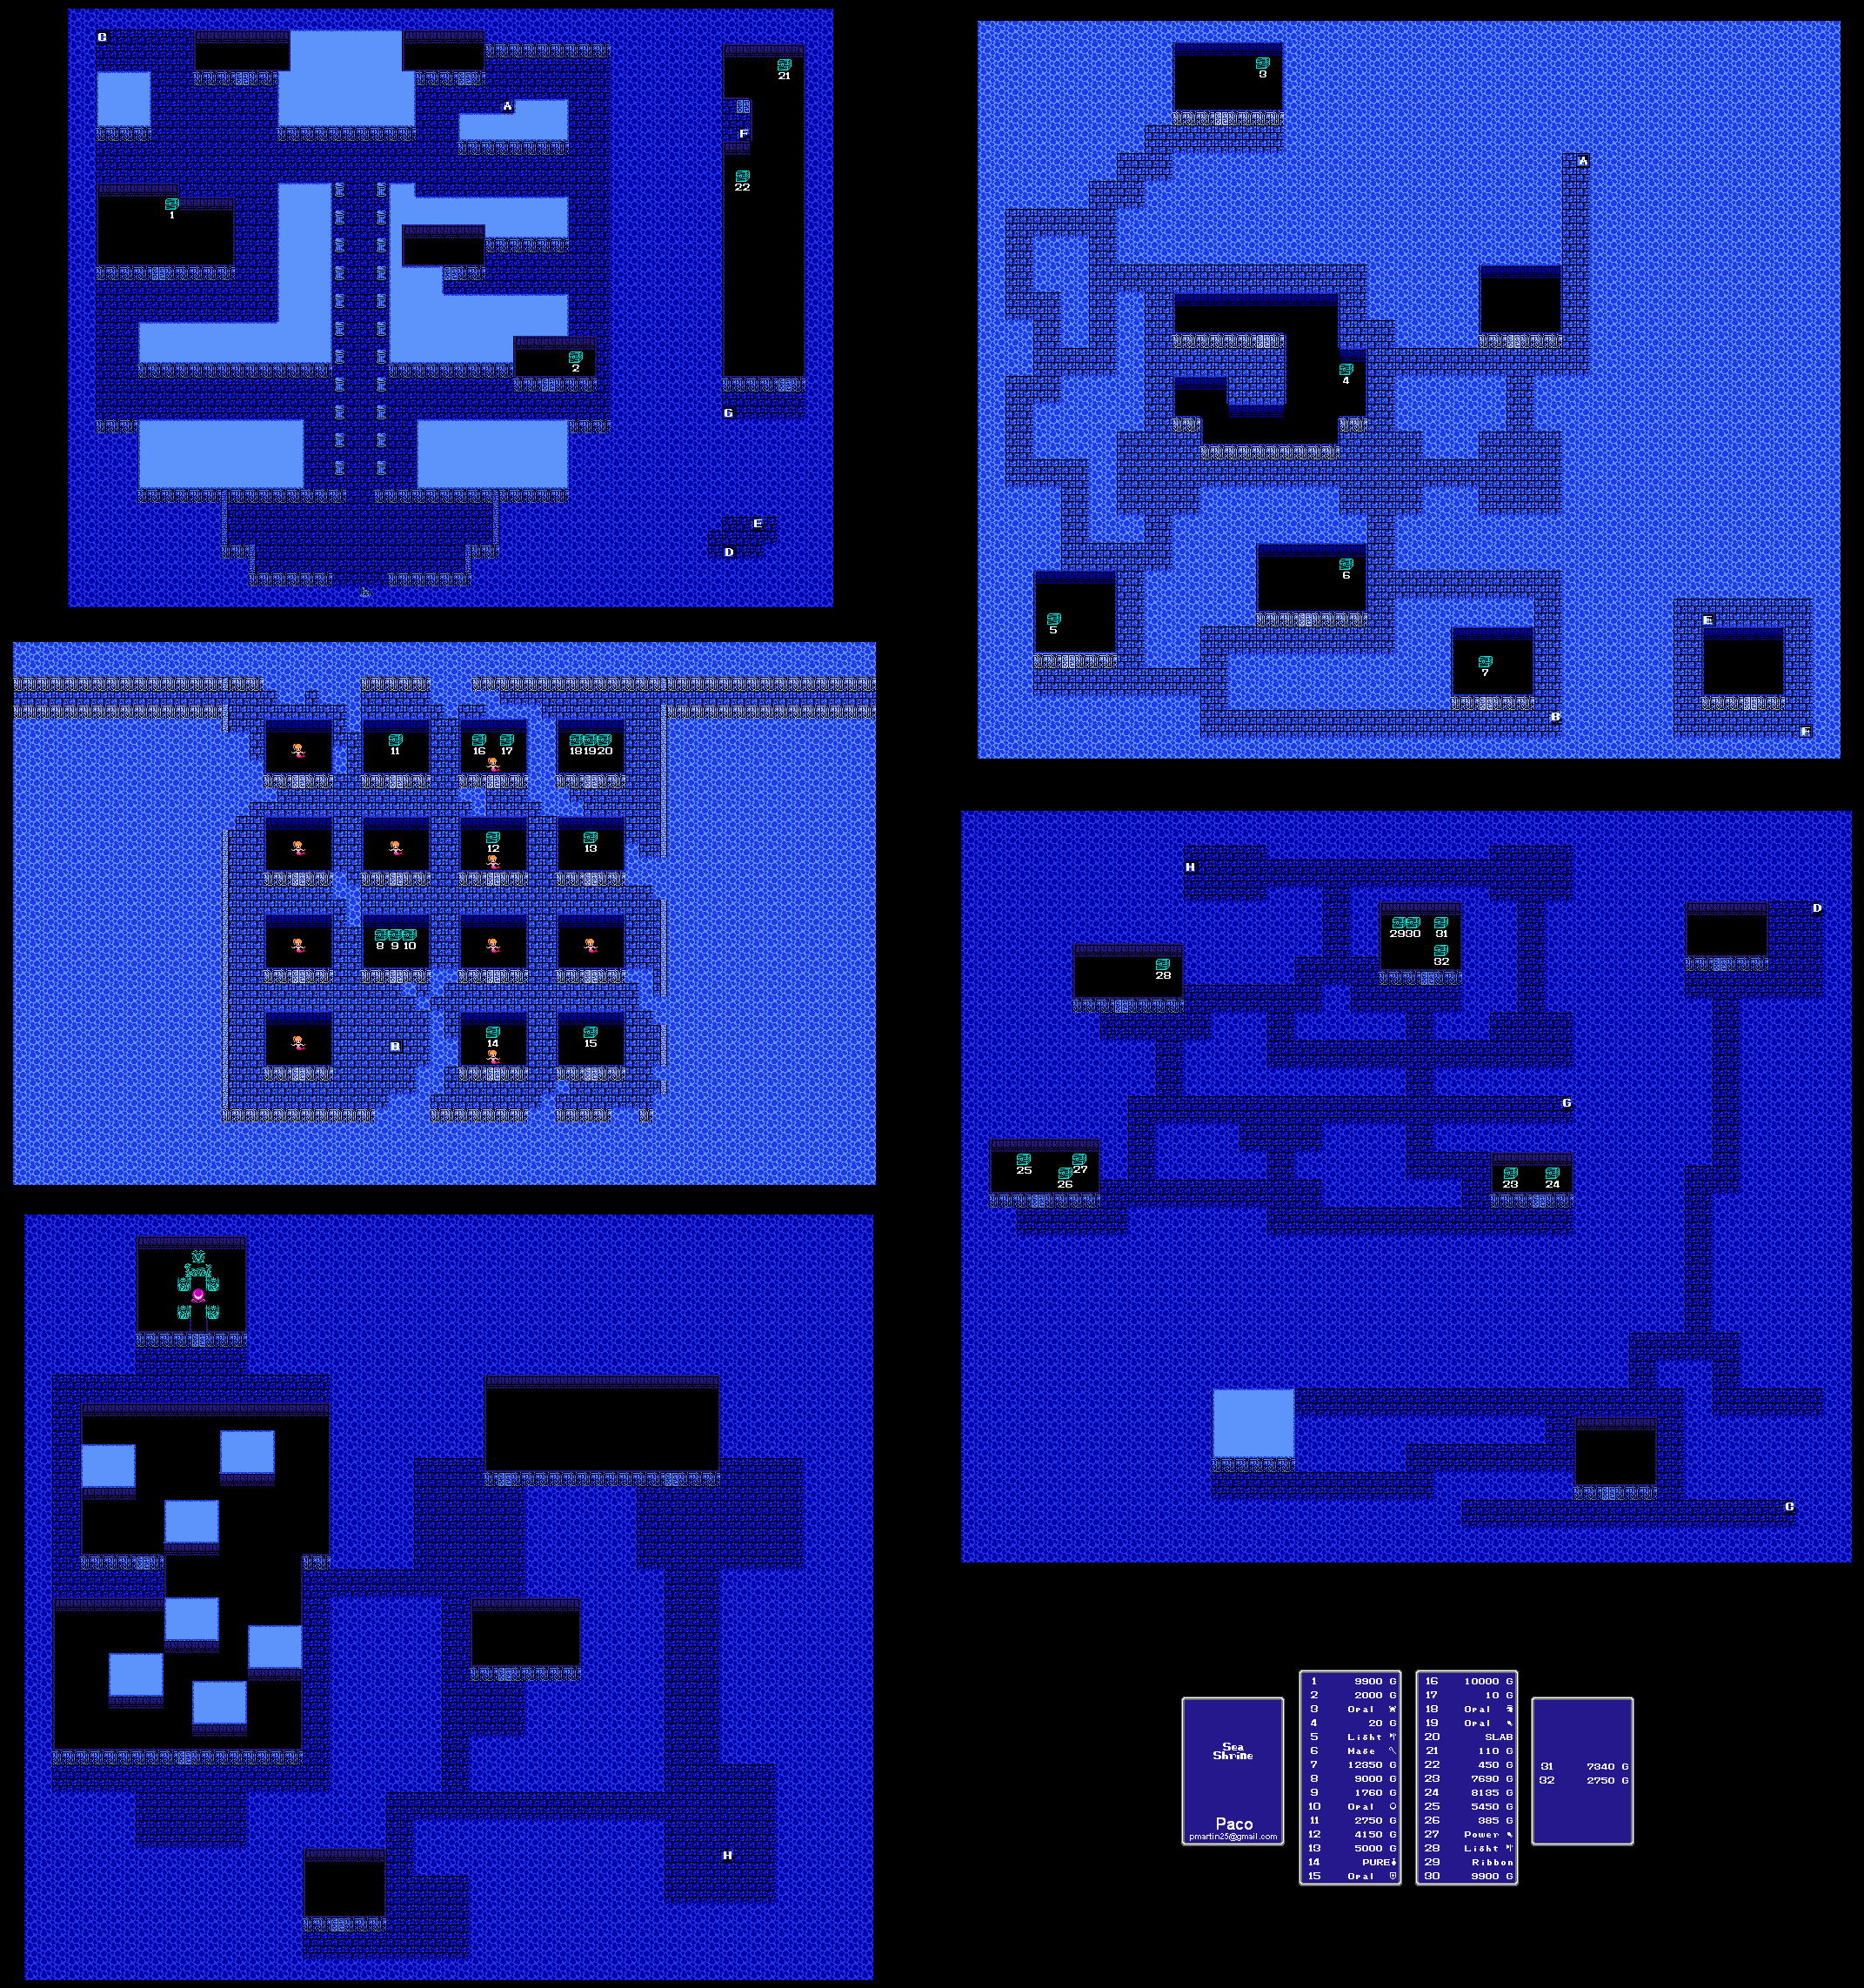
The Ghosts have a lot of HP, but you have Harm spells, Fir3...and a bunch of items that cast magic. They really aren't that hard now! They can Paralyze you with their physical attacks, so be careful.
You'll find another Light Hammer in a chest, but that chest is guarded on both sides: GrSharks on one side and WzSahags on the other. WzSahags can Poison you, making the GrSharks the easier battle.
You'll also find another Ribbon. Give it to one of your Wizards, assuming you have one.
The room with four treasure chests has a fixed encounter at the intersection, so if you get the gold with over 7000 G in it, you'll have to fight monsters twice. Thanks, game.
Once you make it through that huge room, you'll find the Water Orb altar...and Kraken!
Boss: Kraken
You should know what to do by now: cast Fast on all your party members, and keep your HP high.
Use the Zeus Gloves, since the Kraken is weak to Lightning.
The Kraken can also Blind you with the Ink spell, so be careful about that. His physical attacks also have 8 hits everytime, and it can be enough to kill one of your wizards or somebody with lower HP.
When you beat him, you'll be able to restore the Water Orb and return to the overworld near Onrac. Go ahead and head over there to heal and whatnot.
Onrac
Map
Talk to the guy who mentioned the Slab. He'll tell you to bring it back to Dr. Unne. To Melmond we go!
Melmond
Map
Talk to the guy near the gravestone in the upper-right corner of town. This is Dr. Unne. You'll find out what you already have to know: you have to revive the power of the Orbs. You'll also be able to talk to the people in the town of Leifen, which we haven't visited yet. We will soon enough...
HCBailly plays Final Fantasy - Part 29 of 38
We meet the mermaids and make our way closer to the Kraken...
All maps by x_loto.
Sea Shrine
Map
The top floor doesn't have any monsters, but there are mermaids.
The Opal Bracelet is the best bracelet in the game for everyone except for the Knight and the Ninja. If you give it to the Master, his Absorb will go up even more. The Opal Helmet is also decent, and can be given to the Knight, if you have one. The Opal Gauntlets are actually sort of useless, due to the ProRings being more powerful. The Opal Shield is a good replacement for the Flame Shield.
One of the chests at the top floor contains the Slab. You'll definitely want to pick this up.
Talking to the mermaids will reveal that you'll have to fight Kraken, the Water Fiend, in order to save the mermaids from disintegration and revive the Water Orb once again. The Kraken is at the bottom of the Sea Shrine. You'll also learn that the Leifinish used a musical tone to unlock the Mirage Tower.
Take the time to use Exit, replenish your party's HP and spell charges in Onrac, then head back to the Sea Shrine.
This time around, we'll be heading into the bottom-most floor.
The SeaTrolls and Lobsters are easy enemies.
The 7690 G chest is guarded by anywhere from one to three Waters.
The two chests in the corner of the left room are guarded on both sides by Mummys, Coctrices, Paralisks and Waters. You'll have to fight either the mummy/Stoning enemies or the Waters to get these two chests. I prefer the Waters.
Wednesday, June 11, 2014
HCBailly plays Final Fantasy - Part 28 of 38
We take our first trip into the Sea Shrine and find some useful items in the process...
All maps by x_loto.
Onrac
Map
Go back to the woman standing next to the submarine. Now that you have Oxyale, you can enter the submarine and enter the Sea Shrine.
Sea Shrine
Map
The GrShark (Gray Shark) isn't that much different from the regular Shark.
The Naga can Poison you with its physical attack, and can cast Lit2. It's still pretty weak if your party is strong enough, though.
You'll usually see the WzSahags and R.Sahags together. The Zeus Gloves can make quick work of the R.Sahags, and the WzSahags aren't really that troubling.
The SeaSnakes, unlike the regular Snakes, cannot Poison you with their regular attacks.
A Water (Water Elemental) on its own isn't much of a threat, but if you meet up with a group of them, don't be afraid to use Ice2. Strangely, they're weak to it.
The Opal Armor is not only one of the best pieces of armor in the game, it also protects the wearer from Lightning-based attacks. Equip it on the Knight if you've got one. The Light Hammer can cast Hrm2 when used as an Item in battle. The Mage Staff is even more useful, as it casts Fir2 when used as an Item in battle.
Tuesday, June 10, 2014
HCBailly plays Final Fantasy - Part 27 of 38
We finally free the fairy and prepare to adventure into the deep...
All maps by x_loto.
Well, the Defense sends the Hit Percentage on a party member way up, so equip it on a strong character such as the Knight. The Ribbon protects against some of the special attacks in the game, including some death spells. Other than the cap, it's the only headgear that a White Wizard can equip.
Anyway, let's head to the Caravan, which is straight west of Onrac. Due to a bug, you can land right in that patch of desert where the Caravan is.
Before we head over there, though, HCBailly covers the Naocho. (I'm now reminded of Beavis and Butthead and their love for nachos. Thanks, game.) He can Poison you with his physical attacks, but other than that, he's only slightly tougher than some of the other water enemies we've met so far.
Caravan
At least this place isn't like Big Bill Hell's.
Anyway, the only thing they sell is a bottle, which you'll need 50,000 G to purchase. When you get it, you'll save the fairy.
Gaia
Map
Well, now that you have the bottle with the fairy inside, go up to the spring at the upper-right corner of the town and use the Bottle as an item. You'll release the fairy. Talk to her, and she'll thank you with a bottle of Oxyale. Yay!
Now that we have the Oxyale, we can level up a little bit in preparation for the challenges ahead. The "power peninsula" that was mentioned earlier is still of some use, due to the monsters that show up only at the edge of that location.
The fixed encounter point with the Zombie Dragons in the Castle Ordeal is also of use at this point.
You can also use the Ice Cave as a farming area. Just watch out for all those Mages and Sorcerers. Even though you have the Ribbon equipped on the White Wizard (probably), they can still be formidable. Hunt down the Eye and keep fighting it over and over.
The Gurgu Volcano is probably the easiest point to level up at. The fixed encounters with the Fire elemental enemies give some good experience, and you don't have to go far to find one of these points, either.
HCBailly plays Final Fantasy - Part 26 of 38
In this entry, we take care of a lot of stuff. Even though we can't get the magic in the next town yet (we're not powerful enough to get the charges for them), you have some of the most important spells in the game there.
Also, we're getting pretty close to the end of the game! Can you believe it?!?
All maps by x_loto.
If you're still missing useful spells and whatnot, go exploring and get them. We'll wait for you.
Alright? Alright.
Now that we're ready, let's go ahead and go east of the Cardia Islands and the Castle Ordeal. There's a town blocked entirely by mountains. This is Gaia. Let's head over there.
Since we meet at least one new enemy on the way, let's cover it. The FrGator is a vanilla enemy, and you'll face it in the rivers of the northern hemisphere of the world.
Gaia
Map
No, this isn't Gaia Online. Put down the Jade Peasant Clothes and the Enchanted Halo.
The Lv7 Black Magic shop has Ice3 and Brak. Keep Ice3 in mind, since one, you'll need it; two, you won't be able to get the level 7 and 8 spell charges until your mages are level 26. Brak is another instant death spell.
The Lv7 White Magic shop has Cur4 and Hrm4, which are the most powerful versions of Cure and Harm you can get. They are very, very useful. Make a mental note of these.
The Lv8 Black Magic shop has Stop, Zap! and XXXX. XXXX is an instant death spell, while Stop and Zap! are basically Paralyze spells.
The Lv8 White Magic shop has Fade, Wall and Xfer. Fade is basically Holy (or Pearl, for you hardcore Super Nintendo version fans), and lets the White Wizard do magic damage. Wall is all the anti-elemental spells (AFir, AIce, ALit) rolled into one. Don't even get Xfer, it's completely bugged in this version.
In the Armor Shop, get the ProRing (Protect Ring) for everyone, including the Master. If you have a Master and/or White Wizard, get the Gold Ring. This way, your Master's absorb will actually rise higher when you equip both on him.
The only thing in the Weapon Shop is the CatClaw. If you have a Black Wizard, get one. Otherwise, don't even bother. This is the best weapon for him.
As you talk to NPCs, you'll learn about the tower in the desert to the south, the language of the town of Lefein, and more about the Sky Warriors. You'll also learn that the fairy in the spring was kidnapped. Turns out the fairy is important, as only a fairy can draw Oxyale from the spring. You'll find out a pirate in the northwest corner of town bottled the fairy and sold her to a caravan.
When you're done, head to the Waterfall Cave. It's the waterfall that's north of the town of Onrac.
Waterfall Cave
Map
Take the left path on every fork, and you'll come across the treasure. After a fixed battle where you fight Mummys, WzMummys, Coctrices and Paralisks. Run away, then get the treasure. You'll get the Wizard Staff (which casts Confuse when used as an Item in battle), a Ribbon (for the White Wizard), a lot of gold, and the Defense (Defender), which is a very powerful sword. I'll mention that...and the Ribbon...next time!
Before you leave, though, talk to the guy in the treasure room. He'll give you the Cube, which gives you entry into the Floating Castle.
Monday, June 9, 2014
HCBailly plays Final Fantasy - Part 25 of 38
In this episode, we give a rat's ass.
No. Really. We give a rat's ass.
All maps by x_loto.
Castle of Ordeal
Map
You'll find another Ice Sword on the top floor. Hand it over to your Fighter if you've got one. You'll also get a Gold Bracelet here. Give it to your strongest Mage.
When you make it to the throne, open the chest and find...a Tail. What? Did Miles "Tails" Prower lose one of his fox tails? Did he originally have three, lose one of them and had the third tile miraculously end up here?
It's a rat's tail?
Never mind.
Anyway, stand across from the throne and you'll face the ZombieD (Zombie Dragon). He isn't too hard, thankfully. When you beat him, you'll be able to walk up to the throne room chair and teleport back to the beginning.
Cardia Islands
Map
Head back to the Cardia Islands and see Bahamut again. Turns out the tail of a rat is your proof of courage.
WHAT THE HELL IS THIS.
Anyway, your reward? Your party's classes change completely! A Fighter becomes a Knight (and gains the ability to learn some White spells), a Thief becomes a Ninja (and becomes extremely useful in the process), a Black Belt becomes a Master (which doesn't really add any extra benefits), a Red Mage becomes a Red Wizard (which allows him to learn more spells), a Black Mage becomes a Black Wizard (and can learn more Black spells) and a White Mage becomes a White Wizard (and can learn more White spells).
Anyway, learn any spells you haven't gotten yet, preferably Exit (because you're going to need this one). After that, it's time to explore the rest of the world.
Onrac
Map
Time to head to Onrac. Be careful as you canoe your way north through the river, as you may run into some tough enemies.
Anyway, one of the NPCs mentions Oxyale. Not sure what that is, but since it's in all caps, I'm guessing it's either really important or something that Billy Mays advertised in the world of [i]FF1[/i] before he died. Another NPC mentions Underhill, the Caravan Master, and that he has (or had) a strange item.
As you talk to NPCs, you'll also learn about the mermaids and the shrine that used to be nearby, as well as the Leifinish language of the Sky Warriors being stuided by Dr. Unne of Melmond. He needs a Slab in order to teach it to anyone who is interested, though. Keep a mental note of that for now.
You'll also meet Kope, who says he saw something fall in the north near the waterfall. You'll also meet a woman who has created a submarine to save the mermaids, but to go deep enough it requires...Oxyale. Brilliant.
The Black Magic Shop here has Sabr and Blnd. Sabr does jack shit due to buggy programming, so don't get it. Blnd is nice, but at this point you're probably strong enough to take on anything without necessarily having to need it.
The White Magic Shop has ARub and Hel3. ARub protects against the Rub spell. Despite what HCBailly says, go get it anyway. You'll need some way of taking down any more Mages or Sorcerers that come across your path (even though you'll find something that takes care of it later on). Hel3 is a more powerful form of Hel2. Get that as well.
HCBailly plays Final Fantasy - Part 24 of 38
In this episode, we hunt down the proof of our courage and also get some very useful items. We're jammin' now!
All maps by x_loto.
Cardia Islands
Map
After we get some more chests open and get some more gold (which we can never get enough of), it's time to go to the Castle of Ordeal (as you'll find out by one of the dragons).
While on the islands in the overworld, you may fight Wyrms. These things aren't terribly hard as long as they don't score a critical hit on anybody in your party.
Castle of Ordeal
Map
The Castle of Ordeal is northeast of the Cardia Islands. While you could land on the other side of the land where it's located in and walk to it from there, you can get your ship, park at the edge of the river where it flows into the ocean and canoe in from there without having to deal with very many monsters.
When you enter, you'll see a sage there. He says that possession of the Crown is proof of your courage, and that you'll have to take it back to the royal throne.
Go to the room in the upper-left and walk into the teleporter to be swept into another teleporter. From there, you'll be walking into pillars to access different parts of the castle...thankfully, that's what the map I've linked to is for! :D Anyway, the correct order is A, B, C, E, F, G, H, I, J. Red letters are where you step while the green letter is where you'll end up.
Watch out as you make your way through the castle, as you can run into Sorcerers around here.
If you didn't open the chest in the upper-right corner of the second floor, you'll be able to open all the chests at the top, as one of them is a duplicate of the second floor chest. That's a good thing, since the second floor chest is guarded by a MudGol (Mud Golem). He's not that hard, mind you, and he's there for some good gold and experience, but the fact that all the treasure is basically after the flight of stairs at the end of the first half of the castle makes going to the chest it guards a moot point.
However, the treasure inside is a keeper: the Zeus Gauntlets. Give them to your White Mage (but don't equip it), and they'll never have to perform physical attacks again! Just use them as an item in battle with the character that has them and they'll automatically cast Lit2.
The WzMummys aren't very hard, but don't be afraid to cast Fire or Fir2 on them.
Yes, the Medusas can Stone you. If you see them, run like hell.
The ManCats can cast Fir2 and scorch your party, but if you can cast AFir before they can strike, you'll be set. If they ambush you, though, you're better off running.
The Nitemares will only be any sort of threat if they're in groups. They're weak to ice, so if you're fighting more than one, throw out an Ice2 spell.
The Heal Staff is also necessary for your White Mage. When used as an item in battle, it casts Heal.
Sunday, June 8, 2014
HCBailly plays Final Fantasy - Part 23 of 38 - BONUS INTERMISSION EDITION
You thought the Ice Cave was easy? Wrong.
It should also be noted that Sorcerers can use Trance to paralyze your entire party. Just another reason to run away from them.
HCBailly plays Final Fantasy - Part 22 of 38
We've completed the Ice Cave. About time, because this area is terribly difficult.
All maps by x_loto.
Ice Cave
Map
If you have a Thief in your party, save the Ice Shield and Flame Armor for him. It'll help him out defense-wise in the long run for a little while.
Anyway, the chest we can only access a certain way (read: through the holes) contains the Floater. Before we can get it, we'll have to face the Eye. Thankfully, he's not that much of a threat.
Now, you're probably wondering what the Floater does. Well, wonder no more! You're about to find out soon! For now, let's get out of here.
Elfland
Map
Go back to Elfland and talk to the guy near the Armor Shop. He'll tell you to use the Floater near something that is emerging from the send in the desert to the south.
With that in mind, go to the desert south of Crescent Lake. Since you have the Canoe, this should be easy going. Go into the desert and select the Floater from the Item menu. You now have an Airship.
Go back to the overworld, and walk up to the airship like you would any other vehicle. Now you can fly anywhere you want in the game!
But where to first? Well...we learned earlier in the game that there are no ports to the north. So we'll just take the same route that HCBailly takes for now, so let's head to the Cardia Islands.
Cardia Islands
Map
Well, it's a very simple dungeon, with a few useful items and a bit of gold. Thankfully, there are no monsters, and there's a dragon there who tells you to come back with proof of your courage. I wonder what he means by that...
The holes in this area of the overworld are the only way of exploring all of these rooms. You'll also meet another dragon who tells you to meet Bahamut, the King of the Dragons. Make a mental note of this, as this will prove very, very useful really soon.
While you're in the overworld, you might be meeting up with the Saurias. Run away from them if you see them, as they can turn you to Stone.
As you explore, you'll learn that the Dragons of Cardia and humans once got along, but now...
Anyway, one of the holes will take you straight to Bahamut. Go down the long hallway, take the stairs and go all the way to the other side of the throne room. He'll tell you what you already know: bring true proof of your courage, and receive the honor due true Warriors. But how are we gonna do that? We'll find out next time!
Subscribe to:
Posts (Atom)