At last, we meet the Professor...and we also get a way to go to and from the space station whenever we want!
All maps by Grizzly.
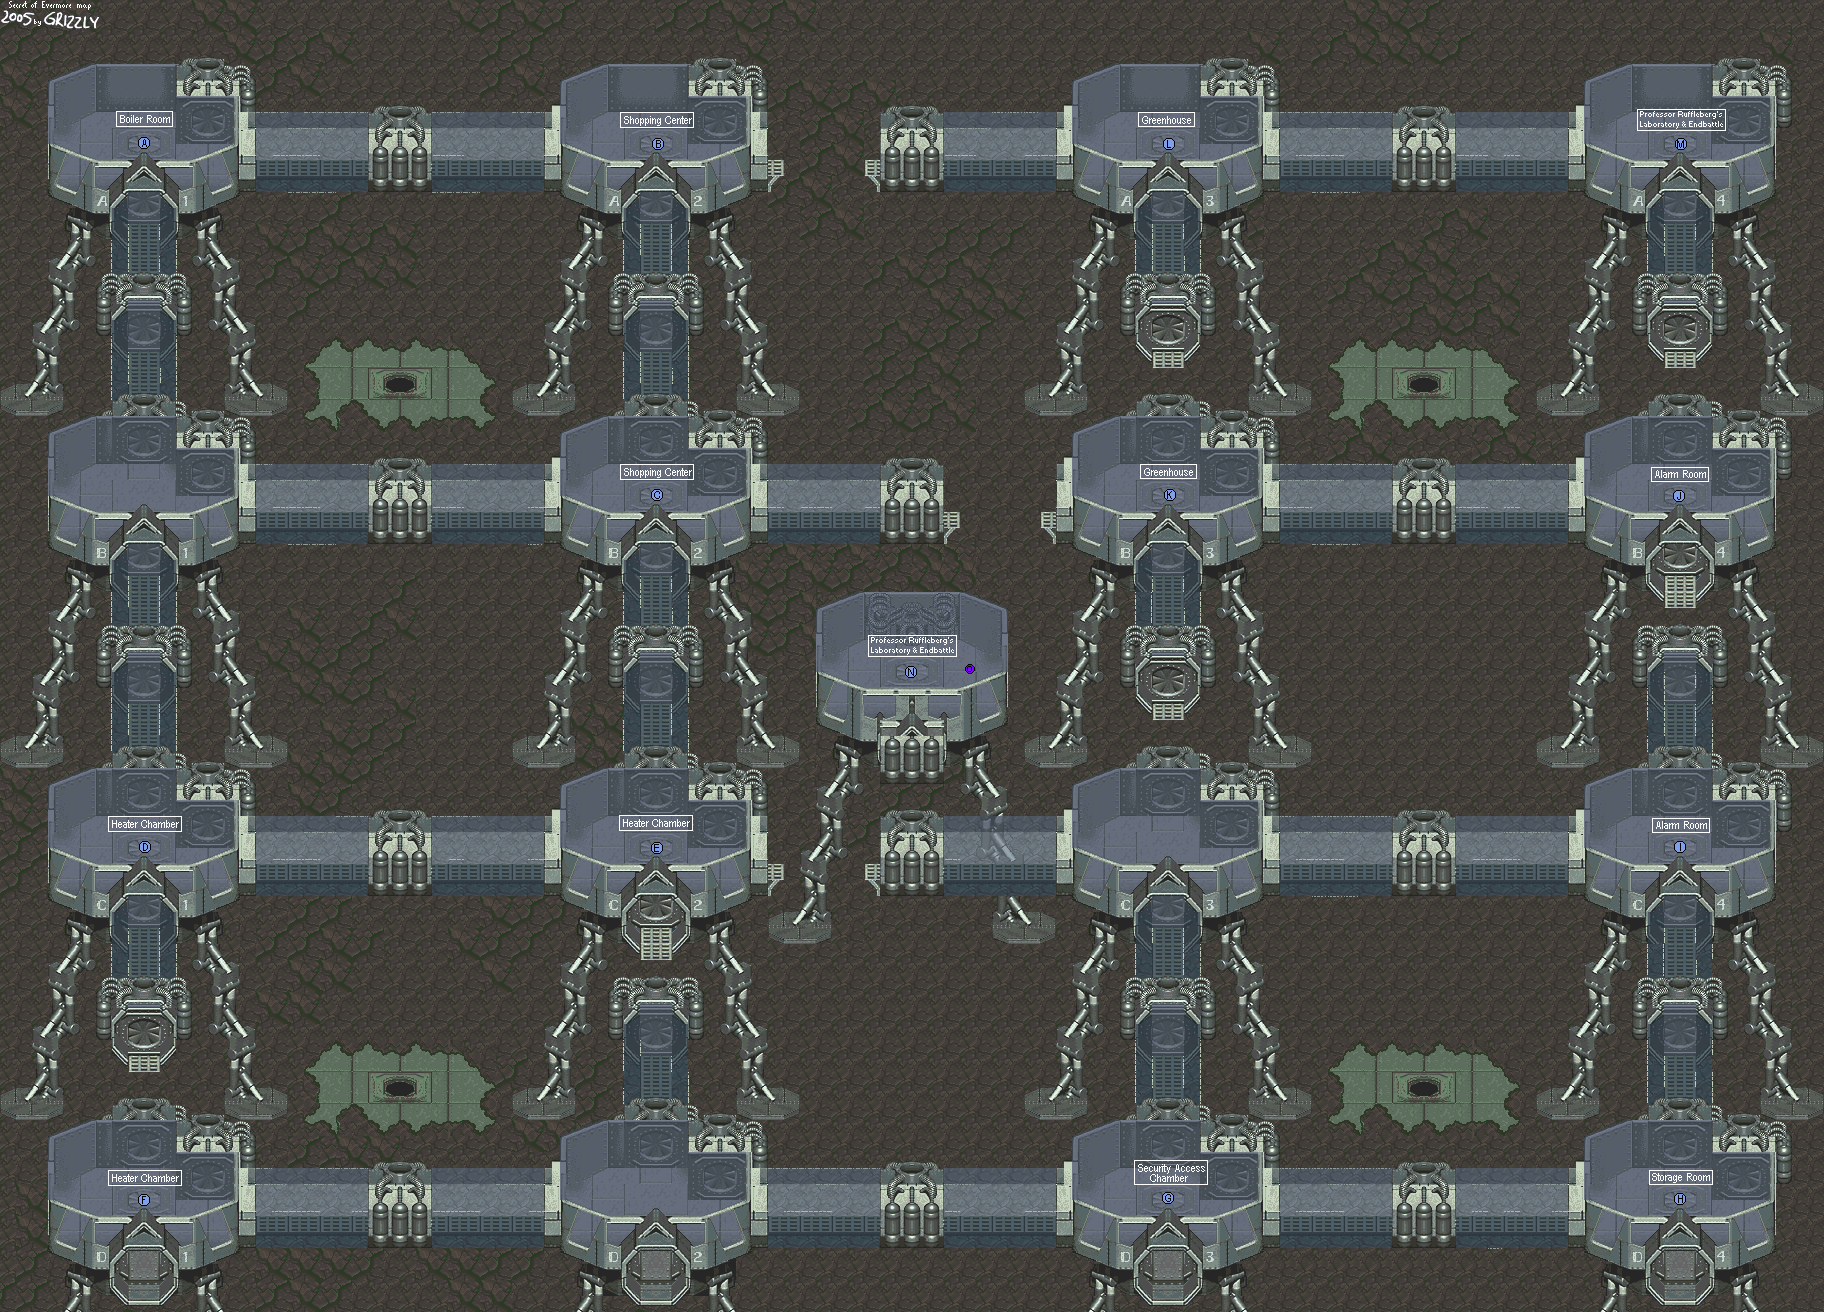
You start off in the "first section" of the Main District, which consists A-1, A-2, B-1, B-2, C-1 and C-2. You'll have to get through the heater maze to get to the "second section."
Heater Chamber
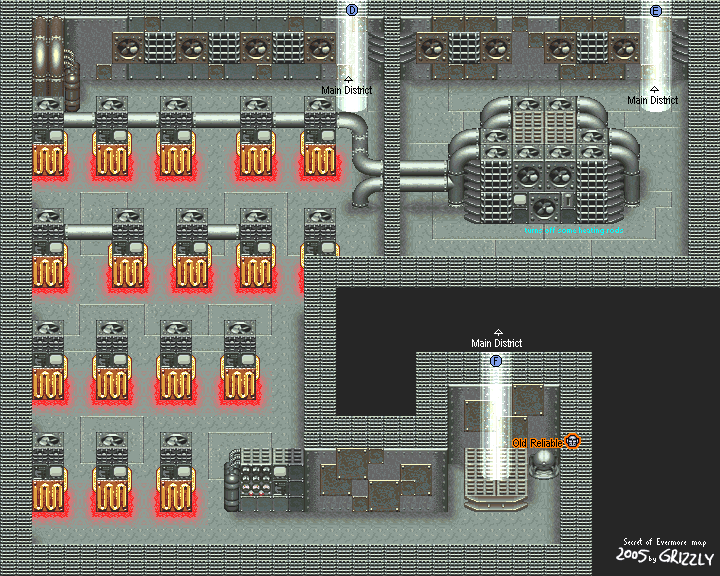
C-1 leads to a bunch of heaters. If you touch them, however, you will take damage. In order to get to the other side of these things, you'll have to turn the switch off that controls some of these. To do this, you'll have to go to C-2, flick the switch, then return to C-1. When you do, some of them will be turned off and you'll be able to get to the other side without a problem.
Be sure to open the little bubble next to the teleporter when you reach the other side, too. It contains Old Reliable, which is stronger than what you can get in the Shopping Center.
Once you go into there, you'll get access to the "second section" of the Main District maze which consists of the entire D row as well as C-3 and C-4.
Security Access Chamber
D-3 leads to the Security Access Chamber. When you come down the transporter beam, take down all the fans that come out of the floor. They may look like they're powerful, but they're not. Now you can do stuff around here without being very slightly hassled.
The console in the middle is the greenhouse lighting switch, and to the left of that is the storage room lighting off. Both of them are connected, and if you turn one on, you do the same to the other.
If you don't flick the storage room lighting, you'll have to fight some monsters if you go into it.
The console on the right controls the alarm. If you used this before you went into the alarm room and used the code for it, you won't have to fight the eight Guardbots (which aren't very hard, anyway) in the Alarm Room.
Storage Room
D-4 leads here.
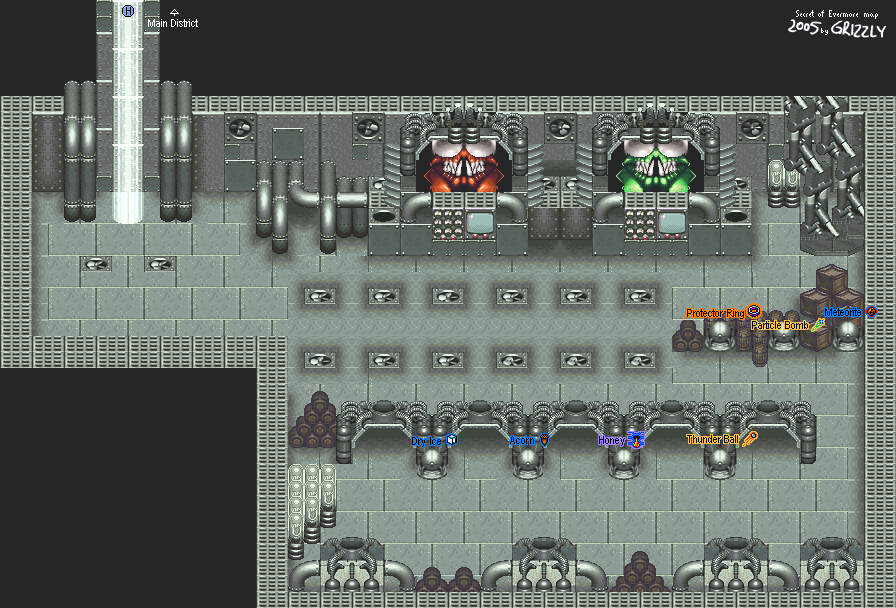
If you don't turn on the lights here, you'll trip an alarm and you'll have to face more enemies. What's up with the red and green Thraxx heads, anyway?
You can find the Protector Ring here, along with a few alchemy ingredients, healing items and some Bazooka ammo. For some reason, the alchemy ingredient and healing item chests are glitched. You can open the chests, but the game takes forever to tell you you got something and give it to you.
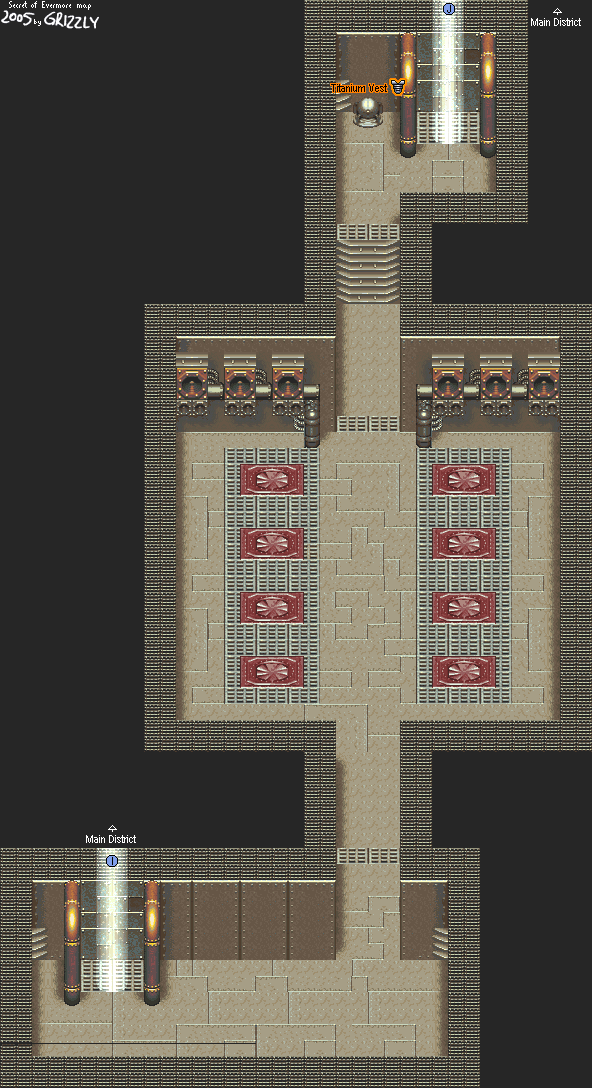
Alarm Room
C-4 leads here.
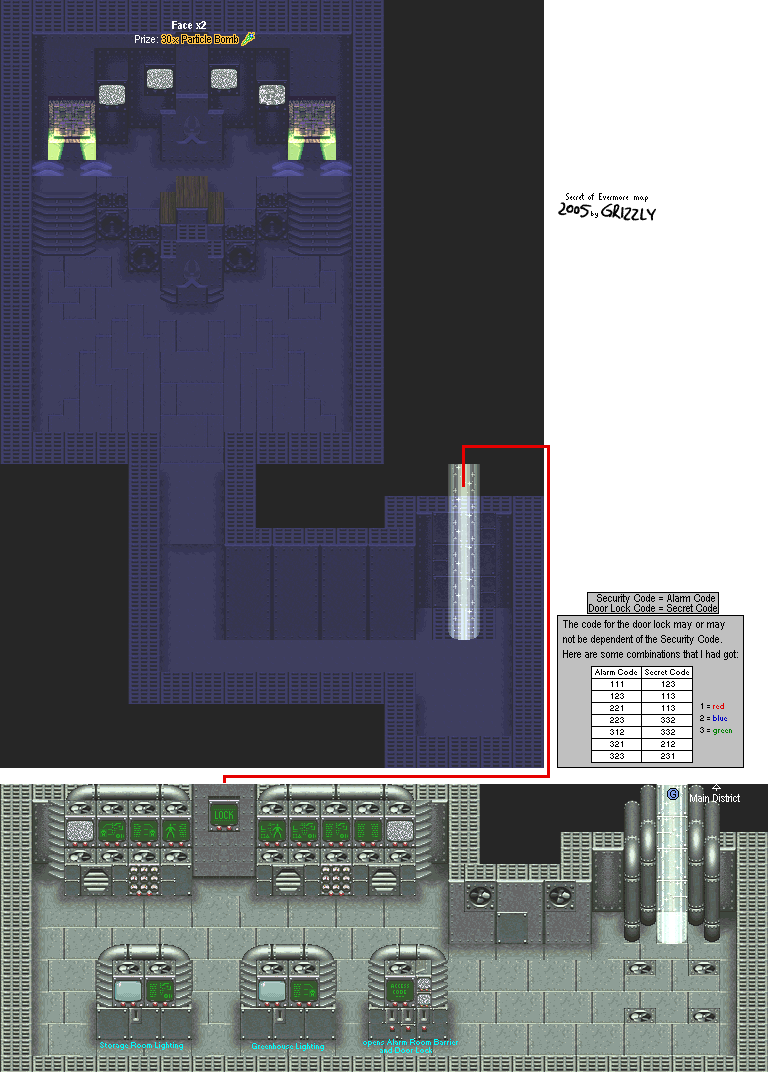
There is a switch that turns the alarm in the Alarm Room off somewhere in Omnitopia.
If you don't turn off the alarm in the security access chamber, you'll have to fight off eight Guardbots before you can continue on. Hope you got the more powerful Bazooka Ammo before you got here.
The little bubble here gives you the Titanium Vest when you get to the transporter beam on the other side. Sweet! From here, you'll be able to go from B-4 to B-3, which leads to the greenhouse.
If you go back to the security access room after fighting the Guardbots, the alarm code machine will tell you what the code was when you see it.
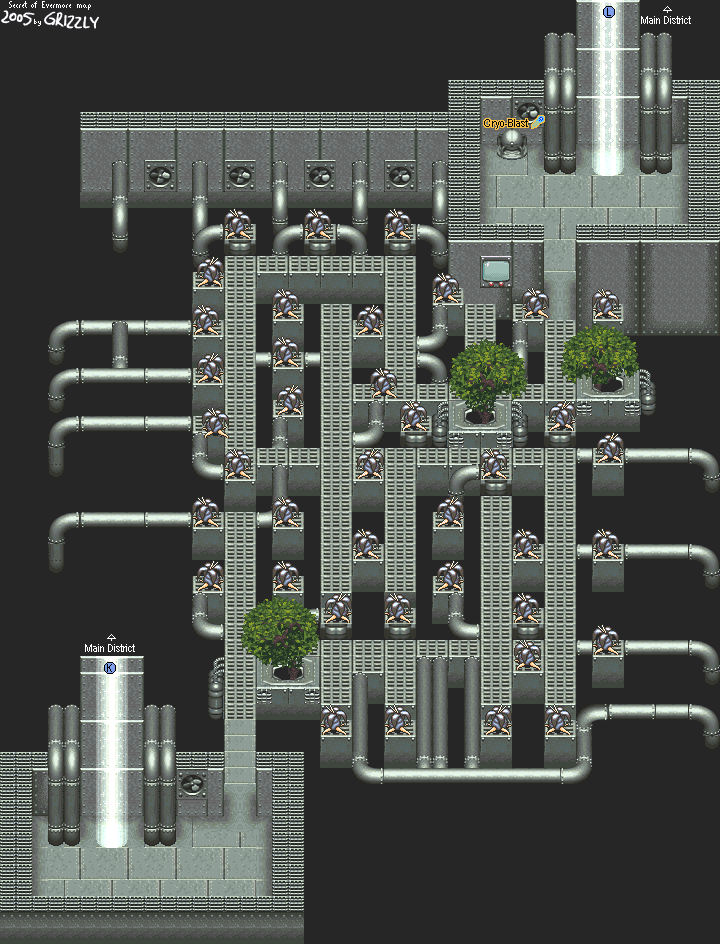
Greenhouse
If you come in here while the lights are on, you'll get the Prehistoria jungle music and some of the flowers will try to attack you as soon as you come near them. These flowers are called Flowering Death, and if one lands a successful attack on you, it instantly causes a 999 HP which puts The Boy out for the count via an insta-kill. Unless you use Pixie Dust and you have six of those things, I wouldn't even recommend going in here while the greenhouse lights are on. Instead, you'll have to turn them off, and to do that, you'll have to go to the Security Access Chamber and turn the greenhouse lighting off.
When it's dark, you can actually do some stuff. Head to the transporter beam on the other side of the maze. Open the treasure bubble to get some Cryo-Blast ammo, which is even more powerful than the Particle Bomb.
All you'll have to worry about in the maze now are the grey mosquitos that show up near the north end of the maze. They're just like the ones in Prehistoria, so trust me when I say that they aren't that powerful.
You'll come out through A-3. Go right to A-4...and you'll finally meet Professor Ruffleberg!
Professor Ruffleberg's Laboratory
When you meet Professor Ruffleberg, he'll tell you how all this started:
It was all a scheme by his household robot servant, Carltron (the guy who sent you into the room with the two Guardbots at the very beginning of the game). The AI that he had from being programmed into a very good chess player also gave him free will. Carltron got tired of being the Professor's household servant and sabotaged the Evermore experiment. He then schemed throughout the years, which led to the creation of the robot body doubles and all the problems going on in Evermore. Now the Professor needs your help to stop him.
TL;DR: The butler did it.
He'll then tell you about the Energy Core that's located at the base of the Chessboard in Gothica. He will then open the door to it so you can get. You'll be able to use the spaceship (which actually works this time) in order to head down there and get it. He'll also give you Call Up, which uses the super-rare Meteorite ingredient (there's only about 14 of them in the entire game). It lets you create Call Beads. He'll also give you his Call Bead spells as well.
Call Up
1 Meteorite, 1 Dry Ice
Disrupt: Casts Confound on enemies.
Restore: Brings The Boy and The Dog to maximum health.
Electra-Bolt: A powerful lightning attack.
The switch that the Professor was standing at will give you the most powerful armor in the game. Go buy it. You'll need it for the final battle.
No comments:
Post a Comment