asdf
All maps by Grizzly.
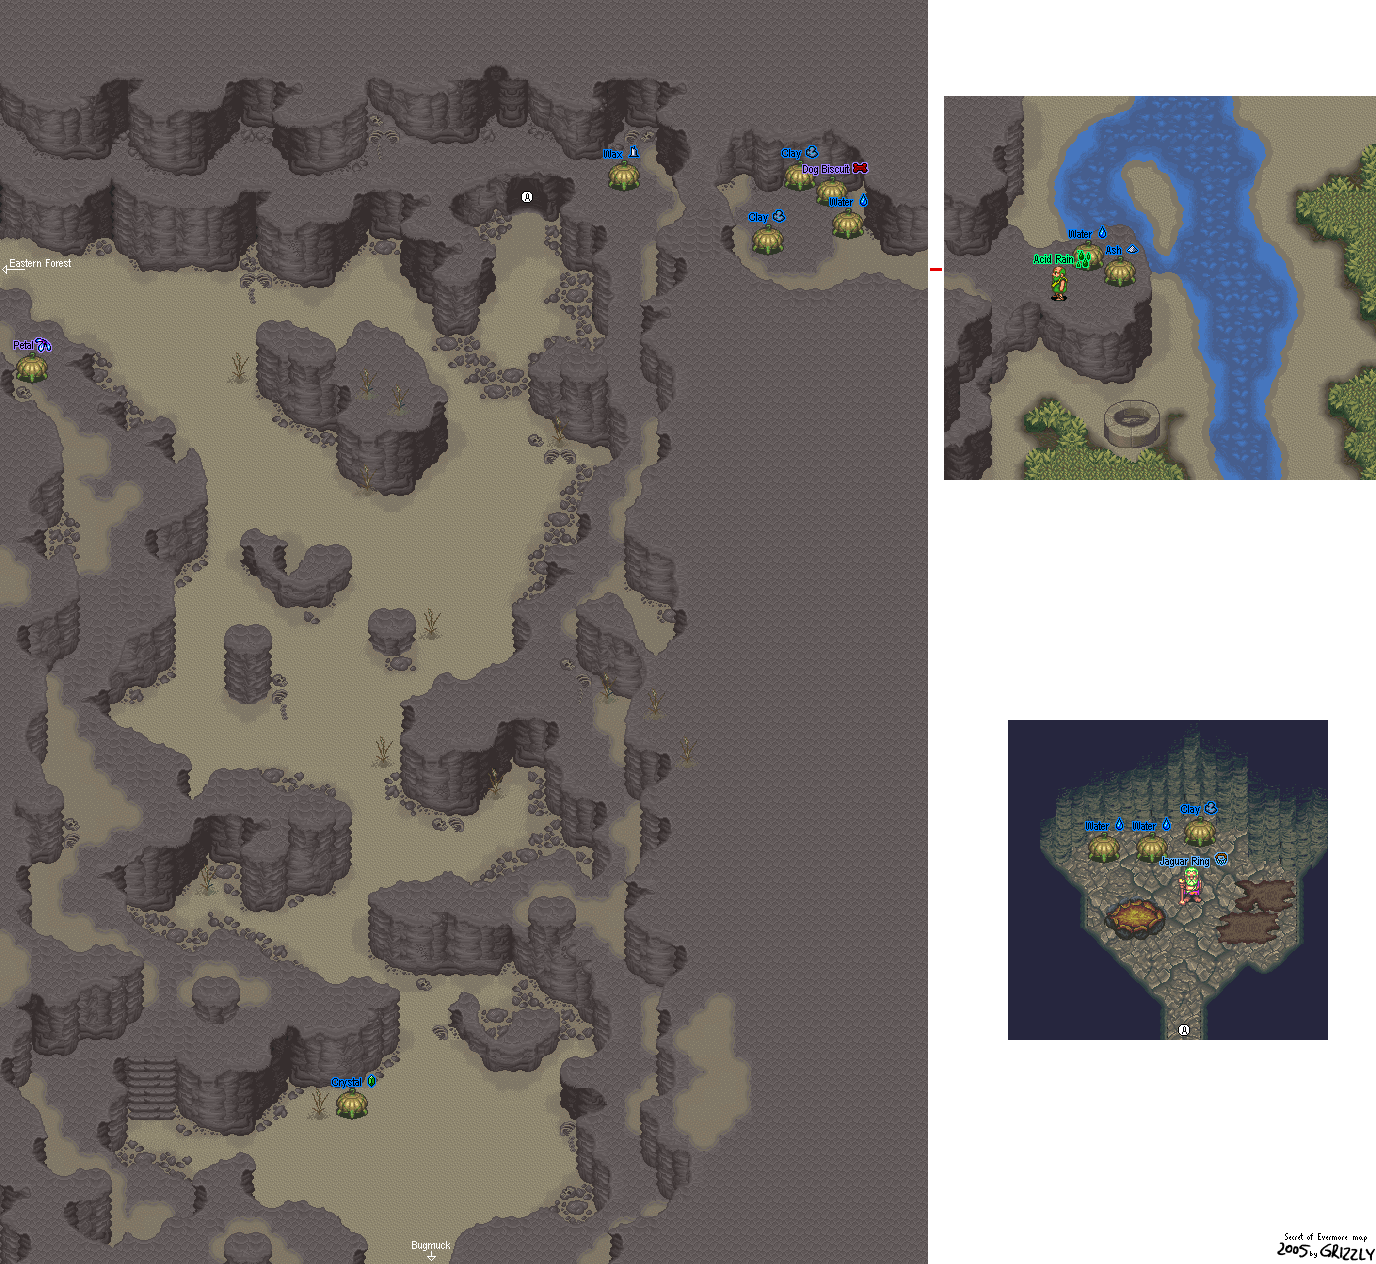
Quicksand Field
When you head west, you'll appear at the big field with the Skelesnails. Chop the underbrush down with the ax and you're out of there. Now go and head back to the village. If you chop up more of the underbrush here and go north, you'll just go to a useless (for now) area. It's possible to find some alchemy ingredients here if you cut the plant life down around here, so it wouldn't hurt to go here at the moment.
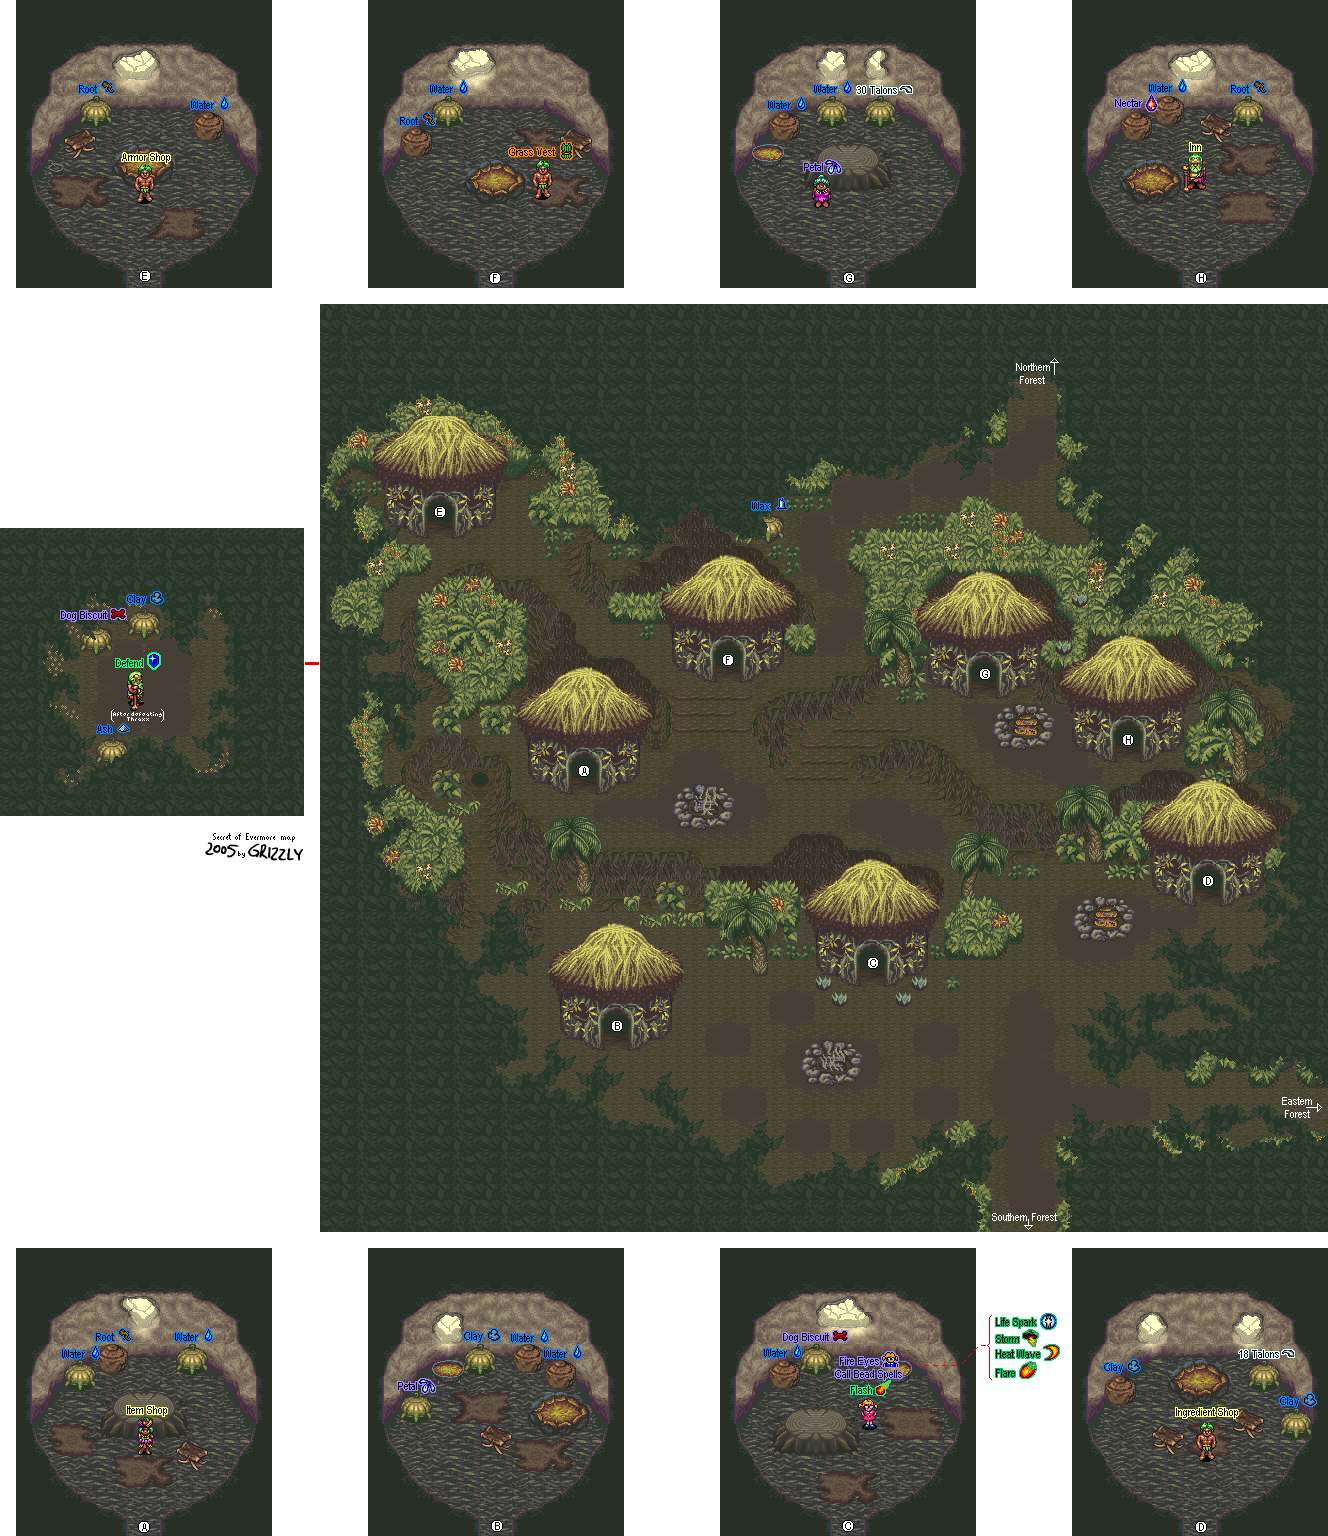
Fire Eyes's Village
Head back to Fire Eyes's hut. She'll tell you that the village is facing a new crisis: the volcano north of the village is cooling down, and she wants you to find out what's causing this. She'll also tell you about her uncle, who lived on the mansion on the hill back in Podunk, where she is also originally from. She'll also tell you about his machine which took people to a world of their own design. Not surprisingly, since she liked all things prehistoric, she was taken here. Something obviously went wrong, as the few hours she spent here has now become a few decades.
That's not all. She'll also give you a few Call Beads, which allow you to cast some powerful spells. Hold on to these for much later. You may never know when you'll need them. Then she'll give you a demonstration of her powers which explains why they call her "Fire Eyes." She will set a fire pit aflame, and if you search that fire pit afterwards, you can find some Ash.
Fire Eyes has the follow spells:
Flare: A huge fireball that does huge damage to one enemy.
Heat Wave: The screen turns a red hue, then all on-screen enemies take a lot of damage.
Storm: A powerful lightning storm that deals damage to either one or multiple enemies.
Life Spark: A very potent healing spell that heals a lot of HP.
Also, remember the gourds I told you not to touch? Go to them now. You'll get better treasures out of them, and one of the gourds will have a Call Bead instead of a Biscuit. Also, some guy will show up that you can talk to. He'll give you the Defend formula.
Defend
1 Clay, 1 Ash
This will temporarily increase your defense, so level it up!
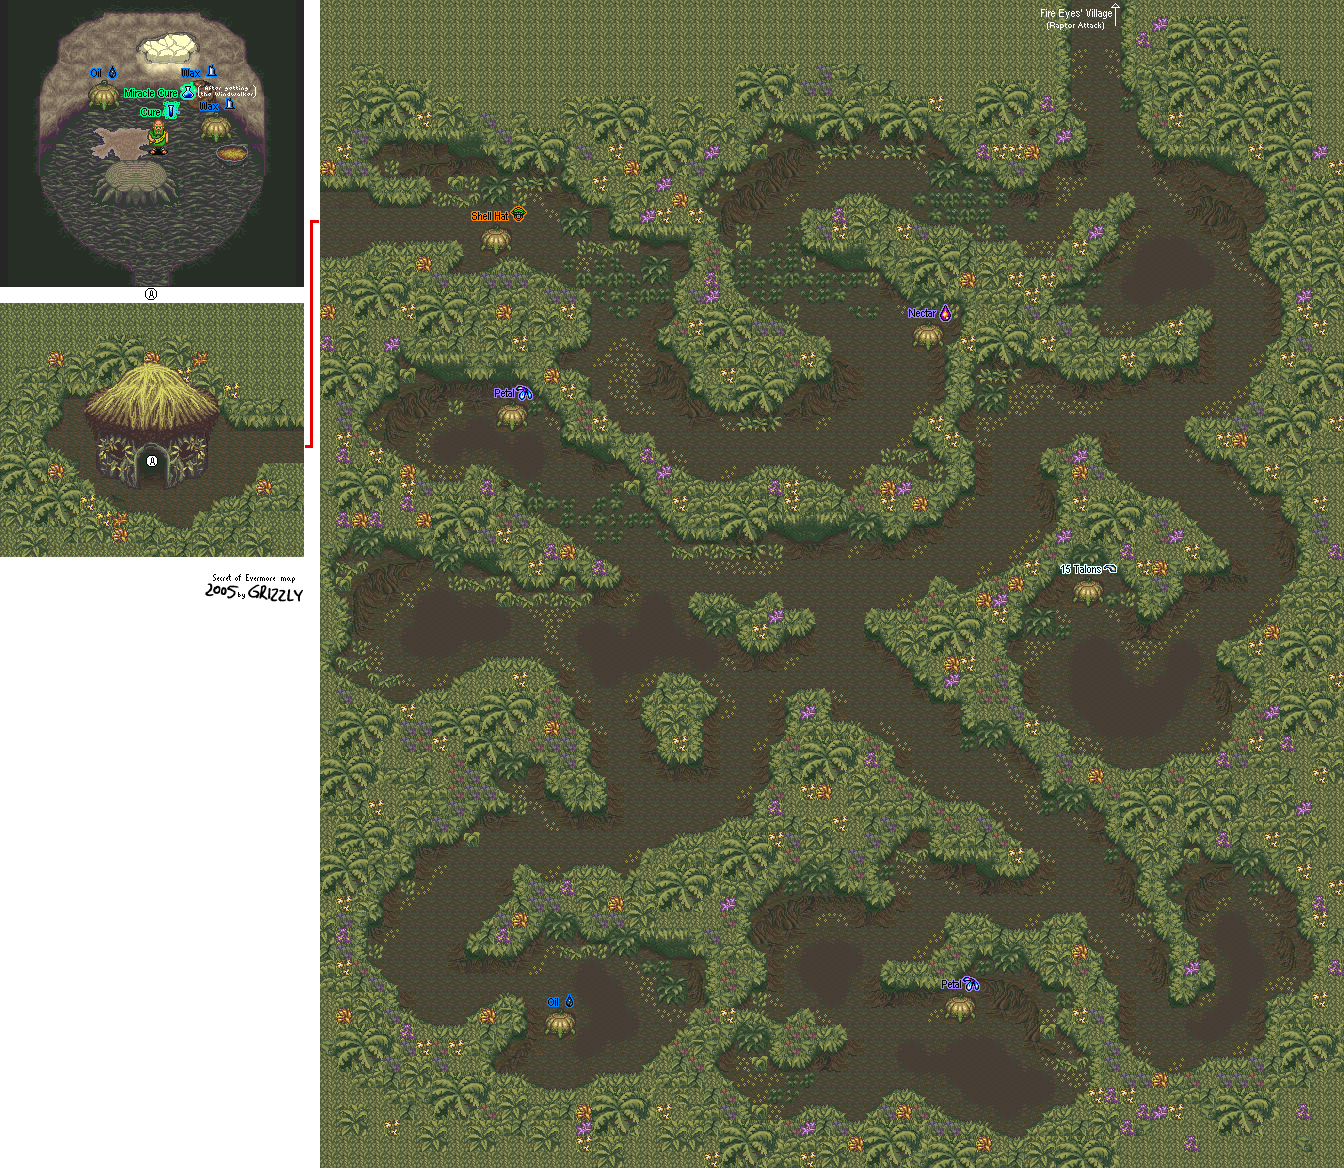
Jungle
Go back through the jungle area south of the village. Cut down the underbrush whenever you see it. Not only will you find some more monsters and alchemy ingredients (as well as a free Shell Hat in a gourd), you'll also find Strong Heart's hut. Go in and he'll give you another spell: Cure. Equip this; it acts as a Alchemy version of the Essence item.
Cure
2 Roots, 1 Oil
You can also purchase some ingredients from him, too.
If you talk to Strong Heart as The Dog, you'll get a free Leather Collar.
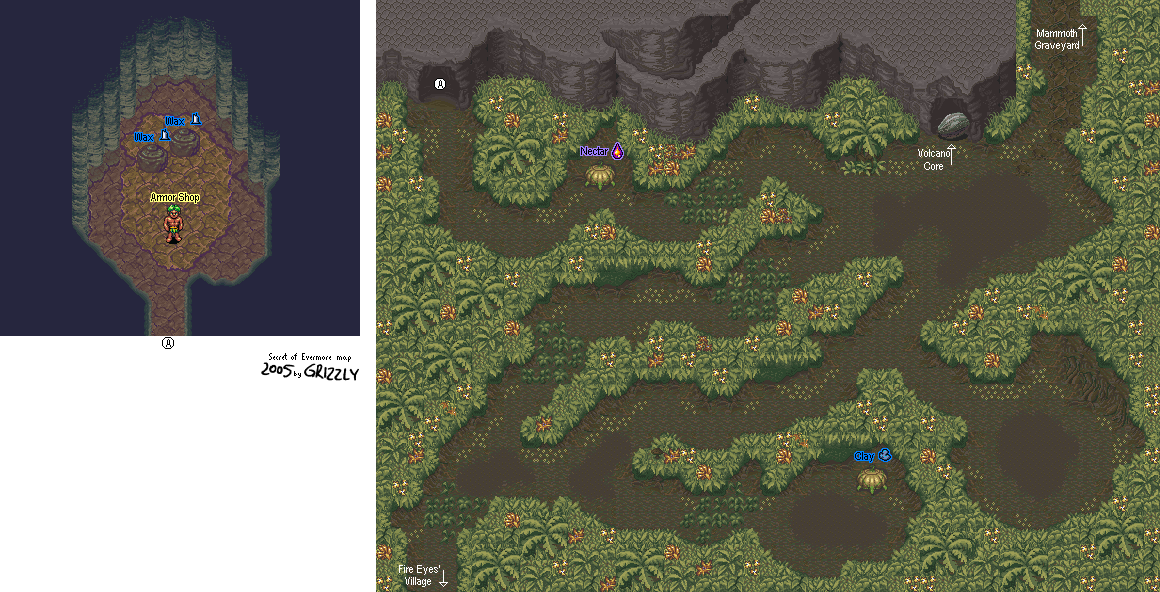
Path to Mammoth Graveyard
Time to go north of the village after all that leveling up.
The Carniflowers are palette swaps of the Wimpy Flowers, with one noticeable difference: if they hit you, they can eat you and do some extra damage before spitting you back out. Hitting them with 100% strikes from the ax will help, as will using the weapon you'll get later on. If your ally hits you out of it, it won't do as much damage.
You'll see a rock blocking the path into a cave. This is the entrance to the volcano, and it's blocked to you for the time being. You won't be able to do anything about that yet. If you go west from here, you'll be able to find an armor seller that sells better stuff that what you'll find at the village. Take advantage of this, you'll need it.
Going north from the rock will take you to the Mammoth Graveyard.
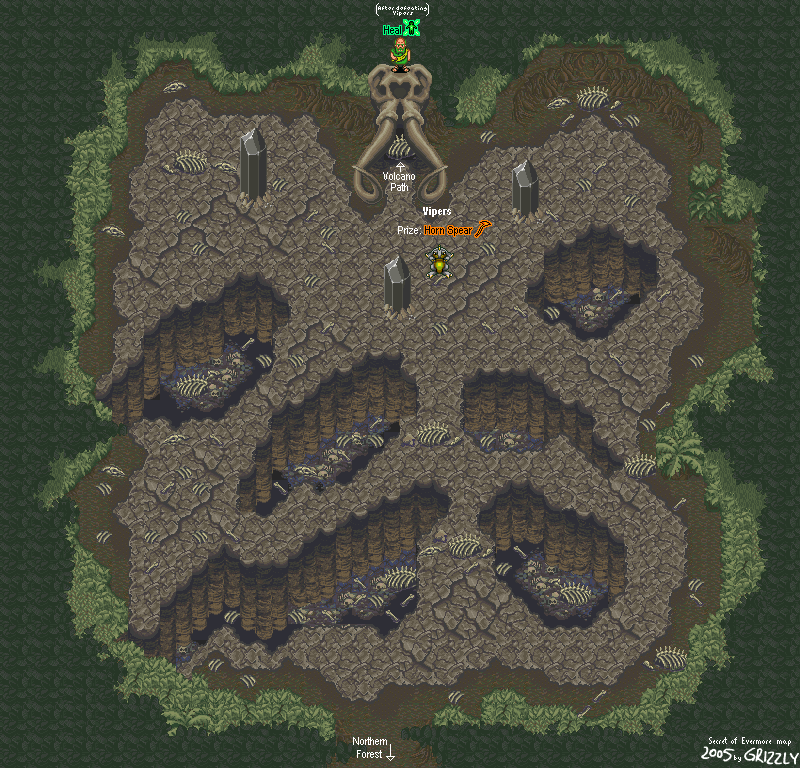
Mammoth Graveyard
Even though the Widowmakers don't give you as much experience as the other monsters you've fought so far, they're still far from a pushover. They can inflict Poison on you, which either wears off on its own or can be cured with Essence or the Cure Spell. If you still need to farm for Talons to buy armor from the cave to the west of that volcano entrance, go right ahead...but don't trigger the battle on the north end of the area yet.
Be sure to search the skeleton walls of this mini-maze to find some more alchemy ingredients. That Sniff function isn't there for fireworks, you know.
When you make your way to the north end of the graveyard, you'll meet up with this gray lizard who's about as large as The Boy. This is the Viper Commander, and he's ticked off that you're in the Mammoth Graveyard. He then sends four of his purple flunkies after you.
Boss - Vipers and Viper Commander
Keep the Vipers away from you and use offensive spells on them whenever possible. Their lick attacks can cause a good amount of damage, but they only strike diagonally and only at very close range. The Viper Commander will jump off the mammoth skull here and crash right into the nearby crystal that juts out, causing an earthquake attack that attacks both characters. Amazingly, you can hit the Viper Commander at this point. Keeping The Boy alive is essential in this battle.
When you finish off all four Vipers, you'll fight the Viper Commander. Besides being slightly stronger and having more hit points than the regular Vipers, he's not that different from the regular Vipers at all. At least you only face one of him.
When you win this battle, you'll get the Horn Spear. Whenever you get a Spear weapon, level it up to Level 3 as soon as possible, as you can throw it at Levels 2 and 3 (the latter is even stronger and works well against bosses).
When you beat the Vipers, you'll meet another Alchemist. He'll open the door to the Volcano Path and offer to heal your wounds. If you say no, he'll give you 10 Oil and 10 Crystal for you to practice the spell he's about to give you - Heal. Now you can use Alchemy to heal yourself.
Heal
1 Root, 1 Water
No comments:
Post a Comment