We're now in a strange land and separated from our dog with no other choice to explore and find out where our dog went...
All maps by Grizzly.
Right Bank
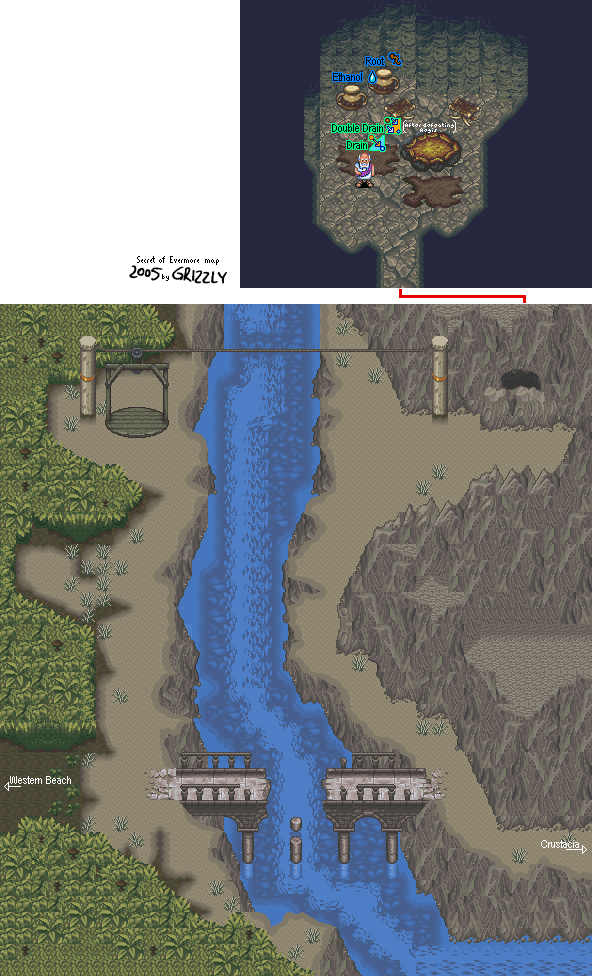
I come here for ingredients, but that's about it.
Left Bank
The Rogues just have close range attacks, while the Mad Monks are pretty deadly, as they can give you status ailments such as Plague (it's like Poison, but it eats away at your HP even faster) and Confound (which reverses your Control Pad controls). Sometimes, if an enemy leaves something behind, you might be able to get Wings, which let you return to the entrance of mazes. You won't be able to find those in stores...at least, not yet...
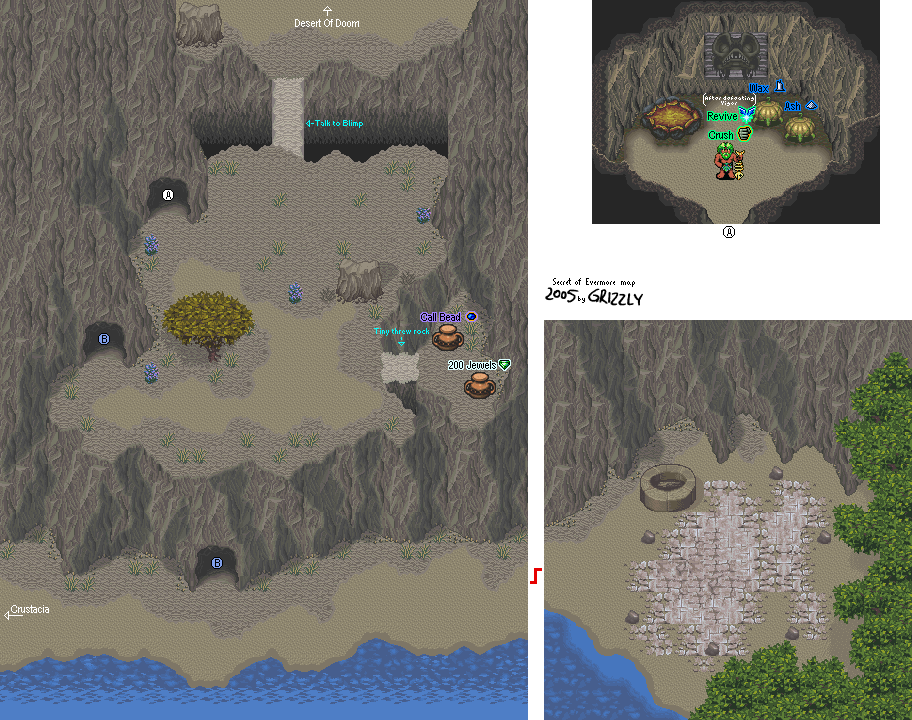
If you go east in this area, you'll see another landing pad. There's a few alchemy ingredients here, but that's about it. For some reason, the dog's head shows up in the lower-left corner of this area, and why the dog's head shows up there is unknown. For some reason, the dog is in an unreachable place where we can't find him. Maybe it's something left over by the developers?
From here, go into the cave, then go north to the other cave. You'll finally meet Blimp again. Looks like he survived the volcano eruption in Prehistoria.
Blimp's Cave
Blimp will tell you how he survived, then he'll ask about your dog.
The scene will shift to a palace somewhere. The dog will pop out, and this time he's changed form again, this time to a sleek, little white greyhound. Leap on the lily pads to get out of the pool, then make your way into the palace. You'll see a conversation between some unseen man and another guy named Pompolonius, then the dog will suddenly flounder in.
From there, Blimp will construct a bridge that allows you to go past the bottomless pit to the north, and you can finally make your way to the desert. He'll also give you the Crush formula, and this one will come in handy later on if you level it up in the desert.
Crush
1 Limestone, 1 Wax
Limestone is unique to this new land, Antiqua. Be sure to go back into Blimp's Cave if you need to stock up on alchemy ingredients...including the hard-to-find Mud Pepper, which is finally available to you now!
From this point forward, if you want to equip spells, you'll have to choose to add and remove to the list at an alchemist's shop, as you have the maximum of eight equippable spells.
Desert of Doom
Oh, boy. You'll be going north until you see a brick wall. Until then, get near the oases to refill your health. There's four of them, and it'll be a bit of a walk until you reach the next one. Your health will steadily go down as you cross the desert, so be careful and don't let the enemies give you a hard time.
The Tumbleweeds are just a pain in the butt, and the spiders here will Poison you if given the chance.
Early on I run into the Bone Buzzards. You'll see them at the sides when you reach the end, but if you move to the side at the beginning, you'll see them then, too.
There is a skeleton on a boat that'll take you quickly to the other side, but he wants an Amulet of Annihilation...and you don't have that. You'll just have to tough it out.
There is an Alchemist in this area. You basically have to travel north to the second oasis, then you have to travel about nine screens up and four screens right. (You basically have to go between the second and third oases, reach another oasis in this direction, then you have to keep going northwest until you find the man.) You should be able to find the Alchemist from there. He'll give you the Sting formula...something I never found as a kid.
Sting
2 Water, 1 Ethanol
Of course, you can also go northwest from the first oasis, hit up the next oasis you see (which shouldn't take long) and then go north from there to find the guy. That works, too.
No comments:
Post a Comment