We're on top of an airplane? Where WON'T we be going?
All maps by Captain Drake.
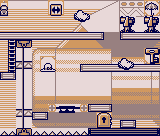
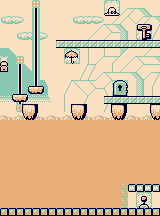
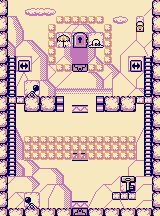
World 6: Airplane
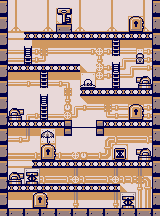
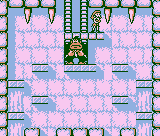
Stage 6-1
Since you're moving around on top of the plane (as opposed to inside it), the wind blows you backward. This can be bad depending on what it is you're trying to do.
If you're going to go for the parasol, you're going to have a slightly difficult time due to the cannons and the wind.
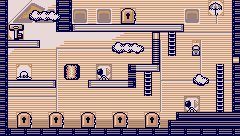
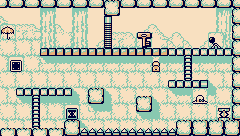
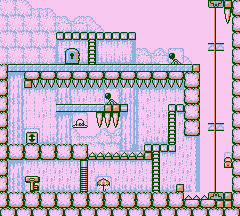
Stage 6-2
Go left, ride the crusher, then go right and toggle the switch. Go back to the start and toggle the switch there. You'll be able to get the key. Leave it on the bridge, trigger the switch at the start again to get rid of the bridge, and grab the key again before it disappears. You can now open the locked door Pauline was taken through, which is second from left out of the five at the bottom.
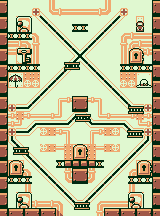
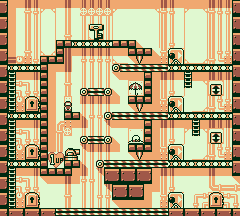
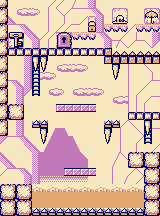
Stage 6-3
Correct door is the center door at the bottom.
You'll be using handstand double jumps and backflips off of moving platforms to get to where you want to go. The switches control the movement of the platforms.
At least you're inside the airplane now, so you won't have to deal with the wind pushing you back.
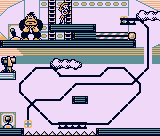
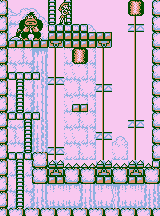
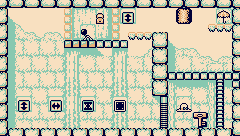
Stage 6-4
The wind may be pushing you back, but it's still not too hard staying on the platforms. It's the fact that even though there is a switch at the lower-left that lets you reverse direction, Donkey Kong has a switch near him that does the same thing, which can mess up what you're trying to do when you least expect it.
Just avoid the bullets from the cannon, and avoid the spiked wheel that rolls around the platform in the bottom center, and just pay attention to what Donkey Kong is doing so you can anticipate when the platforms will reverse direction.
The cutscene here shows off the turrets, which appear only on the airplane and shoot slower bullets.
Stage 6-5
The turrets make their first appearance here, and unlike the cannons, they will try to track you to some extent even though they can only shoot straight.
Just remember that you can take damage and not die if you have the key in your hand.
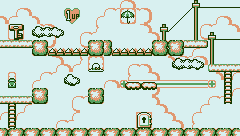
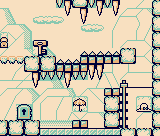
Stage 6-6
You're in the clouds this time around.
Getting to the key is easy, it's the way back that's slightly more difficult. Just be sure to leap off the very edge so you don't land in the spikes.
Stage 6-7
Go all the way to the top and get the key. Throw it on the conveyor belt, then toggle the switch and go down one level. Grab the key before it returns to where you found it. Toggle the switch again, then keep repeating this step until you make it to the next-to-the-bottom-most level. Hit the magical ladder icon and place it so that you can climb down to the beginning, then do the conveyor belt stuff one more time. Grab the key, then toss it up the platforms until you reach the upper-left-most locked door. You're done.
Stage 6-8
This isn't any different from the other levels where you toss barrels at Donkey Kong, but you're doing it outside of the plane and the wind is involved. Be careful.
The cutscene here shows that the walking flames will cause ice bridges to melt.
World 7: Iceberg
Stage 7-1
Let the walking flame at the beginning clear out the ice blocks that are in your path. From there, take the moving platforms up and hit the switch. This not only removes the bridge to the left and lets the two walking flames near it move around and clear more ice blocks, it also reverse the direction of the moving platforms.
You'll want to toggle the bridge when they leave the upper-left corner, so they can clear the ice blocks and give you access to the key.
Being that this is an ice level, the ice platforms will have you slipping and sliding around. Use your jump to fine-tune your positioning.
Stage 7-2
The octopus will try to latch onto you. Move left and right rapidly to shake it off.
The walrus will lunge at you with his teeth when he sees you.
The icebergs will sink the longer you stand on them. Keep jumping on them to keep them on the surface.
To beat this one, flip the switch in the lower-right corner to turn on the moving platforms, underneath the water. Mind the octopus. From there, you'll be able to get the key. Just watch out for the walrus.
While on the iceberg, be sure not to fall into the water with the key. Otherwise, you'll have to get the key all over again as you won't be able to swim with the key.
Stage 7-3
The door is near the hat, but there's a rather interesting conundrum involving the door: it's invisible. Expect to see them a few more times in the Iceberg world and remember where they are in each level.
This one's pretty simple. Just jump onto one of the penguins and grab and throw it into the other when you reach the switch. Toggle the switch, grab the key and you're good.
Stage 7-4
The main thing to watch out for here are the crushers. Not only will you be dealing with that, but you'll also have to deal with Donkey Kong reversing the direction of the moving platforms every so often.
The intermission shows off a new hazard: falling icicles that will get in your way.
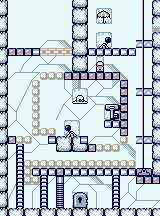
Stage 7-5
The icicles, when they fall, will act as platforms. When they shake, they're about to disappear before they slowly respawn on the ceilings. You'll have to be ready to jump from one icicle to another.
Stage 7-6
For this one, wait for the walking flames to fall after running out of ice blocks to melt, then wait for two of them to get on the bridge above the moving platforms. Toggle the switch and the rest of the ice blocks will be melted.
The switch also reverse the direction of the moving platforms, so grab the key, go up on the moving platforms and toggle the switch when you have fire near the exit again.
From there, you'll want to place one of the magical bridges so that the fire will walk on them and melt the ice blocks surrounding the exit. Place another one directly under the exit, and you're good to go.
Stage 7-7
For this one, grab the key and get in the water. Position yourself so that when the fish sees you, he swims into you while you hold the key, causing you to drop it and get rid of the squids that swim back and forth, blocking your path.
Leave the key there, then use the magical platforms and bridges to make your way to the door. Watch out for the squid when you get back in the water.
Stage 7-8
After keeping the icebergs on the surface of the water, you'll be taking a quick ride on conveyor belts while avoiding a (literally) crushing defeat. Thankfully, the conveyor belts go in the direction where you want them to go, so if you can time your movements perfectly, you can get to Pauline before DK shakes the screen more than once.
Stage 7-9
Head to the right and flip the switch, and carefully ride to the bottom of the moving platforms with the icicle. Stand on the walrus to trigger the icicles into falling down, then go up and cross the icicle bridge. Use the magical ladder to reach the nearby switch and toggle it. This switch causes a bridge to appear to your immediate right and also causes the moving platforms to go back up. You'll also open the door blocking the key, so get the key and get back to the start.
Stage 7-10
You'll need to use the icicles as platforms to get to the end. You'll want to run across the second icicle as it's falling. For the ladder before the end, you'll want to get on the last icicle while it's in mid-air in order to climb the ladder, as you cannot grab a ladder while jumping.
The three bonus items are at the end.
Stage 7-11
The invisible door is in mid-air between the magical bridge and ladder icons. It's not exactly between them (it's a little higher up), but it's in that relative location.
Use the magical ladder at the top to get to the switch and toggle it. You can get the key, but there's still the problem of getting to the door. Let the walking flame run out and melt the ice blocks in your way, then drop down from the left and get the magical springboard. Place it in Mario's fall path, and you'll save yourself from falling too high.
If you put the magical bridge where the door is, the game won't let you position the bridge there as it will overlap the door. From there, you can use the magical platform and springboard to get to the bridge. The bridge must be touching the top half of the fourth wall block of the bottom.
Stage 7-12
The icicles make it slightly harder to grab some of the barrels. Thankfully, there are three spots where the barrels will stop moving and stand upright, so you should have plenty of ammunition to hit DK with.
No comments:
Post a Comment