Part nostalgia-bomb, part note-taking and part FAQ, what started in GameTrailers as a video game blog is now on Blogger. This blog is a look back at video games, both popular and obscure, from the video game industry's infancy all the way to the previous console generation.
You'll start off as Rambi, then you'll be swimming around as Enguarde before making platforms as Squitter, flying around as Squawks and finally jumping high as Rattly.
Squawks' part is the worst, since you also have to deal with the wind blowing you around. Use Left and Right on the Control Pad to keep the wind from giving you trouble, and tap Left and Right if you have to.
In Enguarde's section, if you go all the way down after transforming and go to the left, you'll find a hidden room with a bunch of bananas and the O.
When you reach the Barrel Cannon leading to the Squawks section in Squitter's section, don't jump in. Instead, use platform webs to go over it and to the right. You'll find the last Bonus Barrel. Use platform webs to reach the Squawks Barrel while killing all the Zingers, then fly to the top and egg the rest of the Zingers to get the DK coin.
Krocodile Kore
Looks like the sharks weren't enough to kill Kaptain K. Rool. He pulls out all the stops to try to take you down, but if you can hit him once and only once, he's done.
After the fish come out of the gun, he shoots a purple blob. Jump over it.
He then shoots spiked cannonballs. Jump the fourth and sixth, duck under the rest.
Two more purple blobs are next. Jump the first, duck the second.
He will then shoot out eight spiked cannonballs that come out progressively faster. You'll be doing a jump, duck, jump, duck movement until the either and last one. Hope your reflexes are good here.
K. Rool shoots out three more purple blobs. Jump over them all.
He then shoots eight more spiked cannonballs. Jump over every single one of them. Once again, they are fired progressively faster the more that come out.
You'll get a slow purple blob followed by a fast one. Jump over both when they overlap.
You'll then have spiked cannonballs again. He'll shoot out slow one, then a fast one. He'll shoot another slow one followed by two fast ones, then a slow one followed by three fast ones. You may have to hang out at the opposite end of the room to avoid these.
Three more purple blobs: low, middle, high. These are easy to clear, as are the next three spiked cannonballs; also low, middle, high. He then shoots them out again; high, middle, low. The high-middle-low group is a little harder to dodge, you'll have to be a little closer at the apex of your jump to clear the high one.
After this, he shoots four more spiked cannon balls. There is a gap between the third and the fourth. He does this again. The first group ascends in height, while the second group descends. One again there is a gap between the third and the fourth in the second group.
After avoiding all of that, you get the barrel. Jump on it. Grab the cannonball. Throw it at K. Rool when he does the vacuum thing. You're done. You'll get the 40th and final DK coin, and Kaptain K. Rool falls into the core. Enjoy your 102% and your real ending!
Here it is: the battle with Kaptain K. Rool! Watch as me trying to speak over this in post-commentary almost becomes a bad idea!
K. Rool Duel
Finally! We fight Kaptain K. Rool!
As soon as you enter the stage, Kaptain K. Rool leaves a cannonball. Grab it, then jump over him when he rockets to the other side of the room. He will try to suck you in with his gun. Throw it at him when he does so to hit him, them jump over the cannonball when his gun shoots in back. If you try to ram the cannonball into him, he will smack you with his gun and you will get hit.
On the second shot, he will shoot out a spiked cannonball. Avoid the cannonball until the spike sink back into the ball, and jump over Kaptain K. Rool goes from one side of the room to the other twice. At this point, the spikes will be gone. Throw the cannonball at him when he does the vacuum thing. Jump over the fire back.
The third attack is two spiked balls. Stand in the center of the room and jump over Kaptain K. Rool has he goes from one side of the room to the other three times. Avoid the balls until then. The spikes will sink back in on one of the balls. Grab that ball and throw it at K. Rool when he does the vacuum thing. Jump over the fire back.
After the third hit, you'll get a DK barrel, but it only lasts until the next hit. K. Rool is down, but not for long.
For the fourth attack, duck and jump to avoid the spiked cannonballs until K. Rool shoots a barrel. Jump on the barrel to break it and get a cannonball. Throw the cannonball at K. Rool; avoid it when it comes back.
For the fifth hit, K. Rool shoots bouncing spiked cannonballs. Run under the ones that go very high and jump over the rest carefully. Hit the barrel. Grab the ball. Jump when it comes back. At this point, you may have to run to the side opposite K. Rool to avoid the fire back.
For the sixth hit, the spiked cannonballs advance while going in circles. The first three are solo, but you'll have to deal with pairs. Jump over cannonballs when they are at their lowest point. The barrel thing happens. The throwing thing happens. The avoiding thing happens.
K. Rool is down again, but not for long. You have a DK barrel that will last until the next hit.
For the seventh hit, jump over K. Rool, then jump over the blue blobs that will freeze you in place. K. Roll charges back and forth three times, going from solid to translucent to invisible. Watch the sparks on the floor to see where he is and jump over him on the third charge. He becomes translucent when the cannonball shows up. Throw and avoid
For the eighth hit, avoid K. Rool and jump over the bouncing red blobs that slow you down as well as the spiked cannonball. Grab the ball. Throw. Avoid.
For the ninth hit, use your tag throw to avoid the purple blobs. Thankfully, all these things can do is reverse your Left and Right controls. From there, run away from K. Rool so he doesn't suck you up with the vacuum. He will get in close after the first suck, keep running away. You will avoid him. After the fourth in-close sucking, the cannonball appears. Grab it and run to the right. Throw. Avoid the fire back. You did it. Donkey Kong gets free and kicks K. Rool's butt, and K. Rool falls out of the Flying Krock and into the ocean, where sharks devour him. You get to see how many DK coins you picked up, followed by the enemy roll call and the credits.
Oh, and you have a Kremkoin. Get back in there and go to Klubba's Kiosk at K. Rool's Keep.
It's Slime Climb Part 2! This time around, the water hurts you as soon as you touch it, and there's no way to make it not do that. You'll also be using Rattly, Squawks and then Squitter to get to the very end. You'll be using Rattly for the whole first half of the stage, and it's a long - and agonizing - drop down if you mess up a jump off either a platform or a Zinger.
Just after the K, you'll see a Zinger on some staircase-like platforms separated by gaps that you'll have to superjump to reach. Kill that Zinger, then drop down from where it was and to the right. You'll find the DK coin. Use the Barrel Cannon nearby to get back up.
Remember to hit the checkpoint above you as soon as you turn into Squawks. Here, you can really blaze your way through the level, especially if you're using Up and Down on the Control Pad.
When you become Squiiter, destroy the first Zinger on the right as you make platform webs to make your way up. You'll find a lone banana that hints at a secret passage that leads to the lone bonus area. Use Squitter's platform webs to get to the top, and don't touch the sides! You'll get a Kremkoin.
At the end of the stage, go to the right of the end of stage target. The slime will sink down a little bit. Go down into the gap near the target, then go all the way to the right for a hidden 2-Up.
Stronghold Showdown
You'll find Donkey Kong...and a Kremkoin! But Kaptain K. Rool takes him away!
The Flying Krock
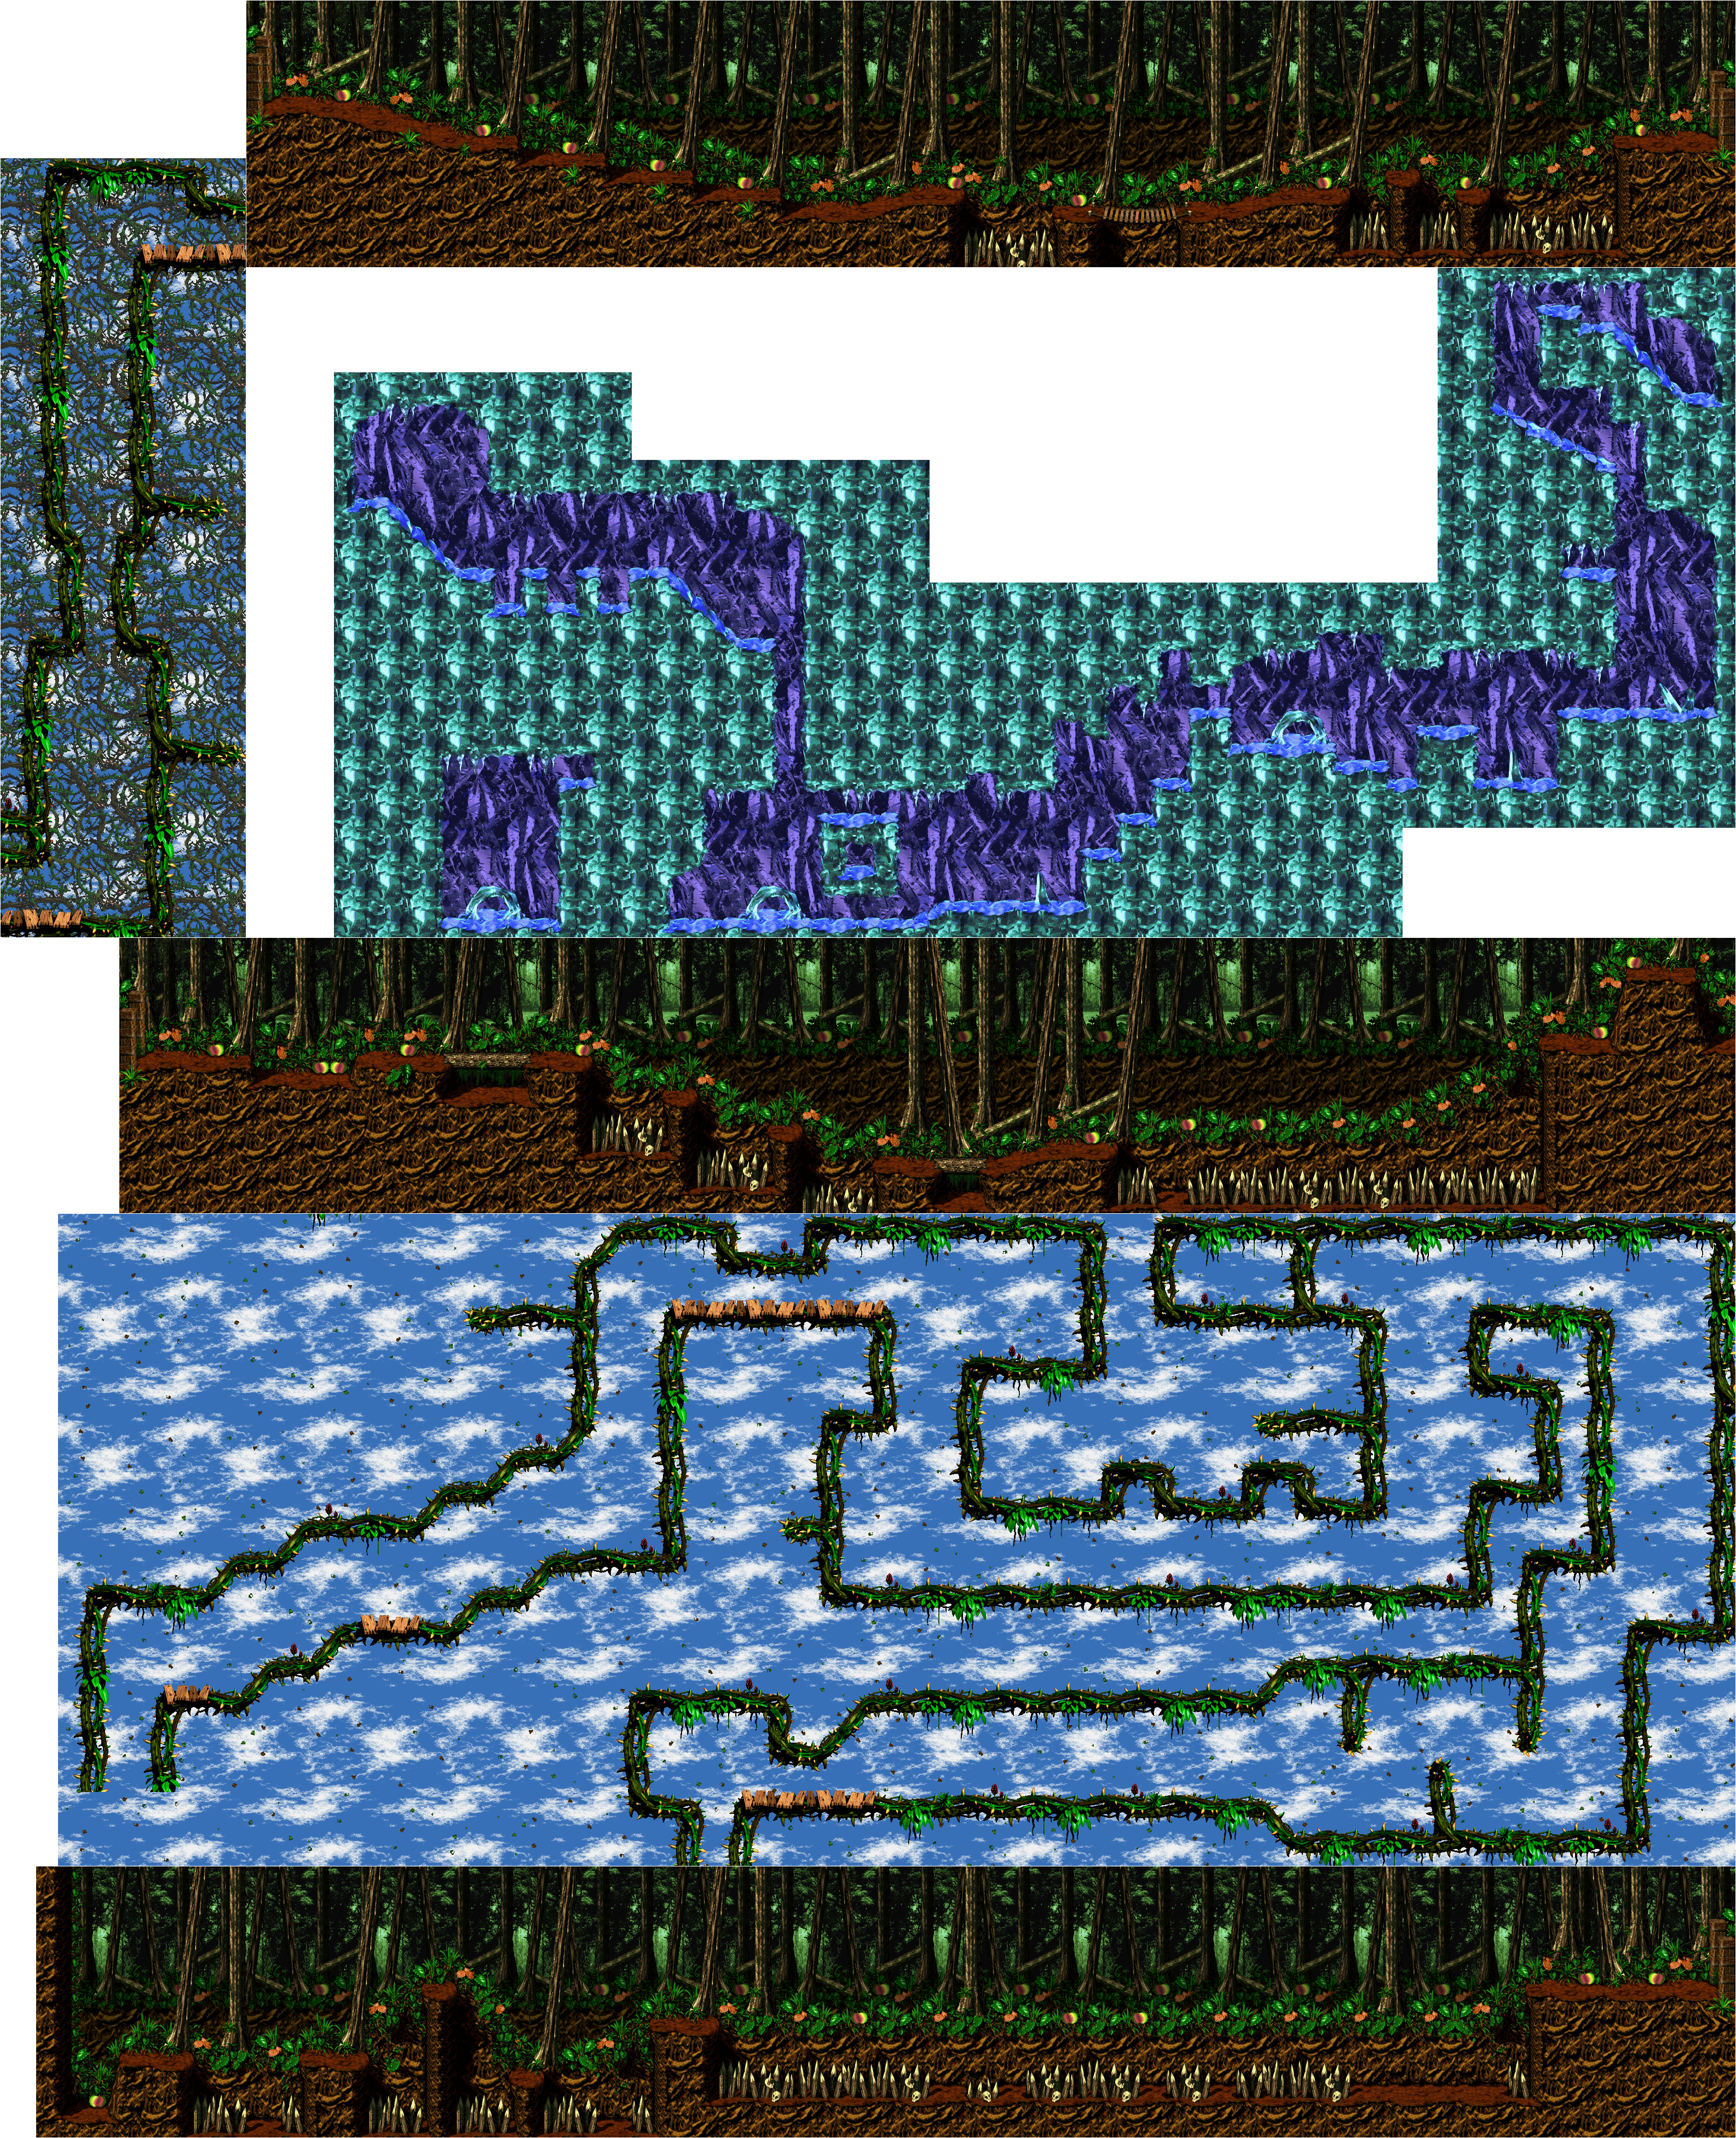
Well, whaddya know? K. Rool had a bit of a back-up plan in case we made it this far. Now we have to face him hundreds - if not thousands - of feet above the ocean. But we're going to have to deal with brambles again to get there!
Shortly after some vine climbing and platforming, you'll eventually reach the checkpoint and a Squawks barrel. Here, you'll be facing Screech, which comes across as an evil version of Squawks. You'll have to race him to the end of the stage, and if he makes it there first, you lose a life. Thankfully, as long as you're good at flying around with Squawks, you should be able to make it to the end first.
Start moving to the right as soon as the four Zingers next to each other are just above the rope to get past them. To get past the two Cat-o'-9-Tails before the rope climb with the Neckys, jump over the first one, then keep running to the right and jump over the second one. Just keep on going and grab on to that rope, then go all the way up as quickly as possible without stopping to avoid all the Neckys.
The lone bonus area is in a set of wooden platforms above you just before the race. Tag throw your way up there, and you'll find a cannon and a cannonball. Throw the cannonball to the cannon, then jump in. Use Dixie's helicopter spin (don't forget to hit the DK barrel at the start if you need to), and be ready to superjump (the bananas point the way) to get the Kremkoin.
After the O - and all the Red Zingers that come afterwards - you'll find an arrow made out of bananas pointing down. Keep going right, and go left after the DK barrel. You'll find the DK coin.
The floor continuously moves upwards. Be ready to take out enemies whenever you can, fend off Krooks and don't get caught between the floor and a ceiling.
Shortly after the start of the level, there is a DK Barrel. Use it to destroy the Kutlass to the left, and go left to enter the Rambi Barrel. You'll need him for the first bonus area.
The silvery-red Krushas will hurt you if you jump on them. You'll need something strong, like Rambi, to take care of them.
When the floor slows down at the set of Spinys, head upwards as soon as you can and supercharge with Rambi to the left to open a hole into the first bonus area. You must be Rambi to do this. Here, take out all the Zingers to get a Kremkoin.
After the first bonus area, you'll go a little higher with some Barrel Cannons. You could wait for the floor to come your way, but you can also drop to the right after the Barrel Cannon ride for the O.
After the continue point, there is a wall up and to the left that you can run through. This will take you to a Squawks barrel. Fly upwards and spit eggs at anyone in your way, and use Squawks to get not only access to the second bonus area, but the DK coin, which is below the N. Be sure to grab the DK coin first!
When you get Squawks to the "No Squawks" sign, you'll get a TNT barrel. Send it into the wall up and to the left near the arrow made of bananas that is pointing to the left. Here, don't worry about the bananas; just survive and make your way to the top to get the Kremkoin. The floor will go faster here than in the main stage itself.
Tag throw upwards to some hooks at the start to find a path above the start. You'll find the first bonus area. Jump from platform to platform (use Dixie!) to get the Kremkoin. You'll get the K and the DK coin on the way back. Just tag throw to the right when you're back in the main stage to get the DK coin. Dropping down to the right gives you the K.
Clapper the Seal is back! This time around, jumping on him allows him to freeze the water for a short time with his breath. Inside the water is Snapjaw, who is back for more after you outsmarted him in Slime Climb. Don't let Snapjaw eat one of your Kongs, and watch the water: when it gets darker, you're going to have to hurry, especially when you have to use ice physics to your advantage to simultaneously duck and slide under some Zingers.
Eventually, you will be underwater. Get Enguarde, since you will need him. Going left of where the "No Enguarde" Sign is takes you to the second Bonus Area. Just supercharge into the wall with the lone banana next to it. Here, get to the right as quickly as possible for a Kremkoin.
You'll be doing a lot of climbing and jumping to get everything here!
When you reach the first area with the Krooks, make your way up, then kill the third and last Krook. There will be a yellow Klobber to the left. Lure him to the right and off the platform to grab the cannonball. Jump to the right and use the cannonball to take out the second Krook to get it in the cannon. You'll find the first bonus area. Climb from side to side and jump over the Zingers to get the Kremkoin here.
After that, you can either take the left path for hooks and ropes, or you can take the right path for Rotating Barrels. The left path is easier, and you won't be missing much on the path you don't take and you'll get the O either way. From there, watch out for Zingers on the grid. When you see the circle of Zingers, go left for the checkpoint. If you need a free Kong, it's behind the first yellow Klobber.
Outjump the Zingers, then watch out for Neckys that will want to blindside you. After that, it's more rope grid action with circling Zingers and a Kutlass at the bottom. Go low, but not too low that the Kutlass will hit you. After that, you'll be alternating between ropes to avoid cannonballs from the Kannon. If you jump into the wall to the right halfway up, you'll find a hidden passage that will take you to the DK coin.
After the pair of Kannons that are causing those cannonballs to rain down, go right, then up. Leap into the wall to the left. You'll find a secret passage. Take out the Kannons to find the second bonus area. Aim carefully with the Rotating Barrels to get the Kremkoin. Be quick! From here, head to the right to trigger some Singers. After
In the vertical shaft with the Neckys, there is a hidden passage in the wall to the left that I don't show off. There are two Banana coins there.
Up and to the right of the end of stage target is the G.
Assuming you haven't been to The Lost World at all, this is the first ice stage you'll actually see. Like all ice stages, there are ice physics here and it is definitely possible to slide around like mad, so be careful.
The first bonus area is just after you enter the Enguarde barrel and turn into Enguarde. In the upper-left corner of a nearby room, there is a pair of bananas that are easy to miss. When you see the first Lockjaw in the stage, the water will rise, allowing you to go up there. Stand where they are, face left and supercharge into the wall with A. You'll open up a hidden door that takes you to the first bonus area. Use the Y button to grab as many stars as you can. Being able to turn around and keeping hitting Y as you go from side to side as the water recedes will make this easier. It may take a few tries, but you'll eventually get the Kremkoin.
The DK coin is right after the continue point. After a long vertical passage, face right and supercharge. You'll be able to get to the platform where the DK coin is, at least.
The second bonus area is after the G. There is a shaft you can go down. Go down it and swim through the wall to the right. You'll find the second bonus area. Grab the chest and send it into all the Zingers. As easy as this can be, it's even easier if you're Dixie. Killing all the Zingers will net you the second Kremkoin.
The level order is different depending on which version of the game you're playing. If you're playing the Super Nintendo version, you'll play Windy Well, then Castle Crush, then Clapper's Cavern, and you can only save after beating Windy Well. If you're playing the Game Boy Advance version, it will be Clapper's Cavern, then Castle Crush, then Windy Well, and you can only save after beating Clapper's Cavern. Apparently Rare figured out Windy Well was a bit much for the second level of the world and switched places as far as this and Clapper's Cavern were concerned.
Drop down the center of the first pit you see to get the K.
The leaves are back, and so is the wind. This time around, you'll be going up and down in it. When the leaves are going upwards, you'll be held up in the air. Holding Down on the Control Pad will allow you to ascend more slowly, and holding Up to ascend more quickly. When you reach a certain height, you'll drop down to the lowest one before the wind raises you up again.
When flying between Zingers, hold Down on the Control Pad and start making your move as soon as you are at the lowest possible point.
The first bonus area is after the O. Make your way past the crook, then run and cartwheel off the ledge to the left...but don't jump. Keep holding Left and you'll sail past the Zinger and onto the platform housing a Bonus Barrel. This one is dead easy: just let the wind carry you up at the left-hand side, then get on the hook, jump off to the right and kill all the Flitters to get the Kremkoin.
If you jump for the N (or the extra life just before it), the wind will start carrying you up and down. Only grab them if you know what you're doing and you really, really want them.
After the N is the DK coin. After the two Krooks, hold Down and Right on the next jump. You'll fly past all the Zingers and grab the DK coin.
The second bonus area is at the end. When you see the "No Squawks" sign, jump to the lower platform, then lure the Yellow Klobber to the left. Jump on him, then grab him and send him right into the Kutlass. This frees the path to the second Bonus Barrel. Get on Squawks and collect the stars, and use Up and Down on the Control Pad to get all the stars as quickly as possible, because the game expects you to know this by now.
New Barrel Cannon type: Steerable Barrel Cannons. Use the Control Pad to move them in eight directions, and press B to fire in the direction that the open mouth of the barrel is facing. If you run into any enemies, you're getting hit. If you move into the lava, you're losing a life. They also have timers, too, so you'll have to be as quick as you are careful with them, or else you're history.
Be careful when you're on the ground at the beginning; the enemies here are pretty fast.
Before the continue point, there is a path of bananas heading up. Shoot from the Steerable Barrel at the top-most banana, and stay in control as you leap off the first Flitter. Keep bouncing off them to the right and you'll reach the checkpoint.
The lone Bonus Area is just before the end. There will be a trail of bananas going up. Tag throw up there, and you'll reach a Steerable Barrel. Move it to the right, and you'll find the stage's lone bonus area. You can use the Cat-'o-9-Tails to get here, but you'd better be ready to steer your Kong to the Steerable Barrel. From here, it's a game of Irritating Stick. Move the Steerable Barrel carefully. If you touch the bramble walls, you're kicked back to the main stage and forced to hit the exit target, meaning that you will have to do the entire stage all over again to get back here if you fail this. If you can somehow reach the end before time is up, you'll get the DK coin.
Gloomy Gluch
Kreepy Krow
Krow's back. This time, he's a ghost.
Avoid or beat up the ghost Neckys until a solid-colored one shows up. Jump on it to get an barrel. Send the barrel into Kreepy Krow to get to a higher height. Of course, you'll have to get up there yourself, but you will get some ropes. This still won't be easy, however, as Krow will rain eggs down one at a time, and the egg will drop from above your current position. You may have to time your movements a little bit so that the eggs don't hit you near the next destination.
After the second hit, you'll be using ropes and hooks. The eggs will not only come at you from above, but from the left side of the screen! You'll have to look around a little bit to ensure you don't get hit here.
After the third hit, Krow's spirit is destroyed. You've done it!
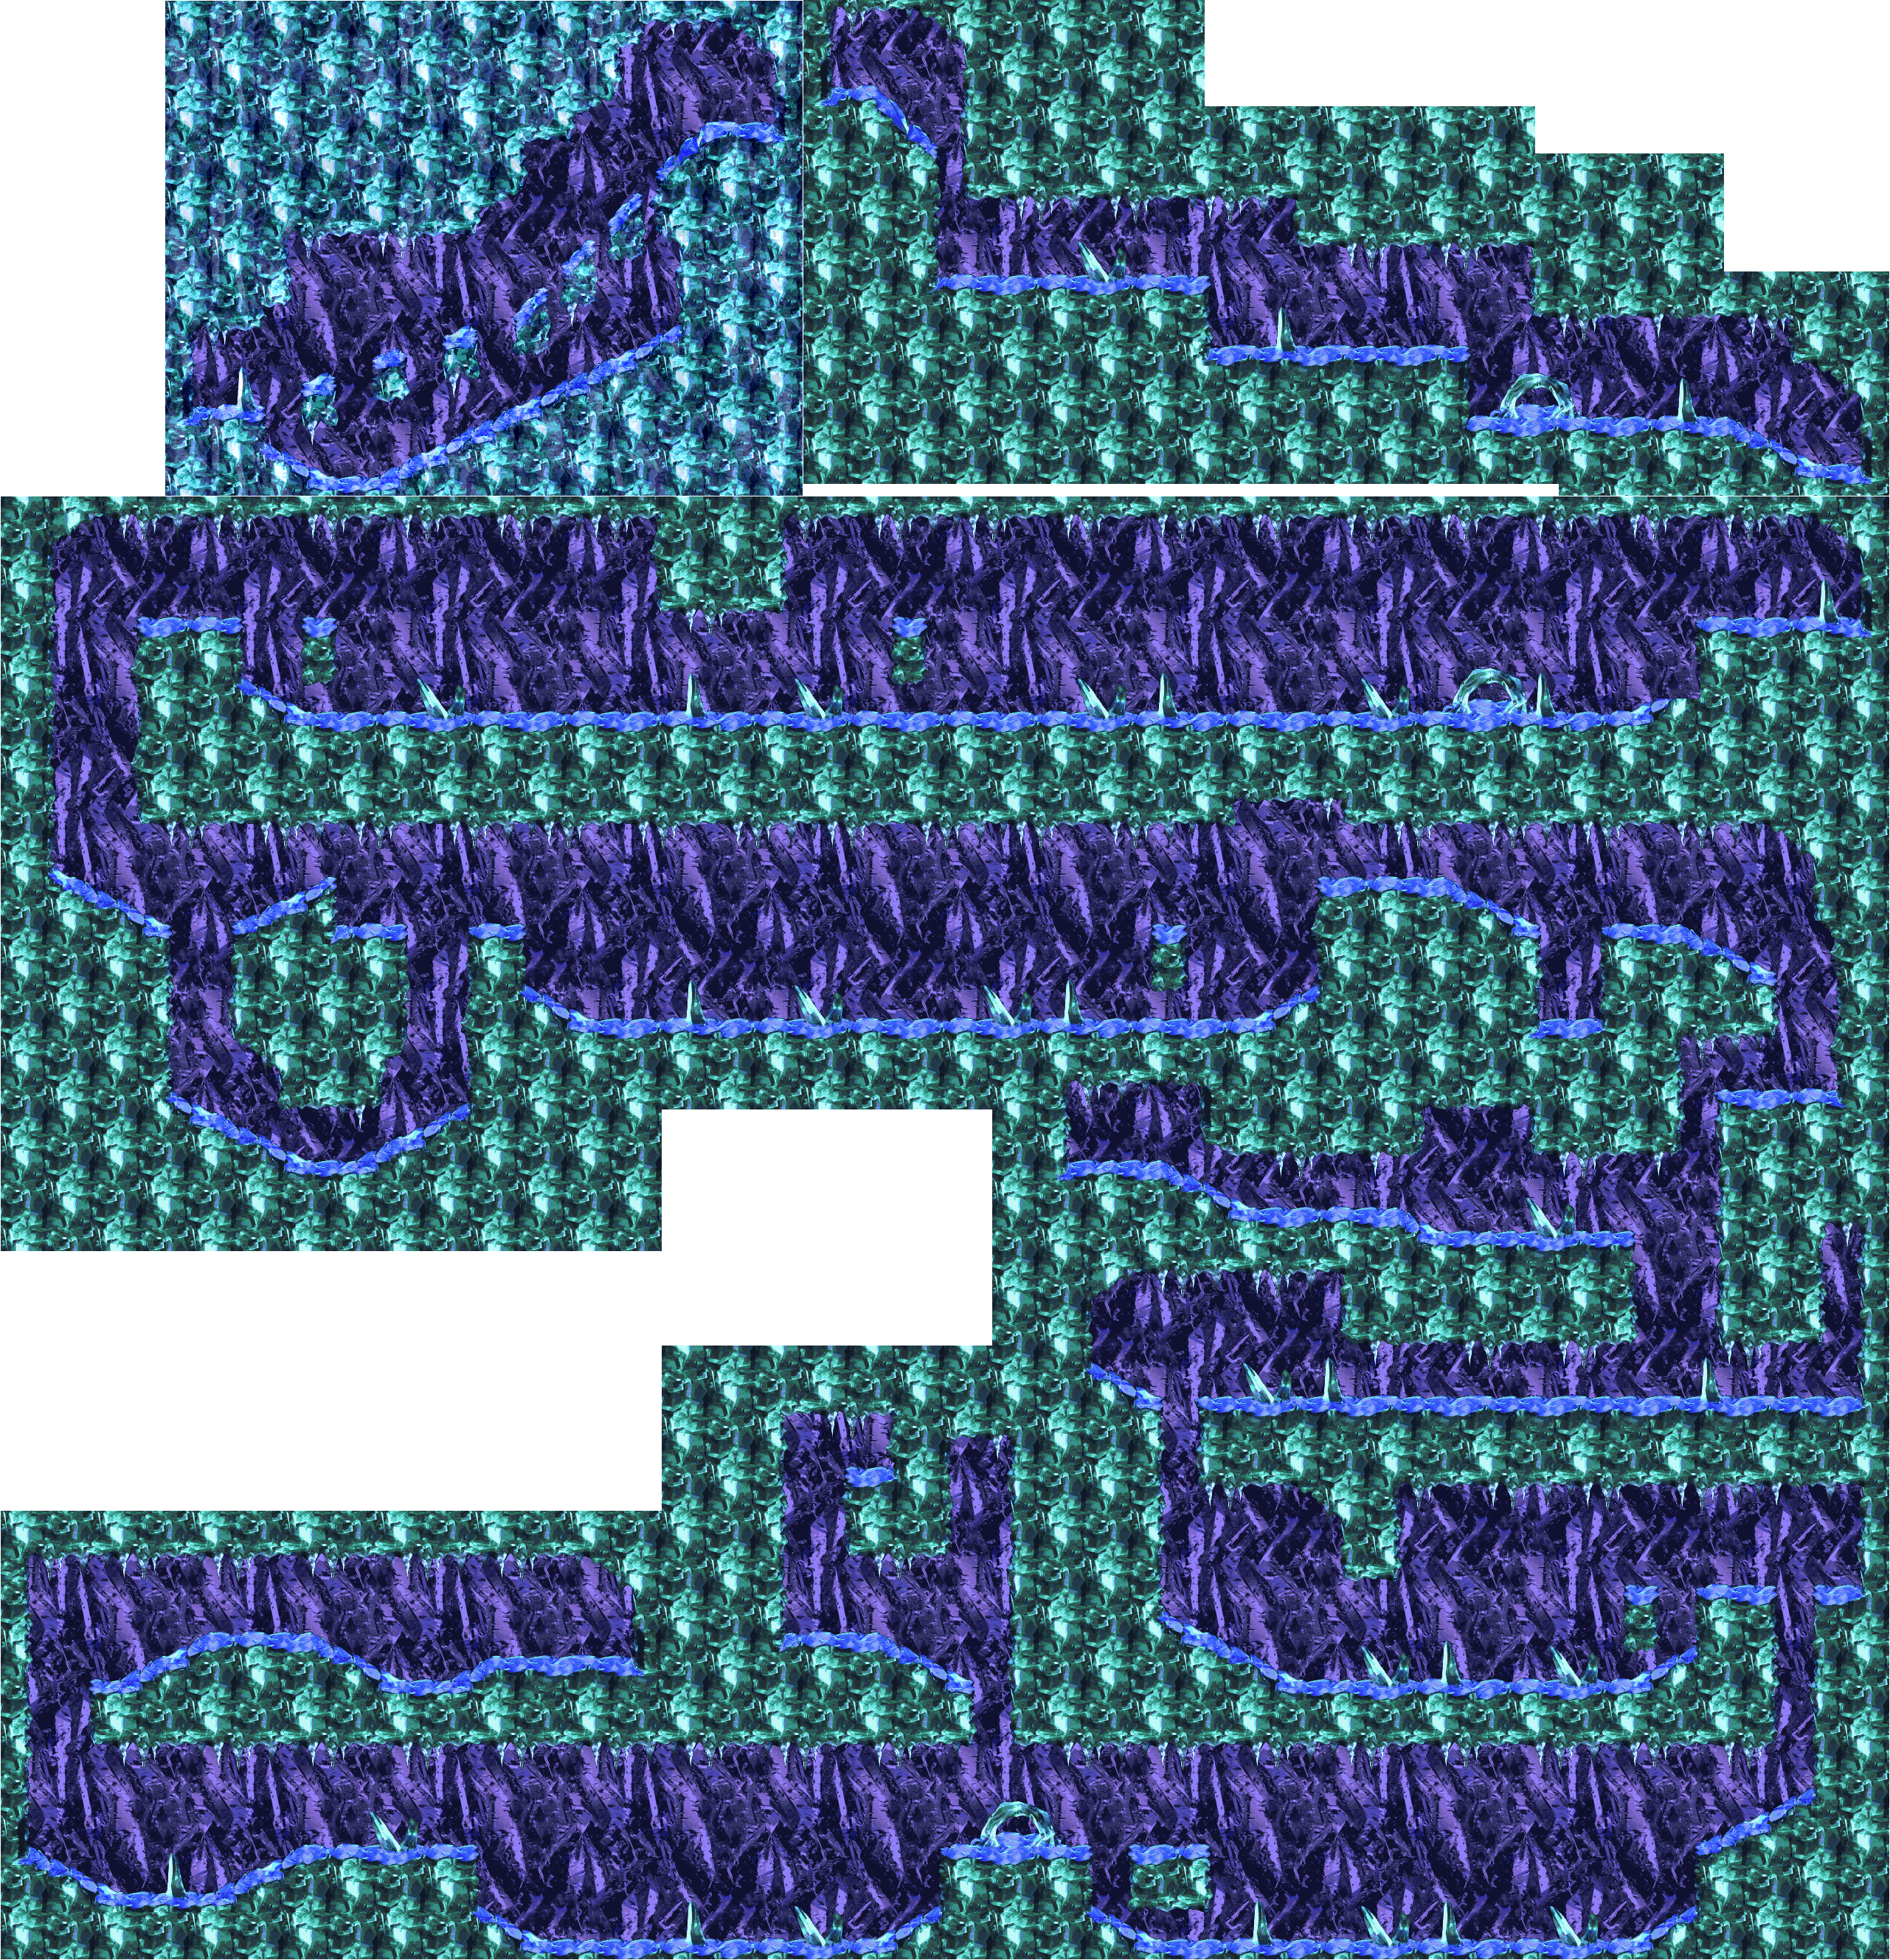
Here, you will be using a blue Squawks to make it to the bottom of the level. Hold Up and Down on the Control Pad to slow down and speed up your descent, respectively. Unlike in other levels, the Squawks here is blue and goes by a special name: Quawks (which was used in Japan and wasn't official in America until the GameCube era). Quawks cannot spit eggs, and all he can do is descend. At certain parts in the level, Quawks will drop you off (he will let you know by making the egg spitting sound), and you'll eventually have to find him again as you go deeper into the level.
The DK coin is to the left just after you start dropping down. You're better off using Dixie's helicopter spin to get this.
There is a shortcut to the right of the second Quawks. Grab the nearby crate and throw it into the wall below it. This will take you to the K.
The first bonus area is to the left. After you grab the third Quawks, there will be a wide berth to the left as you drop. You'll want to go to the left as much as you can as soon as you enter it. You'll eventually find a doorway. Press X to jump off Squawks and enter. Fly up to the top with the green Squawks to reach the Kremkoin.
As you go further down into the level, you'll be dodging Zingers without any means of defending yourself. Watch where they go, and plan your moves carefully. Do not rush anything.
At the fifth Quawks, you have a choice between taking him or not. If you don't take him, you'll be using Dixie's helicopter spin to make your descent. Thankfully, you can go down more slowly as long as you are holding Y.
Just before the N, there is a honey wall you can stick to. You'll have to superjump from the platform to the right to make it there, since there are Zingers below the sticky wall that make it impossible to get there otherwise. Use the honey to make your way up, then get to the right to enter the second bonus area. Destroy all the Zingers with the green Squawks (use that TNT barrel you get at the end carefully!) to get the other Kremkoin.
If the stage name didn't clue you in, you're going to be playing as Squitter here. Once you make it past the K, it's web time.
You can tag throw to the area above the entrance to the Squitter Barrel room. If you do that, you'll find a Barrel Cannon that will take you to a chest. Smash it into the nearby Zinger to get a 2-Up.
Be careful at the continue point and beyond. There will be platforms where green Kaboings will lie in wait, and they will jump off the platform high above when you get close enough.
The first bonus area is after the N. You'll know you're there when you see a Kannon that fires a very slow cannonball. Keep the cannonball on screen, keep slowly going to the left when it is fired, and try not to touch it. The cannonball will hit the wall, opening up the doorway to the first bonus area. Use your platform webs to get to the other side - and don't touch the brambles! - and use your projectile webs to destroy the Zingers to get the Kremkoin here.
The second bonus area is near the end. Once again, you will know you're near it when you see a Kannon firing another super-slow cannonball. Follow it to the left, keeping it on the screen and going slow while trying not to touch. When it hits the wall, you'll enter the second bonus area. Collect all the stars with your platform webs (the fact that they make the Rare "R" logo is a nice touch) to get the second Kremkoin.
The DK coin is at the exit target. The DK coin stays onscreen for less time as everything else, so you'd better get the timing of the appearance of the prizes down pat to get it.
I don't even know why there is a Kloak seemingly out of reach at the start. You can tag throw at him to kill him, and if you off-screen him, he's gone forever. The Kloak after that gives you 10 bananas if you stick around long enough.
The ghost ropes will fade in and out. When you see their red eyes blink, they're about to fade out of existence. Be quick with getting where you want to go. Thankfully, it doesn't take the ghost ropes long to reappear.
The first bonus area is after the O. Grab the barrel and hold Up as you throw it. It will take out all the enemies and move slowly, and if you follow it, it will eventually break the wall leading to the bonus area. Keep throwing chests at the Red Zinger until you get the Kremkoin.
If you have not played Klobber Karnage yet, this is where you will first meet Kaboom outside of The Lost World.
Speaking of the O, the DK coin is directly under it. On the platform after the O, you'll want to helicopter spin down the pit and to the left with Dixie. Superjump if you have to. You'll find the DK coin there; just jump into the barrel cannon and you've got it.
The second bonus area is right after the N. You'll have to be quick on the ghost ropes to reach the Bonus Barrel. This time, the ghost ropes will be much slower than the ones you had to climb to get here. If you can helicopter spin off the top of the third with Dixie, you won't have to climb the fourth one.
It's another roller coaster level...except this time you're in a haunted house. If you go to the left at the start and jump, you'll get 20 bananas.
You'll meet a new enemy here: Kackle. This guy cannot be destroyed; all you can do is outlast him. Pick up the green Plus Barrels to add seconds to your time, and avoid the red Minus Barrels that will subtract seconds from your time. If you run out of time, you'll lose one of your Kongs, and if you're unlucky enough, one of your lives.
You'll deal with Kackle four times, and each time you meet him, the stage gets harder and the Plus Barrels give you less times. At the second meeting, you'll be hitting as many Plus Barrels as possible to keep your time at anything above zero seconds just to survive, and for the third meeting, you'll have to avoid all the Minus Barrels, which are everywhere. You can hit one and still make it, but just barely. For the fourth and final meeting, the Plus and Minus Barrels are next to each other, and you'll have to jump carefully to grab the Plus Barrels.
The first bonus area can be reached by jumping at the top of the slope leading downwards after the first gate after the K. Jump to the upper track, then jump again to get to the wooden platform at the top. Ride all the way to the Plus Barrel, then prepare to jump when you get pushed backwards after hitting it. If you can land on all the platforms, you'll get the Kremkoin. When you leave the first bonus area, you'll be able to enter the second one when your cart goes in reverse before going forwards again after dropping. Keep jumping to collect as many stars as possible to get the Kremkoin here.
The third bonus area is past the gate after the end. You'll have to make a short hop just as the car is beginning to fall to make it to the lower track. If you can jump early enough, you can land on that lower track without having to do a superjump on the cart. Either way, you'll be at the third bonus area. Make sure you hit every star so you can get the Kremkoin, and try not to fall into any pits. The cart goes very fast here, and if you slip up just once, you won't be able to come back until you've completed the level or you've died and returned to the checkpoint.
The DK coin is to the left of the end of the target. Run into the wall to get it.
The wind becomes a hazard here. Watch the direction that the leaves in the foreground to see which direction the wind will blow you, as the wind here affects your jumps and can move you into the corresponding direction very, very well to the point that you can do some crazy jumps.
If you tag throw up to the left at the beginning, you can find Rattly, and you'll be able to do some insane jumps.
The wind does not blow at all on the super narrow platforms where you find the O.
The first bonus area is past the Rattly charge jump after the O. It will be in the air just before the "No Rattly" sign. Watch the wind and jump on the Flitters to get the Kremkoin here.
The second bonus area involves a Cannon and a Cannonball, and you'll find it in the top chest in a group of two chests (the other containing the N). Run the chests into the Kutlasses to free the N and the Cannonball, then wait until the wind is blowing the leaves to the right to get the Cannonball to the cannon. Collect all the stars using the moving Barrel Cannon to get the Kremkoin here.
Sometime after the second bonus area is a really big slope. If you have Dixie Kong, switch to her. Make a running jump to the right and helicopter spin in that direction for as long as you can. You'll get the DK coin at the beginning of your descent, and if the wind is blowing to the right when you first make the jump, you can helicopter spin all the way to the end.
The first half of this area is pretty simple. It's the second part that is interesting.
For the first bonus area, go to the left just before the O. Jump up and left to an invisible hook (marked by a banana), then wall jump your way up. Wall jump to the top to get the Kremkoin.
When you make it to the doorway at the end of the first half of the stage, stop. There is an invisible hook near the door. Tag throw up to reach it, then jump over the wall. You'll be able to climb to the other side where the second half of the stage is and get the DK Coin. From there, you can wall jump your way up to the first half, then go in the doorway. (You'll have to do this to get past the Zinger without getting hit.) Here, you'll transform into Rambi with the Rambi barrel. Once you enter this room, you can't go back to the first half of the stage, so make sure you get the DK coin first.
It won't be long before you are chased by a giant Zinger. Thankfully, the Zinger isn't very fast, and you can easily out run it. Just before you reach the end target, supercharge into the wall with A. You'll find the second bonus area. Take out the enemies to get the Kremkoin.
Swanky's Bonus Bonanza
Wrinkly's Winner - 1 COIN
What is the name of this area of the island? Krazy Kremland
What color is your parrot buddy? Red, green and yellow
What is the name of the two companies that produces this game and Donkey Kong Country? Rare / Nintendo
Krazy Kwiz - 2 COINS
What is the name of the first wasp hive level on this area of the island? Hornet Hole
What is the name of the old lady Kong, who runs Kong Kollege? Wrinkly
Which of these items can NOT be found at Klubba's Kiosk? Picture of K.Rool
Baboon Booty - 3 COINS
What is your snake buddy's name? Rattly
What color waistcoat does old man Cranky Kong wear in Monkey Museum? Green
Which of these enemies have you not seen yet during htis area of the island? Cat o' 9 Tails (The game assumes you go here before you go to Mudhole Marsh.)
This one is so bad that I ended up using post-commentary and tool-assisted perfect style gameplay, if only because I put these out as quickly as I played them when I played through this game.
This level has a ton of Klobbers, green, yellow and black trough the stage. You'll also meet the red one, named Kaboom. Kaboom lives in a TNT barrel, and if you make contact with him, you're getting hit.
The stage starts out easily, but it gets insanely hard. The fact that the Rotating Barrels rotate on their own as they move and you can only control which direction they spin in does not really help much. You're going to have to be fast on the B button and watch where you're aiming to get past all the Zingers...and have a lot of lives.
The bonus area is at the very end, and you will need Diddy Kong to enter the nearby rotating barrel - which you'll need to have point to the right - to reach it. Grab the Invincibility Barrel and kill all the enemies as quickly as possible to get the DK coin.
Krazy Kremland
King Zing Sting
King Zing Sting is a giant Zinger. You'll turn into Squawks, and you'll have to spit eggs at the flashing stinger. As you hit him, he gets faster, and you'll have to get closer to even get a chance to hit him. Whenever you hit King Zing Sting, he will turn red. When that happens, you will want to avoid him and his eight-way shot.
After enough hits, King Zing Sting will turn into a smaller Zinger and chase you around the room. Destroy the four Zingers that surround him, then spit an egg when he turns yellow. He will get faster with every hit, so stay on the move and quickly move around the room, and spit an egg at him whenever you can. After a few more hits, King Zing Sting is history.
If you tag throw to the right at the start, you can get the K.
Shortly after the start, there is an Invincibility Barrel. Tag throw your way up, then drop down the gap to the right and quickly jump over the walls before the invincibility runs out. The Barrel Cannon will take you to the lone bonus area here. Here, defeat all the Zingers to collect the Stars.
Remember that Squawks is the hitbox. If you rest the Kongs on top of the brambles, you're good; if Squawks touches them himself, you're taking a hit.
After the continue point, jump through the wall on the right. You'll go through a fake wall that takes you to a secret area. Super jump to the right and get in the Squitter barrel to take control of Squitter. Make platform webs to make your way up and score the DK coin. Simply stay close to the left wall and go through where the lone banana in the wall is to get it.
From here on out, you'll be seeing criss-crossing ropes, Neckys to avoid and Kannons shooting at you. The Krooks will shoot their hooks at you faster, and you'll see Zingers block your way and Kloaks throw stuff at the end. A big hint for this entire stage: use Up and Down to make ascents and descents with Squawks
For this one, you'll be racing a bunch of Klanks. If you attack them from above or below, or if you jump past them, you will advance one position, but if one falls off the tracks, it will not count. If you can defeat enough of them, you can get the N. If you can get to 1st place, you'll get the DK coin after dealing with the very last Klank.
If you hold left at the start of the race, you'll get a speed boost.
To reach the lone bonus area here, tag throw your way up the tower at the left when you start the level. From there, helicopter spin your way to the right with Dixie. You'll fnd an invisible barrel. If you can defeat enough of the Klanks (which is awfully easy), you'll get the stage's lone Kremkoin.
Pay attention to signs during the race. They will alert you to potential obstacles.
It's back to the swamp for this one. Here, you'll meet a new enemy: the Cat-O'-9-Tails, a blue nine-tailed who will whip your high into the air at an angle if he grabs you. If you can avoid him for long enough, he will be stunned, and you can jump on him to get rid of him.
Shortly before the O, if you tag throw up to the lone banana up top, you'll get invincibility. Why you would want it when it makes progressing through the level harder, I will never know.
The first bonus area is past the chest with the O in it. Tag throw to get there after you get the Cat-O'-9-Tails to move off the edge. Use your tag throw to grab all the stars to get the Kremkoin, and take your time. You have more than enough time for this.
The second bonus area is the cannon. Once again, the cannonball is nearby; it's just a matter of getting it there. Destroy the enemies with the cannonballs to get the Kremkoin. Dixie makes it easier.
Near the end, just before the G (and after), you'll have to jump off barrels to progress.
After that is a Kannon facing right. Use the barrel he shoots out to get the DK coin at the end-of-level target. The DK coin only stays onscreen for slightly less time as all the other prizes, so you will have to time this carefully.
It's time to head to Krazy Kremland, which I was thought was incredible back in the day. Guess what? It still is.
All maps by Tropicon.
Krazy Kremland
Despite its appearance, Krazy Kremland is anything but fun and games. Pat yourself on the back like Barry Horowitz if you've made it this far; it's not gonna get any easier as you explore hornet nests and ride roller coasters.
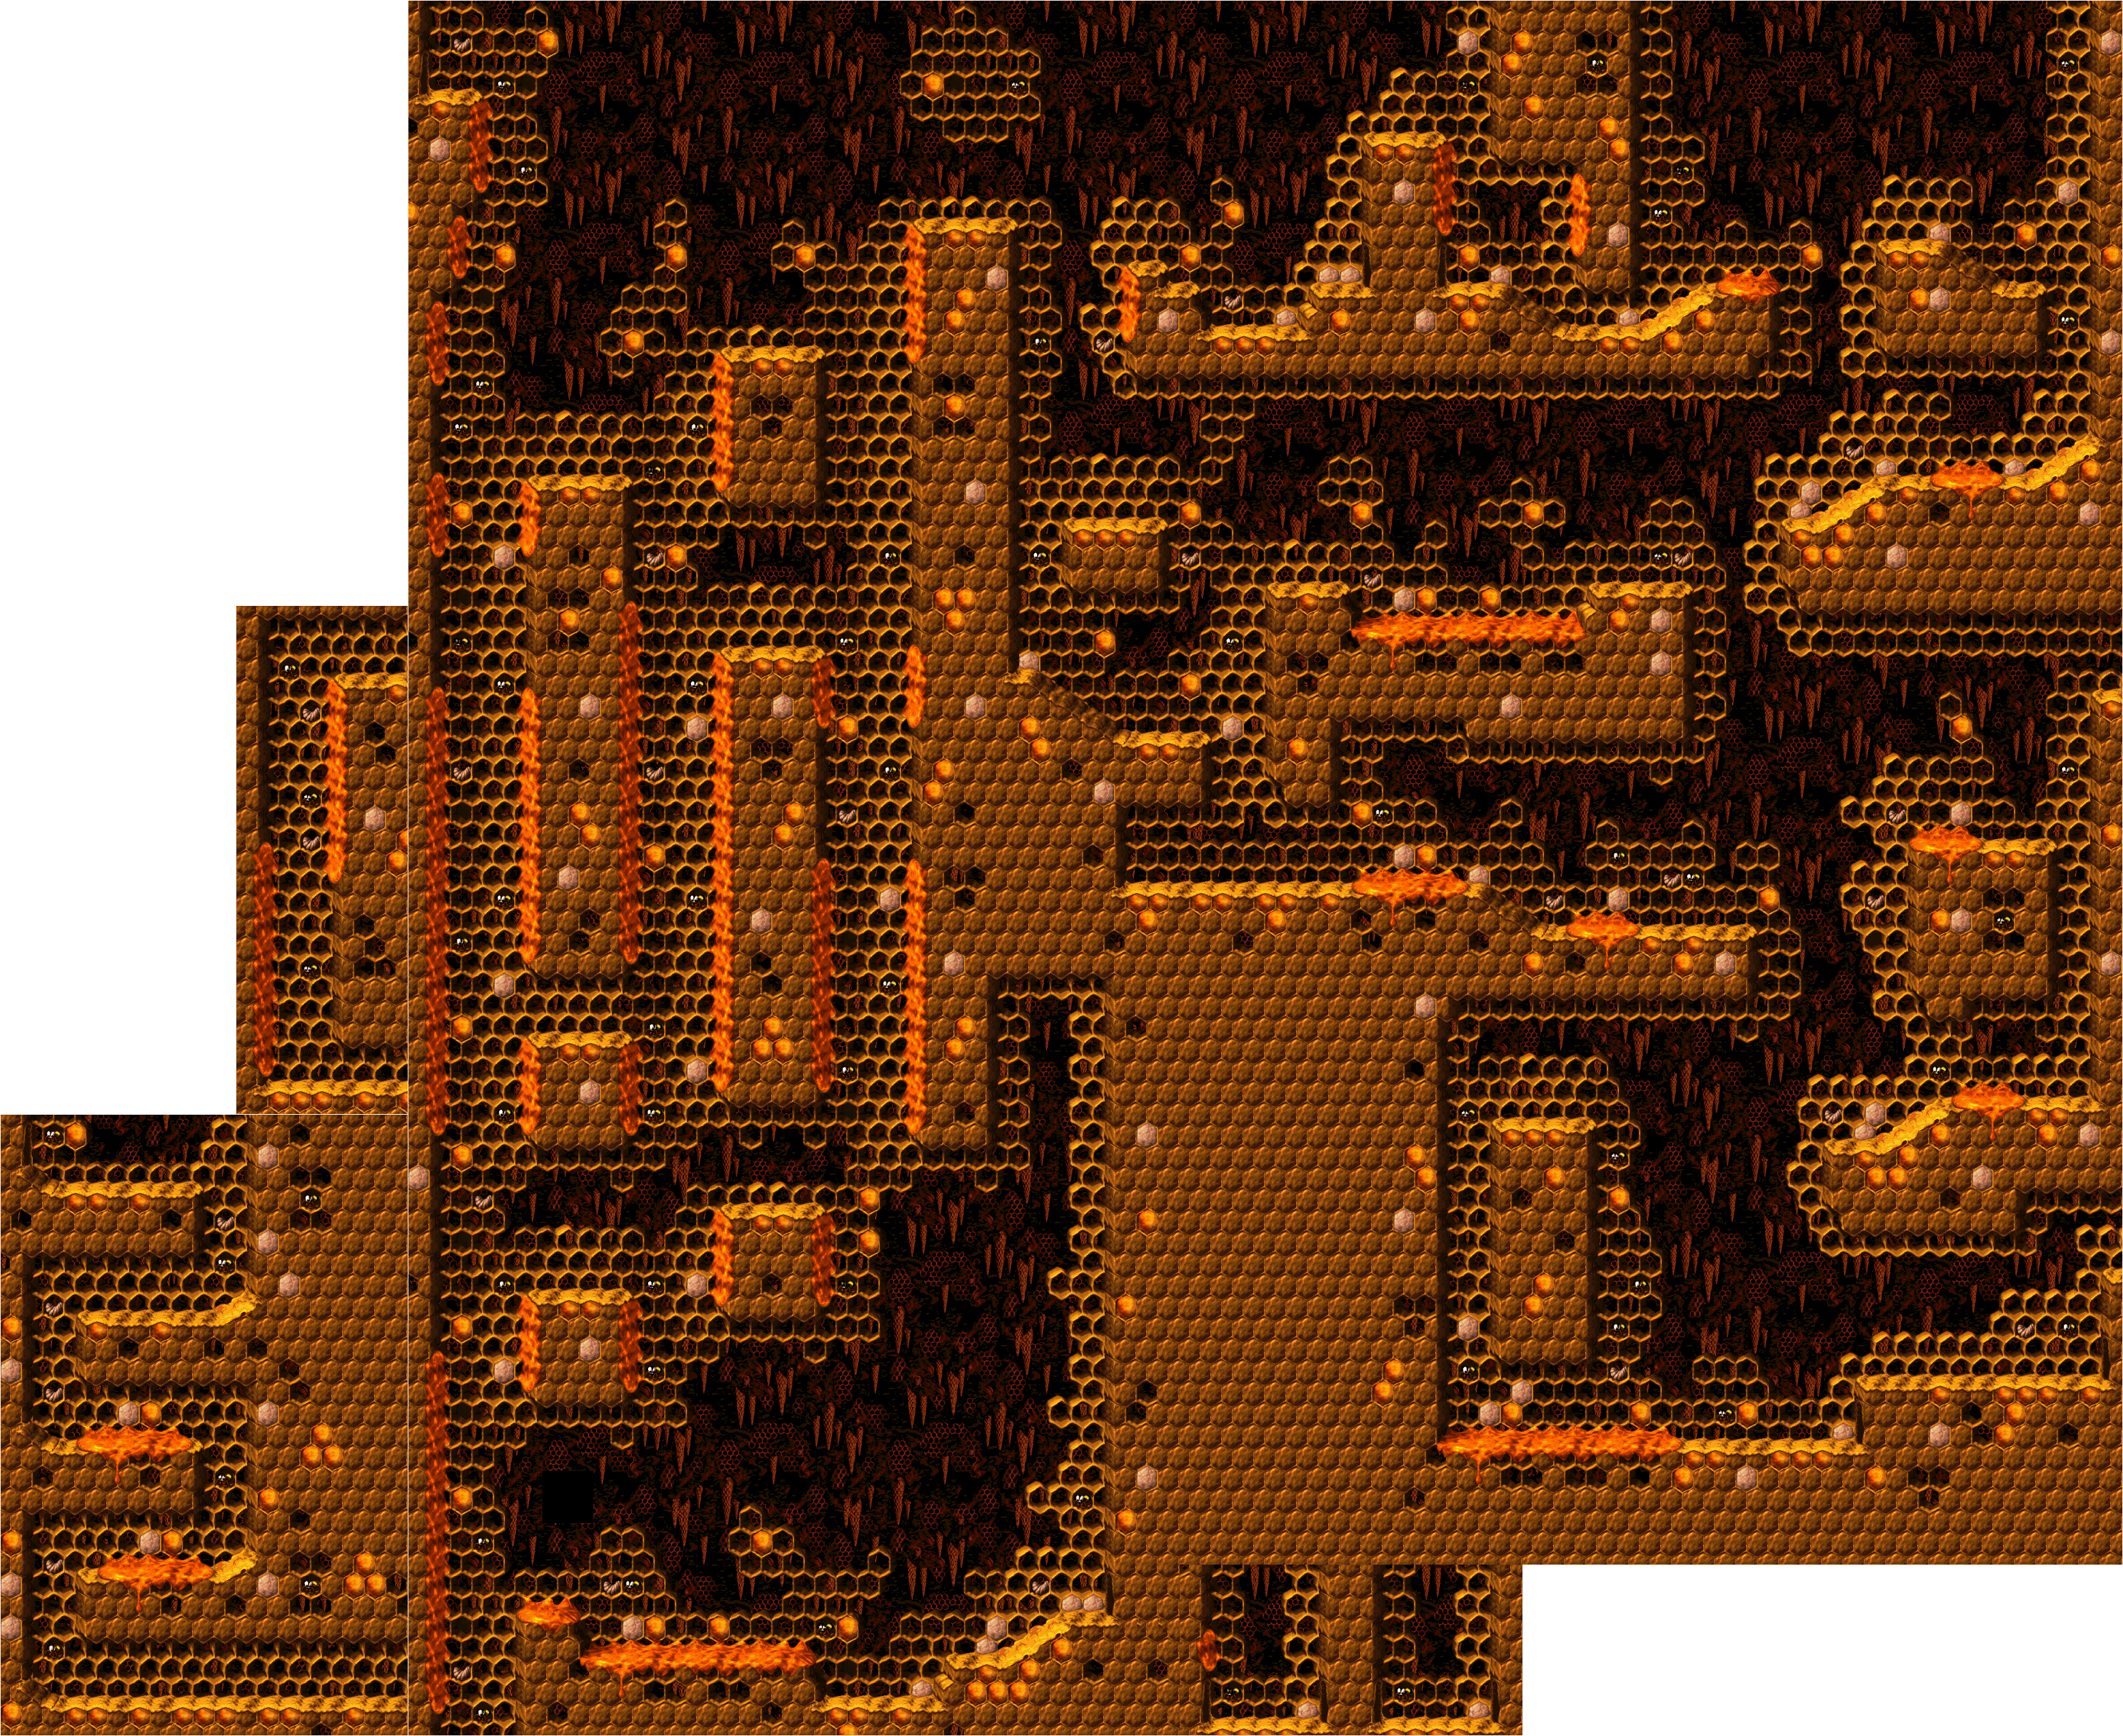
Hornet Hole is the first stage in Krazy Kremland, and here you'll be experiencing a new kind of level: the hornet's nest level. Here, you'll experience sticky floors and walls. You'll have to jump acorss the floors; for the walls, you will have to jump into the wall, jump back and quickly move back forward to climb up.
If you get into tag throw position (impossible on the sticky floors; you will have to do it on dry land) and walk on the sticky floors, the sticky floors will have no effect.
The first bonus area is at the start. Tag throw to the hook, then climb up the honey-covered walls. To the right is the first bonus area, where you'll have to throw a treasure chest into all the Zingers to get a Kremkoin.
Dropping down after leaving the first bonus area takes you to the entrance to the second one. Here, just alternate between the two walls to get the Kremkoin.
As you progress through the level, you'll have to avoid Zingers as you traverse the sticky floors. Tread and jump carefully.
Sometime after the K and before the checkpoint, you will find another hook. Tag throw up to it, then climb up the wall to find Squitter. You will need him to get the third bonus area. Destroy all your enemies with the projectile webs, and don't worry about the sticky floors. Squitter can move through them just fine.
Just before the N, there is a gap that you can drop down. If you have Squitter, you can make some platform webs to get the DK coin.
After the N, you will have to make some platform webs up and to the right with Squitter to reach the third bonus area. Here, make platform webs to get to the Kremkoin.
Thankfully, Kong Kollege is available is soon as you beat this stage.
This is the first roller coaster stage in the game. When you're on a roller coaster, you can press B to jump. The skull-shaped car will jump with you, and you can jump on enemies with it to get a boost if you need to.
There are two new barrel types here: Check Barrels and X barrels. Hit the green Check Barrels, and avoid the red X Barrels. The Check Barrels open the doors, while the X barrels close them. If you run into a closed door, you lose a Kong, and if you don't have a second Kong, you lose a life.
The Check Barrels will be easy to get at the beginning, but you'll have to time your jumps carefully and memorize the level a little bit to figure out where they are and when to jump, especially when Zingers are near these barrels sometimes.
The first bonus area is after the first X barrel. As soon as you see it, jump. You'll make it. Here, you'll be taking a ride on Squawks, killing all the Zingers. The best way to quickly destroy them all is to scan the area, get the camera to move around and pick them all off at a distance. You'll find the Kremkoin in the upper-right corner when you destroy them all.
The Kremlings on the cars are called Klanks. These guys will not only get in your way, but they will throw barrels at you. If you can get close enough to them and jump on them, you can get rid of them. Remember this for later...
After the N, there is a wooden tunnel. Jump as you enter to get the DK coin. After that, follow the Klank you see coming down and fall down the first pit you see along with him. This takes you to the second bonus area. You'll be jumping from one car to another. You may have one second at the end, even if you do it right, but you'll still be able to get the Kremkoin.
Near the end of the stage is a line of bananas. Follow it, then jump when you reach the end to hit the Check Barrel and open the final gate.
If you need a Kong, go all the way to the right at the very end and jump up. You'll find an invisible DK Barrel.
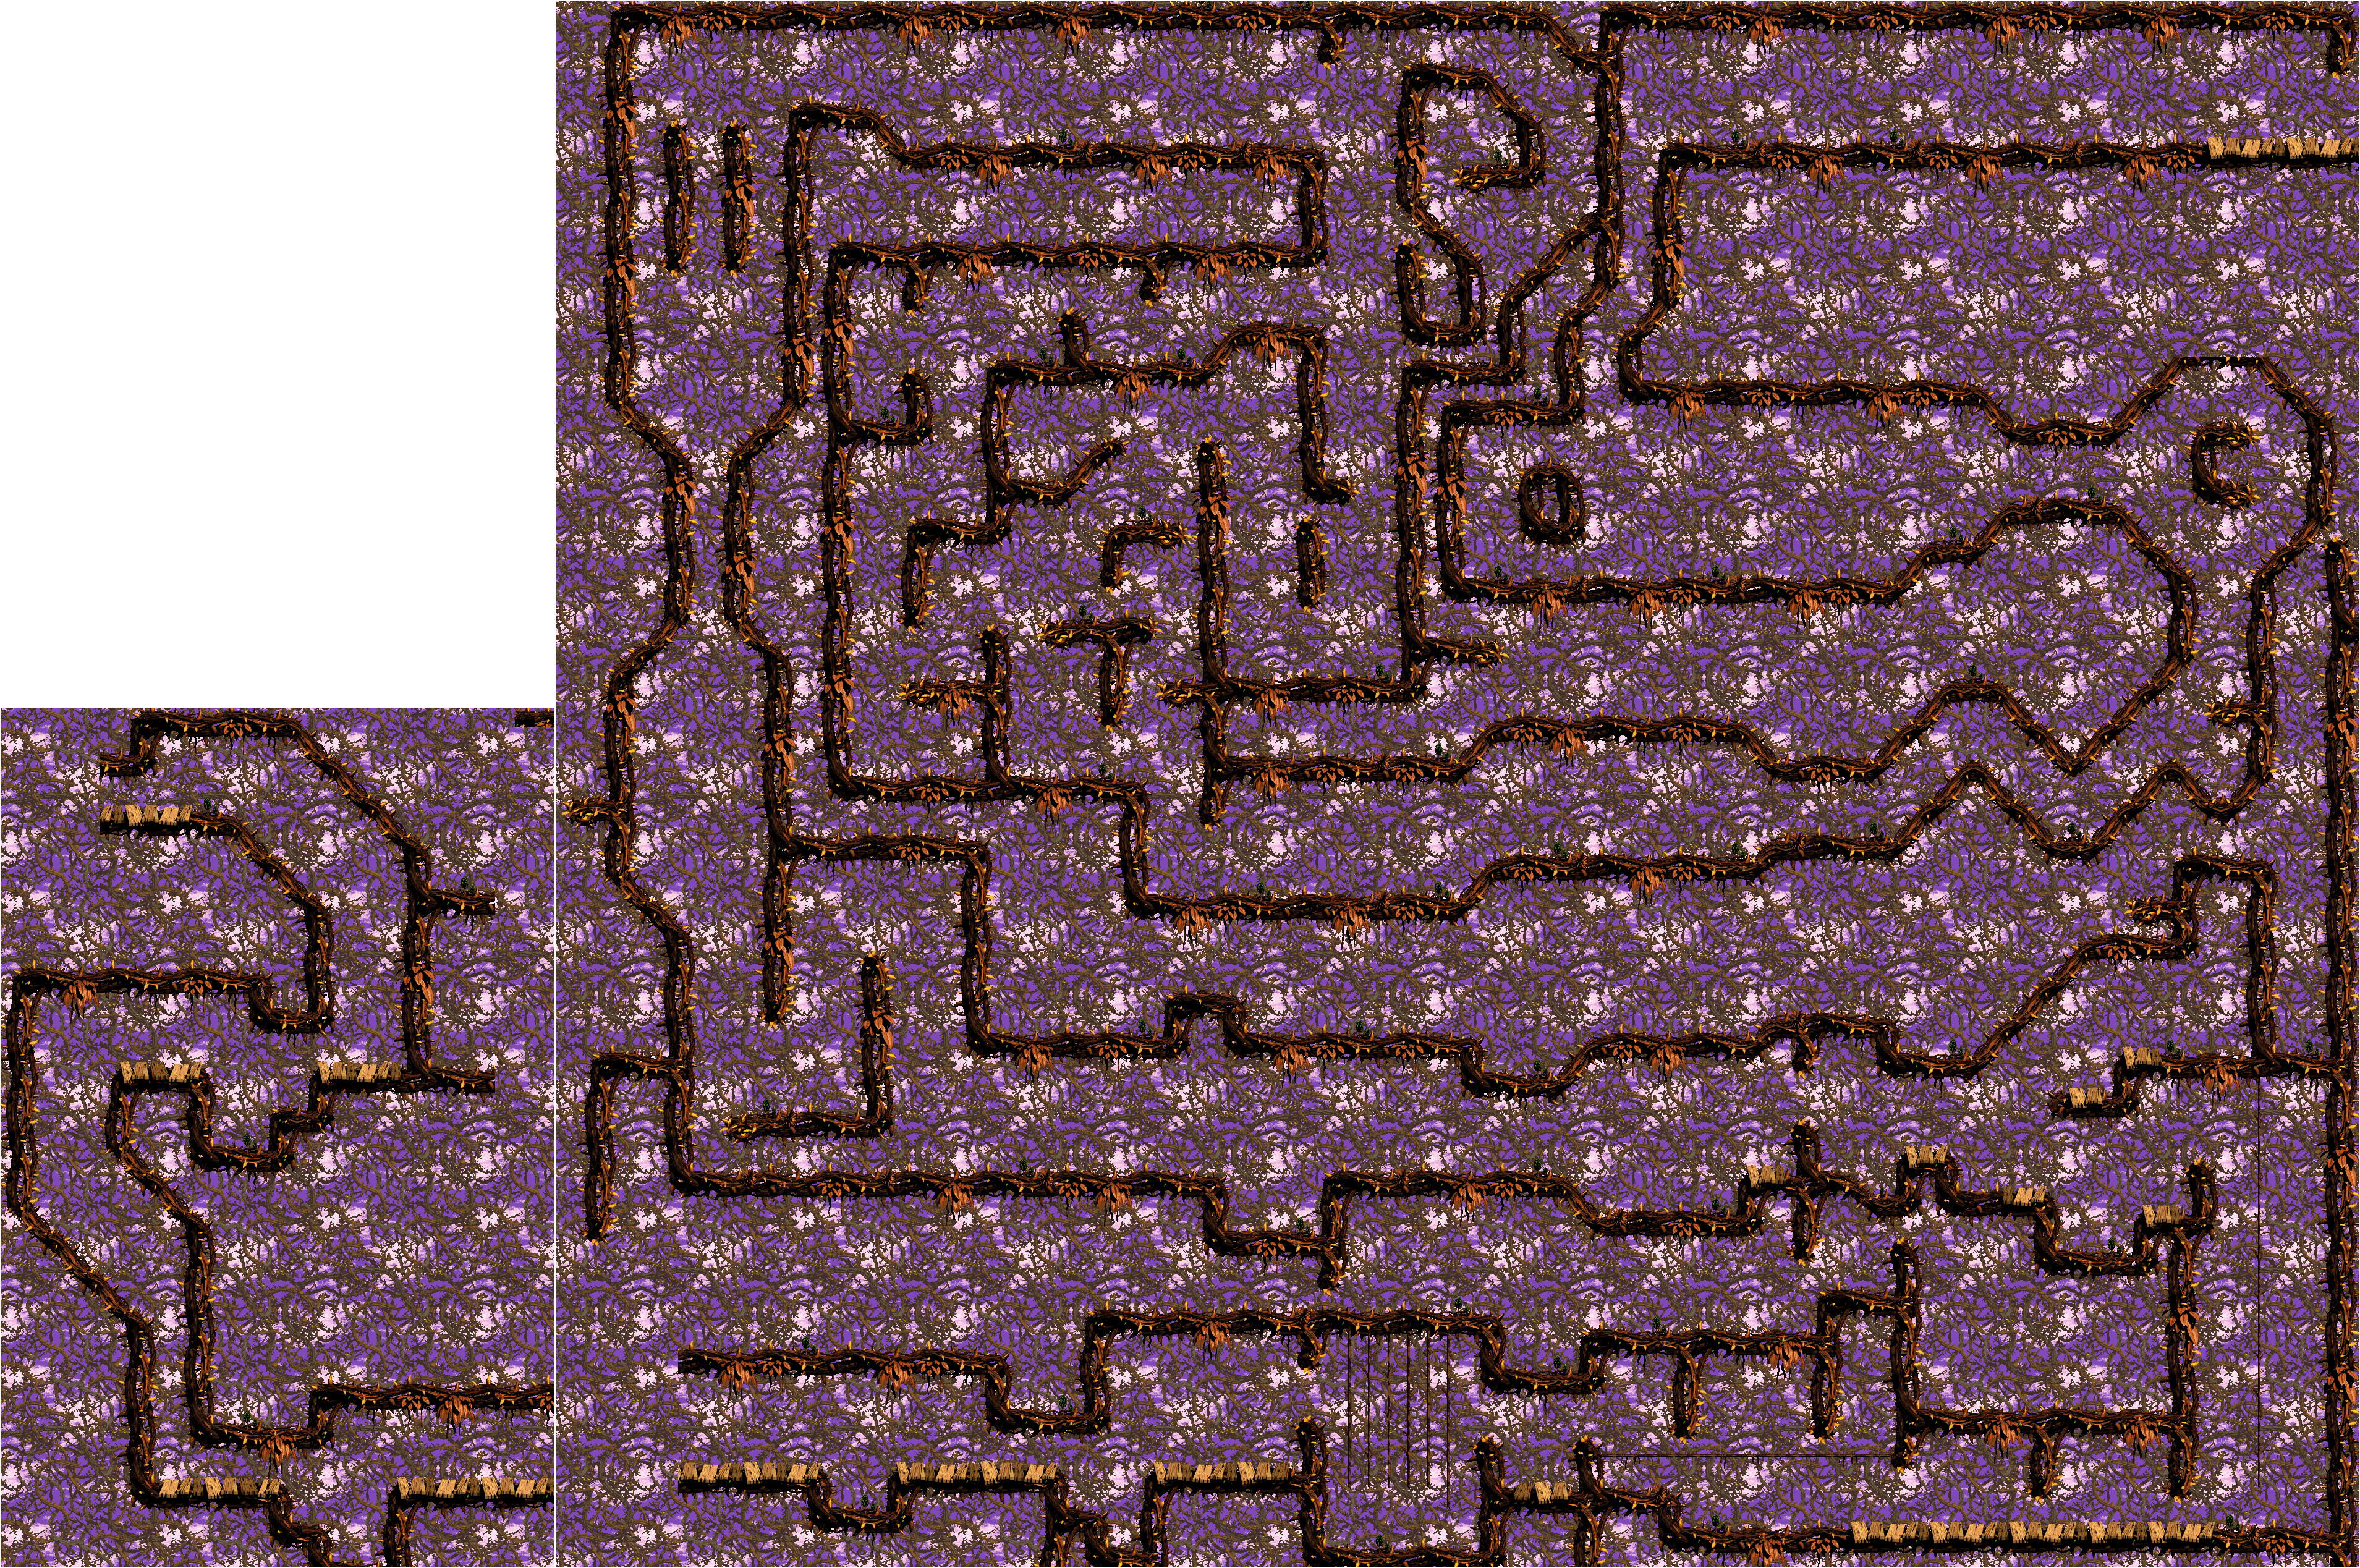
Here, you'll be traveling from Barrel Cannon to Barrel Cannon, trying to stay away from the brambles lining the walls and also trying not to run into any Zingers either. It can be easy to get lost, but as you spend time through the levels, you'll get a flow for how to get around as well as which barrels to take. Most Barrel Cannons will fire in two directions.
The first bonus area is past the rotating Barrel Cannons after the O. You'll want to make your way to the lower-left. Here, you'll be hitting some more Barrel Cannons, and you'll have to find the path to the Kremkoin pretty quickly, as you only have 40 seconds.
Near the end of the level, there are three Flitters in a row above brambles. Go to the left and fall into the Barrel Cannon instead. You'll be shot up to Squawks. Fly around, try not to touch the brambles, avoid the Red Zingers and explore. You'll be able to find the DK coin left of where you find Squawks as well as the second bonus area all the way to the right of that. You'll be riding Squawks here. Don't touch the brambles!
Klubba's Kiosk
Here, you'll find a path to Black Ice Battle. Time to slip and slide.
The ground here is very slippery due to ice physics, so you will want to be careful. Dixie's Helicopter Spin will be very useful here.
At one point, there is a point where you can either go left or down. If you go left, you'll find two extra lives...and the Black Klobber! The Black Klobbers show up near the end of the game as well as the Lost World, and if you bump into them, you'll lose lives!
The bonus area and the DK coin is past the N. After dodging the Zingers, hug to the right as you drop down. Behind the Zingers is a chest. Ram the chest into one of the Zingers to find a cannonball. Take the cannon ball. Jump the gaps and go down the next slope, then go to the right after dropping down to take the cannonball to the cannon. Make your way down the slopes, avoiding the Zingers, and you'll get the DK coin for this level.
Kudgel's Kontest
Back to Krem Quay, where we face Kudgel, a gray palette swap of Klubba.
The battle starts with Kudgel leaping in and out of the screen. You will want to be in the air just before he lands, or else the quake will stun you. If you get stunned, he will swing his club, and that swing has some range. You'll definitely want to stay away from him at all times.After about four leaps, he will produce a TNT barrel. You will have to throw it at him from the air to hit him. If you try to ram it into him, he will block it and take no damage whatsoever. After two hits, he starts jumping faster, and you will have to throw the the TNT barrel at him just before he lands.
After three hits, he changes it up a little bit. Instead of leaping in and out, he leaps across the screen at you. Run under him and jump up so the quake doesn't stun you, and keep doing this until he produces another TNT barrel, then throw it at him like you did before. After a total of five hits, Kudgel is conquered.
At the very beginning of the stage, grab the DK barrel near the start, then run to the left and defeat a Zinger. Keep going left. Super jump to the left, jump off the Flitter and you'll find four more Zingers. Tag throw your way past them, and you'll end up at the other side. There will be a chest there, and if you destroy all four Zingers with it, you'll get the DK Coin.
This area will have you avoiding the swampy water below as you climb on cattails, avoid Zingers and hit the Krockhead Barrels. Hitting these barrels will cause some Krockheads to come out of the water and help you across. You won't have all the time in the world, however, as they will slowly sink back down.
Not surprisingly, the Klingers - the climbing Kremlings - will make a return here, due to all the climbing you'll have to do. Be careful. If you need to throw, play as Diddy, so you can throw straight ahead.
The Krockheads are back, but some of them will sink in and out of the water, and the water is not the place to be.
The bonus area here is at the "No Squitter" sign. Jump straight up, then tag throw your way straight up to the left of the sign to get there. Here, all you have to do is destroy the Zingers with Squitter to earn a Kremkoin.
At the beginning of the stage, go all the way to the left and jump straight up. You'll find some pick-ups as well as the first bonus area. Here, you will be jumping on the over-sized barrels to make your way to the top, where you will find a Kremkoin.
Once you're done, go in the doorway.
The beginning of this stage introduces a new game mechanic: the Animal Barrel. This transforms you into the animal pictured on the Barrel, and if you have both Kongs, you'll have an icon of the animal buddy you are currently playing as in the lower-left hand corner to remind you that you have an extra hit.
Since you're playing as Rattly here, you had better get ready to jump off Zingers and hit the occasional charge jump. To make it even rougher, you'll be fighting a lot of Kaboings. Aside from the standard gray one that we have seen all this time, there are the new teal Kaboings, who have a slight delay between jumps as they bound towards you.
Kannon also comes back, too, and at one point, you'll have to jump off a barrel he shoots out just right to make it over a pit near the end. These guys can be bad news, so don't be afraid to charge up the super jump to take them out if you need to.
At one point, you will see openings in the floor as well as a pit where you can barely see a banana at the supposed bottom. Drop into that pit and go left. You'll find the second bonus area, where you will have to jump off Zingers to get the Kremkoin at the end.
Leap into the wall after the first Zinger after the O. You'll find the DK coin amd be shot back up by a Barrel Cannon.
After the N, there is an arrow made of bananas pointing up. Stand below it and hold A to charge up the super jump. You'll find the third bonus area. Rev up that super jump to get all the stars and reveal the Kremkoin.
If you've reached the end and you need your other Kong, go all the way to the right. You'll find an invisible DK barrel.
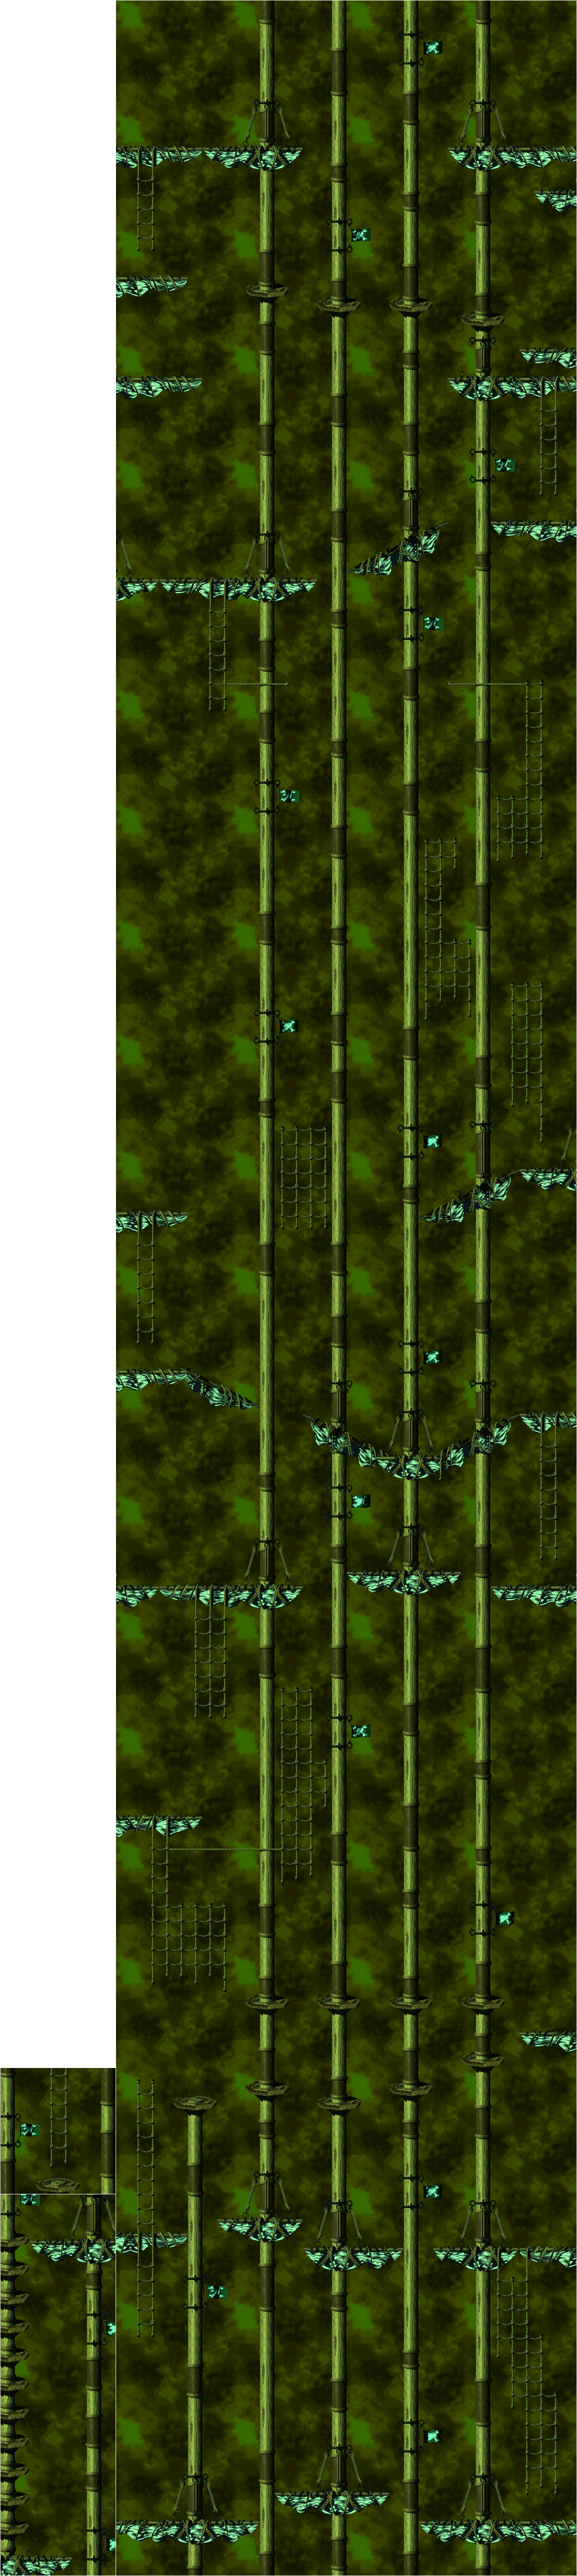
Main rule of thumb: do not hit the water, whatever you do. If you do, you'll meet Snapjaw, Lockjaw's pink cousin who knows how to home in on Kongs...and you're not going to win.
As the title of the stage suggests, you're going up...a lot. You'll also be tangling with enemies as you go. Be fast, but be ready to fight.
The first bonus area, hit the invincibility barrel hidden behind the Kannon just after the continue point and swim underneath the sail where you found it. Follow the bananas and you'll find the Bonus Barrel. You'll be climbing ropes, helicopter spinning, hanging on hooks and grabbing stars again for another Kremkoin.
The second bonus area is a Cannon. Thankfully, the cannonball is just before it, but you'll have to jump from platform to platform to get it there. Here, you'll be using cannonballs as weapons to take out the Flitters and the Zinger to reveal a Kremkoin.
There is an invincibility barrel after the second bonus area. Grab it, then swim all the way to the right to get the DK coin underneath the end of stage target. Watch me accidentally fail at getting it and having to go through the whole stage just to get it back!
Before we finish off Crocodile Cauldron and head to the next world, we take a shortcut to a place outside of Crocodile Isle where the difficulty is a little higher than normal...
All maps by Tropicon.
Klubba's Kiosk
We can now pay off Klubba with 15 Kremkoins! By doing that we can enter...
The Lost World
When you enter the Lost World, there are three places you can go: back to the other side of Klubba's Kiosk, the Monkey Museum (where Cranky will greet you with a special message for finding the Lost World), and one of the stages in the Lost World. The stage you get depends on where in the world you entered from.
The stages in the Lost World are a little more difficult than the ones you've come across so far, and they will also prove to be some of the most difficult in the game, as you will find out later on.
If you leap straight up at the very left of the stage at the beginning, you'll get a bunch of bananas.
The tires here will allow you to jump over some of the spikes (which also have some skulls laid out among them), but they can also crush you against a wall, so be careful when you stand.
The guy walking around with two cutlasses is Kutlass, and if you jump on him as he charges at you, you will be stabbed by his two swords. Instead, jump over him and either jump on him or roll into him from behind as he tries to pull his swords - which seem to be too big for him - out of the ground.
The porcupines - also known as Spiny - can only be cartwheeled or spun into head-on (or rather, face-on). You can also use a barrel if you need to, but any other course of attack will get you hurt.
Just before the continue point, you will be able to go left and get the O. If you superjump to the left to get it, you will find the bonus area for this level. All of the Lost World stages have only one bonus area, and instead of a Kremkoin, you will get a DK coin for completing it. For this one, you'll have to use the tag throw to destroy all the Flitters. If you don't have a partner, you'll be able to get one when you enter.
Crocodile Cauldron
Kleever's Kiln
At the start of the battle, dodge the fireballs. After three fireballs are thrown, a cannonball will drop down. After this, hooks will drop down, and you will want to get to the other side of the room as quickly as possible. There will be a cannonball on the other side that you will have to throw at Kleever. After three hits' worth of damage, Kleever will change tactics.
Kleever will jump out of the lava and try to destroy you without the aid of a lava hand. When he lunges at you, jump over him and use the hooks to get to the other side of the room as quickly as possible, and hit him with the cannonball. From there, you'll want to rush to the other side of the room with the hooks. After three more hooks, Kleever is history.
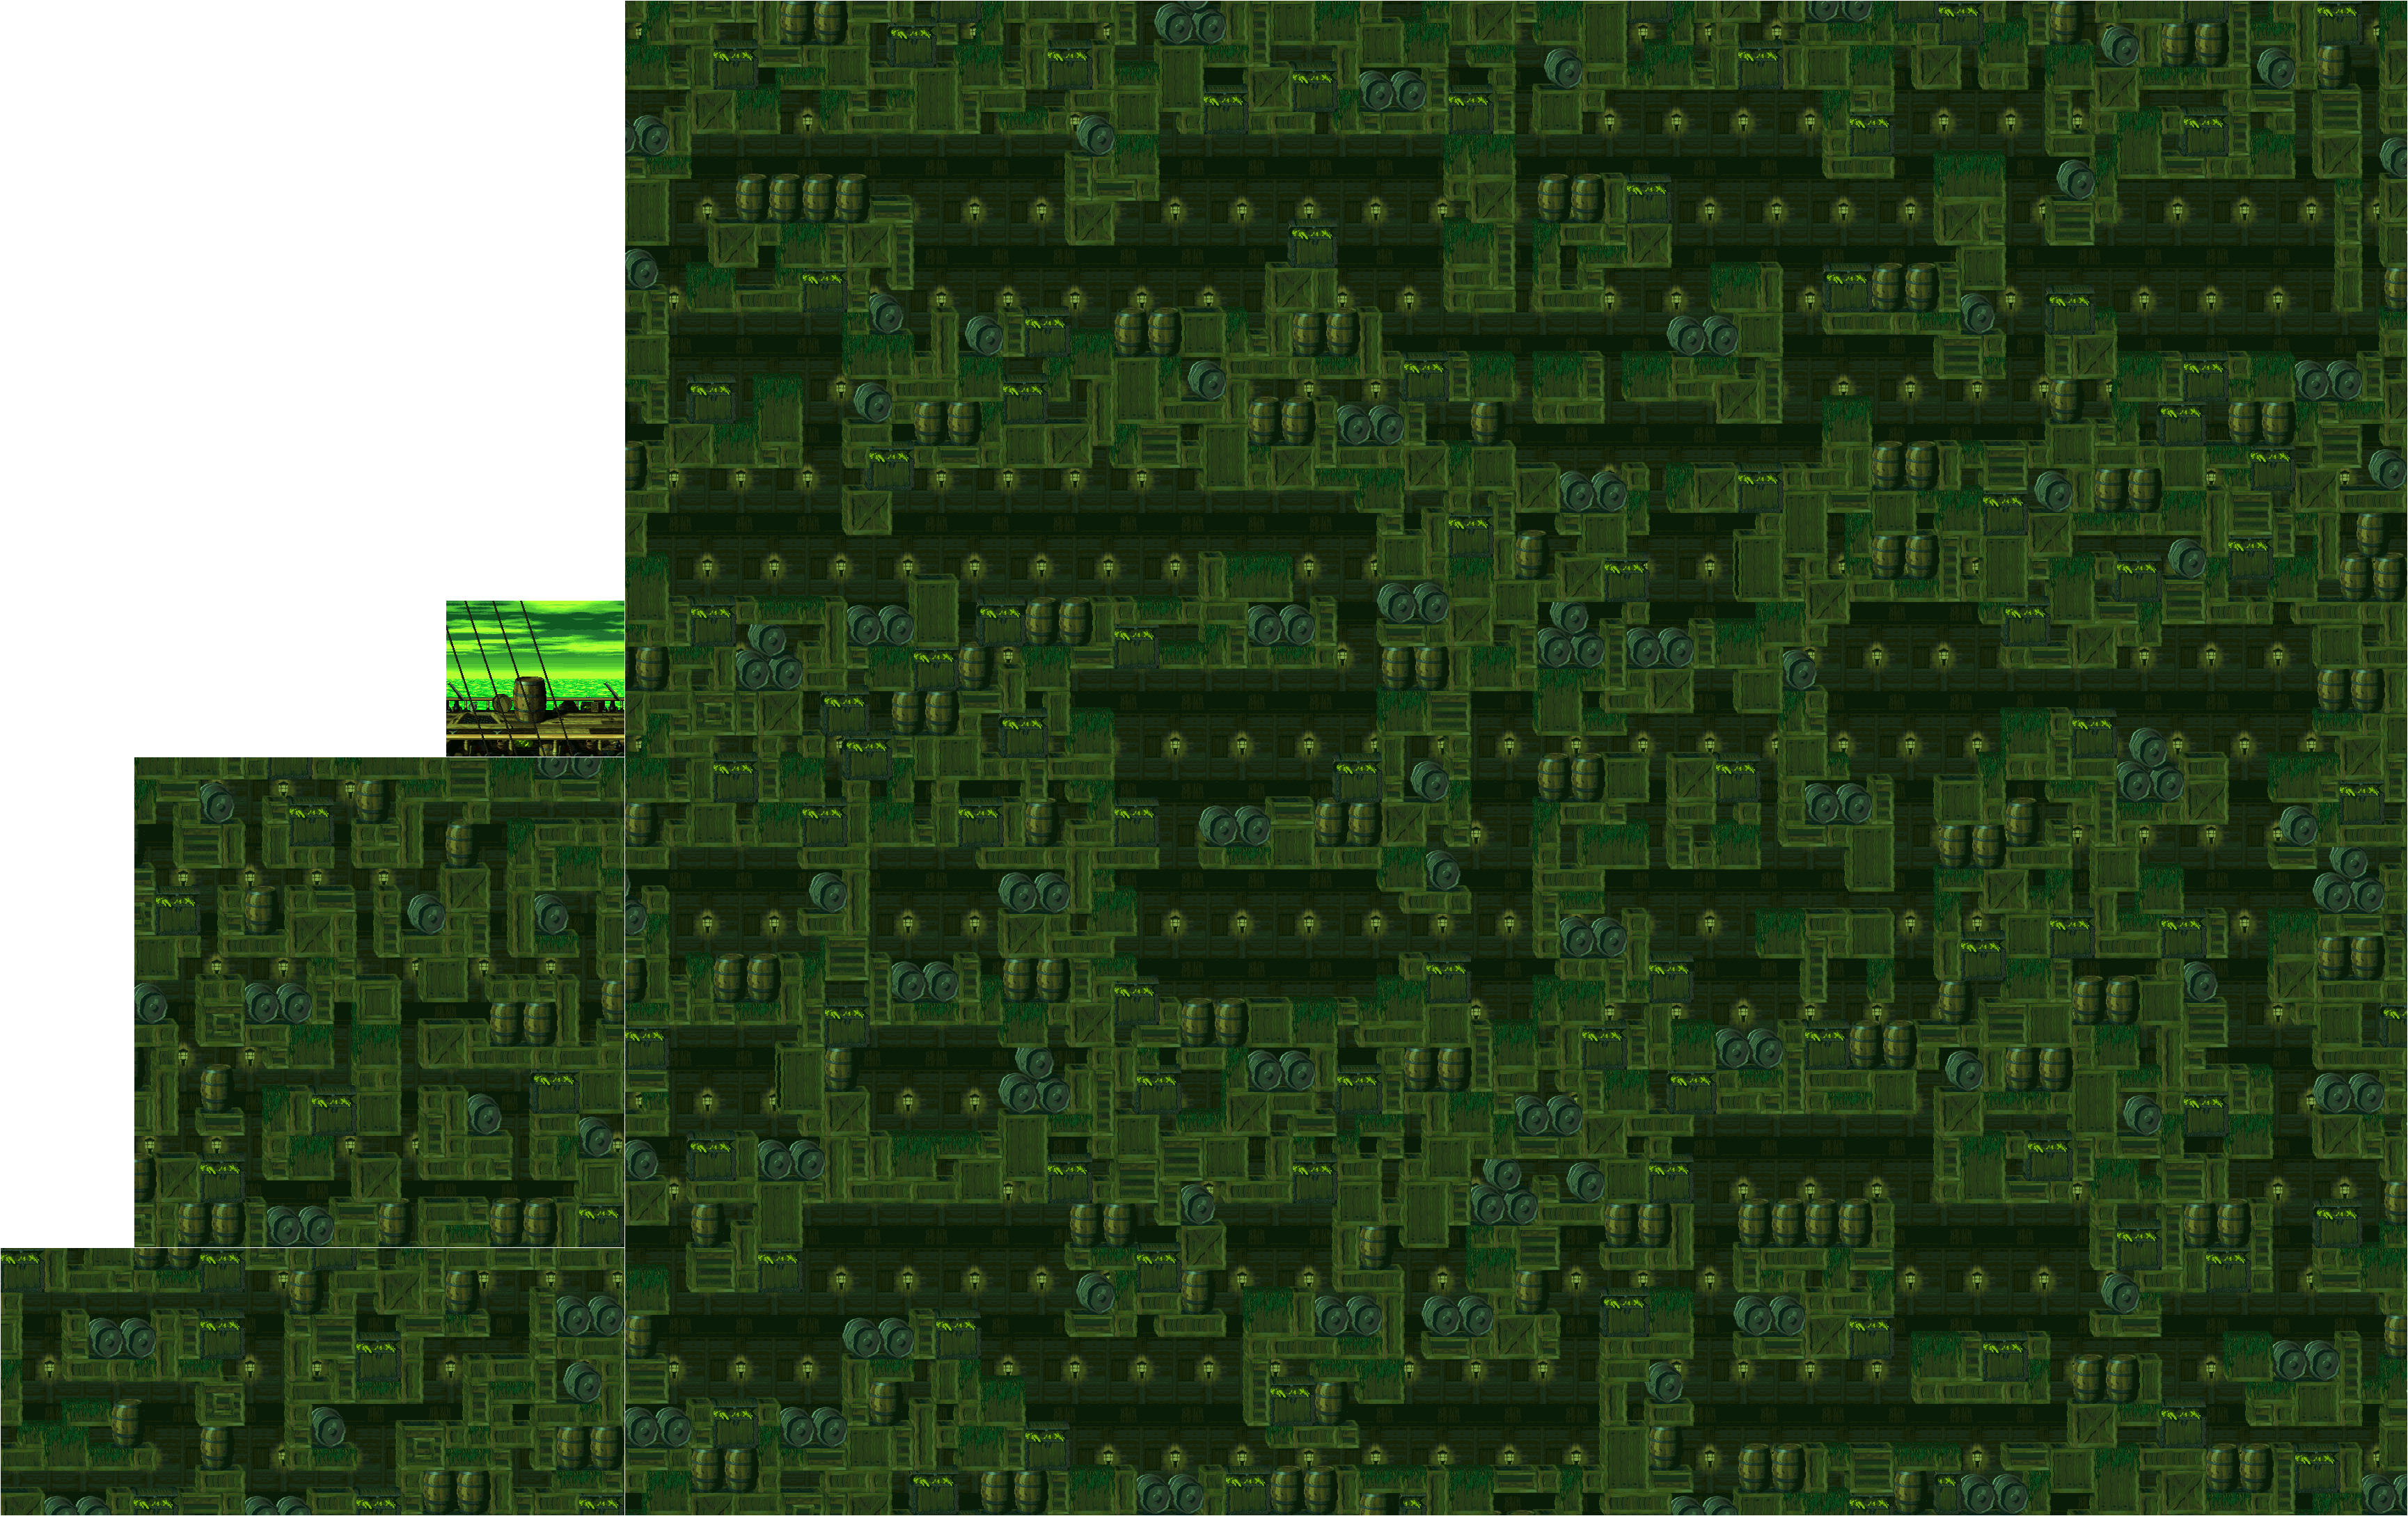
Krem Quay
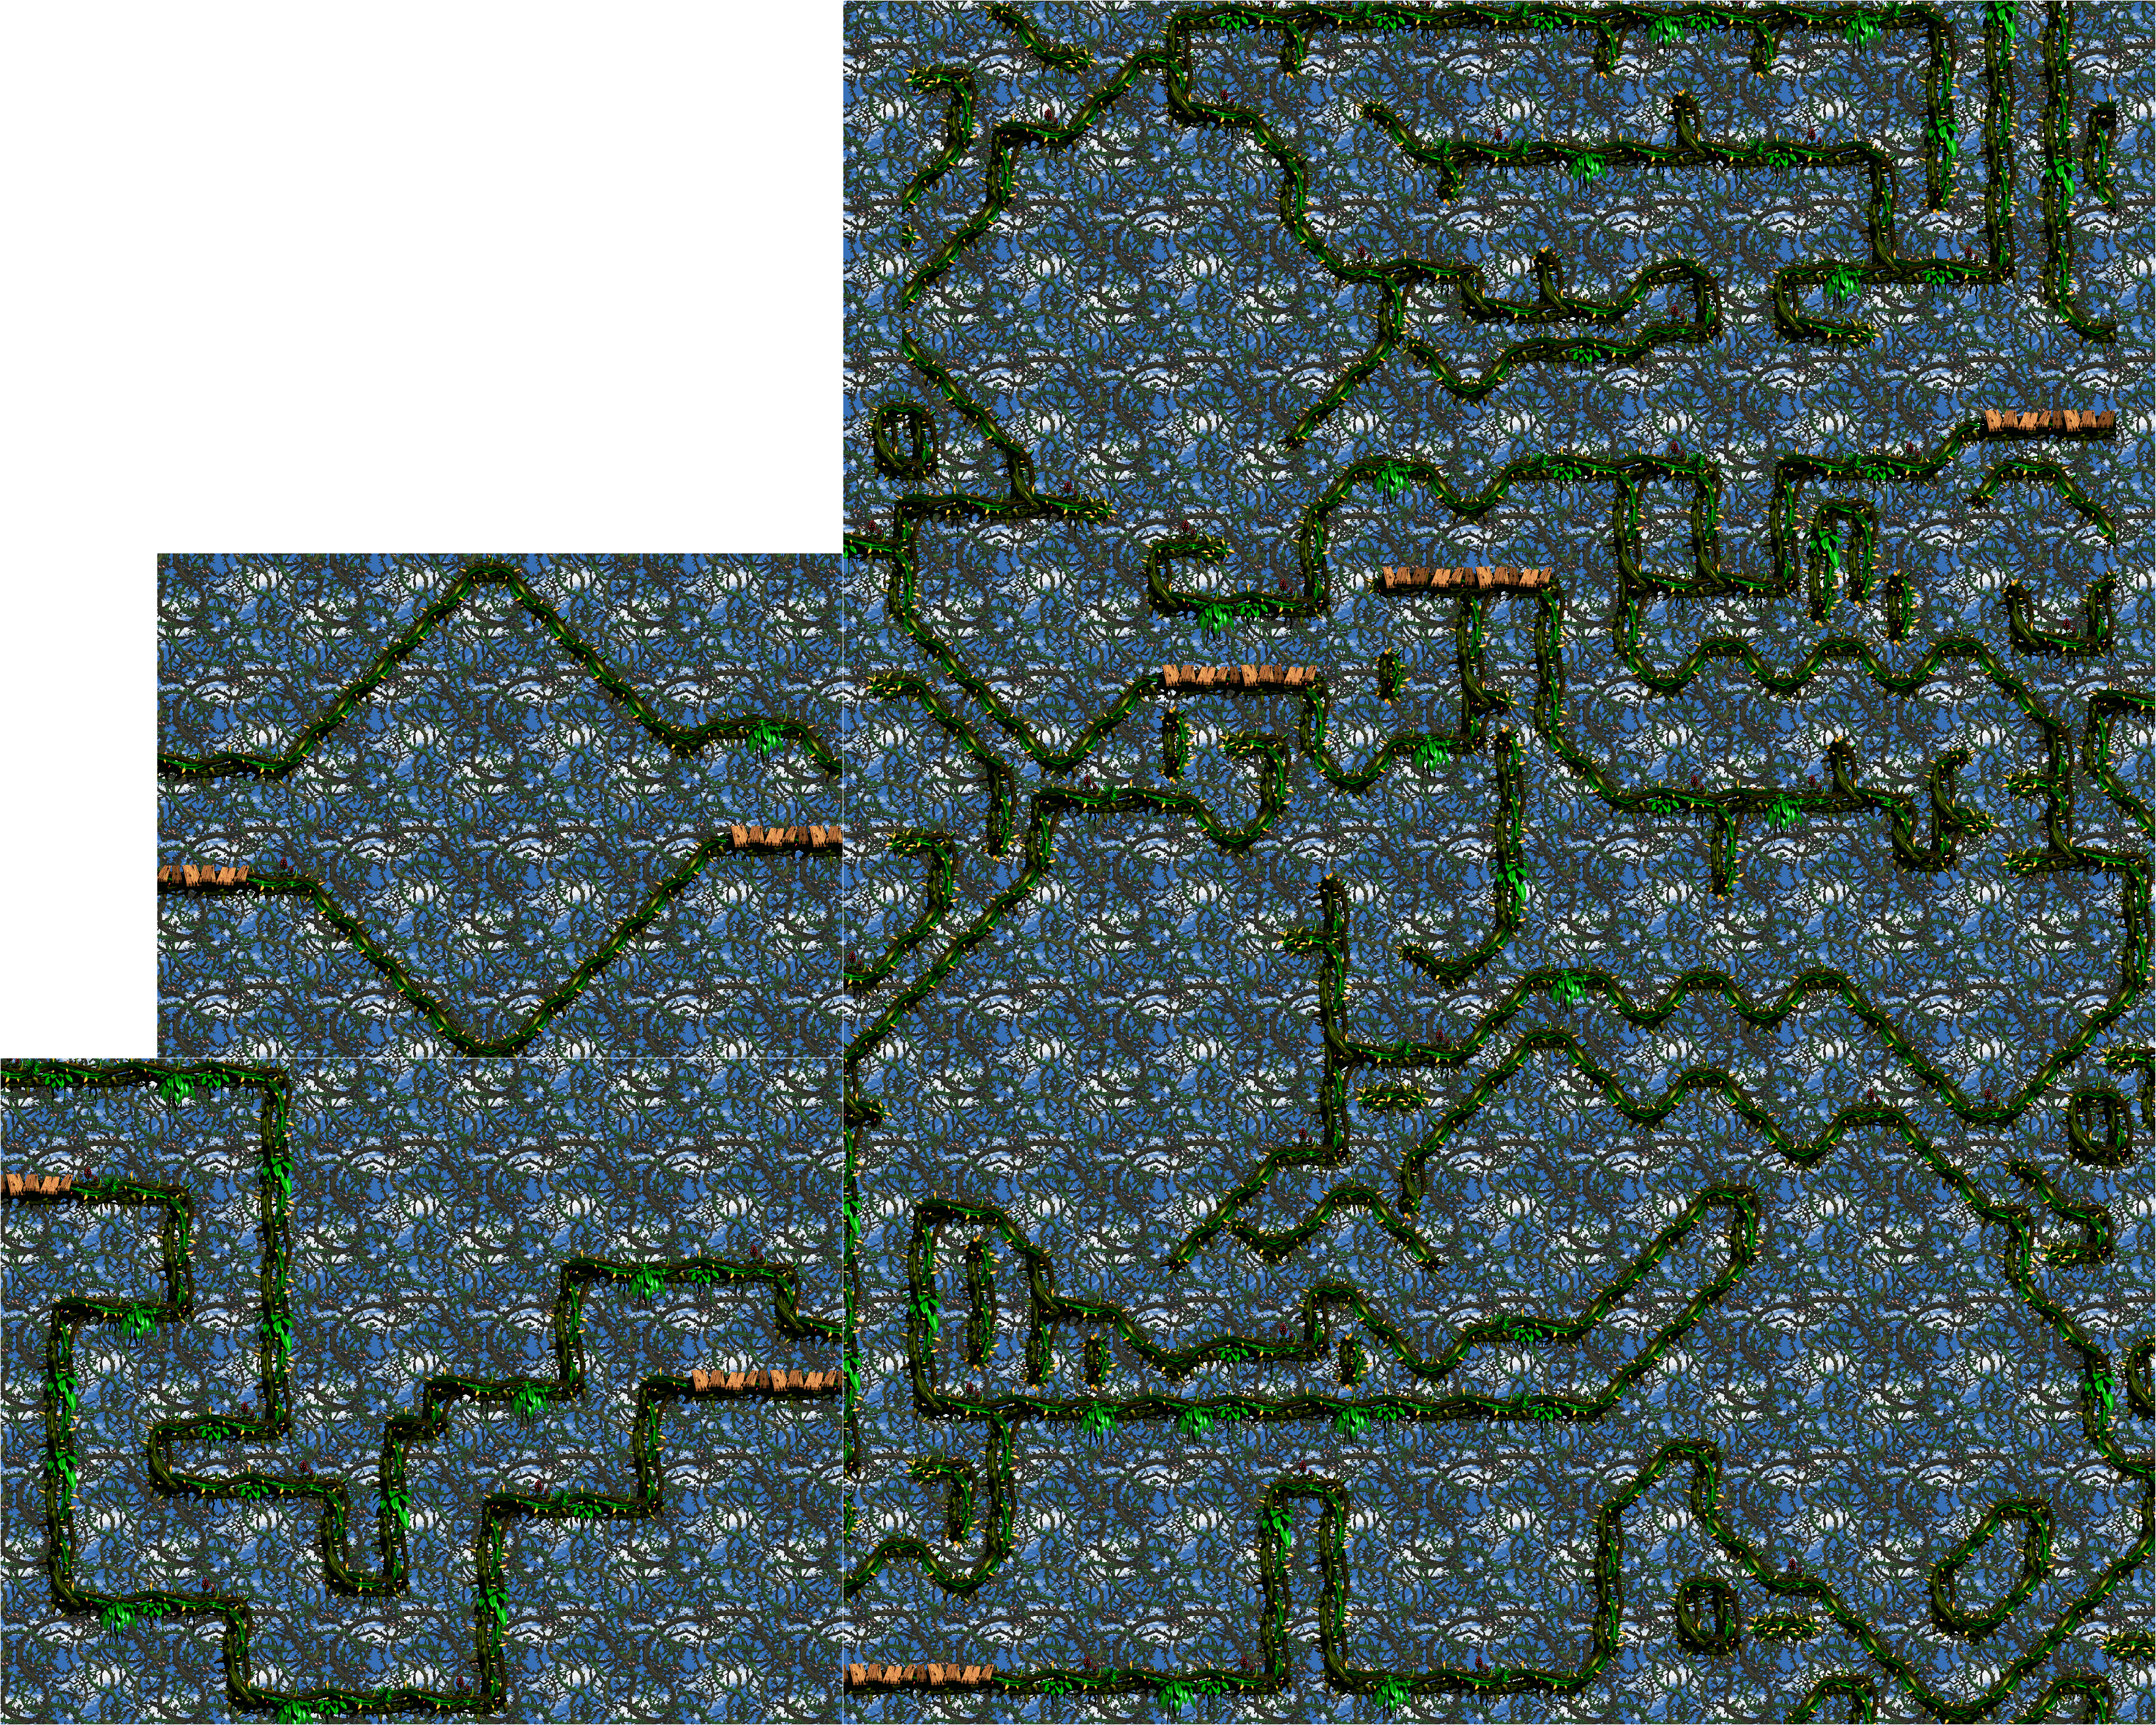
The difficulty starts to ramp up a little more here. Here, you'll not only be avoiding drowning in the swamp, but you'll also have to avoid running smack into sharp, spiky brambles.
The Barrel Cannons with the circular arrows are the Rotating Barrels. The "5" means you have five seconds to use the barrel. Press Left and Right to get the barrel rotating where you want to go. Just remember to time it right when it comes to shooing where you want to go.
Kloak is the floating coat Kremling that throws things. Sometimes he'll throw crates and enemies, but sometimes he can throw good things like chests or power-ups...even lives.
The first bonus area is in a cannon just after the continue point. Just past the cannon is the cannonball, which you will have to grab, take back to the left and place in the cannon to obtain access. To get the cannonball, you will have to go past the "No Rambi" sign until you see a Kloak. He will throw things, then head to the left. Follow him to the left. He will turn around and throw a chest, then just float there. Hit him with the chest to get the cannonball, then put it in the cannon. Here, just throw the cannonball up to kill the Zinger and the two Flitters to get a Kremkoin.
The second bonus area is just after the G and before the end. You will have to jump and tag throw to the Bonus Barrel to get there. For this one, you will have to use the Rotating Barrels to get to the Kremkoins. You can get there with enough time to spare, just focus.
The DK coin here is one of the harder ones to get. You will have to get Rambi pretty on in the stage. There is a Krockhead just past a Zinger that works as a platform to getting there, and once you get him, you will have to bring him to the "No Rambi" ign later in the level, just past the cannon. When you do that, you'll be rewarded with the DK coin.
The two arrow barrels that shoot away from each other and away from where you want to go can be dealt with if you just hold the Control Pad in the direction you want to go.
Head to the right like the banana arrow says at the beginning. You'll find Glimmer the Angler Fish. You cannot ride on Glimmer, but Glimmer will shine a light towards the direction you are facing. Once you find him, go back to the start and head up. You'll find the first bonus area if you head to the right. This one is a maze, and even though it may be hard to see without Glimmer, it is a very, very linear maze.
If you go up and right from the first bonus area, you'll find a secret room. Go up from the upper-right corner, and you will find the DK coin. If you go up from the upper-left corner of where the first bonus area is, you'll find another hidden room.
At this point in the game, the Puftups will start exploding and shooting shrapnel either diagonally or horizontally and vertically at the same time. Be careful.
After the continue point, there is a spot where a path of bananas will lead downwards even though you are able to go in other directions. There is a banana arrow pointing right after the N. Go down form there, and when you are able to go down again, do it. You'll find a path of bananas leading to the second bonus area, where you will have to go through another maze - this time with Glimmer - to find another Kremkoin.
From there, go to the right and make your way up to the goal. Watch out for the Spiny.
You'll meet another new animal buddy here: Clapper the Seal. You cannot ride on Clapper, but if you jump on him, you'll cool the water down. You definitely do not want to jump into the water while it is red like lava, because if you do, you're taking a hit.
The warp barrel is to the platform to the right of where you first meet Clapper. Just go all the way to the right edge and tag throw upwards to reach it.
Just before you reach the O, you will be able to jump up into a hidden nook to find an Invincibility Barrel. Use this to get to the continue point a little faster.
After the "No Enguarde" sign is a banana next to a box with a barrel on top of it. Take the barrel and throw it where the banana is. You'll enter the lone bonus area for this stage, where you will have to get on Enguarde and stab all the enemies. Thankfully, the path is very linear, and it should not take you long to get the Kremkoin here.
To get the DK coin, go to the right of the Clapper after the G, then (and make sure you cool the water down first) swim downwards through the crates to find a secret passage to a rather wide open space where you will find the DK coin. Thankfully, there is an Invincibility Barrel here.
You'll have to stand on the blue balloons in order to use them. When you do, you'll be able to control them with Left and Right on the Control Pad. In order to gain (or regain) altitude, simply place the balloon on in a column of steam rising out of the lava, then wait until you have as much height as you need.
You'll meet a new enemy in this stage: the Yellow Klobbers. Unlike the green ones, who will just bounce you around, these guys will make you drop five bananas whenever they run into you. Pick them back up before they're gone for good
If you tag throw to the left at the beginning of the level, you'll get two hidden Banana Coins. Use them to save your game!
The warp barrel is just before the K. Leap on the balloon just before it, then take it to the next column of steam, then jump and tag throw upwards at the highest point.
You'll see Rambi in a crate. It pays to have him, since he can get rid of any Zingers in your path and act as an extra hit if necessary.
The first bonus area is at the dry land you will reach after the O. Use Rambi's supercharge to break the first wall you see. Destroy all the enemies to get the Kremkoin.
The second bonus area is below the continue point. Helicopter spin with Dixie after jumping over the lava and under where the Star Barrel is to get it. Here, you will be using the balloons to collect all the stars for a Kremkoin.
Also past the continue point is the DK coin. It will be directly above the N. Use a DK barrel or a tag throw to get it.
Near the end, you will have to jump from one balloon to another as if they are falling platforms. You will have to be fairly quick to get to a balloon near a column of steam.
The final warp barrel of the game is to the right of the starting point. You'll have to make a running jump and make a Helicopter Spin to the right past the Banana Coin to reach it.
The guys with the over-sized metal hooks for hands are the Krooks. If they see you, they will throw their hooks at you like boomerangs.
Here, you'll be using Barrel Cannons to get to the top as well as where you are needing to go.
The first bonus area is right after the third crook. After a series of three platforms, you will three Klimps. From there, jump to the right and use the Barrel Cannons to avoid the Zingers and get in. Throw the chests at the Red Zinger in the room and you'll find the Kremkoin in one of them.
The second bonus area is to the left of the continue point. Tag throw to the barrel cannon at the left, and you're there. Be careful with your aim on the Barrel Cannons and watch your aim to get the Kremkoin at the top.
After the O, you'll meet Squawks, who acts differently compared to the first game. Press B repeatedly to fly upwards, and press Y to spit eggs to destroy your enemies. Squawks is the hitbox here, if he hits anything, you're taking damage. If the Kongs hit something, it's okay.
At the first pair of Krooks on the parrot flight upwards, go right after destroying the Krooks. Go up, and you will find the DK coin and the third bonus level. Destroy all the Zingers with Squawks' egg spitting ability to get the Kremkoin.
Swanky's Bonus Bananza
Cranky Challenge - 1 COIN
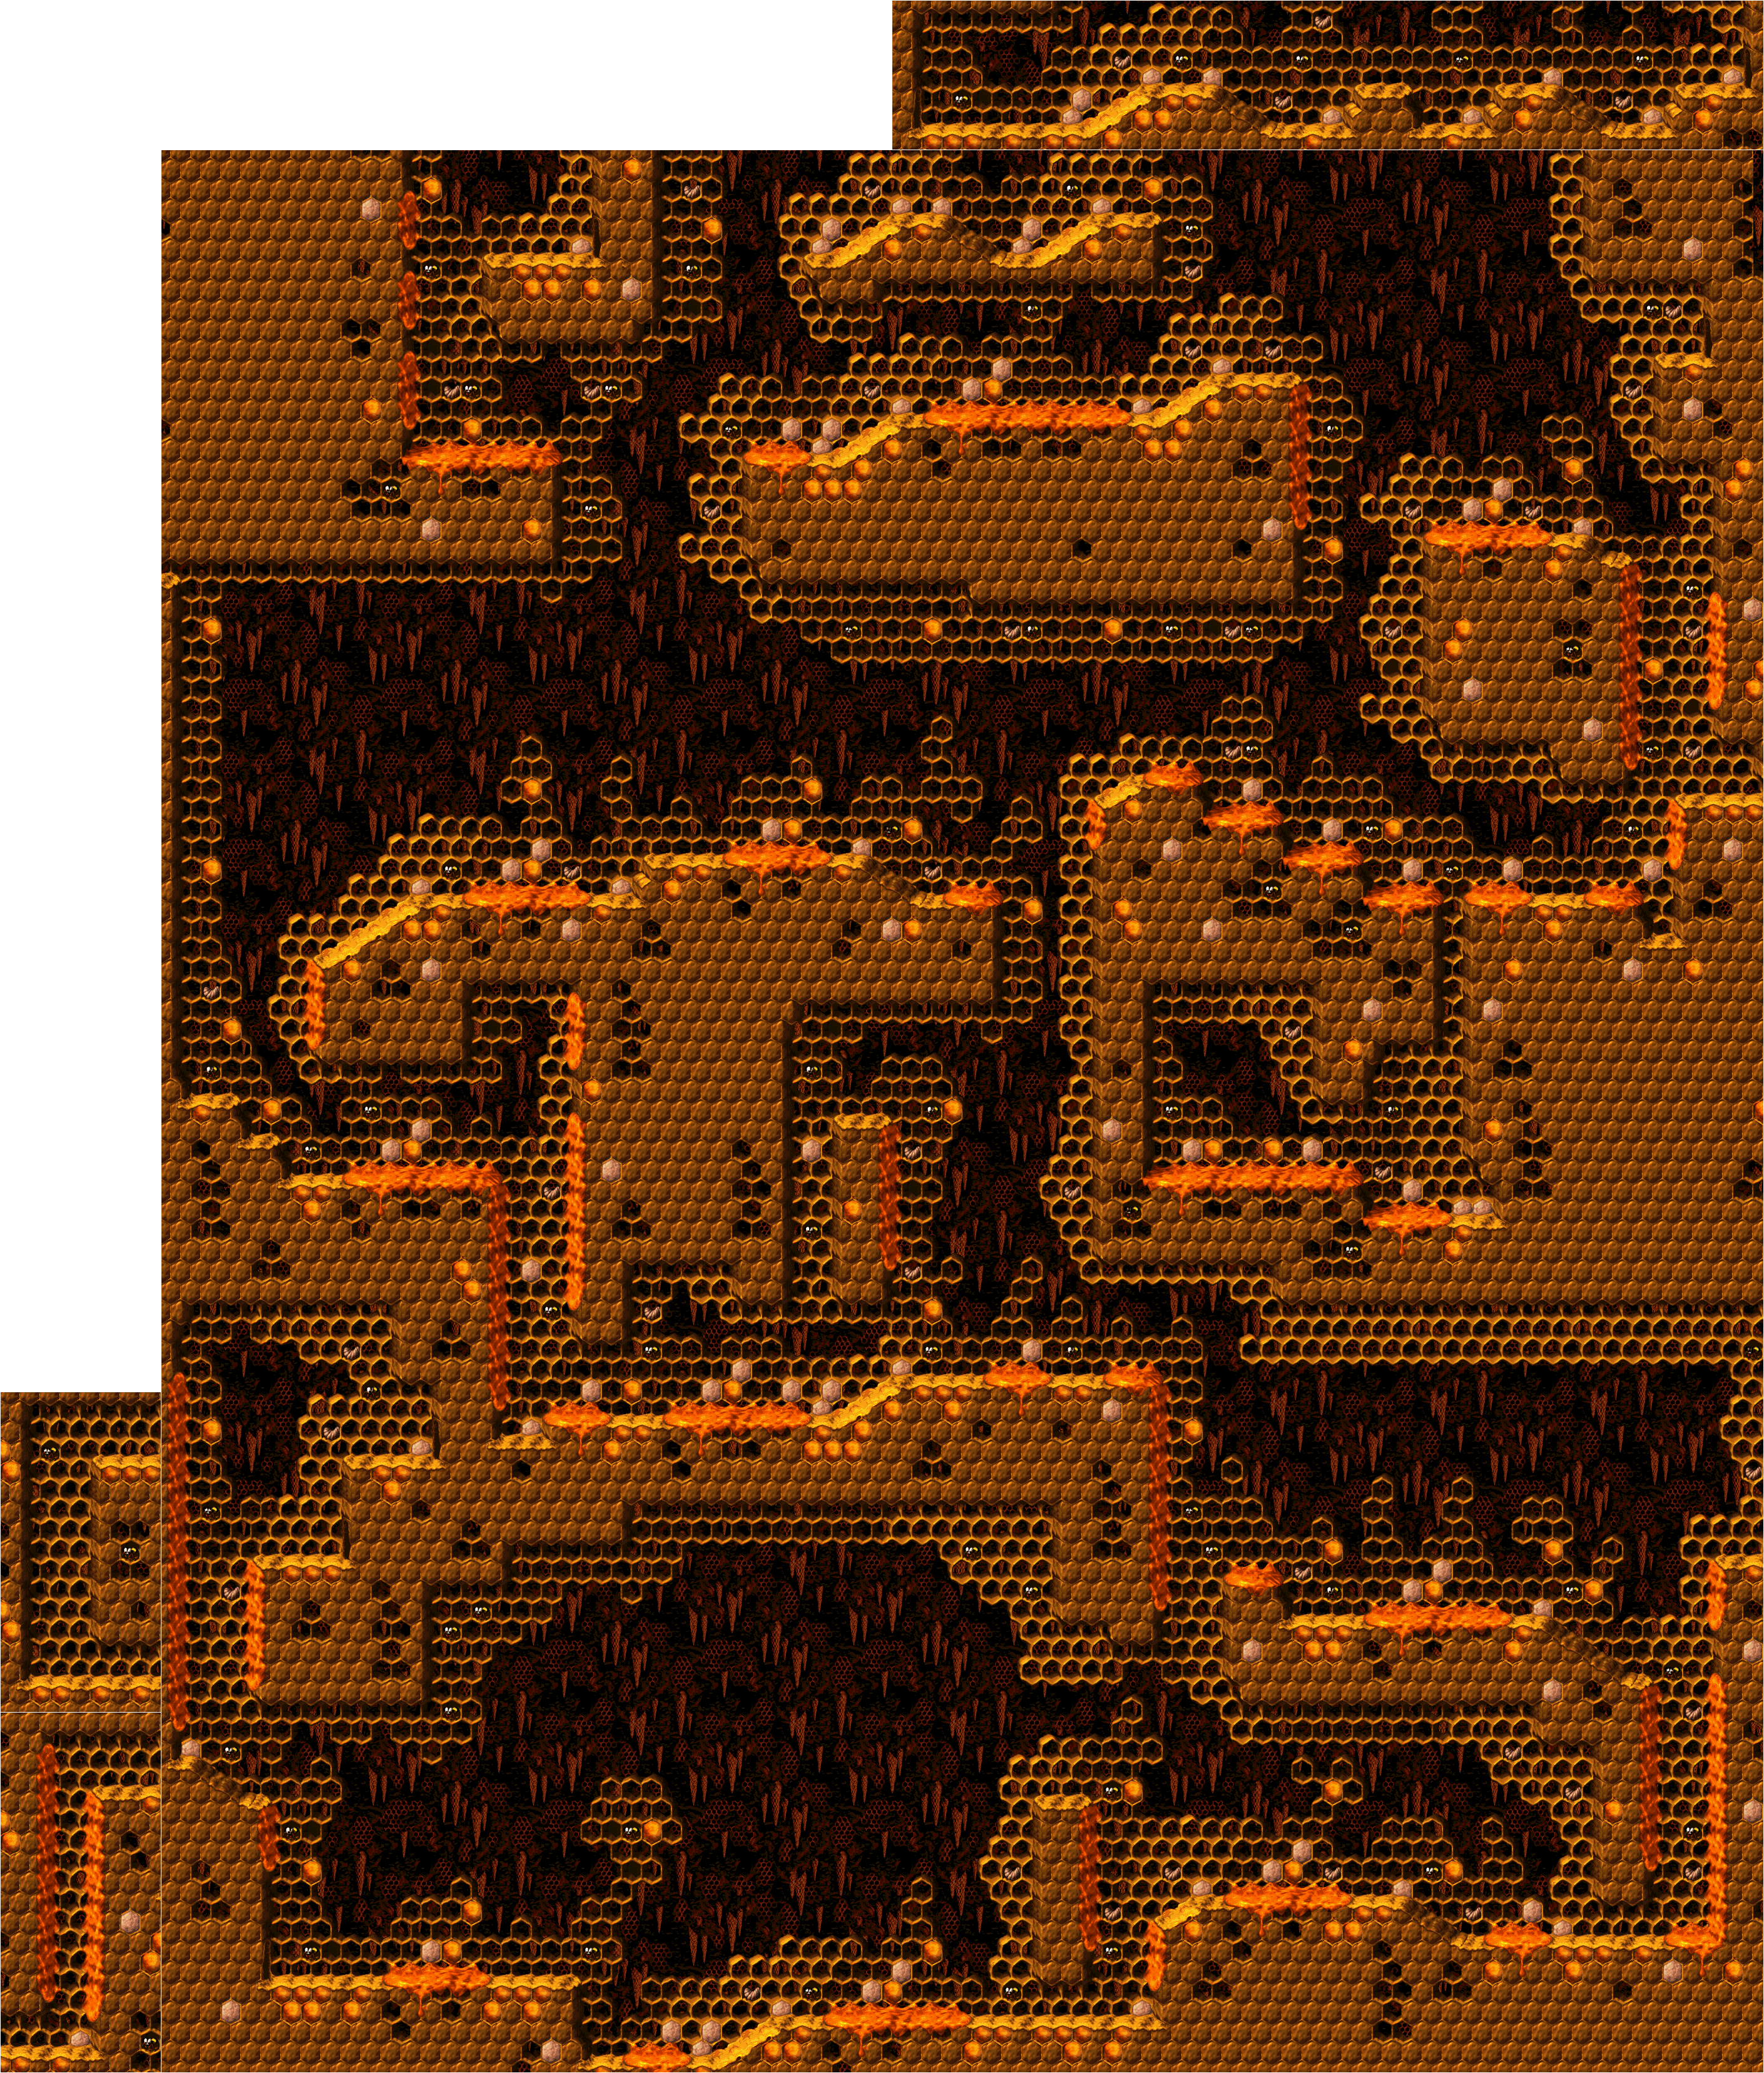
What is the name of the first lava level on this area of the island? Hot Head Hop
What is the name of this area of the island? Crocodile Cauldron
How many times did you have to hit the end of area giant bird to kill him? 4
Lucky Lava - 2 COINS
What colors were the crocodile heads you jumped on in the first lava level? Green and Brown
What is an extra lives balloon colored red worth? 1 life
Excluding the end of area boss, how many levels were there on the firs area of the island? 5
Gorilla Game - 3 COINS
How many banana bunches would you have to collect to get an extra life? 10
Where did the beetle first appear during the first area of the island? Level 2
What is the name of Diddy's pony-tailed girlfriend? Dixie

.png)
.png)
.png)
.png)
.png)
.png)
.png)
.png)
.png)
.png)
.png)
.png)
.png)
.png)