Sunday, October 24, 2021

PrinceWatercress plays Franklin's Great Adventures - Part 1 of 6


Yes, it's yet another kid's game for the Game Boy Advance based on the Canadian cartoon series of the same name. However, if you give it some time, you'll notice that there's a little more challenge in this one than you would think, and that the game isn't just a bunch of simple levels that you go through one by one.


This game can be played in English, French or Spanish. Besides a story mode, there is a mini-game mode, although mini-games have to be unlocked in the story mode in order to be played. 

The story mode begins in the overworld map. Use the Control Pad to move Franklin around, and press A when near another person to talk to them. In the upper-right corner is your current fruit count, and in the lower-right corner is a compass telling you where to go next for your next task. If anyone has a yellow arrow pointing down at them above their head, you need to talk to them to continue the game.

The first person you need to talk to is Mr. Ray Owl, who is just in front of you at the start of the game. He will tell you that school is out for the summer and that you'll be able to have fun with your friends for the foreseeable future, then tell you about the compass in the lower-right hand corner.

To the east is Franklin's dad. He will tell you that there is a good wind and that you could go get your kite and fly it. From here, head northwest. You'll meet Franklin's mom, who tells you that you will have to organize things in your room in order to find your kite. This starts a mini-game, assuming that you choose the icon of Franklin shaking his head "yes" to play it with the Control Pad and the A button.

Clean Up Your Room!

You'll need to put the clothes in the dresser, the toys in the toy box and the kite parts in the bag. Use the Control Pad to move the item to where it belongs and press A to put it there. While the toys and clothes will repeat, the kite parts will not, and you'll be able to tell them apart from everything else pretty easily. When you get all six kite parts in the bag, you'll complete the mini-game.

From here, head east. There will be a big red number one very close by. Press A in front of it, and you can choose whether or not you want to play that level like you did with the mini-game from earlier. Obviously, we're going to be playing this level.

Level 1

A gust of wind has blown away all the pieces of Franklin's kite! Go look for them and pick them all up.

There are 60 pieces of fruit, and there are also 6 kite pieces.

Here, you'll be doing some platforming. Left and Right lets Franklin move, Down ducks, Down+Left and Down+Right crawls, and A jumps. Believe it or not, this game's engine is based on Postman Pat and the Greendale Rocket, which is only available in Europe and is made by the same developers.

As you play through this level, the game will give you a tutorial on how to jump with the A button, crawling with Down and Left or Down and Right on the Control Pad, and standing on buttons and pressing B to activate them and make things happen.

The red and blue ball is a trampoline that Franklin can use to bounce up to higher areas.

The red button makes a thing happen when you step on it and press B. When the game tells you to press the B button, you can press that button to do something. Here, you'll open the gate.

The white stick with the three lines at the bottom is your checkpoint. Walk past it, and you'll start there instead of at the beginning in case something happens to Franklin, such as falling into water. Jump on the rock platforms to get over the water.

This level is pretty easy; the trails of fruit lead to the kite pieces. The fruit will be useful later, as you'll need to collect the fruit in order to play some of the mini-games that this game has later on. Once you get all six kite pieces, you'll complete the level. Thankfully, you can always go back to previous levels to pick up any fruit that you missed.

Fly, Kite, Fly!

Keep Franklin's kite in the air for as long as possible. Don't let it hit the trees. Press the A button very quickly to keep Franklin's kite in the air. Just keep tapping A for twenty seconds and you'll pass. At least you don't have to press it super-quickly like in Greendale Rocket.

After you beat this mini-game, you'll talk to Mr. Ray Owl again. He will tell you about the friendship gauge to the left of a character's portrait when you talk to someone. By talking to people and doing things for them, you will fill that gauge up, and when you've filled the gauge all the way up, you've done all you can with that person in the game. You'll have to do everything to fill everyone's gauge and complete the game 100%. He then tells you to go meet Mr. Badger.

Mr. Badger is to the east. If you talk to him, he will tell you that he has lost all his letters, and asks you to find them for him. Go further to the east and you'll meet Bear. Bear will know what is going on and decides to go with you. A big red number two will show up not far from here. Walk up to it and start Level 2.

Level 2

Mr. Badger lost the letters. Go with Bear to look for the letters. There are 100 fruits and ten letters to collect.

The R button lets you switch between Franklin and your current ally character. Bear cannot bounce on the balls as high as Franklin can, but he can climb up trees and ladders such as telephone poles with Up and Down. Just switch to him and use Up and Down to climb. From there, you can jump to the side with Left or Right and the A button.

Also, enemies show up for the first time. If you run into a bee, you'll be sent back to the start or the nearest touched checkpoint. Also, now that you have a friend with you, you won't be able to activate a checkpoint until both Franklin and his friend walk past it.

When you activate a bridge, you'll need to get both characters to the other side individually. This will happen with other sorts of things, such as a series of platforms that you have to use to get someplace higher. Make sure Franklin and his friend are together at all times!

Bear can also push big heavy logs that can be used as platforms. Just keep moving into them and Bear will push them.

The blue button can be used more than once, and can control things such as where leaf platforms can be moved to. This can be used to get Franklin or his friend to a place that they usually could not get to.

Near the end, you'll need to use Franklin on the lower path, and you'll need to crawl in order to get under the spiders. Once you reach the end, head to the left, hit the red button and get Bear on the upper path. From here, you can head to the goal.

When you have all ten letters, talk to Mr. Badger to get the sailboat mini-game. By playing and beating the mini-game, you'll fill up Mr. Badger's friendship gauge all the way.

The Sailboat

Control the speed of the sailboat to avoid obstacles. Press the A button to fill the sails with wind and make the boat go.

Wait for the lily pads and sticks to move out of your way before tapping A to move the sailboat up. The whirlpools will slow you down, but if you mash the A button, you'll make it past them.

While you have 100 seconds, you will have to mash the A button like no tomorrow in order to make it to the finish line and beat the mini-game. My hand hurt after doing this one. (That's ironic, considering how easy the kite game was.)

Saturday, October 23, 2021

[YTP] Paula Dean - Butter Casserole (by Vilavek)


THAT SURE IS A LOT OF BUTTER

HCBailly plays Final Fantasy II AGAIN - Part 22 of 65


We head back to base only to find out that Princess Hilda has been kidnapped. 


Chocobo Forest


Use the Choboco grove directly south of the castle to get back to Paft. When you catch a Chocobo, you'll have to leave the grove, then walk up to the Chocobo and take a ride on it. This will make it easier to head on down there without running into any random encounters. When you want to get back on foot, just press the A button. The Chocobo will apparently run away, and it will walk on mountains and water in the process. wut

Sadly, this is the only place where you can find a Chocobo in the game.

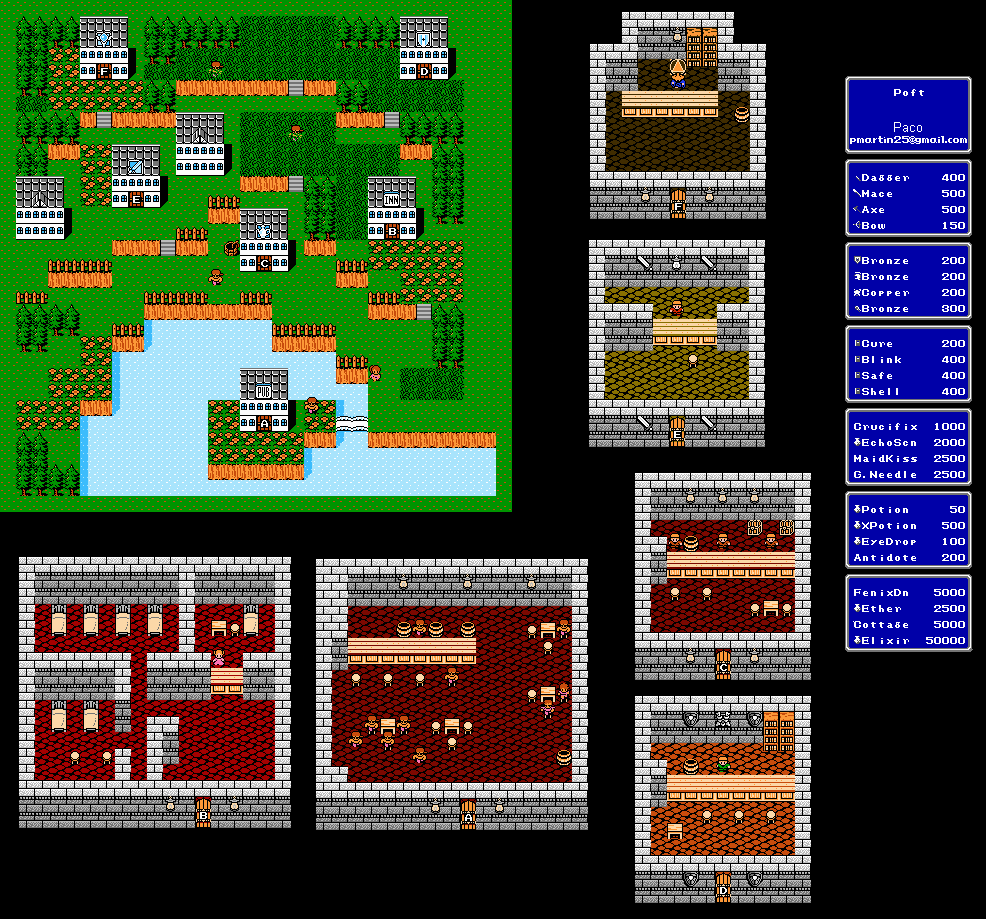
Poft


Head back to Poft, and the people will tell you to return to Altair.

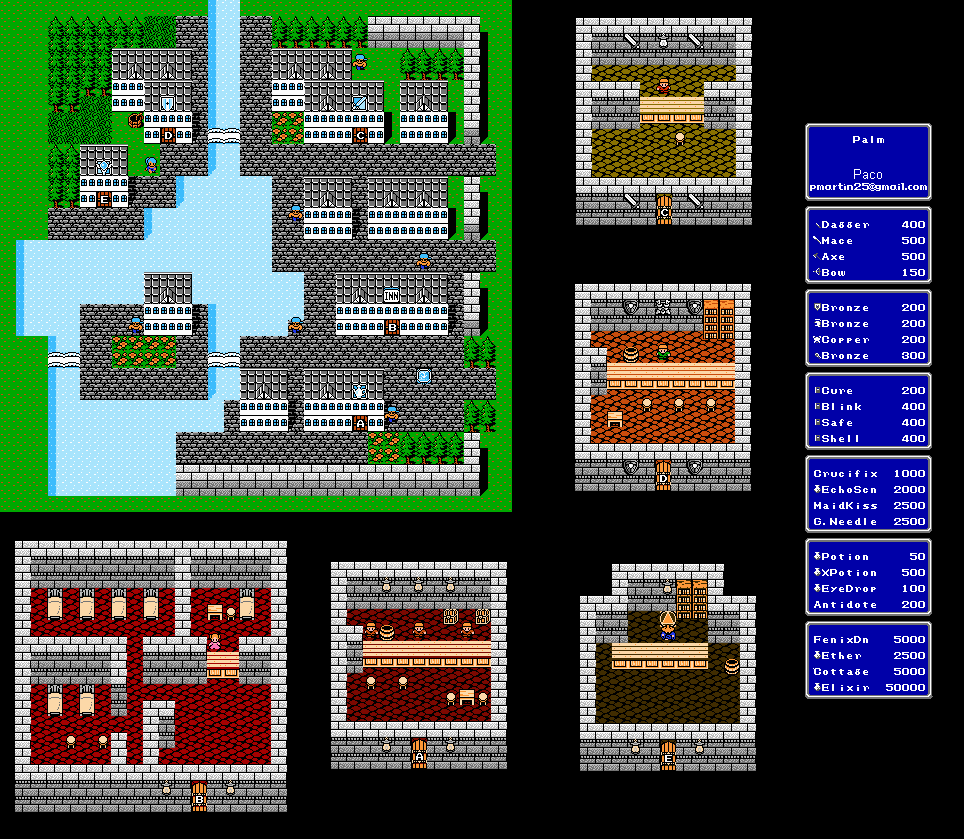
Paloom


The NPCs here have new dialogue, too. You'll find out that Princess Hilda was captured here.

Altair


Go back into the rebel base. Talk to Minwu, and you'll find out Princess Hilda wanted to meet up with you at Kashuan to thank you for your help. Not surprisingly, the Empire has her as a result of that. Ask Minwu about the Dragnought, and he will tell you that it will have to land at some point to replenish its supplies.

While you're in town, sell all your excess inventory. You'll probably have quite a few things on your person that you won't need at this point after all that exploring and storyline progression. Use your money to buy a Cottage and four Ethers. Also, make sure your party also has Antidotes and EyeDrops on tap.

Gatrea


One of the NPCs will tell you that the Dreadnought is taking on supplies to the north, and that you should sneak in and save Princess Hilda there.

Soldiers start appearing as random encounters now. Fight them like you did the first time.

You can win a Blink spell book from the Ogre Mages.

It should be mentioned that the Magicians sometimes drop Magic Canes in addition to books for the Beserk spell. If you get a Magic Cane and you have somebody mastering Canes in your party, equip it as an item. It can cast Bolt 5 when used as an item. You can also get the Scourge spell from them and be able to Poison enemies, and this spell is not sold in any of the game's stores.

The Wizard Ogres (WzOgre) can be fought against like you did the Magicians. Take them out as quickly as possible, as they can Blind your entire party and cast Blink on themselves.

PrinceWatercress plays Barbie: Magic Genie Adventure - The Longplay


Now for the longplay.

Unlike in the Let's Play, I use the power of the rings to do Hidden Atlantis third, then work on Dragon Playground last. This lets me do things in a slightly different order. Other than that, I leave almost all on-screen text on the screen long enough to be read without having to pause the video, and I also inadvertently get both endings. I've also edited the words from the five previous parts to make this longplay-style walkthrough a little more all-encompassing. Enjoy.


One day Barbie Genie and her four genie friends, Fiera, Terra, Sylvia and Marid were having a lovely picnic outside the Crystal City Palace. While Barbie was busy getting some water, the evil sultan, Kardal, took the four magic lamps from Barbie Genie's friends, making them powerless! Barbie goes after Kardal, but Kardal is too fast for her and she realizes she needs some help.

Crystal City

From here, you'll be in Crystal City. Use the Control Pad to fly around in any direction, and press A to talk to people and animals when you are close enough to them. The Select button allows you to look in your inventory and also see your map. By pressing Start, you can see your password. To un-pause, press B at the password screen.

By talking to the people here, you'll find out that the Magical Forest is on the other side, that there is a maze in the Crystal Palace, and that one of the people at the market booths is hungry (and that you'll need to get his lunch for him and bring it back to him).

There is a magic carpet above one of the market booths. Touch it to pick it up. You'll find a few items in the game this way. The magic carpet is to be given to a woman looking out of a window, and if you talk to her with it in your inventory, you'll get a Sun Charm in exchange. There are fifteen jewels in the game, and to get them, you'll need to help find things or do things for other people in the places that you travel to. If you can get all fifteen of these trinkets, you'll complete the game 100%. Above her is the Yellow Crystal, one of the four Crystals you're going to need. Two are hidden in the city; the other two are in the palace.

You can talk to animals, but they just run away. They come back when you leave the area where you talked to them in and come back.

There is an old man on top of a flight of stairs who says that he sometimes plays his harp for Queen Aladima, and that he has accidentally left it in the palace. He will ask you to bring it back to him.

The Green Crystal is just to the left of the Crystal Palace entrance.

The woman and child to the right of the Crystal Palace entrance has the lunch. Talk to the woman to get the lunch for the hungry man at the booth, then talk to the hungry man at the booth. You'll get a Diamond as thanks.

There's nothing else to do here, so enter the palace and talk to Queen Aladima. She will tell you to come back with all four magic crystal balls so you can be trained as a genie. (How do you train a genie?) The palace is a maze, but the maze is pretty open and if you know what's in which corner of the area, you'll have an idea of where you should be going. The harp is in the area with the wooden walls above the throne room, the Blue Crystal is in the lowest part of the castle to the east of the throne room, and the Red Crystal is above the flights of stairs in the eastern-most part of the maze.

By talking to Queen Aladima, you'll be able to put the four Crystal Balls in the medallion she has for you. The Green Crystal goes up top, the Yellow Crystal goes to the left, the Blue Crystal goes to the right and the Red Crystal goes to the bottom. A selects and places, while the D-Pad moves the crystals.

From here, you'll play the easiest game of Tetris in the world to prove your abilities. Move the crystals that fall to the block with. The red crystals land on the clouds, the blue crystals land on the flames, the yellow crystals land on the brown rocks and the green crystal lands on the pink rocks. Remember this for later.

You'll now be a fully-trained genie, and you can now go to the Magical Forest. Meanwhile, Kardal hides the four lamps of Barbie's friends to ensure nobody gets their powers, since he cannot seem to get them for his own.

Magical Forest

The Magical Forest has a whole new set of things to see and do.

The tree with the face at the lower-left corner of the village will ask you to water its roots if you talk to it. Come back here with the Water Ring and Marid's powers to water the roots and get a trinket.

The Village Elder has Terra's magic ring, and he is dressed in red. To get the ring, you'll have to play a game called "Field of Flowers." Use the Control Pad to move the rain cloud around the screen and water each square just once. You cannot move back onto any tile that you have watered in any way, so you have to take a rigid path across the screen to water all the squares. Thankfully, the game is pretty easy when you know what to do. If you make a mistake, press the B button.

After the first time, you get Terra's magic ring. After the second time, you'll get a new flying carpet that gives Barbie a green color scheme if you were Terra's magic ring. After the third time, you'll get Terra's powers, which allows you to break through pink rocks with an earthquake and also talk to animals with Terra's ring equipped.

By talking to the people around here, you'll find out that the water in the Magical Caverns comes from Hidden Atlantis, and that rocks have blocked the water's path.

If you talk to the unicorn at the bottom of the village with Terra's magic ring equipped, it will tell you that it has always wanted to fly high in the sky, but wishes it had the Magic Feather to do it with. You'll find the Magic Feather in the City of Clouds; get it and talk to the unicorn with Terra's ring equipped to get a trinket.

One of the treehouse roofs has a bow on it. Pick it up. One of the kids at the bottom needs it, and if you talk to the kid to the right of the Magical Caverns entrance, you can trade it for a gold arrow.

From here, enter the Magical Caverns. The entrance is the door inside the tree. Terra's magic lamp is all the way in the upper-right corner of the map, and all you have to do is just fly to the right from the start to get there. Press A at the lamp, now that you have Terra's ring, and you'll free Terra and be able to head to the City of Clouds and find Sylvia's ring and lamp. The brown rocks are broken with the powers from Sylvia's ring.

In the upper-right corner of the Magical Forest is the entrance to the City of Clouds.

City of Clouds

The old man with the wings and crown is who you need to talk to in order to get Sylvia's ring and powers. This is the King of the Clouds, and he wants your help in teaching his Pegasus babies how to fly. In "Pegasus Flight School," you'll have to get the Pegasus to the cloud at the top by jumping from cloud platform to cloud platform. Some platforms move, while some others don't. Left and Right move the Pegasus, while A lets you jump a fixed distance in the direction that your Pegasus is currently facing, which takes a little time to get used to. If you switch directions while jumping, the Pegasus will turn around and boost upwards a little bit before dropping straight down, and you can time this to land in a certain spot. If you press A while in mid-air, your Pegasus will fly in the direction it is facing for a few seconds.

By beating this game the first time, you'll get Sylvia's magic ring. The second time around, you'll get an orange color theme for Barbie if you wear Sylvia's magic ring. The third time around will give you Sylvia's whirlwind power, which creates a big gust of wind that destroys the brown rocks like the ones in the Magical Caverns when you press B. You'll also move a lot faster.

There is a blacksmith at the bottom of the village, and he unfortunately has no fire for his kiln. Use the powers from Fiera's ring to rekindle the fire and get a trinket.

Another woman with red hair will tell you she dropped her favorite necklace through the volcano in the Dragon's Playground and fears she will not see it again. Go to the Dragon's Cave with the water ring to break down the fire rocks to the right of the start and just above to get the necklace. Return the necklace to her for a trinket.

In the upper-right corner of the city is the Secret Cloud, where Sylvia's magic lamp is located. You'll have to work your way to the upper-right corner of the maze that is here to find Sylvia's lamp. Press A at the lamp to free Sylvia.

To the left of the Secret Cloud is the observatory. The woman here will tell you that she lost her Crystal Raindrop that allows her to see in the future. The Crystal Raindrop is above the Secret Cloud entrance. You'll need to break the cloud blocks in your path with the Glow power from Fiera's ring to get the Raindrop. Return it to her for a trinket.

Further to the left is a cloud where the Magic Feather is located. Give this Magic Feather to the unicorn in the Magical Forest by talking to it to turn it into a Pegasus to get another trinket.

By flying low near the mountains, you'll enter the Dragon's Playground. This is the fourth area of the game.

Dragon Playground

Not far from where you start is a kite in a tree. You'll need to return this toy to a kid in a windowsill for one of the game's fifteen trinkets.

The woman in the red and yellow robe is Baroness Von Dragon. If you talk to her, she will tell you that her baby dragons want to go to sleep, and the only thing keeping them from doing so is all their toys being on the bed. This is a matching game that's pretty easy to play: use the Control Pad to select a card, then press A to flip it. If two cards match you get rid of them. Playing it more than once gives you more matches, but it doesn't really get much harder.

By beating this game the first time, you'll get Fiera's magic ring. The second time around, you'll get an red color theme for Barbie if you wear Fiera's magic ring. The third time around will give you Fiera's Glow power, which produces heat and gets rid of the cloud blocks in the Secret Cloud in the City of Clouds, allowing you to get the Crystal Raindrop. You'll also move a lot faster.

One of the people in the town will tell you that you can use Fiera's ring to light your way in the Dragon Cave. Remember this for later.

The bottle is to the right of the woman looking for the baby bottle. This also gets you one of the game's fifteen trinkets if you talk to her after getting it.

All the way to the right is the entrance to Hidden Atlantis. The man standing there tells you that he has made a gift for his long-lost mermaid friend, and asks you to give it to her. You'll then get the gift, which you'll have to trade for something later when you get there.

Inside the dragon cave, equip Fiera's ring to light your way into the cave. For the path to Fiera, look for the chimney to the right of where you started, then make your way down. The lamp won't be far behind. Fiera will tell you to free Marid and her powers.

Hidden Atlantis

At the upper right corner is Kardal's Palace, but you'll need to get the Rainbow Potion in order to get in. At the bottom near the middle of the area is the Coral Reef, which is the maze for this area. You can use the Earth Ring to open up a path leading back to the Magical Caverns and the Magical Forest.

When you're here, all of the people will be asleep. This is due to a sleeping spell, and you'll learn about it from a turtle near the start. To break the sleeping spell on everyone, you'll need to find a turtle near the upper-left hand corner near where you came in. This turtle tells you that Hidden Atlantis has fallen under a sleeping spell, and that you'll need to free Marid to free everyone.  When you talk to this turtle, you'll have to play a matching game. Four types of fish - red, blue, yellow and green - show up, and you'll need to use the Control Pad to move the net around and use it to capture certain fish in a certain order that is given to you before the game starts. The fish you've caught will be at the bottom of the screen. If you catch the wrong fish at the wrong time, press B. When you're done, press A. If you got the right sequence of fish, you'll complete the game. As you play the game multiple times, you'll catch three certain fish at first, then four and then five.

By beating this game the first time, you'll get Marid's magic ring. The second time around, you'll get a blue color theme for Barbie if you wear Marid's magic ring. The third time around will give you Marid's aqua power, which produces rain and gets rid of the fire blocks in the Dragon Cave in the Dragon Playground, allowing you to get the Crystal Raindrop. You'll also move a lot faster with the ring equipped, but only in the water, Hidden Atlantis and the Coral Maze. 

All the way down from where you start is a magic wand. One of the people near one of the buildings is looking for the magic wand below where you started here is looking for the magic wand; he gives you a trinket for it if you talk to him after finding it and after breaking the sleeping spell.

The lower right corner of this area has the fishing net, which you'll need to get to trade for a trinket. The boy near the turtle is looking for a fishing net; talk to him with the net after breaking the sleeping spell to get an Oyster for your trinket collection.

By getting Marid's lamp, you can free Hidden Atlantis from the sleeping spell that everyone is under and talk to everyone.

The woman near the boat where the fishing net was is in the lower-right corner of the area is the friend of the guy from Dragon Playground; after breaking the sleeping spell, talk to her with the gift from the man near Hidden Atlantis in Dragon Playground to get a bracelet to give back to him. By giving the bracelet to the man in Dragon Playground near Hidden Atlantis, you get another trinket.

One of the people in Hidden Atlantis will help you make the Rainbow Potion when you talk to them. (Obviously, you'll also have to break the sleeping spell to do this.) For this game, you'll need to match up the colors on the sides of the crystals to connect them and turn their centers pink. When you turn the centers of all fifteen crystals pink, you'll be able to make the Rainbow Potion. You need not connect every crystal in every way; as long as there is a pink path between crystals, those crystals will have a pink center.

Kardal's Palace

In the upper-right corner of Hidden Atlantis is Kardal's Palace. The Rainbow Potion will allow you to get in. From here, follow the path that is all the way down and break the blocks with the power of your rings to get to Kardal. Press A at Kardal to cast a laughing spell on him and beat the game.

If you haven't done everything in the game, the game tells you to keep exploring and keep helping all the people. When you get all fifteen trinkets, you'll win the game and go back to the title screen. You've just beaten Barbie: Magic Genie Adventure!

Friday, October 22, 2021

PrinceWatercress plays Bucky O'Hare - Part 4 of 4


To this day, I still can't believe that I made heads or tails of anything in this game and I was able to beat it.


Center of Magma Core

For the first four acts, there will be walls moving towards and away from each other, with some segments having spikes on them. You'll have to figure out where to go and where to stand, and also where to use your character's special abilities so you can get through the first three acts with minimal trouble.

For the fifth act, you'll have to avoid the electrical barrier that zap in and out. The sections with the spikes and the flashing arrows are areas that will carry you up or down slowly, and you'll have to time your movements across these anti-gravity sections or else you'll be eating spikes. Once you get past the anti-grav part, the rest of the act is much easier.

The sixth act, has plenty of robots that will slowly move towards you. Just super jump over them with Bucky, since they are indestructible.

The seventh act has platforms on vertical conveyor belts. If you stay on the top, you will not get pushed off the edge. Use Blinky for this part, and climb up with Deadeye when you reach that giant wall.

The next four acts are rotating path puzzles. For the first one, take out the Toads, then go in when the path allows you to. Go right when it rotates, then go up and right when it rotates again. Go right after the next rotation. Now hold right and get outta there!

For the second one, take out the Toads, then go in. Stand just after the entrance, then stay there on the next rotation, Stand to the left of the turret when it turns again, then stand there for two rotations. As soon as it rotates one more time, go right as quickly as possible to get out.

For the third one, take out the Toads, then get in and stand near the edge. Wait for two rotations, then go left and down. Stay near the arrow. Wait two rotations, then head right and stay near the turret. On the next rotation, stand above the turret. On the next rotation, charge up Bucky's super jump and jump straight up before the puzzle rotates again. Head to the right. You're done here.

The fourth one is just like the first one. For the fourth one, take out the Toads, then go in when the path allows you to. Go right when it rotates, then go up and right when it rotates again. Go right after the next rotation. Now hold right and get outta there! Only difference between the two is that there is a turret.

For Acts 12 through 14, you'll have to utilize the Blue Planet snake worms again. Wait for them to finish moving and use Blinky's jetpack to get across, and take out the droids as they show up as necessary

To take down the boss, switch to Jenny and stand underneath the left side of the middle platform to avoid taking damage from everything to the missiles to the ceiling cannon. Keep shooting at the cannon and the laser cannon that is underneath it, and you'll take that part down. Just make sure not to jump into the glowing orange lasers. For the upper cannon, stand on the left side of the same platform. Be ready to shoot down Toad and jump over missiles. Once the upper cannon and its laser blaster is dead, shoot down the glass partition guarding the core, Once it's gone, shoot at the core and keep firing. There will be purple fireballs being fired that will split into a six-way shot once they get close, but if you stay in place, the core will go down before you, assuming you have enough health.

After this stage, it's time for everyone to escape, now that we've blown up the core and the Mothership is about to blow up.

Escape!

For Act 1, you'll have to jump on to a spaceship and fly around. It's auto-scrolling time! Avoid the blue flame jets and the spikes, and don't get too close to the Toads or else they will grab on and drag you down unless you smack them into the ground to get rid of them. There will also be dead ends that will trap you and force you to lose a life; watch out for those. Be sure to shoot down the planes when you see them. If you see arrows, line yourself up with them to ensure you don't run into a dead end.

When flying around, be careful who you use, as your shots will still be different depending on who you use. If you use Bucky, you'll have a back shot in addition to a front shot, while Willy will have the most powerful shot of five characters. Use Willy for the first act, as he can destroy the glass partitions quickly and get past the green walls before they crush him to death.

After that set of green walls, switch to Bucky so you can shoot all the enemies that come at you from behind. After that, grab the power-ups that you see. You'll face a boss. Destroy the top and bottom treads and avoid smacking into things or getting shot at. After one of the treads is gone, the Toad head will spin around wildly and shoot, and when both are gone, the head bounces around at 45-degree angles shooting everywhere. Avoid the shoots while shooting at the head with Willy's lasers.

Once the robot head is destroyed, you'll get some power-ups. Grab them all, then switch to Bucky. Get in the lower-right corner and start shooting when you see the floro spikes. You'll be able to avoid the Toads that jum out of the train that comes out, and be ready to shoot at the four turrets on the train that will start shooting at you. Remember that if any part of the train touches you at any time, it's instant death.

When the train moves right, go to the upper-right, switch to Deadeye. Shoot at the turrets with his three-way shot, and when you reach the rear of the train, avoid the lasers as well as the afterburner as you make your way to the lower-left corner. Keep shooting at the afterburner with Deadeye's three-way shot, then position yourself below the turrets in the one safe spot that you have while avoiding getting shot at. When the train starts moving right again, get to the upper-right corner without touching the train and without getting hit by lasers from the front cannon. From here, switch to Bucky. The attack pattern will now start repeating. Use Bucky's back shot to take out the last of the turrets. This should make the second cycle a lot easier. From here, you should know what to do, and you can use Deadeye to destroy the afterburner at the back.

Once you destroy the air train, switch to Bucky. Power-ups will show up. Grab them all. You'll then face the Air Marshal himself. Aside from the wall of lava, you'll also have to avoid this grenades and the seven-way shot that rises up from the floor in the wake of their explosions. Be sure to avoid everything as much as you can, and make sure not to touch the lava wall (which thankfully is not instant death). Just keep aiming at the Air Marshal's head, especially with Bucky's back shot. Thankfully, you can figure out the Air Marshal's pattern, and once you do, you'll be able to figure out where to move when without getting hit. Once the Air Marshal is defeated, you've done it! You've won!

HCBailly plays Final Fantasy II AGAIN - Part 21 of 65


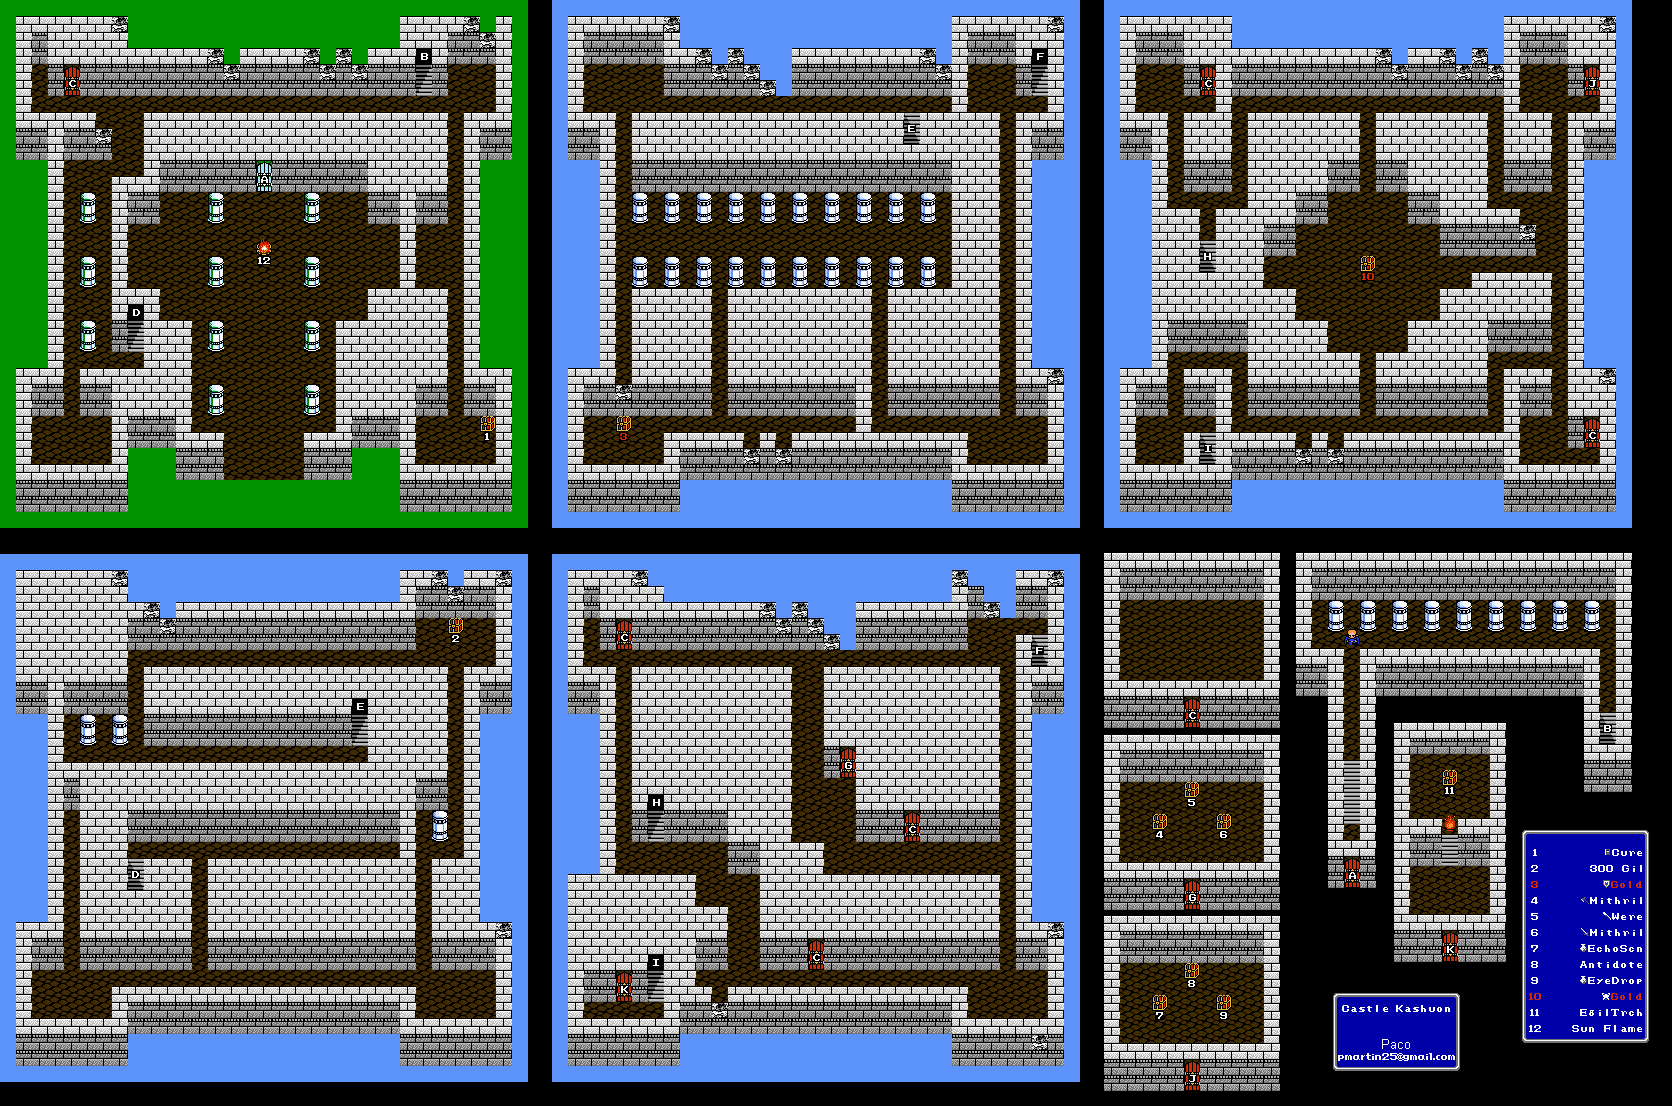
In this entry, we go further into Kashuan Keep.


There is a glitch where if a character dies before they can attack in the first round, they will attack when they are revived.

The Mallet cures the Amnesia spell, which is the permanent version of Silence, which keeps you from casting spells.

The Ghasts can Paralyze with their physical attacks and can cast Blind. You can meet them here, but HCBailly does not meet them until a little bit later. They are also strong against Ice attacks.

The chest with the Gold Armor contains new monsters: Mines. They're just like the Balloons, except they area a Rank 3, their physical defense is really high and they can hit you with a Level 5 SelfDestruct spell. You're better off using Fire or a powered-up offensive spell on them.

The Land Turtles (LandTrtl) are weak to Ice.

Ogre Mages can show up here and, like before, they can drop one of many spell tomes. The rarest one is Warp, which can help you get out of dungeons and instantly kill enemies.

The Wraiths are a Rank 2 enemy and are strong against Ice attacks. They can also drain 1/16th of your current HP with their physical attacks.

When you make it to the chest with the Egil's Torch, you'll meet up with the Red Soul, the torch's guardian.

The Red Soul absorbs all magic (even spells like Cure and Heal), and it also has high physical defense, so your weapons will barely make a dense unless they're really powered up. For best results, remove all armor and any off-hand things such as shields and non-main hand weapons at the beginning, keep shields and non-main hand weapons in your item slots, and then get re-equipped as you get closer to the end of the battle. If you attack it with the Ancient Sword, though, you'll be able to Curse the Red Soul if the sword connects, and you'll be able to weaken its physical and magical defense and offense. It'll be smooth sailing from there. The Scourge spell (also known as Arrow in the previous version of this Let's Play under the NeoDemiForce translation) has a chance of Poisoning your party, and it can hurt, so be ready to cure your party.

Once you beat the Red Soul, you'll be able to get the Egil's Torch. Use Teleport to get out of there (don't forget to heal!), then go back in and go to the Sunfire to light the torch. When you leave the castle again, you'll see the Warship chasing after Cid's Airship.

PrinceWatercress plays Barbie: Magic Genie Adventure - Part 5 of 5


We've freed all of the genies and we have the Rainbow Potion! Let's show Kardal he messed with the wrong genie!

First | Previous | End

Now that we have the Fire Ring, we can now go back to the Secret Cloud in the City of Clouds and use the Fire Ring's power to dissolve the cloud blocks and get the Crystal Raindrop. We can then return it to the woman at the observatory to the left for one more trinket.

Kardal's Palace

In the upper-right corner of Hidden Atlantis is Kardal's Palace. The Rainbow Potion will allow you to get in. From here, follow the path that is all the way down and break the blocks with the power of your rings to get to Kardal. Press A at Kardal to cast a laughing spell on him and beat the game.

If you haven't done everything in the game, the game tells you to keep exploring and keep helping all the people. When you get all fifteen trinkets, you'll win the game and go back to the title screen. You've just beaten Barbie: Magic Genie Adventure!