Part nostalgia-bomb, part note-taking and part FAQ, what started in GameTrailers as a video game blog is now on Blogger. This blog is a look back at video games, both popular and obscure, from the video game industry's infancy all the way to the previous console generation.
And now for the ending and credits. Thanks for reading.
If you hold L, A, Left-C and Right-C and then press Start, you can access the sound test.
5-9: Ending
Just a quick reminder: the more gold gems you have, the more of the ending you see. As you go through the ending, the number of gold gems in the upper-left corner counts down. If you have less than 52 and an A rank, you won't see the entire ending sequence.
Marina and Professor Theo return to Nepton Village, and King Aster shows up along with them. We find out that Celes was Princess Ondine the whole time as King Aster thanks Teran for protecting her. Ondine and King Aster reunite, and a coronation ceremony is held in the village.
At the coronation ceremony, Teran heads away from the festivities, but Ondine catches up with him. Teran tells Celes that he is not her true brother and that he is Blockman, a Clancer from another world who was hired by King Aster as a bodyguard to protect her. He runs away, but runs into Marina and fights her. He is met by Sarie, who beats him up a little bit as she tells him to stay with Ondine, as she will still need him in the future. Teran then gets knocked by Sarie into Celes, who asks him to stay at her side.
Meanwhile, Professor Theo and Marina Liteyears leave Planet Clancer behind in their flying house, then the credits roll. After that, you'll get a surprise ending where Geold, now on a cloud and carrying a magic wand, changes Lunar, Tarus and Merco back into their human forms.
The surprise ending isn't over yet: Geold then meets Marina and Professor Theo, and gives Marina a human form. Geold casts the wrong spell at first, then changes her into a human. Depending on what your age is, you'll either get a younger Marina (if your age on your save file is 15 or below) or an older Marina (if your save file's age is 16 or older).
There is a way to change the ending slightly, but you must have all the gold gems as well as an A average among all of your best stage times to do it. Before Teran attacks you, a target will appear around him. If you grab him at the right time with the B button, you can grab Teran, and Marina will tell Teran to forget about the past and that Ondine will still need here, not Sarie. If you do this, Marina will talk to Sarie, who will give Marina the gold gem as she leaves.
With the 53rd gold gem, you'll get one last scene for the ending: Professor Theo going full pervert.
5-10: Credits
It's the credits. That's it. That's all. The end. You just beat Mischief Makers! Congratulations!
I never got the gold gem for this one as a kid, and given that you have to go the whole battle without taking damage once, there's probably a reason why.
The first phase is a drill mech. Go counter-clockwise to the upper-right, grab Merco when you see the target, and then shake backwards so that you rip his shield away from him. Avoid Merco's projectiles from the other end, and watch out for the mech when it extends its drill tip forward. From here, you want to inch your way forward - preferably without getting hit - and grab Merco when he is standing still after the target appears. Shake backwards to take away his lance, then get away.
At this point, Merco will repeatedly do dash attacks from one end of the battlefield to the other. At this point, you have to throw the weapons so that they hit Merco when he is stunned right after he hits the wall. And yes, the drill mech will still be extending the drill bit towards you, so be careful.
After hitting him two or three times, the drill mech turns into a bird mech. After the bird mech does its pecking attack, go up to its head, grab it, then shake downwards so you slingshot the bird's head into its mechanical body. After this, dive down repeatedly with the boosters to avoid all the feather lasers, then grab the head again after the double wing lasers and shake downwards.
After doing this twice, Merco and his bird mech will be right behind you, shooting at you. Move around in a circle, Space Harrier style, to avoid the bullets. He will eventually shoot missiles at you. Grab the missile, then throw it to the left when the camera is focused on Marina. You've done it.
You'll then get a recap of the story so far, then you'll get a hint about getting A ranks for the 53rd gold gem.
Afterward, Professor Theo will wake up in a dark room. Suddenly, he is met by The Emperor, who reveals that he is Theo's long-lost brother Leo, the same man who tried to kill Marina in Aster's Lair, as the monolith spins. Leo says he wants power to take over Planet Clancer.
5-7: Inner Struggle
The Emperor chews out Lunar, Tarus and Merco, who finally come to their senses and turn on the Emperor. Marina shows up and the confront the Emperor.
This boss battle is an interesting one. For this one, word bubbles with things like "Hurt," "Blood," "Hate," and other negative things on them float to the top of the screen and turn into fireballs that home in on Marina's current position at the time of firing.
To beat the Emperor, you have to grab these word bubbles, shake them to turn them into opposite, positive things and then throw them at the Emperor. Each word can only be used once, and when you use all the words, you win.
During the battle, there is one word that only shows up once in the entire battle: "Dire." If you can grab it, shake it to turn it into "Lucky," throw it into the air and avoid getting hit the whole time, you'll get the gold gem.
If you take "Death," shake it and throw it into the air after turning it into "Life," you'll get a blue gem.
After beating Leo, Leo admits that he thought he and Theo had the same goals, then tries to kill Marina again. This time, however, Theo takes a bullet for Marina, and pretends to die afterwards. Marina makes him pay for it by throwing him upwards into space.
5-8: Final Battle
The Beastector is not done with Marina yet! After Leo is beaten, they just want to fight her as much they want her to be part of their individual fan club over the others'. After that, they combine their three mechs to create their own Megazord to beat Marina once and for all.
At the start, the Beastector Megazord (obviously not its real name) will try to stomp you. Grab the mech's foot when that happens and throw them up. You can also shake them to get some gems.
After enough damage, The Beastector will move to the side and shoot their fist at you like some kind of missile. Grab the fist, then you'll be in "first-person mode." You'll want to move the cursor so that the fist hits them. Be careful and be fast, as they can also move out of the way. If it hits, good. If not, keep on fighting. You're bound to get your chance again.
The Beastector Megazord all has a flying kick from the side, and you can grab the foot if you're agile and attentive enough.
When the Beastector move far into the background and Lunar yells "Through fire, justice is served!", run all the way to the right with your boosters and keep moving in that direction until the chest laser the Beastector fires is gone. (You can also roll with Down-C; I did that every time as a kid and it worked.)
After enough damage, The Beastector will be defeated, then Marina tosses Professor Theo halfway across the planet one last time.
In this entry, SlimKirby tackles the final world of the game, which sees battles with Beastector leader Merco and a maze level.
Imperial HQ
5-1: Clance War II
In this stage, you'll be fighting a lot of Clancers in a very straight-forward side-scrolling stage. There are four missile pod mechs - red, blue, yellow and green - and you'll have to destroy them as you keep moving to the right. The best way to beat these mechs is to grab them from behind and shake them.
Using the Slide Jump will get you to the mechs a lot more quickly.
After the yellow mech, grab a black Clancer and shake them. One of them will have a gold gem.
5-2: Counterattack
In this level, you'll be riding an ostrich while being chased by Marzen 64. Why? I don't know. And where did that ostrich come from...?
To beat Marzen 64, grab the flying orange Clanbombs that Marzen 64 creates and throw them back at him. When you see a target in his mech's mouth, be ready to grab the laser. If you do that, the laser will turn into a gold gem, and you'll have have to be quick to grab it. If you're good, you can grab subsequent lasers and throw the resulting fireballs at him.
5-3: Bee's the one!
In this level, you'll be flying on a giant Clanbee! Use the Control Pad to fly in any direction in this auto-scrolling stage.
One of the missiles in the stage has a gold gem. As a matter of fact, it is the first one after the 8th jeptack Clancer. Be sure not to be too far to the left, or the auto-scrolling will keep you from grabbing it.
The whole stage is basically dodging missiles, dealing with jetpack Clancers and traversing between two rotating rings of Clanspikes. That's it.
5-4: MERCO!!
At long last, Marina Liteyears finally confronts Merco...who makes himself into a ladies' man as the game breaks the fourth wall again like it always does.
When he stabs at you with his lance, you will have to be fast to grab it. When you do, shake the lance to get the gold gem. From there, you can throw it at Merco to deal some damage.
It is possible to grab Merco's shield when he has it out and the target is on it. All you have to do is grab onto it and shake backwards. You can use it against him as a weapon by throwing it at him, but you can also shake it for a few blue gems.
Merco has a couple of stab attacks, such as a jumping downward stab, a multi-stab in midair, a multi-stab on the ground, and a wide slash in case you grab onto his lance and hold on for too long.
Merco will eventually go down, and he will tell you to destroy the Emperor's pan while he is still himself. He tells you that the Emperor is trying to take over the Earth and that there is a true objective that the Emperor is trying to fulfill.
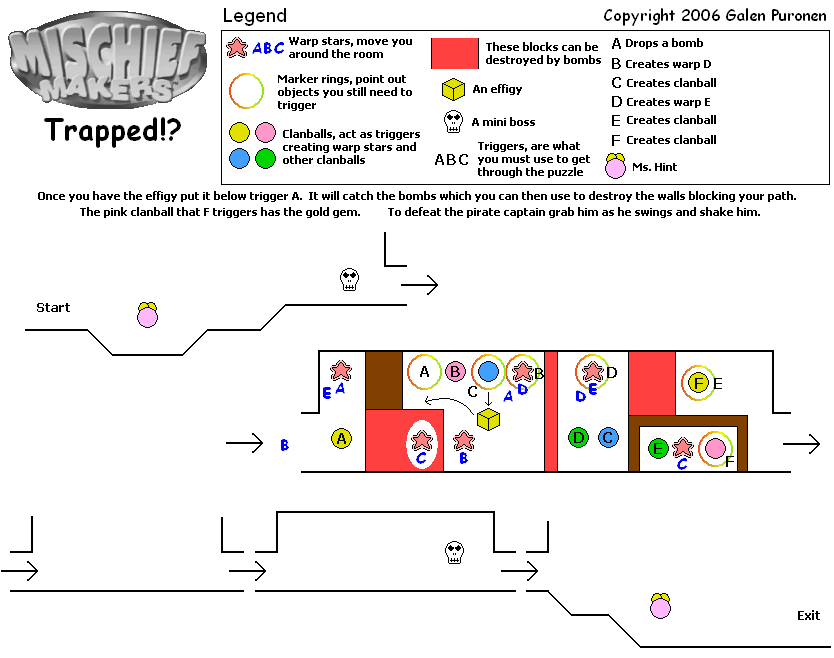
This level has some puzzle elements. After you beat the mech enemy, you'll be seeing them first-hand.
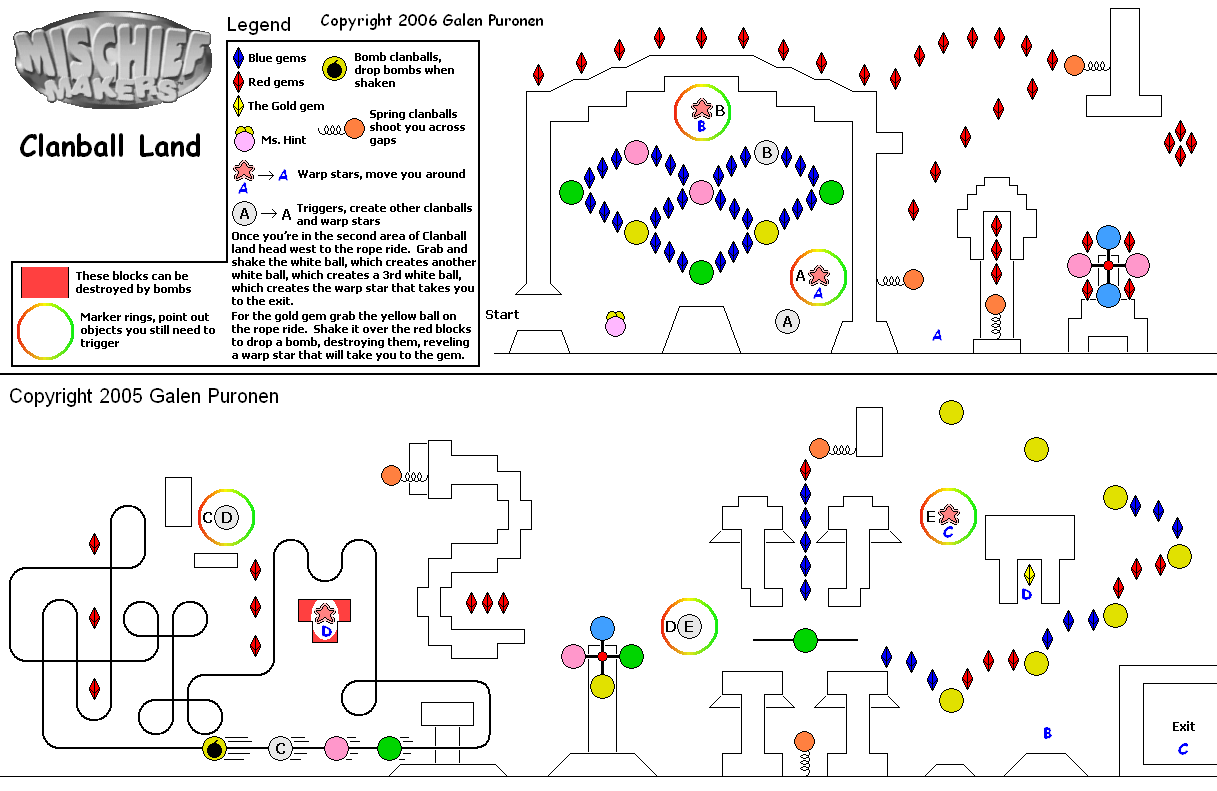
First, grab the warp gate above. Shake the pink Clanball downwards to create another warp gate to the right. Grab that one, and grab and shake the two Clanballs downwards to create some warp stars. One of them will be above you. Grab it to go back to the beginning of the second section. Grab the warp star in front of you again when you re-appear,
Shake the blue Clanball that is now here and place it below the circle above the glowing red wall. Use the warp stars to go back to the orange Clanball. Shake the orange Clanball. With the statue below where the Clanbomb will spawn, it will not fall on the growing red blocks and blow them up.
From there, you can go to the Clanball and throw it at the glowing red walls to the right. You can leave, but you're not done here yet. Blow up the glowing red blocks near the start and grab the warp gate that they hide. Grab and shake the green Clanball to create another Clanball above, then go back and grab and shake downwards the Clanball you just spawned. That creates a pink Clanball below. Go back to that pink Clanball and shake it downwards. You'll get the gold gem.
If you mess up, there is a warp gate below the pink Clanball at the start that will let your reset the puzzle.
After this, you'll have to avoid being shot at by lasers. You'll then fight a pirate Clancer. Back him up to the opposite end of the room, avoiding the Clanspikes that bounce after he throws them, and when he jumps up into the air and swings across the room, jump up, grab him and shake him downwards so he falls down and eats the floor. After three hits, he's done, and you can head to the exit.
In this entry, SlimKirby finishes up World 4 and the Professor is officially kidnapped again.
If you hit B on the stage select screen, you can see your best times for each stage and also see if you've collected the gold gem for that stage or not. As long as the average of all the times below is at an A rank, you can still get the 53rd gold gem.
4-8: Moley Cow!!
It's another mini-boss battle, and this time, you're fighting a mole.
To damage the mole, you have to grab it and throw it to the ground. It will lay on its back, and if you jump repeatedly on its stomach while it is lying down, there is a chance you can get the gold gem here. When he gets up, if you stay close, you can grab the mole and throw it before it fully gets back up.
The mole will leap up, swipes it claws forward and then dig into the ground. When it comes out in a random location, it will throw a rock out as it peeks its head out of the ground. You have to get in front of the mole, grab it and throw it forward so it hits the ground.
If you can trap the mole into the corner, you can keep grabbing the mole and throw it into the wall to ensure it lands on the floor and takes damage.
When you deal enough damage, the mole will keep moving forward, swiping its claws at you as it does, then run into the wall and explode, ending the battle.
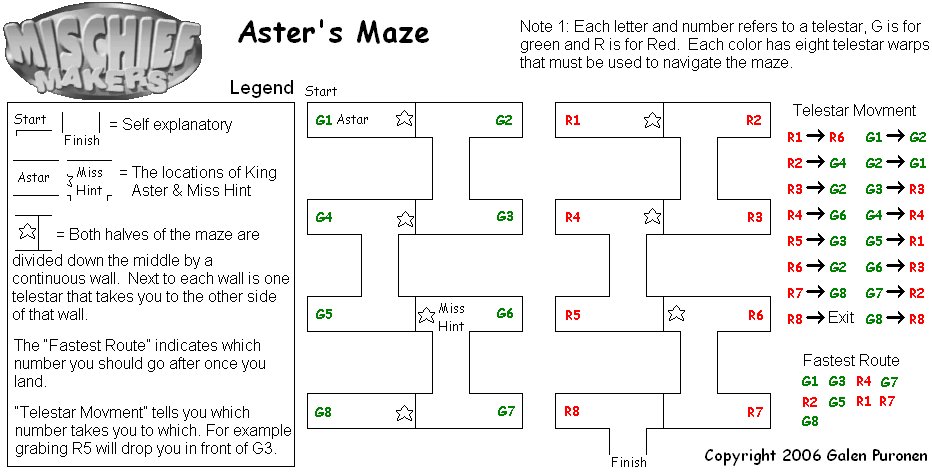
For this stage, you're in a maze. You need to find Sasquatch Beta at the bottom.
Interestingly, there are two maps for the two sections: the green one on the left and the red one on the right. You obviously want to reach the bottom-most room on the left in the red section to complete this level. To do that, you'll have to use the warp gate.
At the start, drop down as soon as you can and go to the right. Grab the warp star in Green 3. This will take you to Red 4. From here, grab the warp star again, or else you'll be going around in circles.
You'll be at Green 6. The Clancer to the left of Ms. Hint tells you that if you appear in Red 1, Red 4 or Green 8, you'll need to re-enter the gates that are there. Drop down and head right to Green 7. You'll be at Red 2. Grab the warp star there when you re-appear; you'll be at Green 4.
From Green 4, head to the right, but don't enter the warp gate! Instead, shake the Clancer there to get the gold gem. This guy will tell you that Red 1 takes you to Red 7 (and from here, you can reach Red 8) From here, drop down and go left to Green 5.
You'll be in Red 1! Grab the warp star there to go to Red 7, then grab the warp star there to go to Green 8. Grab the warp star there, and you'll be in Red 8! Talk to the Clancer, go right and drop down! You've beaten the maze!
4-10: SASQUATCH Beta
Once again, you must go without taking damage the whole battle to get the gold gem.
At the beginning of this battle, stay far away the cannon and keep flying to the right so the turret doesn't hit you from here. From here, take the rocks that Tarus produces and throw them back at him. When the turret is about to fire again (you will know from the target that shows up), fly up to the cannon and grab it, then keep shaking it upwards. When the turret fires, hold Up and Right and press B to jump off the cannon and boost to the right. The tank will damage itself.
After a while, Tarus' tank will turn into a walking mech. When it kicks at you, grab the foot, shake downwards, then slam the machine into Tarus by shaking upwards to launch the machine upwards and shaking downwards while in mid-air as soon as possible to slam it into Tarus. You have to time it right so that the tank lands on Tarus before he has a chance to get up. When you do this enough times, Tarus will finally fall.
After this level, it's time to destroy the Empire. You'll also get a hint telling you to use the Control Stick (which does nothing in this game, strangely, so why is this hint here?).
After this, you'll get a cutscene in the floating house where Marina tells Professor Theo not to get himself kidnapped. Not surprisingly, she sees a Clancer pull out a panel in the ceiling and spy on them. As she chases after them, Marzen 64 shows up, and alows Professor Theo to kidnap him. When Marina returns, she finds out that Professor Theo has been kidnapped again.
Meanwhile, the Monolith - who is the Emperor - tasks Merco with the Professor, but Merco wants to destroy Marina, much to the chagrin of the Emperor. After Merco leaves, Calina announces that Theo has indeed been kidnapped, much to the Emperor's delight.
In this match, you'll fight Celina - who turns into her Marina form with the help of a staff - as Teran.
Before you fight her, however, you'll want her to blow up the blue block in the lower-right with a Clanbomb. The gold gem will be hidden behind it. If you die by falling into the pit, you'll still get credit for it if you use a continue.
As for the fight with Calina herself, you'll want to use Final Blow to hit her out of the air, then punch her multiple times until she gets back into the air. Rinse, lather, repeat. Teran will then find the Mr. Health, and Marina will be nursed back to health.
4-6: TARUS!!
Marina Liteyears, now fully back to 100%, suddenly meets Tarus, who comes out of the ground. After some fourth wall breaking, they both battle.
Stay away from him when he jumps, and don't let him grab you. When he rears back, the target shows up, and you can grab his hand and throw him backwards) (preferably into the wall. If he hits the wall, you'll get the gold gem as a result.
What you really want to do, however, is wait for him to do a slow jump. When he lands on the ground after performing it, rocks will drop down from the ceiling. You will want to grab those and throw them at Tarus as your main way of doing damage.
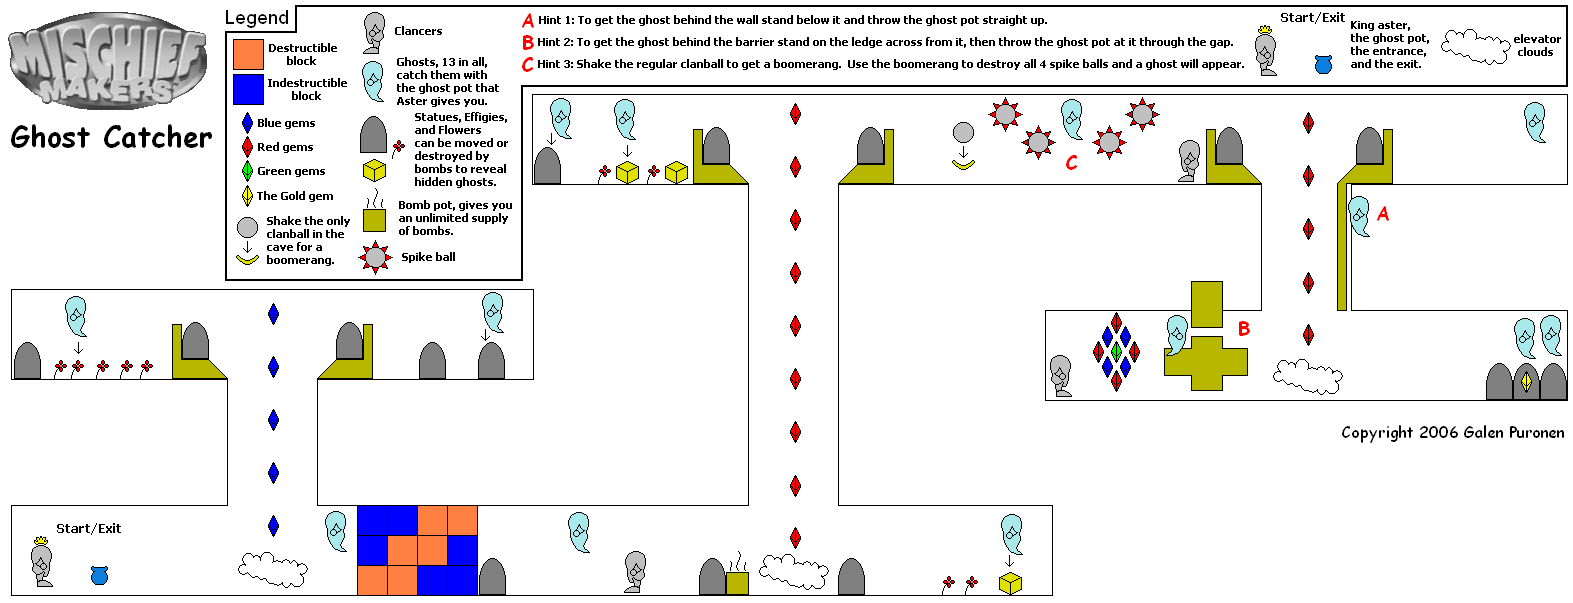
Marina eventually stumbles upon King Aster, who is now leading a resistance. He mentions that there have been ghosts flying around the cave doing all sorts of bad things, and that he has prepared a special blue Clanpot to catch all thirteen ghosts in the cave yet. If you catch them all, there will be a reward.
When you see a ghost, get the center of the Clanpot into the ghost. By picking up flowers, you can find at least one ghost. Be sure to look under as well as destroy statues and also if you see any; you might find ghosts under them, too.
The cloud acts as a platform that goes between the two levels. Thankfully, they will follow you if you fall down a vertical shaft.
The only Clanball in the level contains a boomerang. Use it to destroy all four nearby Clanspikes to find a ghost.
Two of the ghosts shoot fire, so be careful approaching them.
A cylinder past the destructible block contains Clanbombs, which you can use to destroy statues as well as tombstones that will hide ghosts. You'll have to do this to get the gold gem.
When you catch all thirteen ghosts, you'll automatically go back to the start, where you will be able to exit after getting some red gems.
4-8: Aster's Tryke
In this level, Marina finds King Aster's favorite tricycle in the cave. Now, she has to keep hitting the booster to ride it to the other side as the ground behind her is slowly being destroyed. And yes, you have to bring it to the other side, or else you're starting the entire level over.
You obviously saw the gold gem near Aster on the other side, so that reveals where it is. The problem is getting it before you land.
In this entry, SlimKirby fights a frog and re-unites a family again, but a mysterious man shows up and wipes Marina out.
4-2: Toadly Raw!!
It's time for another mini-boss battle. This time around, you're up against a frog. To beat it, you will have to grab its tongue when it tries to grab you with it, then throw the tongue back at it.
If you take the tongue and then shake it, you'll get some blue gems for a while, and not a whole lot, either.
Whatever you do, don't let the tongue grab you or you will be eaten. You'll lose some health, too.
To get the gold gem, do not use the shake attack. Instead, keep throwing the tongue at the frog. When the frog is down to one hit left, the frog will summon a cloud that shoots out a thunderbolt. Grab the thunderbolt, then throw the resulting fireball at the frog. If it hits, you'll get the gold gem.
The mother and father from "3 Clancer Kids" are back, and this time they have seven kids. You'll have to get all seven of them back, and this time you're in a very linear maze than can still be confusing at times.
Shake the Clanballs upwards or downwards to get to where you want to go. Thankfully, they will follow you between floors if you fall for whatever reason. There are three mini-boss types that you will have to face:
Giant Clanpot: This boss will shoot out meteors that will come down at you. If you grab them, you'll be able to cool the fire down around them and throw them back up at the giant Clanpot. This mini-boss also brings down some gems, and you can even get some green ones out of this. As you do more damage, the meteors will come out faster, and when the giant Clanpot is glowing red, it's about to be destroyed.
Giant Clansattelite: When the laser cannons are at the sides, they will shoot the ground and create a bunch of rocks. Grab these rocks and throw it at the Clanball in the center, and take care not to get hit by the lasers.
Giant Clanspike: This one create a ring of bombs around it. Grab a bomb and throw it at the Giant Clanspike. When you use one bomb successfully, it is replaced in the ring with a spiked ball. When you successfully use all the bombs, the Giant Clanspike is destroyed. Later on in the battle, wait for the ring to stop spinning quickly before grabbing a bomb to keep from being hit by a spiked ball.
As you beat the mini-bosses and rescue the kids, be sure to shake every kid before talking to them. One of them - Sarie, the small purple Clancer with the Santa hat - has a gold gem. As you talk to the kids, you'll find out that Calina used magic on them and that the family is looking for King Aster, who has gone missing in the cave in an attempt to stop the Empire. You'll also learn that Celes has been kidnapped by Calina.
There is a warp gate in the stage that lets you get from one side of the stage to the other more quickly.
You'll get some Red Gems after you complete the level, then you'll find out about King Aster. You'll find out that after the Empire destroyed the kingdom, King Aster retreated into a cave. Unfortunately, his daughter, Ondine, who should now be the queen, went missing. Before they can do much, they must destroy Calina, who is looking for Teran and Celes. Unfortunately, Teran isn't as strong as he though he was, and Marina manages to confront Celina as she holds Celes up into the air. She punches Calina out, then an old man shows up as she tends to Teran and Celes. He shoots out a fireball that ends up defeating Marina.
4-4: Rescue! Act 1
This time around, instead of playing as Marina, you'll be playing as Teran while Marina is out of action. You'll find out that there is a recovery machine known as "Mr. Health" that can help Marina recover; it is the same machine that Lunar is currently lying in.
Pressing B will let you punch repeatedly, Down and A will let you do a slide kick, and holding Up and pressing B lets you use the Final Blow, which is a deadly anti-air attack. Double-tapping Left or Right lets you run. You can also triple jump in mid-air by jumping and then pressing A while in mid-air, and if you time it right, you can get a lot out of one jump. Sadly, you cannot grab and/or throw enemies as Teran even though he could do it in the first world; because of this, touching a warp gate makes you enter it automatically.
If you go all the way up and left after the bottomless pit, you'll take a path to the gold gem. Watch where the sparkles are, and when a sparkle is above solid ground, touch the nearby warp gate. As you go further to the right with this, the sparkles get faster. When you see the gray "M" made of blocks, be ready to hold Right on the Control Pad to reach solid ground after popping up out of nowhere. The blocks will spell out "MARINA," hold you'll find the god gem at the end. Just wait for the sparkle to touch it, and you've got it.
Use the Tricycle and press A to jump over the gaps to get it into the space next to the other tricycle to open the warp gate that ends the level.
In this episode, SlimKirby finally bests Lunar, but it becomes apparent the rest of Beastector wants to step up. But who is that mysterious monolith...?
3-11: Cat-astrophe!!
After the events of the Athletic Festival, the White Team win and the Red Team storms off. Before Professor Theo can be offered as a prize, a Cat Clancer shows up and says that Professor Theo has been kidnapped by Lunar before declaring that she is here to destroy Marina. Unfortunately, she is too weak, and the only way this can be settled is in a game of dodgeball. Marina accepts on the condition that the Cat Clancer takes her to Theo if she wins. The Cat Clancer accepts the stipulation, and the dodgeball battle begins.
For this battle, all you have to do is grab the balls and hit the Cat Clancer with them. Marina will be on the left, and Cat Clancer will be on the right, and you must stay on your side. You can leave your side, but the game won't consider it fighting fairly. The flower and the bouncing Clancer face are completely useless, but even the Cat Clancer will grab and throw them at times.
If you can fight fair and beat Cat Clancer without being hit, you'll get the gold gem from Cat Clancer after you talk to her. Thankfully, this is very easy to do.
When you beat Cat Clancer, you'll be able to talk to her. she will tell you to watch out for Lunar's laser beams and missiles, and that Lunar scolds her for riding on the missiles, saying they are not toys, but admits they are fun to play with. She also says that you can shake the missiles to make them bigger.
3-12: Cerberus Alpha
You'll fight Lunar for a second time here. This time around, he will be on his bike.
On the first phase, you'll have to avoid missiles as well as grab them. If you can jump on a missile, you can ride on it. As mentioned earlier, you can shake a missile after grabbing it to make it bigger.
Lunar will also fire green lasers as well as a fireball that will hit the ground a fair distance to the right. You can grab the green lasers to turn them into blue gems. If you hear a rushing sound, he's going to fire his laser. If you grab at the right time, you can grab the laser, turn it into a fireball and throw it at Lunar for some more damage if you're quick enough.
After enough damage, he jumps over you to the right to fire at you with his machine gun. The machine gun has a limited range, but you'll still have the missiles and the laser beam to deal with.
Eventually, you'll enter the second phase, where Lunar's bike changes into an animal form. You'll have to fight Lunar in hand-to-hand combat. Get close to him, and then get behind him when he is somersaulting. Grab him from behind, then throw him downwards or forwards to deal damage. He has a rising claw attack as well as a somersault kick in addition to the kick he has that goes forwards.
He'll eventually get on the animal form of his bike. When he rolls at you, jump over him. You will want to grab him machine gun and aim it at him. If you shake the gun, the gun will shoot fireballs that can do a good amount of damage. If you get too close while he has the gun, Lunar's animal mech will hit you with a backflip kick.
When Lunar falls off his mech, you've beaten him. Marina then throws Professor Theo halfway across the planet again, then you get more of the story so far followed by a hint that if you beat a boss without taking damage, you'll get the gold gem.
Meanwhile, at the bad guy's lair, Tarus tells the monolith that gem mining in the caves is going smoothly, and if continues like this, the Imperial Fleet will soon be ready to depart. Taurus then finds out that Lunar was defeated by Marina, and that the task of defeating Marina now falls to him. Tarus assembles some Clancer troops, then they all leave. Meanwhile, the monolith wants Tarus to kidnap Professor Theo, but Tarus is far more focused on Marina.
Suddenly, Calina - in her real outfit - shows up and offers to kidnap the Professor.
Meanwhile, at the floating house Professor Theo and Marina have a bunch of missiles from Cerberus Alpha to protect Theo. Suddenly, the phone rings, and as Marina answers the phone, Calina - disguised poorly as Marina - gets the Professor's attention and gets him to play hide and seek with her, even though Marina has clearly entered the other room. Theo chases her around the room and out the door, and when Marina shows back up, Theo has gone missing. She looks out the window to see Theo chasing Calina and heads off.
Aster's Lair
4-1: Rolling Rock!!
In this episode, you'll have to outrun a rock. If the rock hits you, you're starting this level completely over.
After the first warp gate, you'll have to clear out all the blocks by throwing them into each other and get to the rest of the level before the rock gets there first. From there, you'll have to keep making your way down.
There is a red warp gate just before the end. If you grab it, you'll be able to get the gold gem. You'll then have to grab a Clanbomb out of the cylinder to the right to break the glowing red walls surrounding you, but if you're not quick enough, the rock will cover the exit and you'll have to run into it to start the level all over again.
In this entry, SlimKirby faces a member of the Beastector and take part in some Olympic games such as...Mathfun and dodgeball?
3-8: LUNAR!!
In the middle of Mt. Snow, Marina meets Lunar, who shoots down from they sky and lands on the ground.
Lunar has a few attacks. He has a diving claw that drops bombs as he dives towards you, as well as a slide that also produces bombs as he slides forwards. You will have to use these bombs against him by grabbing them before they explode and throwing them at him.
Lunar can also shoot a fireball at you with his gun. If he does this, grab the fireball. There is a chance it will turn into the gold gem. You can also catch the blasts and throw them at him, but you have to be quick. Other times, he uses rapid fire bullets. You cannot catch these. Just duck under them.
Lunar also has a grab attack. If he grabs you, he kicks you into the air to a little bit of damage.
You can grab Lunar from behind and throw him downwards to do some damage, but you have to be quick on this, too.
When you beat Lunar, he will tell you that some Clancers took Professor Theo.
3-9: The Day Before
Marina is finally at the Athletic Festival. The first Clancer you see brags about how this area is a Super Rich Hotel for folks from far away places, and that the guests spend tons of money. If you talk to the guests, however, you will find out they are less than satisfied with their accouterments, and they take their dispute directly to the guy in the top hat.
There is also a practice area for the 100M dash. Talk to the guy before it, and he will tell you the guy up top is training for the 100M dash. You'll then trigger a mini-event. When he says start, start dashing to the right by double-tapping Right with the Control Pad on the lower lane. If you win, you get a red gem.
After this is the warp gate, and further to the right is a pair of Clancers playing jump rope with a line of Clanspikes. Stand in the middle and join them, and jump over the Clanspikes multiple times. As you do this, you'll keep getting red gems as the line gets faster and faster, and if you survive for long enough, you'll get the gold gem.
When you grab the warp gate, you'll be at the Athletic Festival. Everyone is split into two teams - Red and White - and the team with the highest score wins this year's grand prize: Professor Theo! Marina has to save Theo before he becomes a punching bag, a door stop, or an answering machine.
Marina then meets the Hospital Director (who is one of the non-playable characters you could talk to in the second stage of the game). He mentions that Geold, the elder of Nepton Village, passed away a few days ago, and asks Marina to join the White Team, as they are weak this year and could use her help. Marina accepts on the condition that she get Professor Theo if she wins. He agrees, since nobody wants the prize and everyone likes the Festivals; however, there are some people out there who do want Professor Theo as a prize.The camera then focuses on the purple Clancer with the blue hair from Clanball Land.
3-10: The Day Of
When you play through this level for the first time, you have to play through all seven levels. If the White Team loses, you will have to spend red gems on a continue. After beating this level, you only have to play one, and that is because of the gold gem, which will be mentioned here.
The events are as follows:
100M Dash: For this one, you race against some other Clancers with your boosters as soon as the starting gun is fired. You win if you make it to the other side before everyone else. Remember to use the Control Pad, as it is faster than using the C buttons.
The gold gem in this level is here, and you'll be playing this level a lot in order to get this one. You have to beat the 100M dash in less than eleven seconds, and in order to do that, you have to start dashing as soon as the screen says "Go!" This is the hardest part, because the gap between "Set" and "Go!" is much longer than "Ready" and "Set." If you go early, you get a fault, and if you get four faults, you're disqualified and you'll have to pick another event.
When you win events, you'll get a green gem for some health as well as ten red gems. You also get points: 20 if you win, 10 if you don't.
200M Dash: Same as the last one, except the distance is longer.
400M Dash: Same as the 100M and 200M, but you're covering more distance than even the 200M.
Jump: In this game, you slide jump just before the white line and then use Right on the Control Pad to boost as much as possible. Whoever has the longer jump after two attempts wins.
Ball: You have 60 seconds to collect as many balls as possible. Be sure to collect more white ones than red ones. Whichever teams get more balls into the Clanpot wins. Marina will be carrying the Clanpot. Be sure to watch out for bombs, as the Clancers will be throwing quite a lot of them.
Hurdle: This is the 100M, except you must jump over hurdles every so often. You can get on top of the blocks and jump and boost from on top of them to win by a wide margin.
Mathfun: You must answer as many simple arithmetic questions correctly to win. Grab the Clanball with the correct number(s) to win.
In this entry, SlimKirby makes a lot of headway through World 3 and even gets a few of the gold gems along the way.
Mt. Snow
3-1: Clanpot Shake
At the beginning of the stage, you'll see the Clanpot for the first time in the game. If you put a certain amount of certain items in the Clanpot and shake it, the items will combine to make something useful. Right now, the Clanpot is empty, but as you fill it up, the magic will soon start happening.
The three Clanballs at the beginning contain items. Place the Clanpot below the Clanballs and shake the Clanballs downward to dump items into the Clanball. The orange one has blue gems, the blue one has bombs ad the green one has flowers. Make sure everything touches the top of the Clanpot so it all gets inside.
From here, you can grab the Clanpot and hold Down to look inside. Keep holding Down and you'll cycle through the inventory of the pot as well as how much of each item is in the Clanpot.
As you make your way to the right, be careful of the skiiers, as they throw bombs at you. At the glowing red wall that blocks your path, start shaking the Clanpot (technically, you could have done this at any time given the right amount of a certain item). Two flowers become a shuriken, six blue gems become a green gem, and four bombs will turn into a Clanbomb.
When you jump on the Clanpot and grab downwards, you want to make it so that the Clanbomb is what comes out first. To do that, look inside the Clanpot with Down, then press the L or R buttons to cycle through the contents and select what you want to remove. When you do that, press Down on the Control Pad, and you'll be able to remove what you want from the Clanpot. From there, get the Clanbomb and throw it at the glowing red blocks to the right.
There will be four more flowers. Put them in the Clanpot, then put the Clanpot underneath the orange Clanball and get all the gems in the Clanpot. Start shaking the Clanpot, you'll create two more shurikens, and the three shurikens will change into a boomerang. You'll also be able to make two more green gems, and shaking the Clanpot with three green gems gives you the gold gem for this stage.
From here, you won't need the Clanpot. Keep pressing Down-C on the controller to roll underneath all the spikes on the way up the hill, then grab the warp gate.
You'll then be on top of the nearby building, where you will have to ride on a Clanrobot. Grab onto it, then move it with the C buttons to move the robot to the right over the Clanspikes to the exit.
3-2: Clance War
For this level, you'll have to get from point A to point B without being horribly maimed. There will be all sorts of Clancers attacking you, so be careful.
There is a purple Clancer with a Santa hat on his head shortly after the beginning. You have to quickly head over to him, grab him and shake him before he gets blown up by a bomb in order to get the gold gem.
Bombs will be dropped by the Jetpack Clancers in the background, and Clanspikes will roll out at you from cylinders. Make sure to use your slide and slide jump to get through this area quickly.
You'll eventually face a yellow Clanmech that shoots out Clancers as well as carries a missile pod. Throw the Clancers at the Clanmech, and grab the missile pod to take it. If you shake the missile pod, the missiles turn from standard, straight-flying missiles to homing missiles. When you defeat the Clanmech, you'll complete this level.
3-3: Missile Surf!!
For this stage, you'll have to ride a giant missile to the end. To get it to tilt upwards, walk up to the tail end of the missile; to tilt it downwards, move up to the front. You'll want to use the gems as a guide to learn how to control the tilting. Obviously, the missile shouldn't explode by running into a wall; otherwise, you're going to be set back as the missile re-spawns.
There will be other missiles with Clancer faces on them that spit fireballs, as well as Clantanks that will shot at you. There will also be Clancers on missiles that will punch at you. You will have to watch out for all of these things.
You'll eventually see a missile fly by with a Clanbomb on it; grab the Clanbomb, avoid the missiles that fly up from the bottom of the screen, and throw the Clanbomb at the glowing red wall in your path. You'll reach the exit, but keep going up and to the right like the arrow made of gems tells you. You'll find the gold gem at the top of the screen. You can then jump off the missile and head to the exit.
3-4: Clanball Lift!
In this area, you'll grab onto a Clanball. Grab it to get it moving, then shake it towards other tracks to collect items and avoid obstacles.
After a pit with Clanballs that will help you get to the other side, you'll see a swinging rope made of five Clancers. Above them and the track that they move back and forth on is the gold gem, and you'll have to throw yourself off the Clancer rope to grab the gem.
You'll soon reach the exit from here.
3-5: Go Marzen 64
Marzen 64 is the guy who originally kidnapped Professor Theo...and now you get to kick his butt.
You'll be fighting a lot of Clancers, some of whom have jetpacks and will try to divebomb you. Throw all the Clancers into each other, (I should mention how the Clancers just automatically go into the dirt and turn into ghosts when you kill them. It's a tad funny but also a little sad, now that I think about it.)
A little later into the stage, you'll find a Clanpot. Shake it to turn the four bombs inside into a Clanbomb and create three shurikens out of the flowers, which in turn will give you the boomerang. The boomerang can be grabbed and thrown, if you haven't figured it out, but it disappears like any other enemy.
Use your boosters to get past all the bombs near the warp gate leading to the second section. Here, you'll be using Clancoils to get somewhere, and then you'll have to jump and grab carefully to get to where you want to go.
In one part of the second section, there is a white Clanball above a series of glowing red blocks. Shaking the Clanball produces a Clanbomb from a multi-colored ring up and to the right. Grab the Clanbomb when it comes down, and take it to the left. There is a Clanpot trapped in the glowing red walls. Drop the bomb by pressing B when above the Clanpot, then grab the Clanpot and make your way back to solid ground. Shake the Clanpot to turn the three Clancers with jetpacks inside into one big friendly Clancer with a jetpack. Grab onto him to ride him, then fly around with the Control Pad. At the top of the section, to the left of the upper-right corner, is a bunch of red gems with the gold gem in the center.
Take the warp gate, and you'll face Marzen 64. He will throw penty of Clancer kids at you. Grab one of them and hit Marzen 64 in the back. You can also use the bombs the kids throw to destroy the Clanmech. The Clanmech will eventually explode, and you'll fight the guy riding it on his own. Throw him into the floor and throw Clancer kids at him to get rid of him and move on to the next area.
3-6: Chilly Dog!!
The mini-boss here is a big dog made of ice.
Grab the dog by the head when he lunges at you and shake him a few times. You'll get the gold gem.
From here, keep some distance from the dog and grab the dog by the head when it lunges at you (the target will let you know when to do it). From there, throw the dog forward to deal damage. Stay away from the dog when it is down; otherwise, it will hit you with a backflip kick as it gets back up. You'll eventually defeat it.
3-7: Snowstorm Maze
For this one, go to the right and grab the tricycle. Use the booster by continuously tapping Left or Right - or by pressing Left C and Right C repeatedly - to get it up the left side of the nearby ramp to get it in the little compartment near the other tricycle is to trigger a warp gate. From here, grab the head of the Clanrobot jumping around and leap up to the platform with the warp gate. Jump to the left and keep bouncing off the Clanspikes in that direction to get the gold gem.
But wait! Instead of grabbing the warp gate from earlier, take the Clanrobot and take it to the right and into the little chamber next to where another Clanrobot is. You'll activate another warp gate that takes you to the next area. Otherwise, you're starting back at the beginning with everything reset, and you'll have to do all this over again.
Shake the first white Clanball you see for a Clanpot. Take it all the way to the right and throw it over the wall, then get on top of the Clanpot and press Down+B to pull out a Clanbomb. Use it to blow up the glowing red floor to find the real exit to the next section.
The white Clanball in the next section has a Clanpot. Put all the nearby Clancers in the pot, then go all the way to the right and shake the pot and pull all the Clancers out. This will make the exit show up.
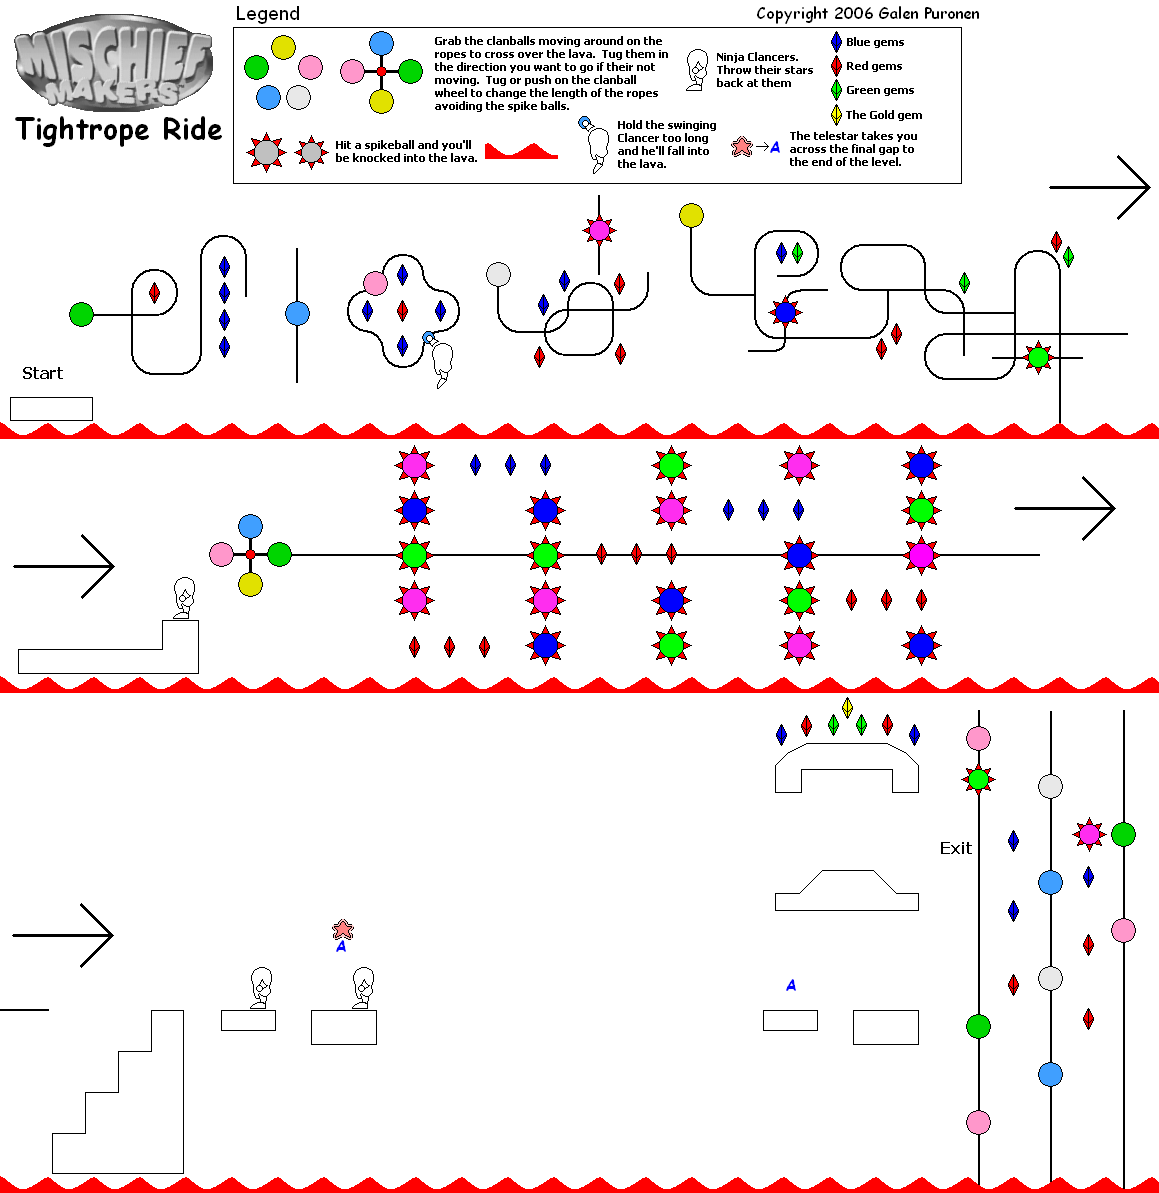
In this stage, you'll be grabbing onto Clanballs as you make your way to the right, making sure to avoid spikes as well as falling into the lava as you go. After this, you'll be avoiding shuriken-tossing Clancers as you make your way to a warp gate.
After the moving Clanballs, you'll be on a set of Clanballs you can rotate and extend. You will have to shake the Clanballs around to expand and contract the the length of the ropes to avoid hitting spikes.
After the warp gate, you'll see a series of Clanball elevators. Throw yourself upwards to reach the exit, but don't take the exit just yet. Instead, make your way to the top. Thankfully, the Clanballs come down in a simple pattern. To the left will be the gold gem.
2-8: Freefall!!
Grab the blocks below to start falling. You'll soon see a fork in the road, one with blue gems and another with red gems. Follow the red gem path and watch out for spikes as you enter the gap on the right-hand wall. Use Marina's booster to get the gold gem.
You'll then reach the bottom, where you will find a green gem. A platform that moves up and down will be to the left. From here, follow the blue gem path, and be ready to grab the warp gate before the end of the path. If you need to, boost upwards to slow yourself down for a second. When you grab it, you'll teleport to the left. Watch for a warp gate to the right. You'll be on the right side of the level. The warp gate will be to the left. Grab it, and you'll be in a center area that leads to the exit.
2-9: Magma Rafts!!
Jump onto the raft to get on, and jump from one raft to another. There will be a Clancer with a flower on their head shortly after the first Clancoil. If you shake that Clancer, you'll get the gold gem.
After this, you'll want to jump on the rafts when they are completely horizontal. At the section with all the balls that drop down, throw them off the platform so it does not sink. Same with the Clancers that jump on in the next section. Throwing the Clancers into each other really helps.
2-10: Seasick Climb
In this area, the screen will rock back and forth as you make your way to the top of the stage. Thankfully, the rocking isn't all that bad.
Sake the orange Clanball shortly after the start to spawn a Clancoil that will let you continue. You'll see the gold gem on the left on your way up. Shake the light green Clanball to make a platform come out of the background, and you'll be able to reach the exit. But if you go further up, you'll eventually find a gap to the left that will let you enter and drop down to get the gold gem you saw earlier. You'll have to backtrack to the exit, but it won't be as bad.
The multi-colored rings will spawn Clanspikes out of the background, so be careful when you're around them.
2-11: Migen Brawl!!
Welcome to the first true boss battle. In boss battles, you must beat the entire boss battle without getting hit once to get the gold gem...which is no easy feat, especially later in the game.
Marina happens upon Migen Sr. interrogating a tied-up Professor Theo, demanding to know who the Emperor of the Empire is. Theo obviously doesn't know, but Migen Sr. doesn't buy it, given that the Emperor knows who he is. Marina drops in and decides to teach him a lesson. Migen then summons his son out of the lava, and boy, is he big. Migen Jr. then decides to eat Theo (which fails, because Theo is alive afterwards), then the fight begins.
When Jr. throws a punch, grab it and send the fist at Migen Sr. Avoid the fireballs, and grab at his fist to deflect it. You can grab the fireballs to negate them as well as turn them into blue gems to restore your health. You'll want to get rid of Migen Sr. first; otherwise, he will heal Migen Jr. during the battle.
After a few hits, Migen Sr. will throw energy balls at you. Grab them to turn them into red gems. It won't be long until you send Migen Sr. into the lava. From here, it's just you and Junior. Keep deflecting the fists and fireballs, and when he stores up energy in the center, stand to the side so his flamethrower attack does not hit you. When he has a weird look on his face when he punches, that means you can grab the fist and throw it back into his face by holding Up and pressing B after you grab it. As you do damage, you'll notice that Professor Theo is still alive and clearly in Junior's mouth.
After enough hit, Junior will fake out with some of his punches, which takes some getting used to.
After you do enough damage, you'll knock Professor Theo out of Migen Jr.'s mouth and Migen Jr. will explode. You've saved Professor Theo! You'll then see a cutscene where Professor Theo gets behind Marina in a creepy manner only to get thrown halfway across the planet, then get a bunch of text that explains the story so far. The Empire's plans have been stopped, but the game is just beginning. The game also explains gold gems as well as the point of grabbing, shaking and throwing.
After beating the second world of the game, you will see some sort of monolith summon the Justice Warriors: Lunar, Tarus and Merco, also known as the Beastector. The monolith mentions what Marina has been doing as of late, calling Theo and Marina evil and disruptors of the Clancers' peace and demanding that the Warriors give Marina and Theo some justice of their own. Lunar wants to destroy them, but the monolith wants them brought back alive.
Meanwhile, on Mt. Snow, some Clancers are talking about the Athletic Festival that is drawing near. However, the prize has not been determined. Lunar suddenly shows up and orders the Clancers to kidnap Professor Theo, as well as to give a message to Marina. The Clancers learn that Theo is this year's prize, and the message to Marina is an invitation card to the festival.
Marina and Professor Theo are now back in their floating home, with Theo seemingly completely covered in body casts (which I just realized while making this guide; I never did put two and two together as a kid). As Marina talks about what she knows about Planet Clancer, Professor Theo falls asleep, but as Marina shakes him, he finds out that this is what looks like a teddy bear with Theo's head on it. Inside the fake Professor is the invitation to the Athletic Festival, and Marina finds out what is going on after initially thinking it to be a love letter from a secret admirer. Meanwhile, Clancers are watching from the window as Marina storms off.
Lunar is then seen waiting for Marina, laughing as he waits to give Marina his own brand of justice.
More than the action heats up as SlimKirby heads into Migen's Shrine...
Migen's Shrine
2-1: Sea of Lava
The little Clanballs that jump back and forth on the stairs at the beginning are useless.
The lava hurts, so don't land in it. If you do, you'll take damage and be sent back to the beginning of he section..
At the end, you'll see a green Clanball. Shake it, then go back to use the warp gate you just activated. In the next area, watch out for the fireballs that come out of the lava.
You'll eventually reach some narrow corridors. You'll find the gold gem just above the lava. You can drop into the lava while grabbing it, then head all the way back and get through the narrow sections to reach the warp gate. Watch the glowing red cylinders to see where fireballs come out when. Or you can just speed through it. It's up to you.
2-2: Vertigo!!
Grab the Clanbomb out of the cylinder and throw it to the right immediately to get around in the level, then get to the green Clanball. When you grab a green Clanball and shake it, you will turn the level upside-down. Do it again to get the level back to normal. If you get stuck, shake a green Clanball. You'll open a path back up. Glowing red walls will be re-formed when you do this, too
The gold gem is in the middle of the level. At the glowing red wall that blocks the exit, drop the Clanball downwards to the right, then go up the wall as it explodes and get on the platform that moves up and down. You'll find the gold gem at the top.
2-3: Sink or Float!
The platforms in the lava sink when you stand on them. Jumping on them repeatedly allows them to rise back up while you're still on them.
The Clancers at the beginning throw shurikens. You can catch the shurikens if your timing is good, and you can use the other enemy Clancers as human shields to kill them.
The gold gem is past the end. Make a slide jump - hold Down and pressing A to slide, then pressing A again in the middle of the slide to jump - then keep double-tapping Right on the Control Pad at the top of the jump to travel to a platform leading to the gold gem. (Using the Control Pad gives you more of a boost than the C buttons will, and not only will it be learned how true this is in a later level, it is also learned if you talk to one of the Clancers in Level 1-2.) Keep doing this, and you'll eventually reach the gold gem.
If you get a game over, you have four options: A Normal Continue for ten red gems which gives you one health bar, a Life Up Continue for 30 red gems that gives you two health bars and a Max Power Continue for 100 Gems that gives you three. I'm Done is Game Over.
Also, SlimKirby getting Marina to stand in mid-air off the side of the gold gem platform is comedy gold.
2-4: Hot Rush
When this level begins, go fast. The glowing red blocks that make up the floor have been set off, and if the explosions catch up with you, you're doing the section over.
When you grab the warp gate shortly after the start, you'll have to wait until the walls around you start exploding before you can continue. As you wait, head left instead. Get over the wall, then rocket to the left and shake the white Clanball. From there, hurry back to the wall. Continue to be fast. Be careful as you jump over the gaps and reach the second warp gate. At the other end of said warp gate, go left and shake the white Clanball that is there. By shaking the white Clanball after the start, you activated this second one. Shake downwards and get the gold gem that comes out. From there, grab the exit.
This is easier said than done, and is one of the harder areas to get the gold gem in.
2-5: Searin' Swing!
The gimmick for this stage is the swinging ropes made up of Clancers. You can use them to swing across the lava, but if you hold on for too long, they will give out from holding your weight and you'll tumble into the lava along with them. Grabbing onto different Clancers in the chain will allow you to grab everything.
It won't be long until you make it to the exit, but if you go past that, you'll find four more ropes made of swinging Clancers. If you can get across all four of them, you'll get the gold gem.
2-6: Flambee!!
It's time to fight a bee! When it dives at you, the target on its head will show up. Grab onto the head and keep shaking it, and it will eventually drop the gold gem. Be quick to grab it, or else it will disappear.
To beat the bee, grab the head and throw it downwards. Watch out for the bees that this bee creates, and don't get hit by the stinger as the bee dives down. Eventually, it will lower and rush at you, but you can still grab the head and toss it downwards. You'll eventually make the bee explode, and you'll be able to continue.
In this entry, SlimKirby storms through the rest of World 1 and finds all the gold gems.
1-4: Spike Land
This is where you'll be introduced to Clanspikes: spiked balls that float around and are painful to the touch. Some of them move, and some of them stay in a very strict area. Some fire lasers. Some of them are in a ring formation. All of them are deadly...so do't touch them.
The gold gem is just above the ring at the beginning of the stage, and it doesn't take much of an effort to get to it. As a matter of fact, this is just a very small stage where you learn to avoid spikes. That's it, really.
When you run into spikes or throw something into them, they disappear for a few seconds. When you hear a tinklebell sound, that means the spike has re-spawned.
1-5: 3 Clancer Kids
Marina ends up in front of a house where a mother Clancer calls for her kids. When they don't show up, she asks Marina to bring them back home.
The Clancer Butterfly flying around doesn't do anything and is just there for level decoration.
Shake the Clanball at the start to the right to get it to move across the path so you can get some red gems.
The first child is soon after the start, and this child runs away from you and jumps over the fire pits when you come near. You can easily grab them while they are jumping. Remember than you can hold Up on the Control Pad while pressing B to grab them from below if you need to. After grabbing a child, take them back to the house and throw them inside.
Shortly after that child is a Clancoil. Use it to launch yourself up to another Clancoil that you can use to launch yourself to the left. You'll meet the second child. Jump to the left after the first spike, then immediately deke to the right to grab them. This child, like the first one, doesn't go too far.
Further to the right still is a linear path that zig zaps upward before taking you back down to the beginning. This is where the third child is. You can use your rocket to quickly catch up to them and grab them. They also slow down near the top to jump to the bottom, and you can use that to take advantage of their slight drop in speed and nab them.
If you run into fire or spikes, you will drop the child, so be careful. I usually use the slide followed by the slide jump - Down and A, then A again while sliding to do a long jump - to get past the spikes and then just rocket home for the third one.
When you bring all three children, you'll get some red gems and the warp gate to leave the level. The mother then asks where her husband is. This part is optional, but it's worth doing. Aim the Clancoil that took you to the second child to the right, then launch up and to the right and use your rocket to get up to the platform. Go to the right, and you'll find a cylinder. Grab downwards to get a bomb, and quickly take it to the zig-zag area where you found the third child. Throw it at the glowing red wall to the right, and you'll find the husband. Grab him and shake him to get the gold gem, then take him back home. He gets angry with you when you bring him back home. XD
1-6: Blockman Rises
You'll meat Teran from Nepton Village in 1-1 in the middle of the desert. He will tell you that his sister Ceres, whom you also met in Nepton Village, has goes missing and he does not know where she is. He asks for Marina's help by asking her to shake him to awaken his fighting spirits. He turns into a Clanball, and if you grab him, he turns into a Blockman (with Clanspike fists!).
Double-tap Left and Right (or use Left-C and Right-C) to tear through enemy Clancers. Double-tapping Down or Down-C lets Terran extend his legs, while double-tapping Up or Up-C let you punch upwards to destroy spikes.
Don't destroy the enemy Clancers too hastily; one of them has a gold gem that you can get by grabbing and shaking. You'll have to disembark from Teran by pressing B in order to get the gold gem, but it's worth it.
The glowing red blocks can be destroyed by moving into them.
Later in the stage, some Clancers will throw bombs at you. When they make the tinklebell sound, they're about to detonate. The third guy that throws the bombs has the gold gem.
When you get to the warp gate, Teran will turn back into a Clanball and you'll have to exit the level.
1-7: Wormin' Up!!!
Welcome to the first mini-boss battle!
Ceres finds some flowers in the desert. She is about to water them when a giant Clanworm shows up and tells her to go away. Marina shows up in time, and the Clanworm take this as a challenge.
To beat this worm, grab them and throw them into the wall. Before you do this, shake the worm to get the gold gem, then start tossing. After a while, the worm will start blowing smoke and breathing fire, and after even more damage, the worm starts rolling around. Keep grabbing the worm and tossing them into the wall.
Interestingly, throwing Celes into the worm does damage as well.
You'll eventually beat the worm and make them explode, and you'll be able to use the warp gate to get to the next level.
1-8: Crisis: Nepton
Back in Nepton Village, Teran is worried about Celes, but Geold is more focused on protecting the village and has the feeling Celes will return. Spur Clancers - Clancers in cowboy hats - start causing trouble in the village in an attempt to steal the village treasure. They attack Geold, then Marina returns with Celes in a safe location. This starts the fight.
The four Spur Clancers will jump in at once, and they will keep coming in four at a time when the four currently on-screen are beaten . Be sure to throw these guys into each other to get rid of them as soon as possible. One of the village guards as well as Teran will fight alongside you. If either of them get on their hands and knees and start crying, they have been knocked out. If that happens, you won't get the gold gem at the end of the battle.
1-9: Western World
At the beginning is a cat tank. If you destroy the tank by throwing it into a wall, you can take the machine gun. Shake the machine gun, and it will go from a traditional machine gun rapid-fire shot to a three-way rapid-fire shot. The gun will flash white and you will hear a beeping noise when it is about to run out of bullets, and when that happens, the gun explodes, never to be used again.
There will be Spur Clancers who will fire at you, and there will also be bombs on the ceilings and floors that go off when you run into them.
You'll eventually fight Spur Clancers in a dead end, and if you shake them, they will give you a lot of green gems for a big health boost if you need it.
After bombing the glowing red well, you'll see a bunch of platforms surrounded by spikes. To the right of them in mid-air is where two glowing red walls will be. Take the bomb from the cylinder and, quickly but carefully, get the Clanbomb to the flashing red walls to break them and get the gold gem.
From here, you can utilize the Clanbombs again to open up the path to the warp gate.
The Clancactus is there for level decoration only.
1-10: Volcano!!
Further into the desert, the volcano in the background suddenly becomes active and starts raining down rocks. Keep going right, and watch for shadows.
If you go up as soon as you are able and make your way to the left, you can get the gold gem.
Near the end, you'll be avoiding spikes. From here, Marina will enter what looks like a temple...
Here's one that I played as a kid. I didn't know much about Treasure's history of making good games such as Gunstar Heroes until much later, so this was a pretty interesting introduction to Treasure as a kid. Unlike some reviewers and magazines of the time, I still had faith in 2D gaming in the 3D world of fifth-generation gaming, so when this game popped on the Nintendo Power radar, I was more than game.
You have two save files. When you create a new game, you can name your file and also indicate your gender and age. The age changes the ending of the game a bit, but I'll get into that later.
The story begins with Professor Theo in his very Japanese flying house above Planet Clancer as Marina Liteyears scouts the planet. All off a sudden, some of the people on the planet show up, storm the house, kidnap Theo and mess things up.
Planet Clancer
1-1: Meet Marina!!
Professor Theo has been kidnapped by the "Great Empire," who have been ordered to take Theo to the emperor. Theo cries for Marina for help. Marina soon loses the Empire's trail in Nepton Village, and a villager meets with Marina. Marina finds out that the nearby village is suffering due to the Empire's actions, and the villager asks her to talk to the elder Geold.
If you want to talk to them, press L or R when next to them.
The Control Pad is used to move Marina around. Double-tapping the D-Pad (or the C buttons) in any direction allows you to use your boosters and move a little bit faster, and you can keep tapping it to keep using your boosters. They aren't very powerful, but a little goes a long way!
The B button lets you grab things. Holding a direction and pressing B lets you throw them, but if you repeatedly press Down on the Control Pad or Down-C, you can shake them to get items, usually gems.
Fire hurts. Don't touch it.
There are four colors of gem in the game. The red ones will let you continue, and the more red gems you collect, the more health you can have when you die and continue. The blue ones increase your health very slightly, while the green ones give you a good boost. The gold gem is special, however. There is only one in any given level, and if you collect it, you'll get a big health boost. You also need these gold gems for something special near the end. When you grab it, get to the exit quickly; if you take too long, you won't get credit for the gold gem.
The only thing for the heads-up display that you have is your life bar. When you go over the maximum, you can actually get another health bar. As a matter of fact, you can get two, and those are indicated by both a red circle (for the first one) and a blue circle (for the second one), allowing you to have three health bars worth of life.
You'll meet Teran and Celes near Geold's house. You'll be seeing them throughout the game.
When you talk to Geold, who will tell you that because the planet is peaceful and friendly, the Empire has persuaded many of the planet's inhabitants - known as Clancers - to become evil and help the Empire take over other planets and control the universe. Geold believes that Professor Theo is being taken to the emperor, and that Marina must rescue him before that happens.
In order to get from place to place, you must find the Warp Gates, which were sealed long ago and must be opened back up. Geold gives you a Clanbomb at the Clance Shrine to unseal the Warp Gates.
When you grab the bomb, a timer will count down from 50. When you throw it, it will explode when it hits the ground. There is a statue early on in the level, and if you get the explosion from the Clanbomb to hit the statue, you'll be able to break it open and get the gold gem for this stage.
The Clance Shrine is the set of glowing red blocks. If you see these color blocks, you can blow them up with a Clanbomb. Grab the small red star to warp upwards, then grab the larger yellow star to clear the level.
Warp Gates are one way, and you may not always be able to return. Keep that in mind.
After you complete a level, you'll see how long it took to clear the stage, your rank for that stage (which is based on your clear time, which goes from D all the way up to S), and whether or not you got the gold gem (as well as whether you got credit for it if it took a while to clear the stage).
Is this important? Well, yes. Turns out, you have to get at least A rank on all the levels to get one of the 53 gold gems in the game. Better start practicing.
1-2: Meet Calina!!
Marina shows up in another village. She soon meets a female Clancer dressed like her named Calina, who has been pretending to be her as well as copying her powers to get all the people to distrust Marina. It soon becomes apparent that Calina is part of the Empire, and Calina dares Marina to chase after her.
As you head to the right and talk to people, you will learn how to do more things. Some of the people will automatically distrust Marina upon talking to her.
The gold gem is not far from the beginning of the stage. Thankfully, you can use your boosters to get there, and if you don't know how to use them, you can learn how from the people in this village. (They're still angry at you, but still...) You'll also need the booster to get past the fire pit.
If you see a cylinder with sparkles coming out of it, duck down by holding Down on the Control Pad, then keep pressing B to grab things out of the ground. You'll find items by doing this.
Flowers can be picked up and thrown like any other object, but the one you find at the beginning of the second section will not be useful. Flowers will be useful later on, however...
Now it's time for an amusement park! Here, you'll be introduced to a ton of new game mechanics.
If you see a pink Clanball (just about everything in the game starts with "Clan," unsurprisingly) with a yellow ribbon on its head, it's Ms. Hint! Grab on and shake to spend ten red gems on a hint. Here, you'll learn that the floating balls can be grabbed and used to launch yourself to higher places by holding the direction you want to go and pressing B (and then grabbing onto the next one). You can also shake the Clanballs while holding on to them by double-tapping Down like you would any other grabable object.
If you shake the white Clanballs, you'll open up Warp Gates to other parts of the park.
The Clancoils can be moved around by double-tapping in the direction you want to move it to get to other areas. You can shake them inwards to launch Marina to another area, while double-tapping in other areas allows you to re-position the Clancoil at another angle. Different angles will allow you to reach different areas.
At one point in the park is a Clanball roller coaster. If you grab onto the orange Clanball that is moving very fast, you can shake it to make the Clanball drop a Clanbomb downward. If you drop it on the flashing red blocks nearby, you can open up a Warp Gate that leads to the gold gem.
The Clanball Ferris wheel can be rotated either clockwise or counter-clockwise by double-tapping in the direction you want to go.