For the first time in our life, we go outside the village of Crysta and see what is beyond. Unfortunately, it is all a barren underground wasteland, and there are five towers we have to ascend to free everyone in the village.
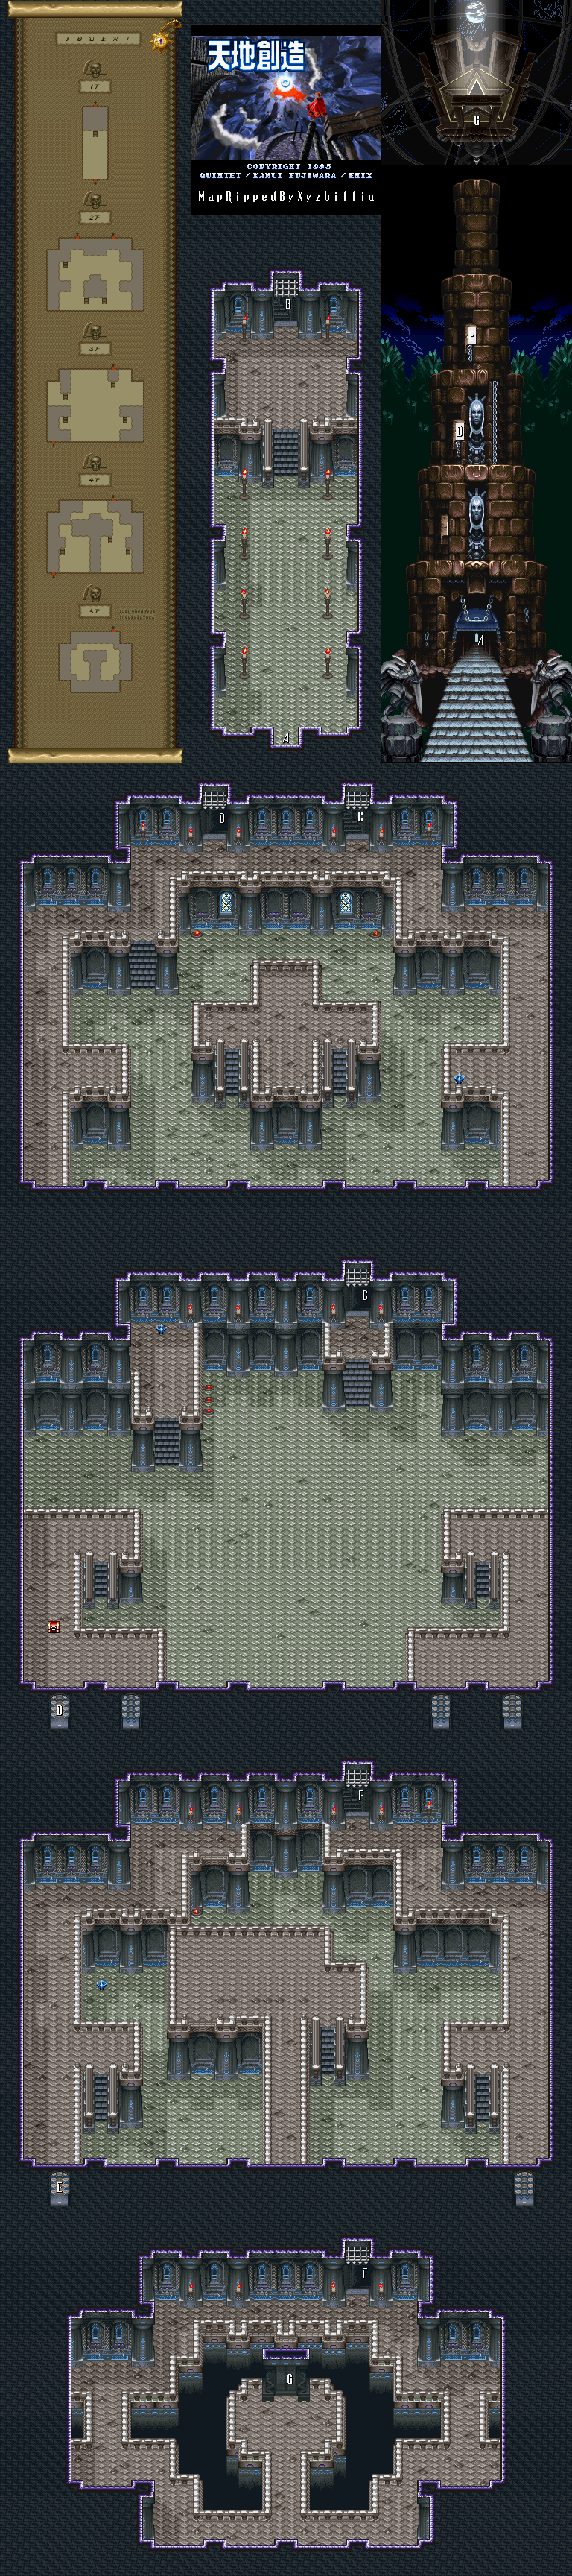
Tower 1
A lets you attack. Dashing before you attack gives you a dashing thrust. Jump in place and press Y to perform a jumping spin attack. Dash, jump, then attack to get a downward sliding attack. The dashing attack allows you to be invincible while performing.
Press and hold the R button to block enemy attacks. Unlike past games in the Soul Blazer series, you won't be able to draw things toward you. It only works against projectiles, and never against melee attacks.
When you defeat certain enemies in the towers, souls will pop out. Talk to the souls to get hints on what you need to do as well as continue through the tower.
The blue sparkling rock is a Magirock. You'll need Magirock for later in the game. You can see how many you've collected by checking the Strength Mirror in the box. The maximum number of Magirocks in the game is 96 (97 in the Japanese version).
Be sure to scout out all the rooms carefully to get the Magirocks in these five towers. They're pretty easy to find with some looking. Be sure to get all the Magirocks before clearing all five towers, so you can have an edge later on in the game.
To beat the big slow guys with the spears, get them up against a wall and keep tapping the A button repeatedly. You'll do a rapid stab attack. The hits don't do a lot of damage, but they do add up and they won't be able to counter-attack as long as you're able to perform it.
Enemies will drop gold bars sometimes. These are Gems, the currency of the game. You'll need these to purchase items, weapons and armor, so get that money whenever you can! Sometimes you'll see a single gem; other times, you'll see a stack of gems. The stacks will give you quite a bit of Gems, depending on the enemy you've destroyed.
The blue sphere-shaped enemies can be defeated easily with a downward slide attack.
The broken window in the lower-left corner of the third floor leads to a path on the outside of the tower that you can climb to ascend to the fourth floor.
When you make it to the top of the tower, you'll meet a dark cloaked figure in a mask. He'll tell you that the monsters you destroyed are people's souls transformed, and by overcoming the challenge behind the door that he guards, their souls will be restored. You'll then face four red versions of the sphere enemies from this tower. Use your rapid stab and/or your dashing attack to defeat them easily. You'll then learn that the Earth is trying to revive itself, and that the nearby door leads to the space for land's control. By going inside, you'll see a special cutscene of the world trying to wake up. Here, snow falls on the mountains. Eurasia has been resurrected. The weavers and Elle will be unfrozen. You'll be back on the underworld map.
By using the map, you'll have to move downwards to see the higher floors in a dungeon, which takes a while to get used to.
Whenever you level up, you'll do a special animation as well as get a special confirmation noise, and see how you stats have increased.
Go north from Tower 1, then head west on the land bridge in the lava river to reach Tower 2 (which is west of Crysta).
Tower 2
At level three, you'll be able to one-shot the purple sphere enemies. The soul on the first floor will tell you to pay heed to the statues and the color of the jewel in the forehead of each one. One of the statues will have a red jewel instead of a white one on its forehead, and if you push it to the side, you'll reveal the stairway leading to the second floor. Do this not only on the right side of the first floor to get a Magirock, but also on the left side to get an S.Bulb.
The flaming pots can be picked up and thrown at enemies if you need to do a little extra damage.
The fire enemies here can toast you. In other words, if you are hit by their fireballs, you'll be stunned for a second. The fireball attacks can hurt at this point in the game, so be careful when fighting these things. Use your dash attack to take them down without much damage to yourself.
The soul on the second floor will mention switches that glow gold. Keep an eye out for them, and flip them when you get the chance.
The Magirocks here are pretty easy to find, and are available on the maps in these entries. In case they're not on a map, or are in a town, I'll explain them in detail.
The floating wizard will be able to stun you for a brief period if he is able to glare at you. Once again, use your dash attack to keep the glaring to a minimum.
There are two switches on the second floor. To trigger them, simply walk into them long enough so that Ark is pushing on it. Ark will trigger something when he pushes it, so keep that in mind for later in the game. By triggering both switches, you'll be able to open the gate in the middle of the second floor.
There are more switches on the third floor. Watch out for the glare of the wizard enemies here, and push the statues with the red jewels on their forehead to make headway here as you trip them all. Hitting all four will allow you to open the pathway to the fourth floor.
The fourth floor is full of statues. Don't forget to grab the Magirock on the left side of the room, and look for the statues with the red jewels on their foreheads at the sides of the room. When you see them, push them. You'll open the stairway to the final floor to the north.
To hit the switch on the fifth floor, toss a pot at it. This requires a little bit of aim. You can also go into the box, head to your inventory, and go to the Jewel Box in the lower-left corner of the inventory. It will be separated from everything else and considered a special item by the game. Equip it like you would any other item in your inventory, then get out of the box. Press X, and if you've bought at least one Magirock item, you'll be able to cycle through them. If you use the Ice Ring and hit the switch with the blast that comes out of it, you'll also be able to trigger it that way.
The switch allows you to enter the door to the next revival room. You won't have to go through a special trial this time; instead, you'll see a cutscene of lighting striking from the heavens and a hard rain coming down on the dry, barren land. South America will be resurrected, and a few of your friends will be unfrozen.
Crysta
Now that you have some Magirocks, you can go to the Magishop in the lower-right corner of the town. Unlike the rest of the residents, the shopkeeps are not affected by what you did when you open the boxes and are never frozen.
The Magishop works a little different than you would expect: instead of using solely Magirocks for your currency, you also have to pay with some Gems as well. The FireRing, for example, costs 5 Gems and 1 Magirock. Whenever you use something that you bought with a Magirock, you'll get that Magirock back so you can buy something with it again. HCBailly indeed said it best: The Magirock are the MP of the game, except you buy your spells ahead of time and you can buy it again when you use your items.
If you head back to the Weavers', you'll find out that everyone felt strange but is now back to normal. Talk to Elle, and she'll help you by weaving something for you. You'll have to come back later when it's finished to pick it up.
If you need to heal, head back to the Elder's house and go back to the bed. You won't be able to do this with every bed in the game, though.
No comments:
Post a Comment