Our journey not only takes us to the Bone Dungeon, but it gives us a new ally.
.png)
Sand Temple
When you open the chest, you'll find it's empty.
Enter Tristam. He's a ninja with shurikens, and he'll try to sell the Elixir to you for 9000 GP. Since you obviously don't have that kind of money, he'll strike a deal with you: help him hunt for treasure in the Bone Dungeon, and he'll give the Elixir to you. Fair enough, right? He'll join your party and tell you about the battlefields.
Tristam's armor protects him from Fire attacks as well as instant death...not that it's going to matter. His Ninja Stars also Poison and Paralyze monsters, which is pretty nice. Don't worry about running out; you'll find more in the Bone Dungeon.
Level Forest Battlefield
You'll meet a new enemy here: Mad Plant. The ax makes short work of them!
The battlefields give you up to 10 battles to test your might. When you beat them all, you win something. Sometimes it's a bunch of gold or EXP, but sometimes you'll win an item!
You'll meet two new enemies. The Mad Plant is weak to the axe attack, and the axe will destroy it in one shot. There is also the Poison Toad. These toads can, of course, Poison you if given the chance. If that happens, you'll need to use a Heal Potion to get rid of it.
There's another bug in the game and it involves battlefields. If you level up on the last battle in a battlefield and the reward is extra experience, you level up again regardless of how much EXP you need for that second level. You get two level-ups instead of one. Fun. The downside is that it makes it a little harder to hit the next level as usual.
You win 54 EXP when you clear this battlefield. out. Level-ups for everybody!
Sand Temple Battlefield 1
The battlefield here introduces the Basilisk. Unlike other Final Fantasy games, the Basilisks in Mystic Quest can't use Petrify.
When you clear this battlefield out, you'll win the Charm, which increases Benjamin's defense by one. Don't worry about equipping it on him; the game automatically does it for you.
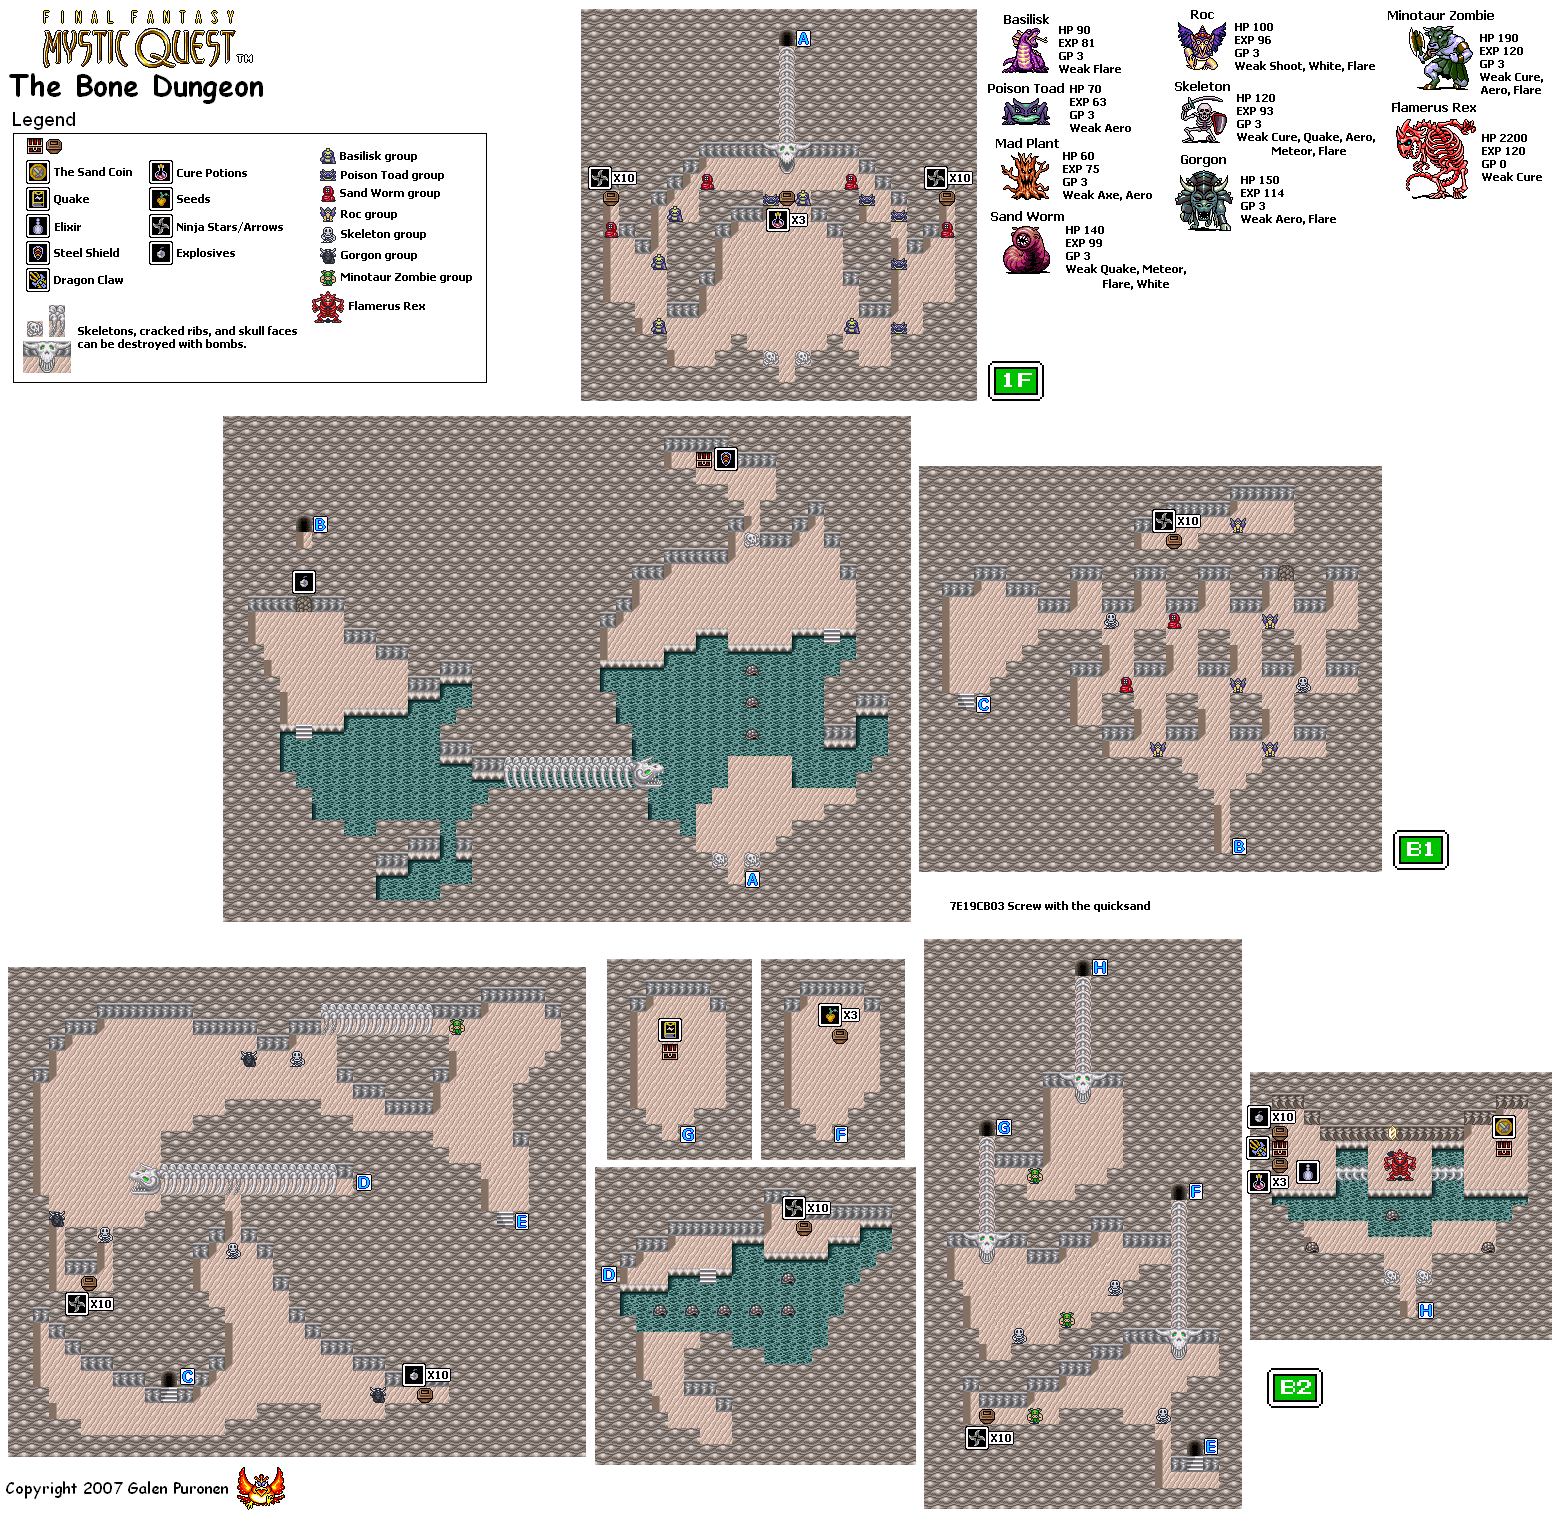
Bone Dungeon
Bone Dungeon - 1F
Finally, your first dungeon.
If you've went through the battlefields prior to entering the Bone Dungeon, you'll have a good ideas to what you'll expect, as the monsters from the Sand Temple battlefield make a return appearance here.
The ground here is animated, but some parts move faster than usual. Those parts are conveyor belts, and they'll carry you in a specific direction, signified by which direction these areas move.
You'll probably be poisoned a couple of times at the entrance, so if you need to, go back to the Level Forest repeatedly to stock up on Heal Potions.
The game will always tell you where you are in the dungeon on the lower-right corner of the screen. There's one floor and two basements here, so the Bone Dungeon isn't that big compared to later dungeons.
Bone Dungeon - B1
When you go up here, your path will be blocked by a skull. You can't jump over it, so head left. There will be a sealed entrance, and Tristam will bust it open with a bomb when you walk up to it. After this, he'll sell you 50 bombs for 30 GP. If you say no, he'll cut the price down to 15 GP. That's more like it. (I forgot about the price knockdown when I played the game.)
Head back to that skull before you continue. You'll find a Steel Shield for Benjamin once you blow it up.
The bombs are really useful. Besides blowing stuff up if it's in your way, they can also be used in battle. They're best used when fighting jsut one monster, as you can't single-target with them like you can with sowrds and axes. If you're fighting more than one monster, the game will split the damage between them. On the plus side, you can't miss with the bombs at all. They'll always hit, so even if Benjamin is afflicted with Blind, he can still fight back. Talk about a versatile weapon!
Go back to the entrance that Tristam opened, and you'll meet three new enemies: the Roc, the Skeleton and the Sand Worm.
The Rocs are week against Shoot attacks. "Shoot attacks" are basically projectile attacks: bow and arrows or ninja stars. (Bombs don't count, as they are their own attack category.) They can also cast the Blind spell on you, which makes them fair game for the bombs if it's casted on Benjamin at this point. The Sand Worm is weak to axe attack, but it can slow you down in battle and make you slower with Sand Storm.
Also, if there's nothing but flying enemies on the battlefield, they'll all fly in mid-air. Otherwise, they won't.
The Skeletons are weak against Zombie attacks. These are basically the use of Cure to destroy an undead monster. I wouldn't recommend using spells against them, though, as there's a boss at the end of this dungeon. Be careful when facing them, as their Spooky Laugh can cause Confusion, which can cause one party member to attack the other. Thankfully, it wears off after the battle or if the person suffering from Confusion is hit with a physical attack.
Bone Dungeon - B2
The Gorgons are really easy to defeat, especially with Tristam's Ninja Stars. Be careful; they can Poison and Paralyze you. If you're Paralyzed, you cannot move, and your ally will have to heal you with a Heal Potion to get rid of it. Thankfully, Paralyze goes after a battle.
Your path will be blocked by a wall of ribcages. Use a bomb to open the crack in that wall, and watch it blow up real good! Yeah! Go right after this and you'll be able to max out on Ninja Stars for Tristam!
Why they spell it as "Minotar" when they got it right last time, I'll never know.
They have more HP than the Skeletons, and they can deal some damage, so using Cure on them to kill them is actually necessary this time.
You'll find some Seeds near the end. Keep coming back into the room and getting these, because you won't be seeing Seeds again for a while. These will replenish all your spell charges, so taking a bunch of these with you will definitely be helpful.
There will also be a red chest near the end as well. Opening it will give Benjamin the Quake spell.
When you enter the next room, you'll meet Flamerus Rex. He's holding the Earth Crystal for his own, and you'll have to beat him to free it!
Flamerus Rex
Strong against: Poison, Paralyze
Weak against: Zombie
The first thing you'll notice is that Tristam's Ninja Stars can't Paralyze or Poison Flamerus Rex.
You can use the Quake spell against him, but the Cure Spell works even better as the game considers Flamerus Rex an undead enemy. Life won't work, so don't even bother trying to insta-kill him.
Long story short: stick to your magic as well as Tristam's Ninja Stars, and keep your party alive!
When you beat him, you'll free the Earth Crystal and Tristam will finally get his treasure...a grappling hook! He'll give you the Elixir. Open the chests, especially the one on the right. The last one will give you the Sand Coin, which you'll need.
Tristam will give you the Elixir after you beat Flamerus Rex, and he'll leave you just before you exit out of the room. You'll definitely cross paths again!
You'll have to backtrack all the way to the beginning, but that's not too hard now that all of the monsters are gone. The conveyor belts of sand make it easier.
Cheat Sheet
Mad Plant
Weak Against: Axe
Poison Toad
Strong Against: Poison
Minotaur Zombie
Weak against: Zombie
Roc
Weak against: Shoot
Sand Worm
Weak against: Axe
Skeleton
Weak against: Zombie
No comments:
Post a Comment