Part nostalgia-bomb, part note-taking and part FAQ, what started in GameTrailers as a video game blog is now on Blogger. This blog is a look back at video games, both popular and obscure, from the video game industry's infancy all the way to the previous console generation.
North of the western part of the market is the freak show. When you use your ticket to go in, The Dog will have to be left behind. The Dog will chase after a cat, but somebody will grab The Dog and kidnap him for who knows what.
The Freak Show
After seeing Mr. Head, the Unigoat, and Mungola (or the lack thereof), you'll finally see the Pigpoodle...your dog in a pig mask. He'll run away, then he run around aimlessly outside before he unintentionally participates in a pig race...and wins. You become the guest of honor at the queen's banquet. You show up at the banquet hall...but the dog doesn't. Instead, The Dog is about to become the meal!
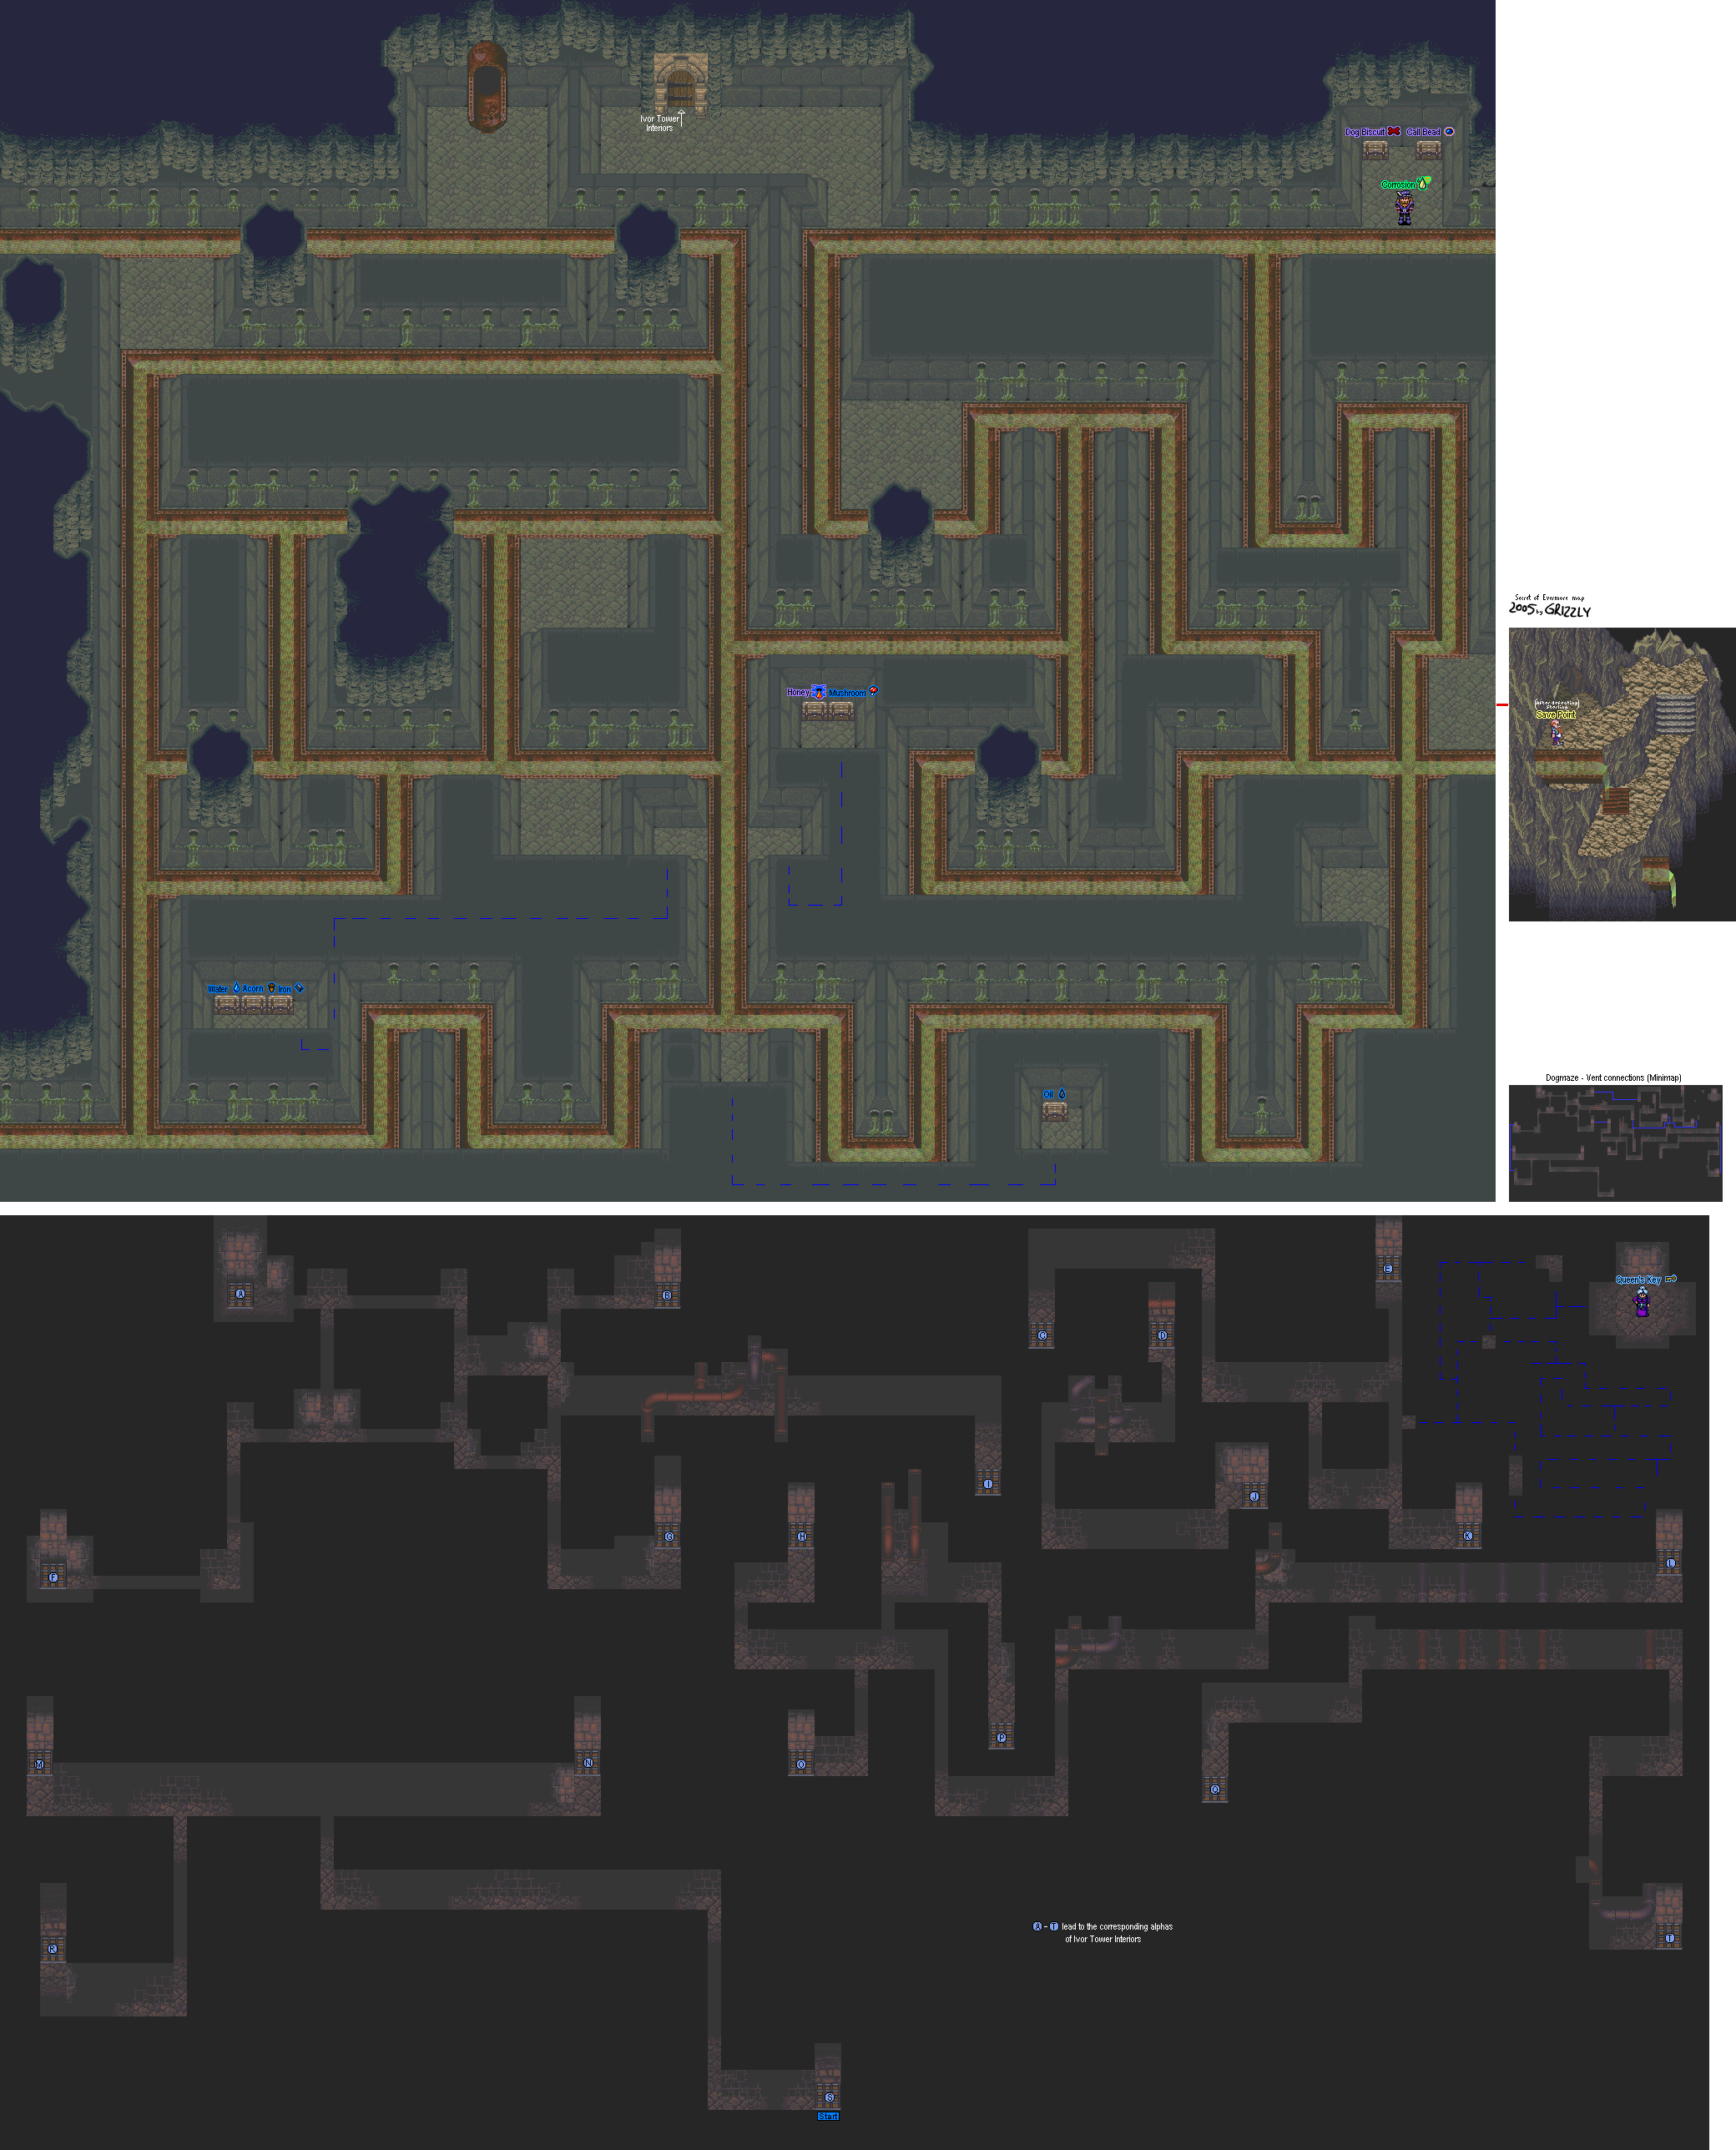
Thankfully, The Dog escapes into a ventilation shaft...but now you're in a maze. Now the game has you spending time with The Dog.
Also, if you forget the key, you can come back here. Just get close to the vents with The Dog when you're in the castle with both characters.
Wondering why you're lost? Turns out, there's a bookcase you can walk behind that leads to a hidden vent. It's not very far from the beginning. It'll be right here.
At the beginning of the maze, there is an alternate path leading to an hidden path inside the maze, and if you walk into the walls, you'll get a sound cue find it. From there, you'll have to feel your way north and west to find an old woman. If you talk to her, she will give The Dog the Queen's Key. From there, you can exit the maze. If you miss it here, you'll be able to get it later on; The Dog will automatically re-enter the ventilation maze when you go back to the exit when the game checks to see if you have the key and sees that you don't have it.. Once you get the key, however, you won't be able to enter the maze ever again.
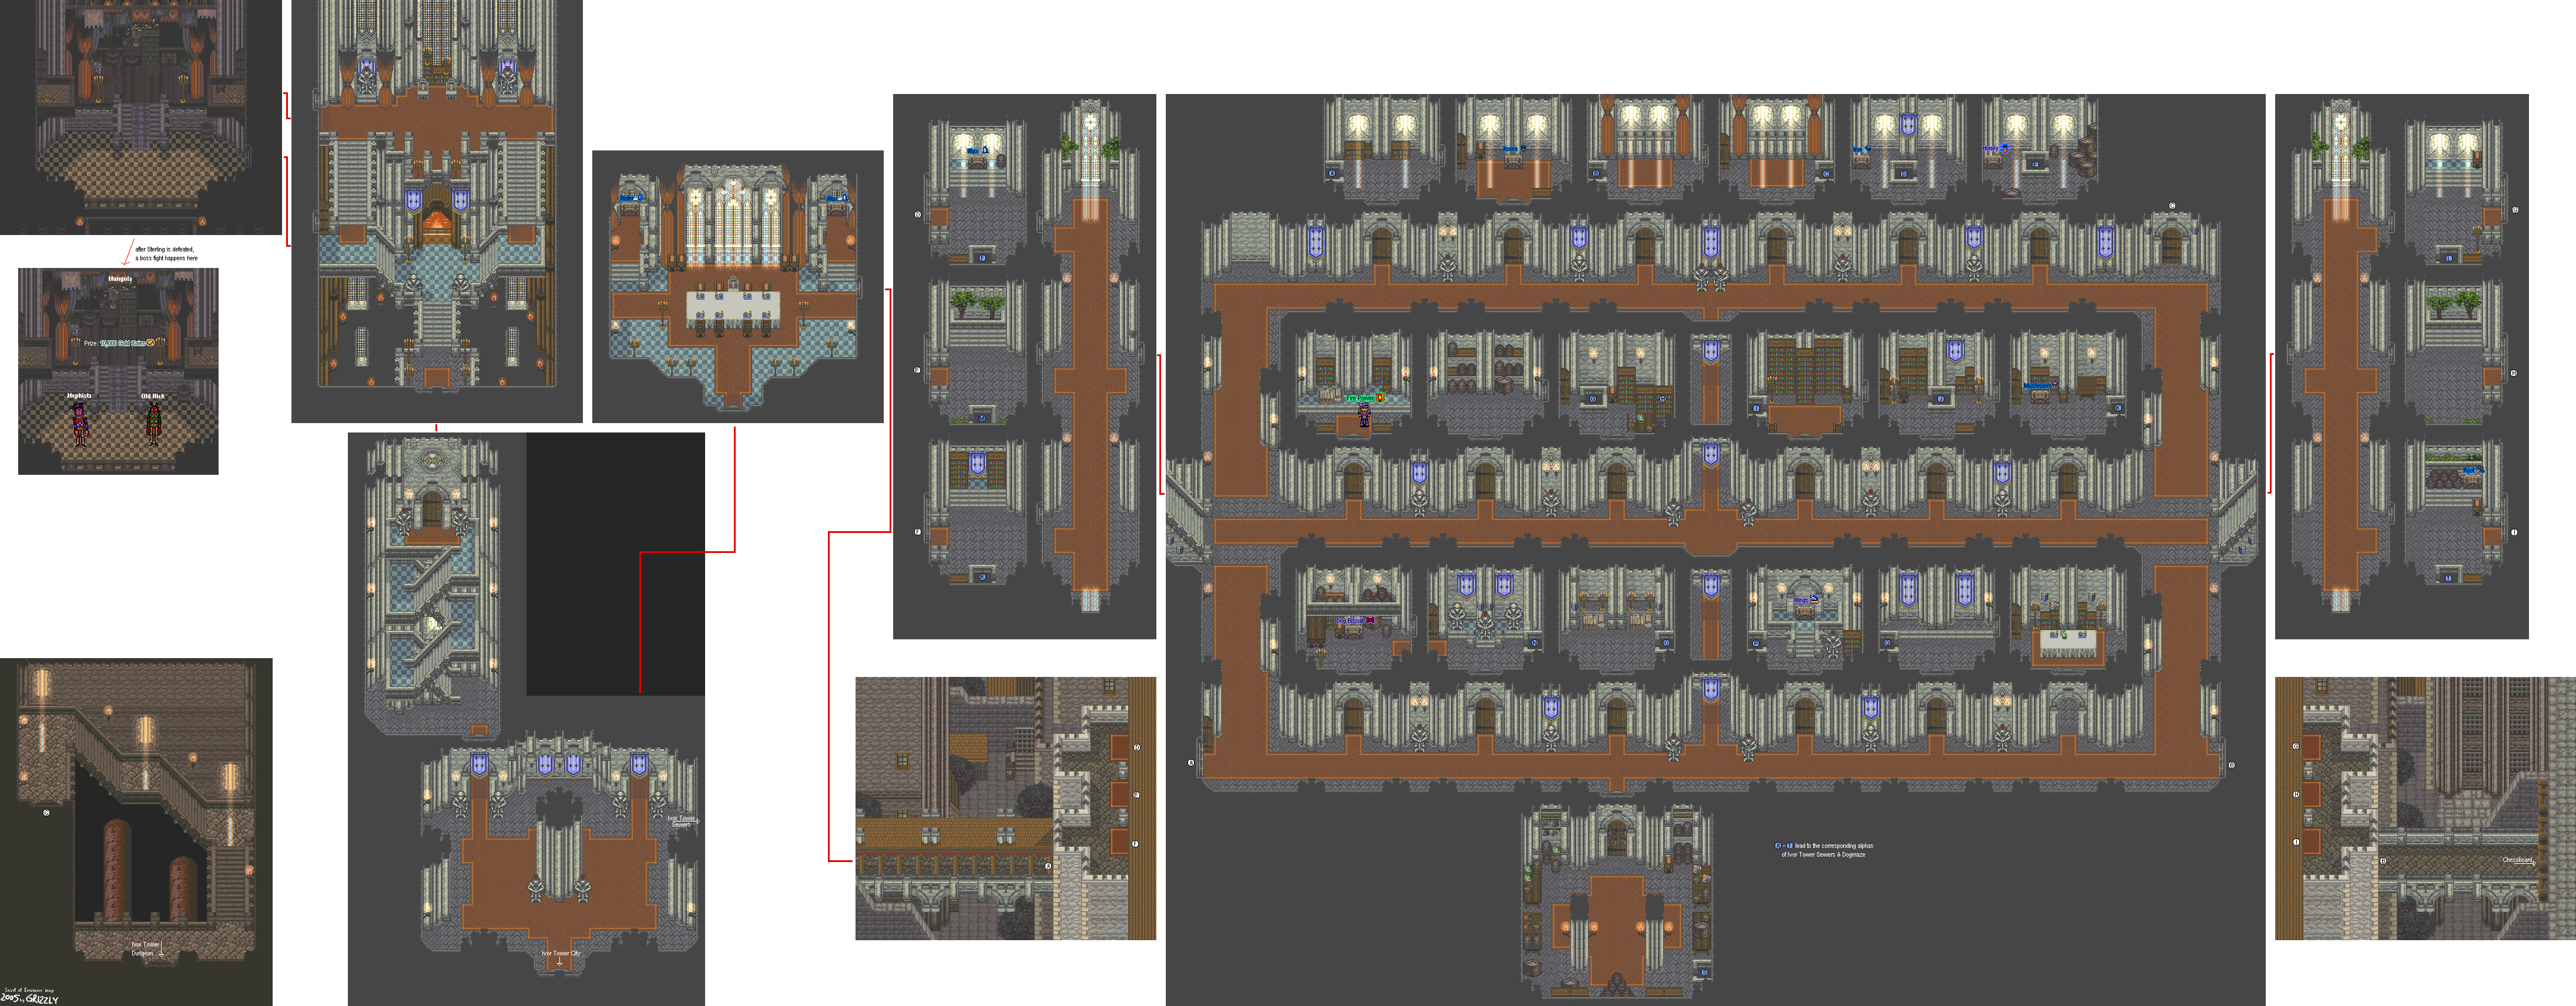
When you're out of the maze, the dog will crash the dinner, and you and The Dog will both be sent to the dungeon.
As soon as you go west, you'll meet up with more of those Blue Goos as well as hedgehogs in knight helmets called Hedgadillos. I want one.
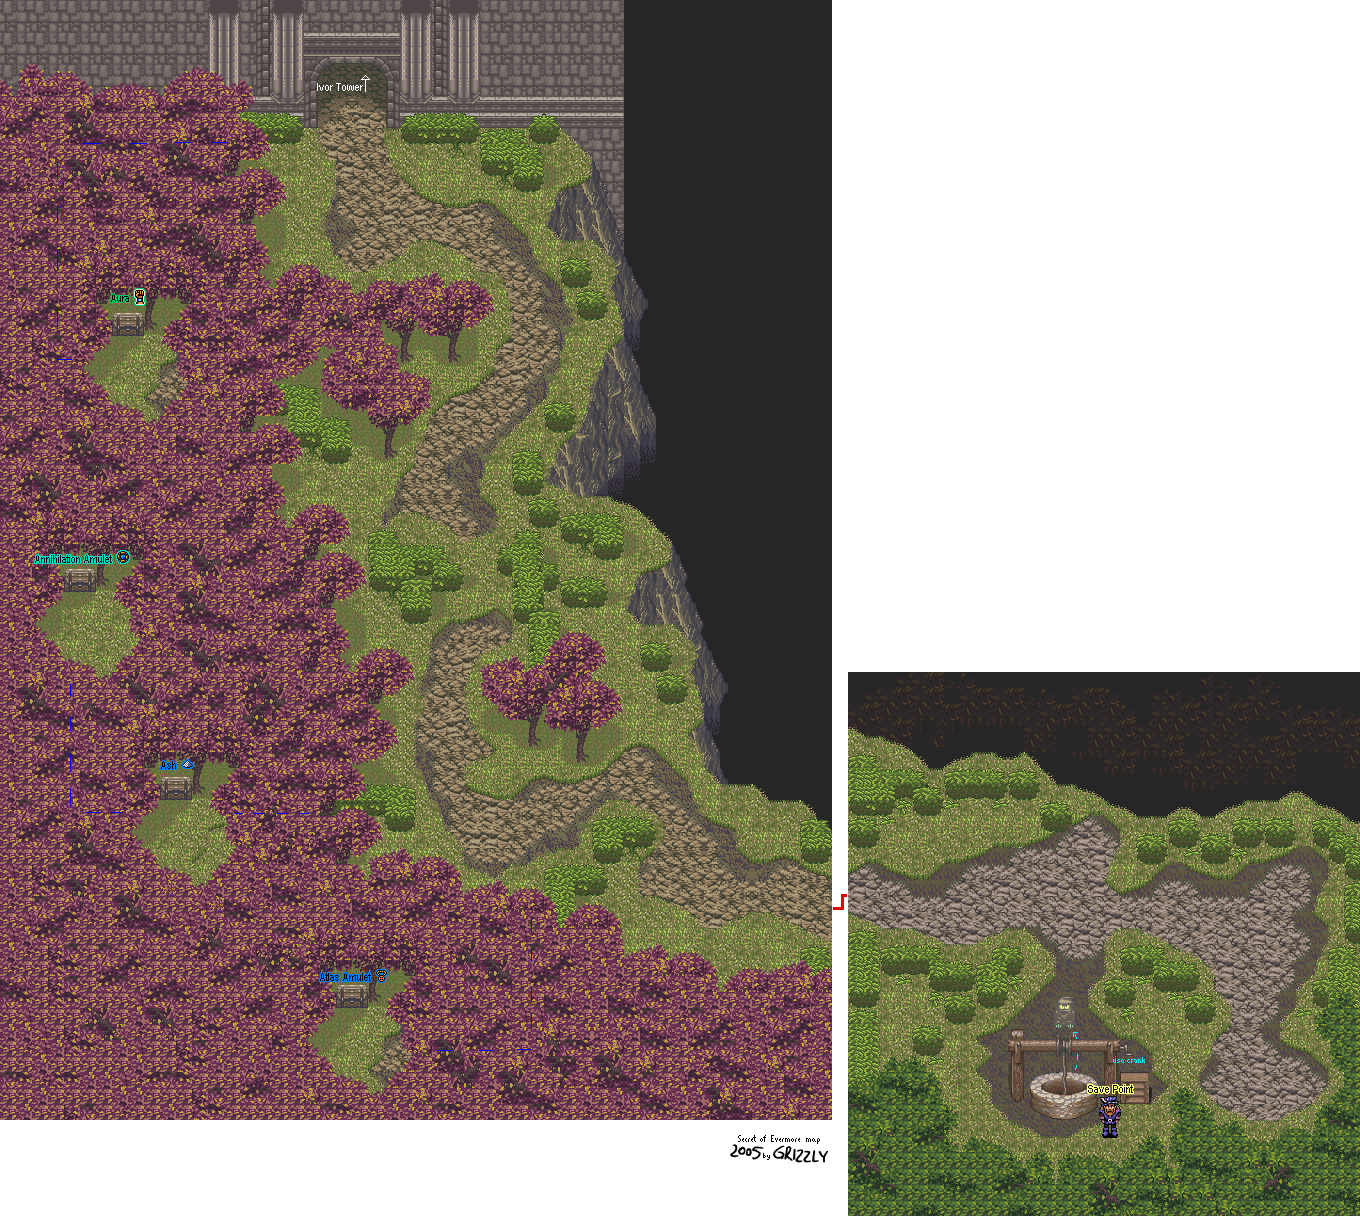
Search the trees lining the path in this section, and you'll find some hidden nooks where you can find some wooden chests. One of them has the Aura spell, which you can use if you have Call Beads and check out Horace's abilities. Aura protects you from all damage for 45 seconds.
One Amulet of Annihilation (one for the ticket to Percival Plank's Exhibition)
Golden Jackal (for the Oracle Bone)
Jeweled Scarab (for the Oracle Bone)
3 Perfumes and 3 Beads (for the the Insect Incense)
If you missed out on the Chocobo Egg, you can buy it for 9 Perfumes and 9 Beads. If you missed on the Thug's Cloak, you could get it for 8 Perfumes and 6 Beads; however, you can get it for free later unless you missed out on the Wizard's Coin in Crustacia.
Thankfully, the path isn't long.
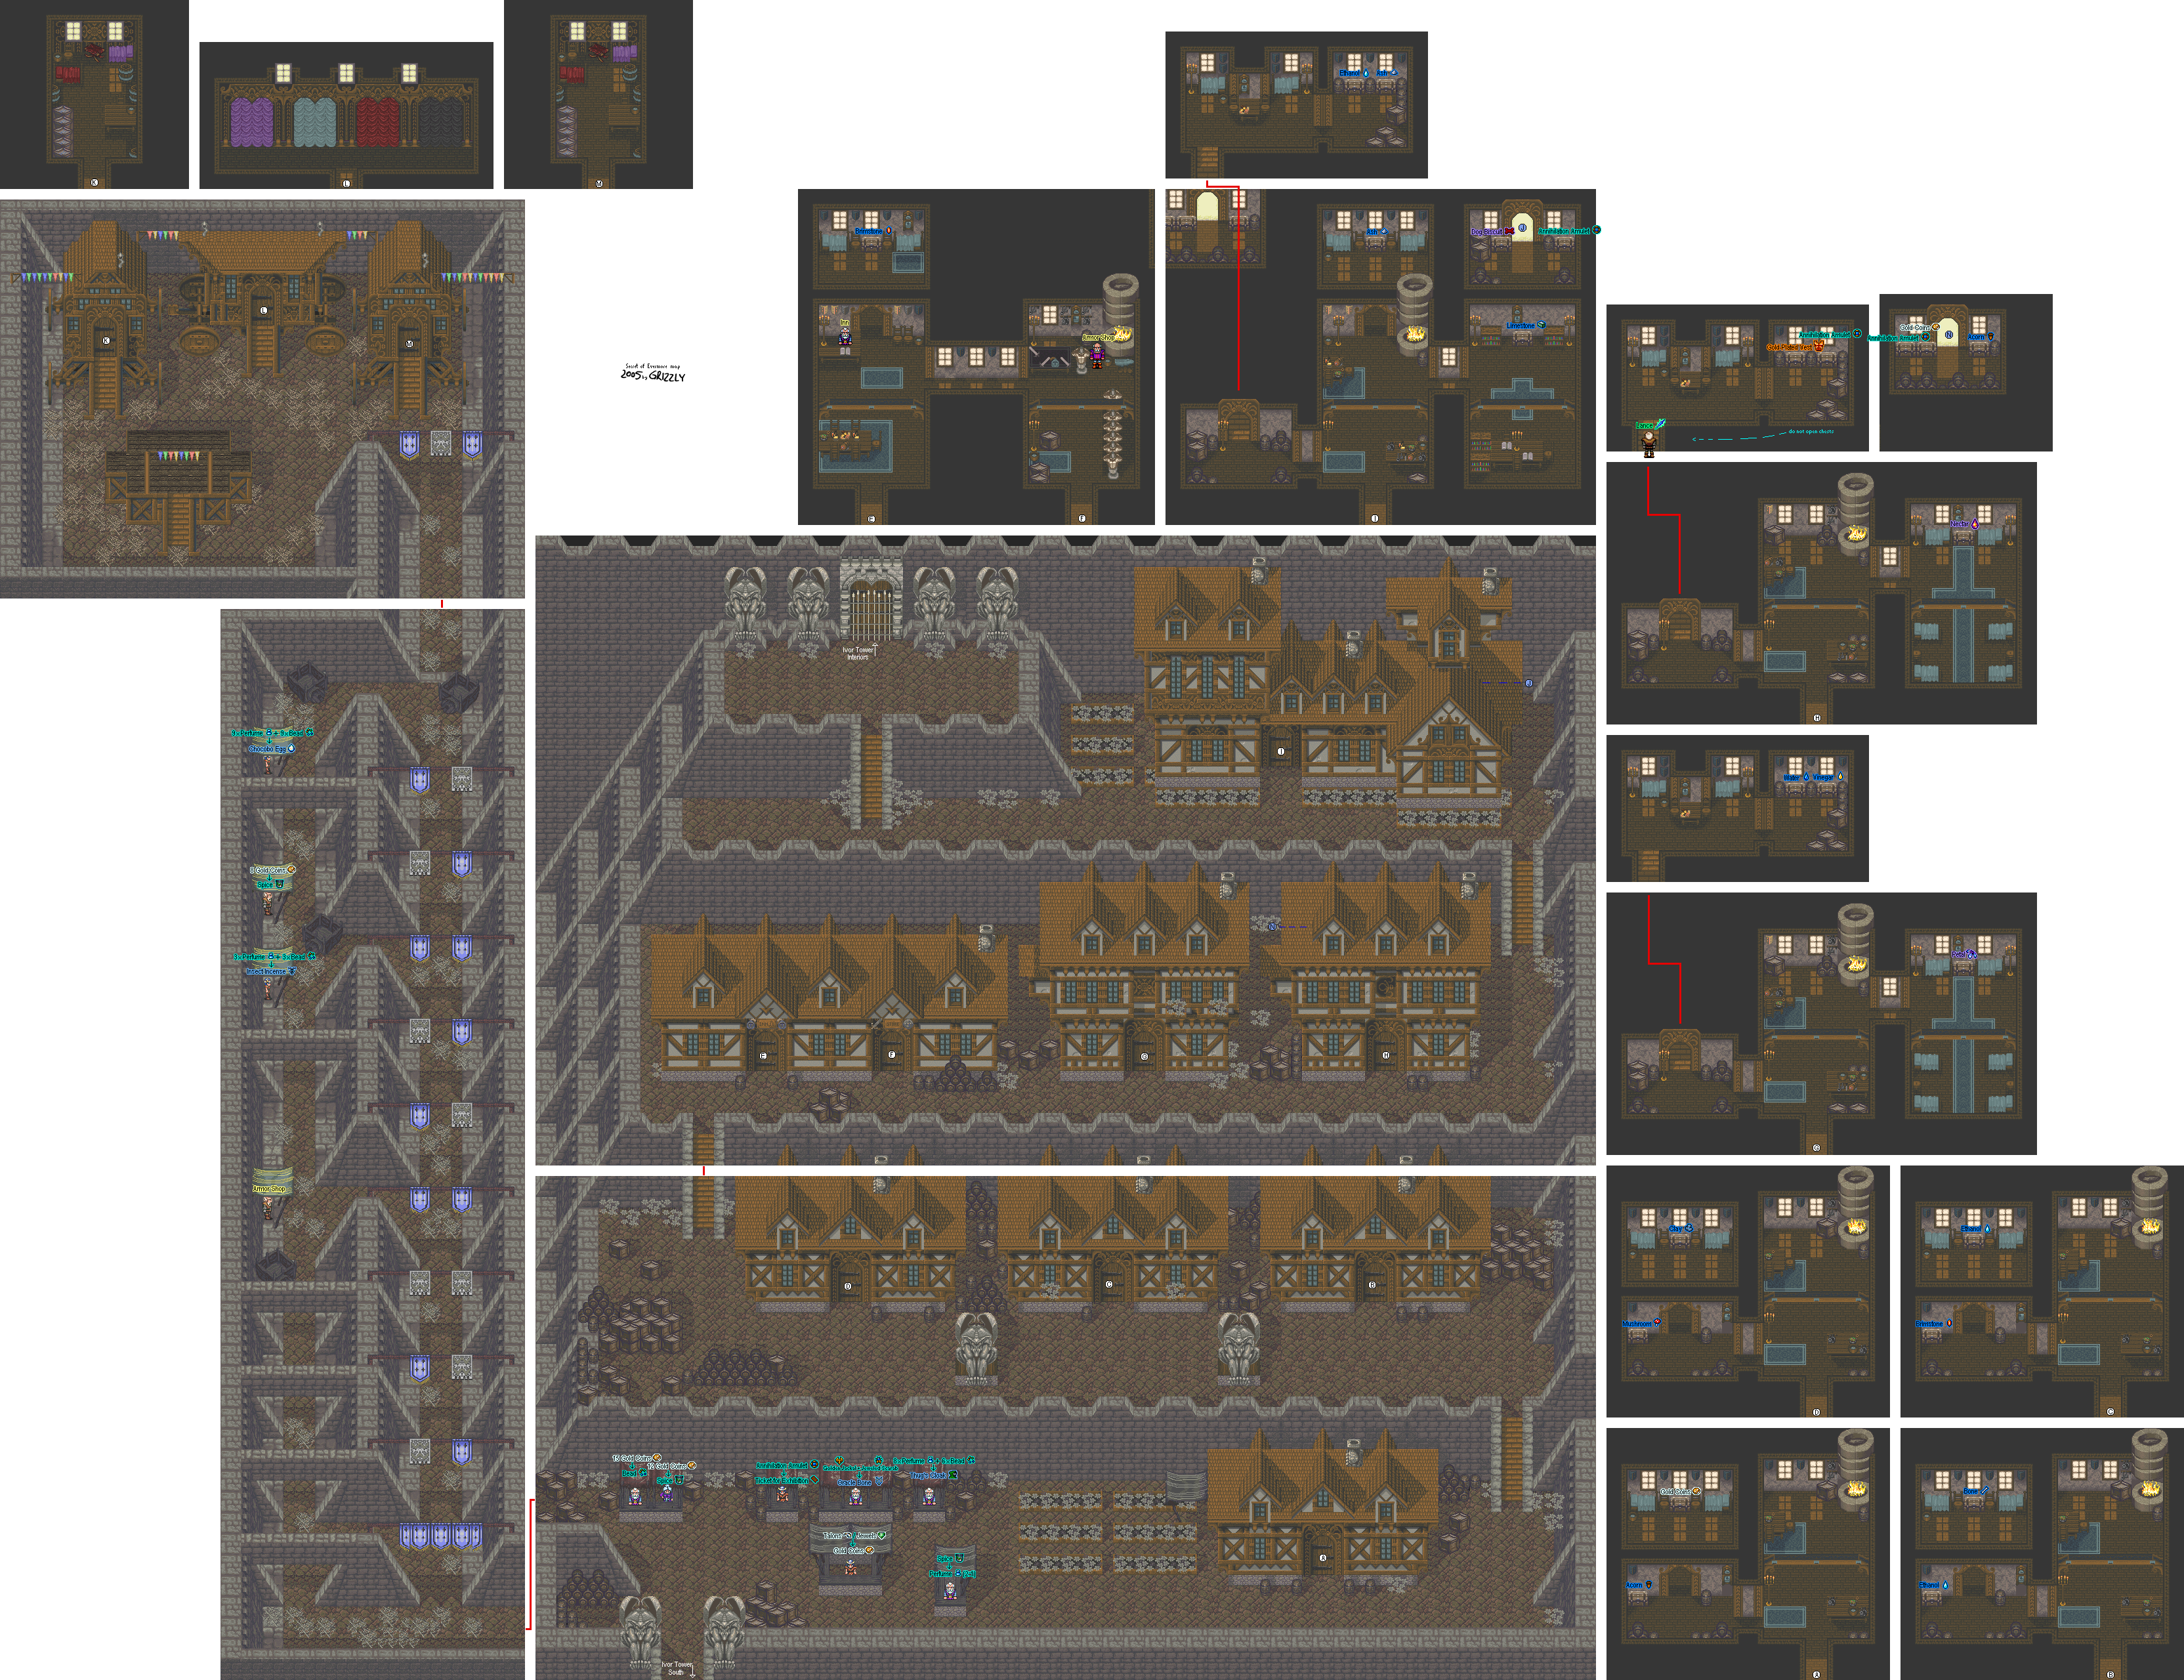
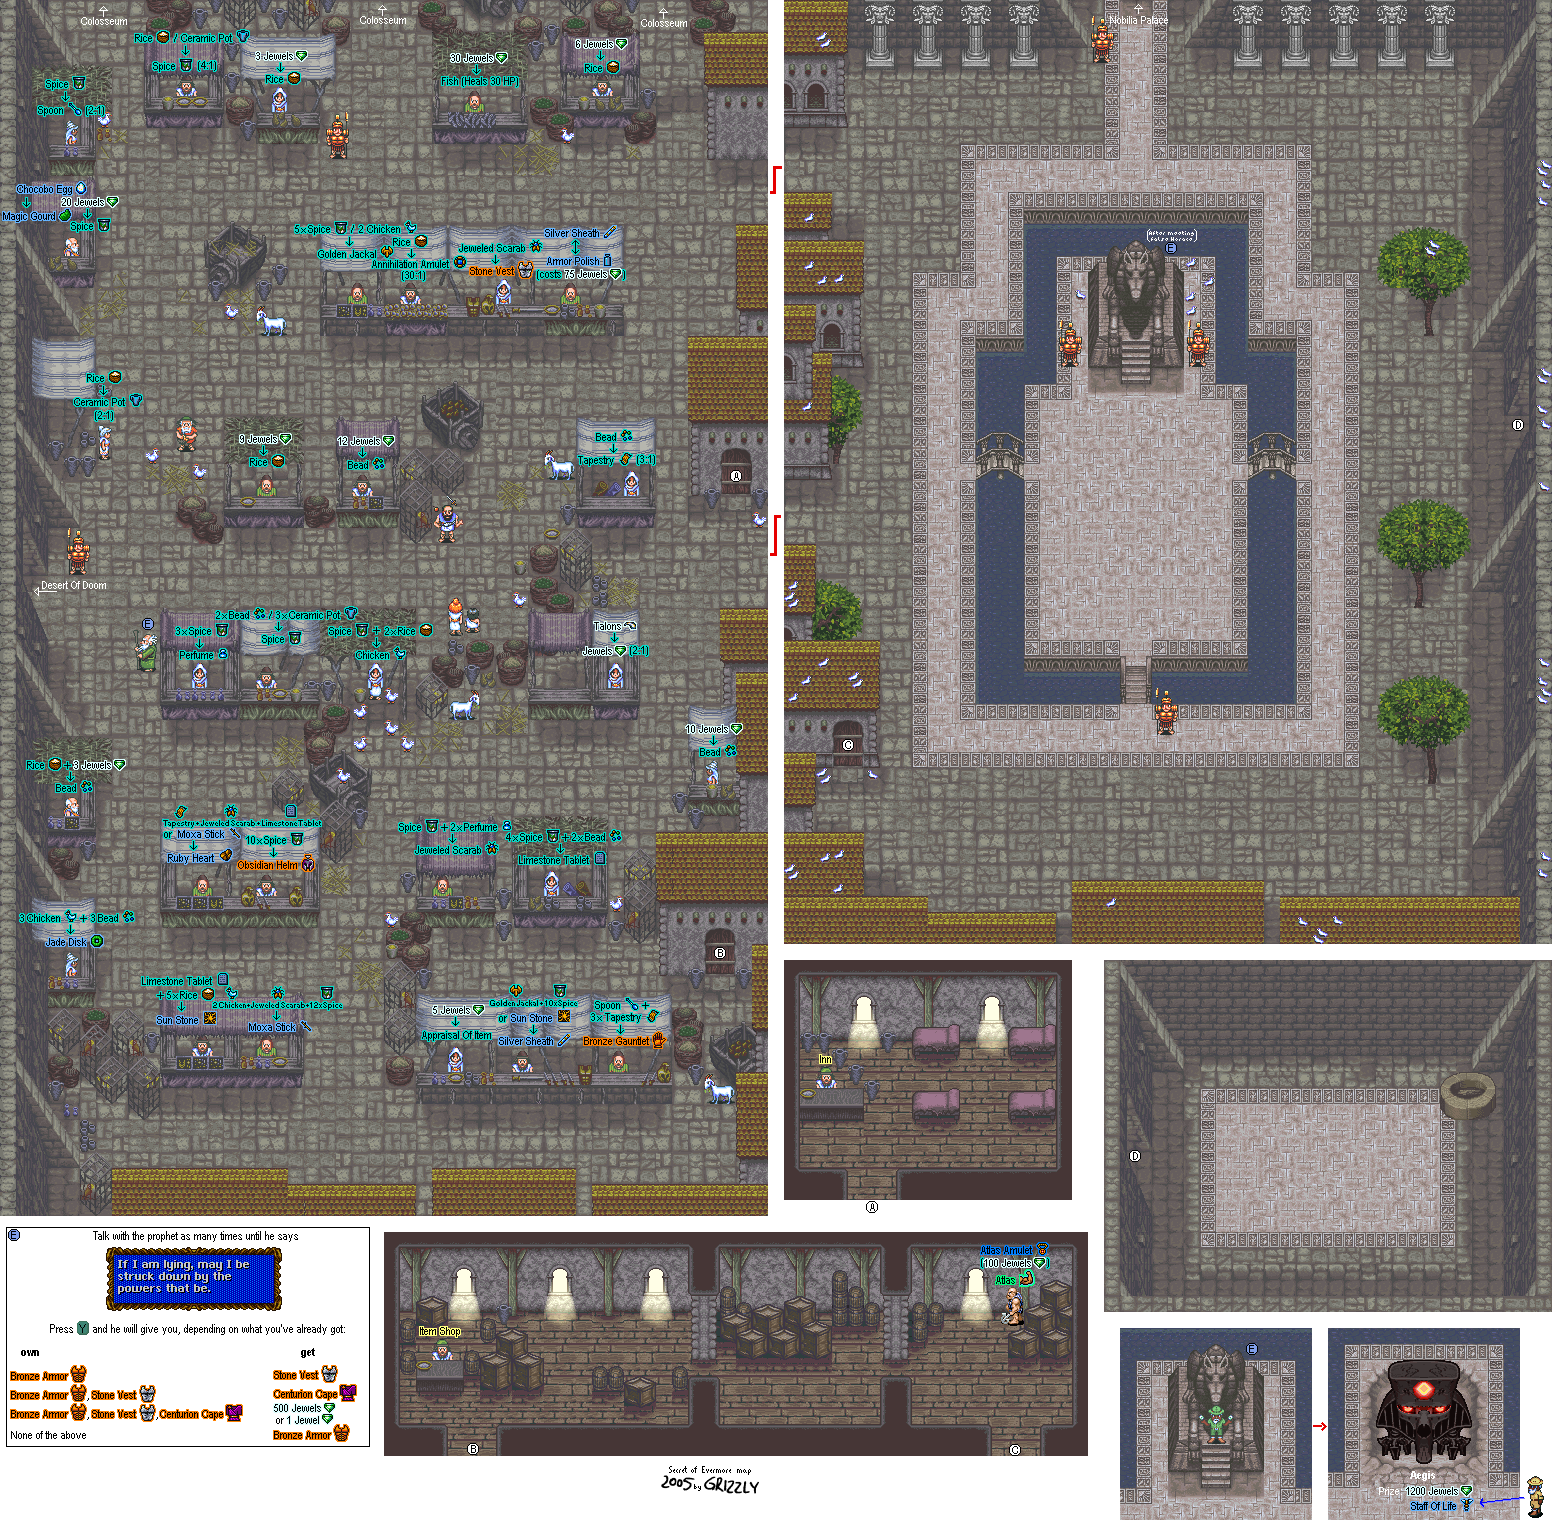
The first thing you'll notice is all the storefronts north of the entrance. This is a market that is somewhat like what you saw in Nobilia. One of the booths sells tickets to Percival Plank's Exhibition of Oddities, the freak show in town, and tickets cost one Amulet of Annihilation. You'll need the ticket in order to continue on with the game, so get that first!
You'll also notice you'll have to get some new currency...again. In Gothica, the local currency is Gold Coins, so be prepared to exchange your Jewels for Gold Coins. You can also buy the Oracle Bone for a Jeweled Scarab and a Golden Jackal. Buy it, because you're going to need the Oracle Bone later.
There are also booths west of the entrance. One of them gives you a second chance to buy back the charms you got rid of earlier, so you should definitely not pass that up. There is also an armor dealer here. If you have the money and at least two Amulets of Annihilation to throw around, get the armor here. You definitely won't regret it! Be sure to buy the Dragon Helm and the Magician's Ring; the Gold-Plated Vest can be found in
If you look behind the houses, you'll find hidden entrances to parts of houses you usually wouldn't be able to access normally. You'll be able to find three Amulets of Annihilation this way, so make good use of it.
One of the houses belongs to the alchemist known as Lance. You'll find out which one it is by entering houses and talking to people. When you're in it, go inside and look around, but [b]don't...touch...anything![/b] When you leave, Lance will come up the stairs and ask you what you're doing. Because you didn't take anything, he'll give you a new spell that is really, really awesome: Lance.
Lance
1 Iron, 1 Acorn
Replace Crush with Lance; you won't be finding any limestone here. Also, you can now open the chests in Lance's room; one of them will have the Gold-Plated Vest.
Oh, and don't ask how that gourd disappeared in the footage at the end. I have no clue.
We finally go into the caverns that have been revealed near the pyramid in an attempt to find our way home. We end up finding more questions than answers.
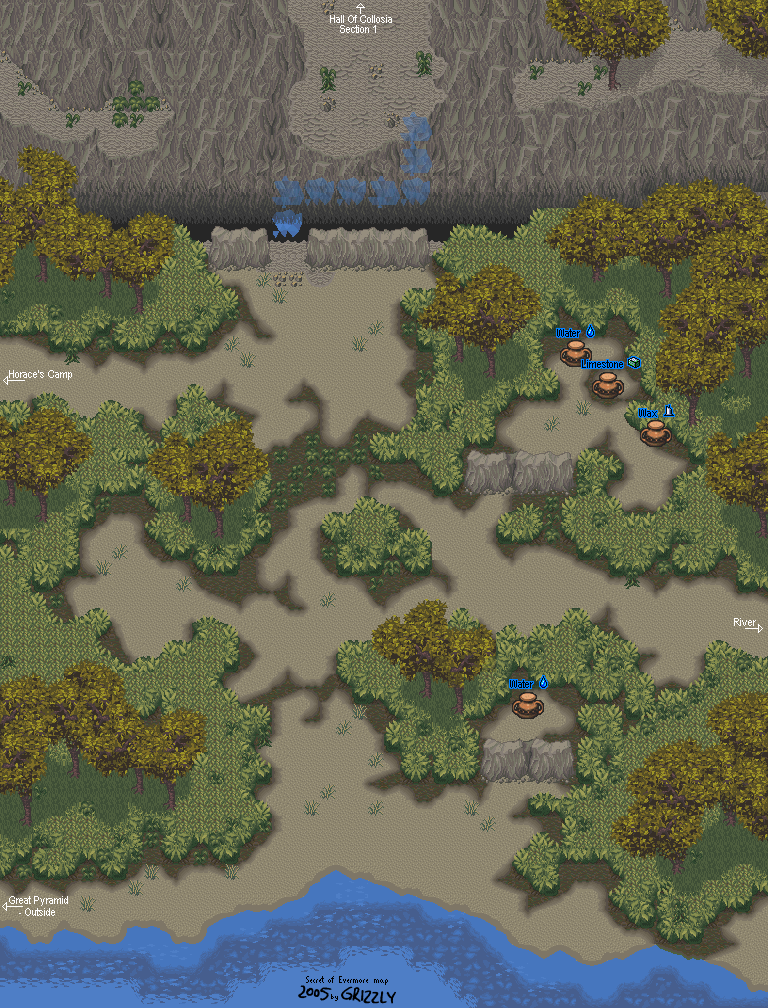
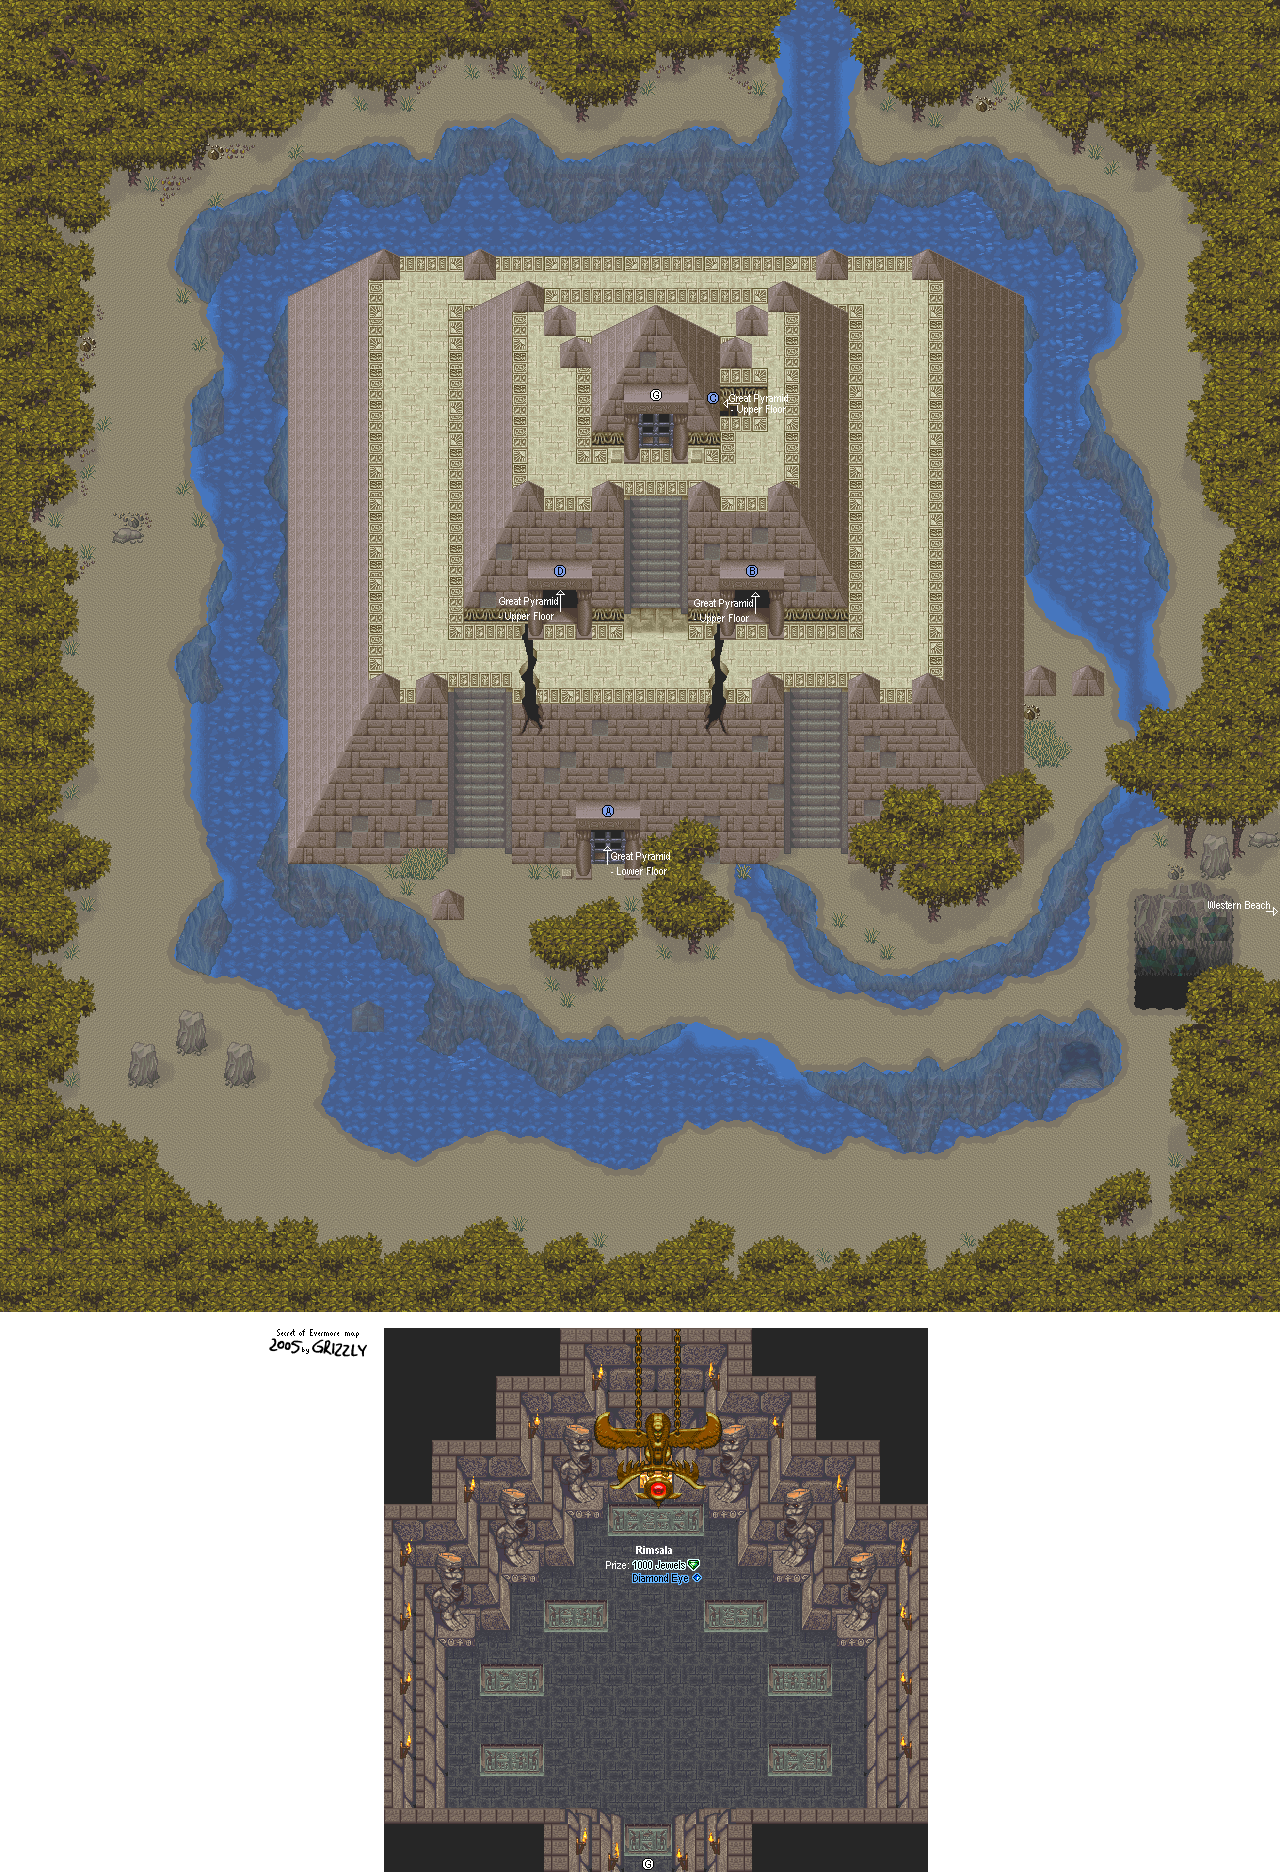
If you head south now that the area around the pyramid has dried up, you'll be able to walk around in the lower level around the pyramid, which will now be crawling with enemies. There is a cave near where the pit is, but you won't be able to do much there until later in the game.
Head north from Horace's Camp inside the river bed, follow the path and then walk off the edge of the cliff. You'll end up in an underground maze.
Throughout the maze, you'll face the Oglins. These green guys in cloaks are pretty fast and will attack you with spears, and they can be pretty powerful and absolutely destroy you if you're not careful.
Boss: Aquagoth
Oh, lord, this guy can be such a pain in the ass.
Avoid the tentacles (good luck watching out for those, there's a ton of them) and let the Dog go after them (The Dog can't hit Aquagoth), and hit Aquagoth himself with The Boy. Crush will work well here, as will Fireball if you've leveled it up enough.
Also, watch out for the shiny, electric sparks running through the floor. You can't destroy them and they will damage you.
Aquagoth can cast Lightning Storm, but if you're strong enough, it won't be too much of a pain. It can still be annoying, though, so keep your health high as always.
Sometimes, an Oglin will join the fight. Let The Dog go after it.
When you beat Aquagoth, you'll get 5000 Jewels and some Honey. As I mentioned earlier, the Honey refills all your HP (like the Royal Jelly in [i]Secret of Mana[/i]), so keep that stuff handy! A man will then talk to you through the ceiling, asking you to get in the bucket. He'll pull The Boy out through the bucket first. When he pulls The Dog out afterwards, you'll find out he's changed. Again. This time, he's a pink poodle, complete with his own animation where he stands on his hind legs.
He tells you that the Aquagoth was the source of the well drying up, and that you're now south of Ivor Tower, the queen's new castle. Welcome to Gothica. The man at the well will also let you save your game. Do it.
By the way, if you play with the crank to the well, an Oglin will pop out. You'll need this to get a certain spell later in the game
Believe it or not, there is a secret warp in the Desert of Doom. Go to the rock-skull cluster, then go to the large rock just north of it. Go a little north and a little east to find another rock formation. Walk between the two rocks here and you'll warp straight to Nobilia in seconds.
If you keep pressing A on the chickens, you'll eventually get told not to taunt the chickens by a mysterious voice and your HP will be reduced to one. If you keep doing this, you'll get a message saying you were warned, and your HP will be back to one again. If you keep doing it, you'll eventually get killed by the game, but if you talk to the woman selling the chickens after the second message, she'll call you a low-down chicken taunter if you try to buy chickens from her. Yes, the game actually does this.
The booths in the northwest are the best place to start, as you can buy Rice for three Jewels a bag. This is the cheapest place to get Rice, and from there, you can go to the left to trade the Rice for Spice.
One of the booths in the northwest allows you to trade the Chocobo Egg for the Magic Gourd. Don't do it; the Gourd does nothing due to either not being programmed to do anything or due to bugged programming. Besides, you can get this useless item by other means, anyway.
Near the northwest corner, you can buy pots. If you keep buying pots, you may randomly find a random amount of Jewels.
The fish booth lets you buy fish and heal 30 HP for 30 Jewels. It's only useful if you don't have anything to spend Jewels on.
At the Amulet of Annihilation booth, you can haggle the price down, but if you go for the three Amulets for a bag of rice, the guy running the booth will never sell Amulets to you again.
The cheapest you can get Beads is a bag of Rice at three Jewels each; that booth is near the perfume booth on the west side.
At the south central area of the market, you can find the appraiser, where you can sell your goods for jewels, including your Rice and Spice. Appraisals are five Jewels each, so you'll have to bring as many goods as possible per appraisal. Once you have all the goods you need to sell, you can sell them here, then go back to the northwest corner and get your Rice and Spice and trade for stuff again. It is possible to make a lot of money off the marketplace when you know what to do and what to trade for.
Now that you have the Bronze Axe, you can break the rocks that are blocking the jars in this area.
Before you head back to the Right Bank, you'll meet Horace...except he's wearing green. He'll ask for the Diamond Eyes and pay you back with an evil laugh. He'll send two Rogues after you, but they're nothing.
When you beat them, you'll earn 100 Jewels. Yes, you beat up two Rogues out of a million that we've already fought before. We can tell you're proud.
That Bronze Axe will also work on the rock wall blocking the cave on the east side of the Right Bank area. Break the wall with the Bronze Axe, then go inside and you'll meet an Alchemist. He'll give you the Drain formula, which works like the HP Absorb spell in Secret of Mana - it drains the enemy's HP and transfers it to you.
Drain
1 Ethanol, 2 Roots
From here, head back to Nobilia. If you need alchemy ingredients, talk to both the alchemist that gives you Drain as well as Blimp again. You have yet another boss battle coming up. Hope you can get lots of Ethanol and Roots...levelling up Drain for this battle can be helpful.
When you return to Nobilia, you'll find out that the marketplace is empty. Head down to the Town Square and you'll instantly walk up to the Sacred Dog. The fake Horace will place the Diamond Eyes in the Sacred Dog, and you'll have to fight the monster underneath it that's been waiting to be revived after all this time...Aegis.
Boss: Aegis
Aegis sends out three creatures - Bad Dawgs (evil clones of your dog from Prehistoria), Will-o-the-Wisps, and Skullclaws. The Will-o-the-Wisps are exactly like the ones from the Salabog battle from earlier in the game, and the Bad Dawgs move as slowly as your dog and just have the Dog Attack. The Skullclaws are the worst enemy of the three, since they are basically more powerful versions of the Bone Buzzards.
Whenever Aegis has a medallon on its head, it will create the three monsters. The skull and moon medallion produces the Bad Dawgs, the dog medallion produces Skullclaws and the sun medallion produces the Will-o-the-Wisps.
Surprisingly, Aegis is pretty easy. Aegis can cast spells, but that doesn't seem to happen very often.
If you try to leave the area around Aegis, the bridges will explode and knock you back.
When you take him down, you'll get 1200 Jewels.
Town Square
When you defeat Aegis, he'll leave some sort of power core behind. The real Horace Highwater shows up and summons Tiny to throw it somewhere...which he does with relative ease. It will explode north of the camp, emptying the river that flows near the Pyramid and exposing a hidden tunnel. Horace asks you to explore this tunnel as it may be your only hope of returning to Podunk.
If you have five or more Call Beads in your inventory, Horace will also give you the Staff of Life. It increases your ability to defend against enemy attacks.
At this point, Madronius will not be at the camp, as he shows up to mention the tunnel near the Pyramid before leaving.
Now that you can trade in the marketplace again, it is possible to get a Chocobo Egg randomly from buying pots instead of getting just 10 Jewels. Chances are pretty low, though, but if you keep trying, you can eventually do it.
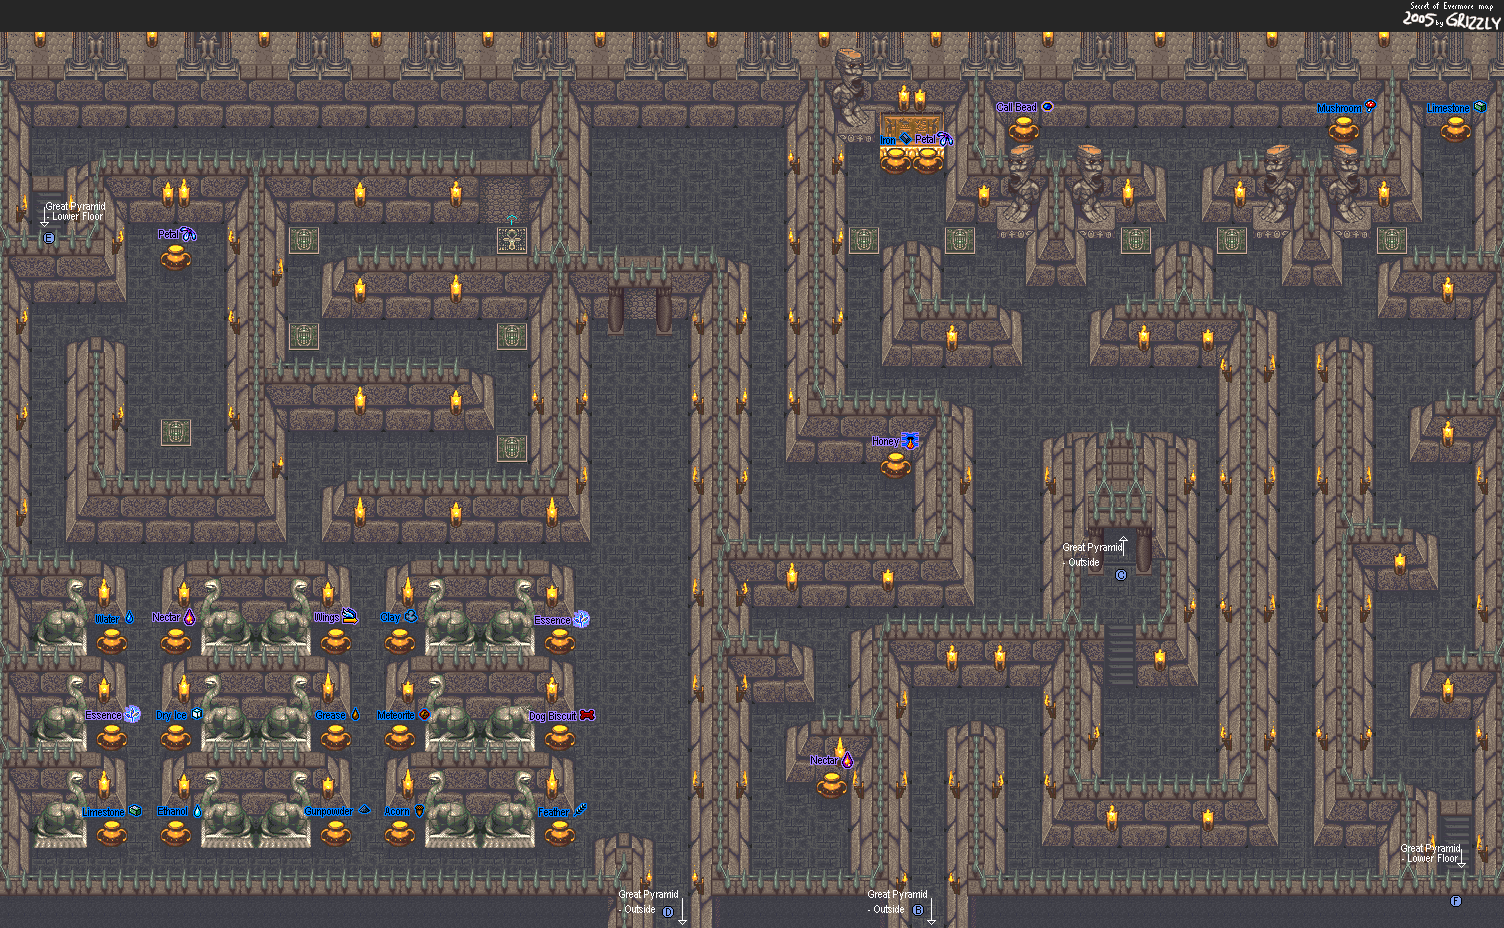
There is a palace north of the new crater where the Sacred Dog statue used to be. The gate will not be open, but you can find ingredients there. The middle stone cobra on the left gives you water, meteorites, dry ice and more water, but you have to talk to it many, many times before it gives you everything, and that takes a while.
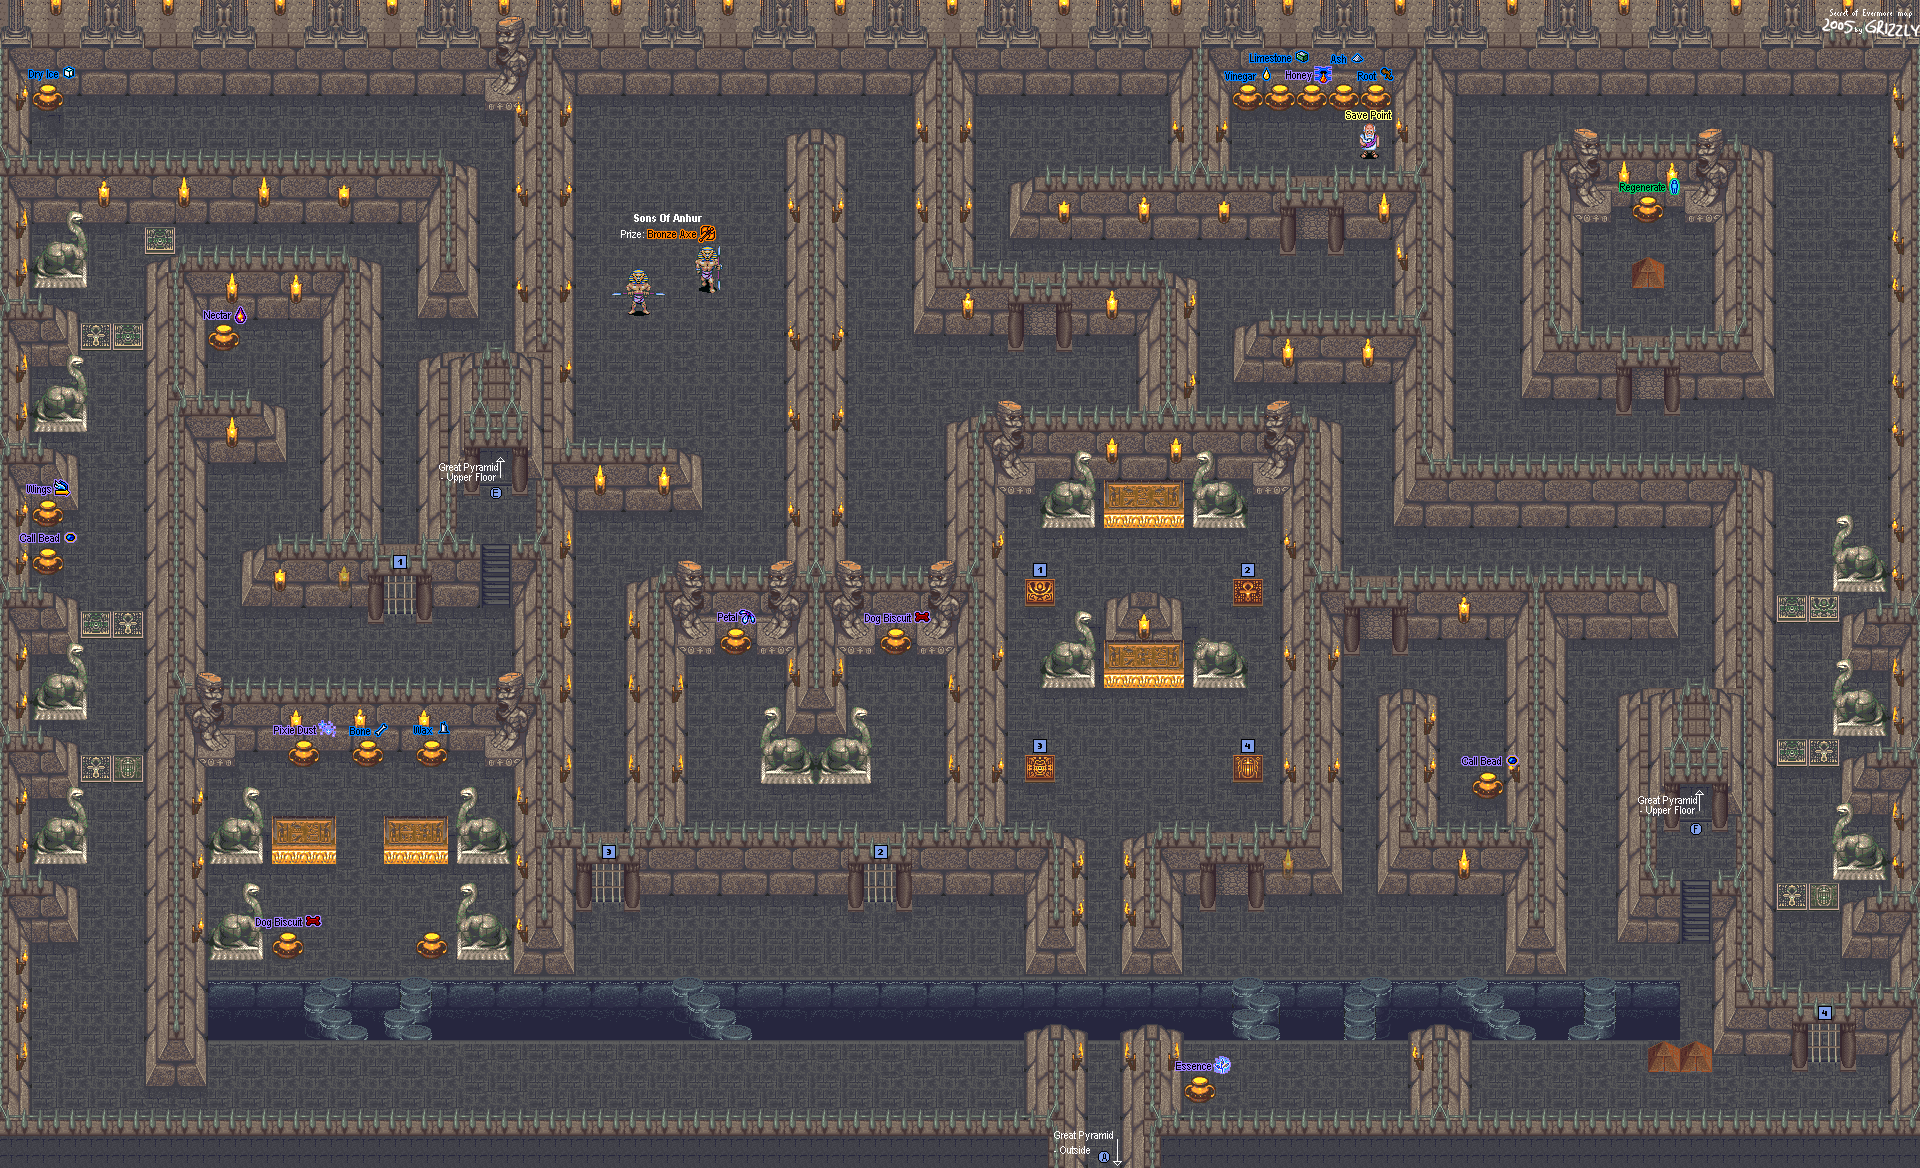
Open the door to the lower level by placing The Boy on the switch. Switch to The Dog and go in, then press A to jump over the water. There are four switches in this room, and you'll have to press all of them as The Dog to get The Boy around the pyramid so that you can re-unite with The Dog and ultimate get the Diamond Eye that is here.
Go back to the jar room at the top of the pyramid, then go north and step on the ankh plate. You'll be able to go down to the lower level.
Once you go down the stairs to the lower level, you'll find yourself with some more choices to make. You'll be near the switch room, but you won't be able to free The Dog yet. Instead, take down all the enemies, then switch to The Dog. The upper-right switch on the floor should open the door nearby. You'll eventually enter a hallway full of Stone Cobras. The first Stone Cobra will come to life no matter what. Be sure to stand on the Ankh symbols for the first two. Otherwise, the Stone Cobras will come to life...and they hurt like hell, with the ability to take down a good fraction of your HP in addition to Poisoning you.
At the southwest corner of the lower level, take care on the bridges, as the spot to the north with the jars can only be accessed once. One of the jars contains absolutely nothing and cannot be opened, and triggers a Stone Cobra. Once you leave this area, you can't return.
Go further to the east and take the bridge. Move The Dog to the upper-right switch and go through the door that opens, and take the stuff you find in the jars. From there, leave the room and move The Dog to the lower-left switch. Go through the door that opens. Follow the path, and you'll face the Sons of Anhur, who are more powerful than the Sons of Sett and can cast Storm. Hit them with Level 3 Bronze Spear shots. You'll get the Bronze Axe, which can break some walls in the Pyramid that look like doorways that cannot be opened. One of them leads to a couple of jars as well as an old man who can save your progress.
At the southeast corner of the lower levels, there is another Stone Cobras hallway. It is possible to end up here first if you don't take the "ingredients of the future room" path, and if that happens, you'll have to change how you get around the Pyramid accordingly. Have The Dog stand on the lower-right stand. Be sure to stand on the Ankh symbols for the first two, and the right symbol for the last one, in order to get through unscathed.
You can get a Call Bead in a jar around here, and since you can break those stone walls down, you can get everything around here. One of the walls you can break contains a jar that holds Horace's Regenerate Magic, which allows you to revive either character when you select a Call Bead, choose Horace and go through his list of spells. If you accidentally missed Horace's Call Bead spells (which is possible), you won't be able to open this. There's another hidden spell that he has, but we won't have to worry about it just yet. Don't worry, it's not in Antiqua.
Once you've found everything you need, break the wall with the Bronze Axe near The Dog to reunite with The Dog. When you take the nearby bridges, they will collapse, and you'll never be able to explore the lower level again. You'll have no choice but to go back to the upper level and make your way to the roof.
From here, you'll have to have The Boy stand on one switch next to the nearby door and have The Dog stand on the other. You'll open the door and take on Rimsala.
Boss: Eye Of Rimsala
Take care of the statues. They cast Flash, but they usually target it at The Dog. Nevertheless, they're annoying. Get rid of them.
As for the Eye of Rimsala, take it down with leveled-up Bronze Spear attacks and the Crush spell. If you've leveled up Fireball, this spell will also work wonders. Just don't let the Eye get near you or The Dog.
The best way to take care of the Eye of Rimsala is to get it on screen, target it with Crush, then keep hitting it with spells. If it returns to the gold statue, Level 3 Dog Attacks and Level 3 Bronze Spear attacks can deal a good amount of damage, if you can keep The Dog alive.
When you beat Rimsala, you'll get 1000 Jewels and the other Diamond Eye. You'll also leave the Pyramid and end up near the entrance at the bottom. There's nothing else to do here, so drop down the pit leading to the Pyramid as a shortcut to Horace's Camp. When you talk to Madronius, he will tell you that Horace is gone and that you may find him on the west bank of the river. Head west back to the nearby forest.