In this episode, we finally take down the last of the Mavericks. It's on to the X-Hunter Stages!
Wheel Gator
You will need the X-Buster upgrade for this.
Head back to where the Heart Tank is. It's that spiked wall to the left of the top of a ladder shortly after the beginning. Jump to the platform to the right, then charge up your newly-acquired Speed Burner and leap to the left before releasing Y. If you do it right, you'll rocket all the way to the Heart and get over the spikes to acquire the Heart Tank.
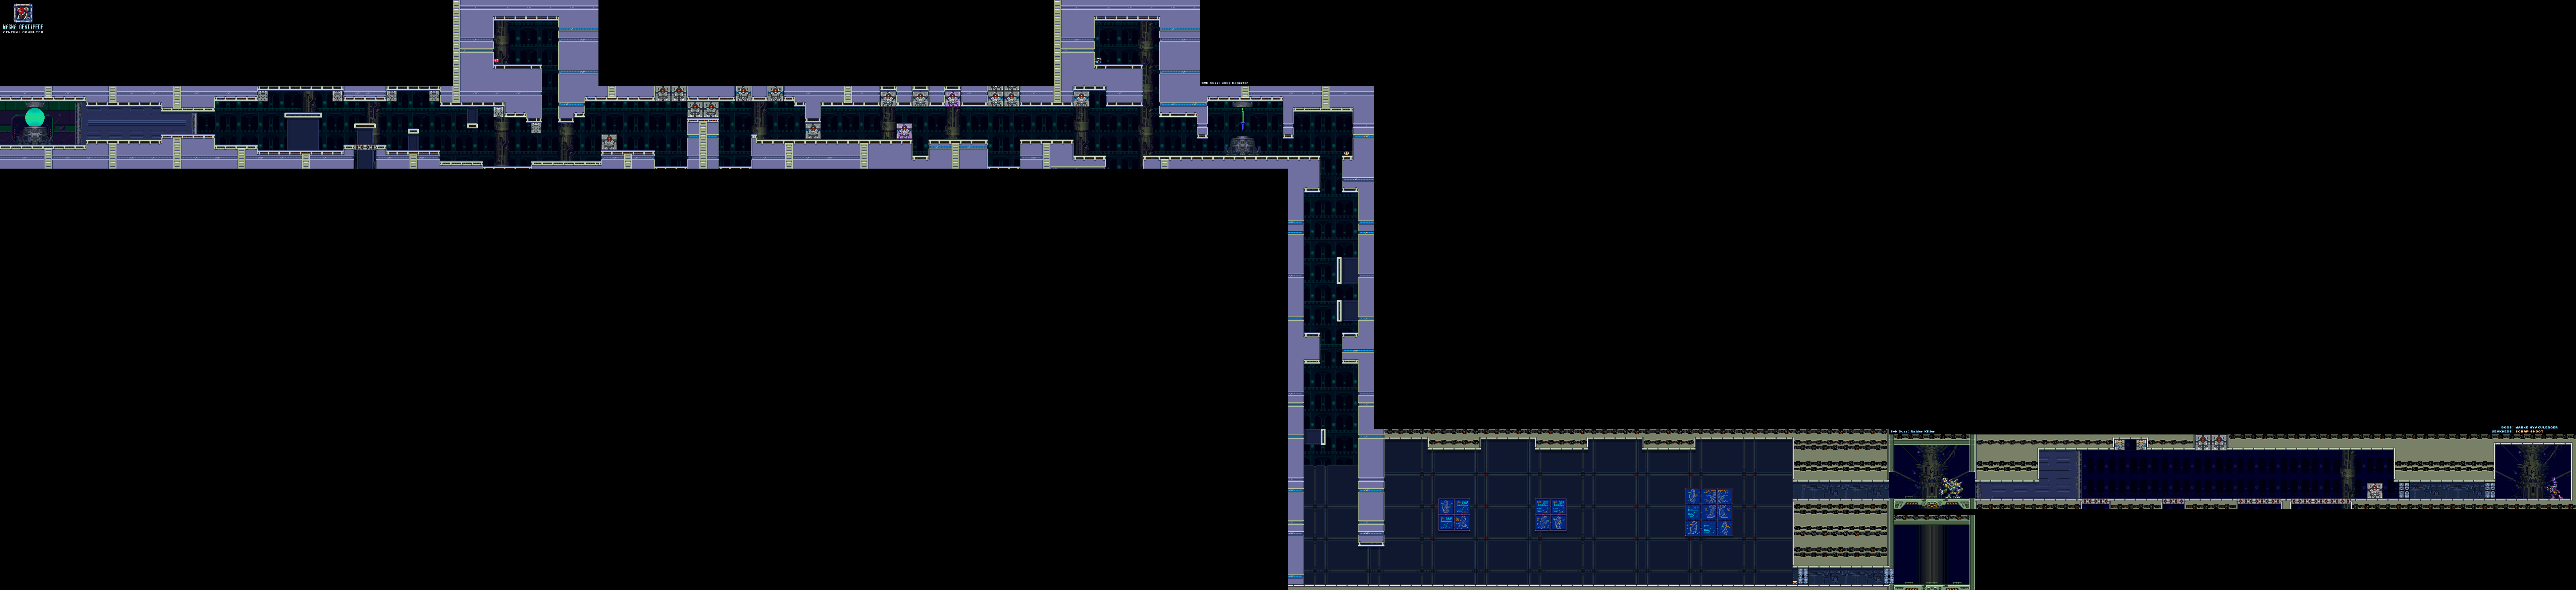
Magna Centipede
The purple robots that fly back and forth are as quick as they are irritating. Hit them with a fully charged X-Buster shot, then shoot them in the center while they're stunned with their shields down.
Avoid the searchlights, too. They cause the grey blocks to come down from the ceiling and shoot at you. If you offscreen them, they'll return back to their normal positions.
There's a passageway leading up shortly after the beginning. You'll need the X-Buster upgrade for this. Charge up the Speed Burner so that you can launch yourself to the grey block to the left of this passage. From there, you can wall jump to the Heart Tank.
You'll also want to do this for the Sub-Tank in this level as well. You're supposed to use the blocks before the passage going upwards just before the mini-boss room, but if you can time it right, it's definitely doable.
Wait for the large grey blocks to stop moving before you continuing. If any of these big blocks are a pale pink, shoot at them to break them. Some of them may also contain power-ups.
The mini-boss is a hologram of a sword. You'll want to hit the handle as it swings back and forth and flies toward you. The blade is completely invulnerable.
After taking out the boss, you'll go down another vertical shaft full of flying robots and searchlights. Then, you'll be dealing with falling rocks that transform into floor segments. If the target reaches X, it will read his data, but it won't shoot at him or anything.
If you can make it to the end in time, you can enter the X-Hunter segment (if you need to). Otherwise, you'll have to take the top path to succeed.
The robot here will jump back and forth and shoot at X. It falls after 11 hits from the Speed Burner. If the target read your data, the robot becomes faster and harder to fight, but it still takes 11 Speed Burner shots to kill it.
From there, you'll have to deal with the blocks that shoot you, falling bridges and the big grey blocks trying to push you into open pits.
Hit Magna Centipede with the Silk Shot so he loses his tail. This will make fighting him much easier, as fighting him the hard way can be somewhat difficult.
Magna Centipede will teleport around the room, leaping around and firing at you. If you hit him with the Silk Shot, he'll lose his tail, which kills his offense a bit. From there, he'll just teleport and jump around. Sometimes he'll teleport and then teleport again, but he'll stay in place for a moment after the second time in such a case.
The Silk Shot fires in an X pattern, so if you know how it fires, you can even hit him while he's on the ceiling.
Beating Magna Centipede will give you the Magnet Mines, which can stick to walls and work...well...like mines. Charging it turns into a powerful orb that slowly moves forward.
Crystal Snail
The cave cycles through the color spectrum here, which shows just how much of the 16-bit technology Capcom played around with at the time.
Grab the Robot Ride armor, then go to the left and drop down the pit. Do a double jump on the Robot Ride armor, then ditch it at the top of your jump and keep going left. You're supposed to use the Strike Chain to grab onto the wall, but if you can get enough height on the double jump, you won't need it. From there, you can take a platform back.
Grab the Robot Ride again, and keep going right. Watch the icy slopes, as they speed you up dramatically even if you're not dashing. You'll land in a pit of spikes. Punch the blocks to the right, then move to the right as jump out of the Robot Ride. Jump over the pit, then hide in the hole in the ground as the huge icy wall comes apart and slides downward to the left. This will break a third block the Robot Ride can't reach. If you want, you can now get the Robot Ride out of that spike pit and take it with you through the level again.
Above this is the path to the X-Hunter room. You'll need the Robot Ride in order to break the blocks. The columns from the Bubble Crab stage are here, and since they are, I can finally mention what they do. Guess what? They're just platforms that float up and down. Use them to get to the X-Hunter area and fight...whomever, depending on how your game is going, in case you have yet to fight them.
The cave cycles through the color spectrum here, which shows just how much of the 16-bit technology Capcom played around with at the time.
Grab the Robot Ride armor, then go to the left and drop down the pit. Do a double jump on the Robot Ride armor, then ditch it at the top of your jump and keep going left. You're supposed to use the Strike Chain to grab onto the wall, but if you can get enough height on the double jump, you won't need it. From there, you can take a platform back.
Grab the Robot Ride again, and keep going right. Watch the icy slopes, as they speed you up dramatically even if you're not dashing. You'll land in a pit of spikes. Punch the blocks to the right, then move to the right as jump out of the Robot Ride. Jump over the pit, then hide in the hole in the ground as the huge icy wall comes apart and slides downward to the left. This will break a third block the Robot Ride can't reach. If you want, you can now get the Robot Ride out of that spike pit and take it with you through the level again.
If you still have the Robot Ride armor when you take the normal route, you can get some power-ups as well as a 1-Up.
The crystallized robots that stick to the walls shoot lasers that bounce off the walls.
You'll come across a robot encased in a crystal. Shoot at the robot inside and avoid the other robot that flies around that shoots lasers directly at you. The robot will also send out another robot just like the one that fires at you, but if you charge up all your X-Buster shots while fighting this thing and focus solely on the robot in the crystal (the two that fly around are indestructible), you should be okay.
Run down the slope to avoid that huge crystal wall that comes at you from behind, but don't forget to slide down the wall after that to get the helmet upgrade. This lets you find secret object and hidden rooms easily.
You may notice a ladder leading to an empty room near the end. Climb up to it and charge up the Silk Shot. You'll cause several large weapon pick-ups to appear. There are a few empty rooms in the game that allow you to do something like this.
You'll have to go back to avoid the crystal walls that slide at you past that point.
When Crystal Snail stops spinning around and stands in place, he's vulnerable. Hit him with a Magnet Mine, then put another mine on the wall while he's stunned. Jump over him when he rushes at you, and avoid him as he returns to his shell. This will let you cause some major damage.
Crystal Snail's main attack is the ability to slow down time. That's not lag you're seeing. X is actually slowed down, which makes avoiding Crystal Snail difficult at times. Just keep hitting him every chance you get, and he won't be able to use it often.
Beating Crystal Snail gives you the Crystal Hunter. It encases enemies in crystal, and you can then use the enemies like platforms. Charging it up lets you slow down everything around you, much like Crystal Snail did.
When you beat all of the Mavericks, you'll know the location of the X-Hunters base thanks to Dr. Cain. We won't be going there just yet, though. We still have a few more things to find.
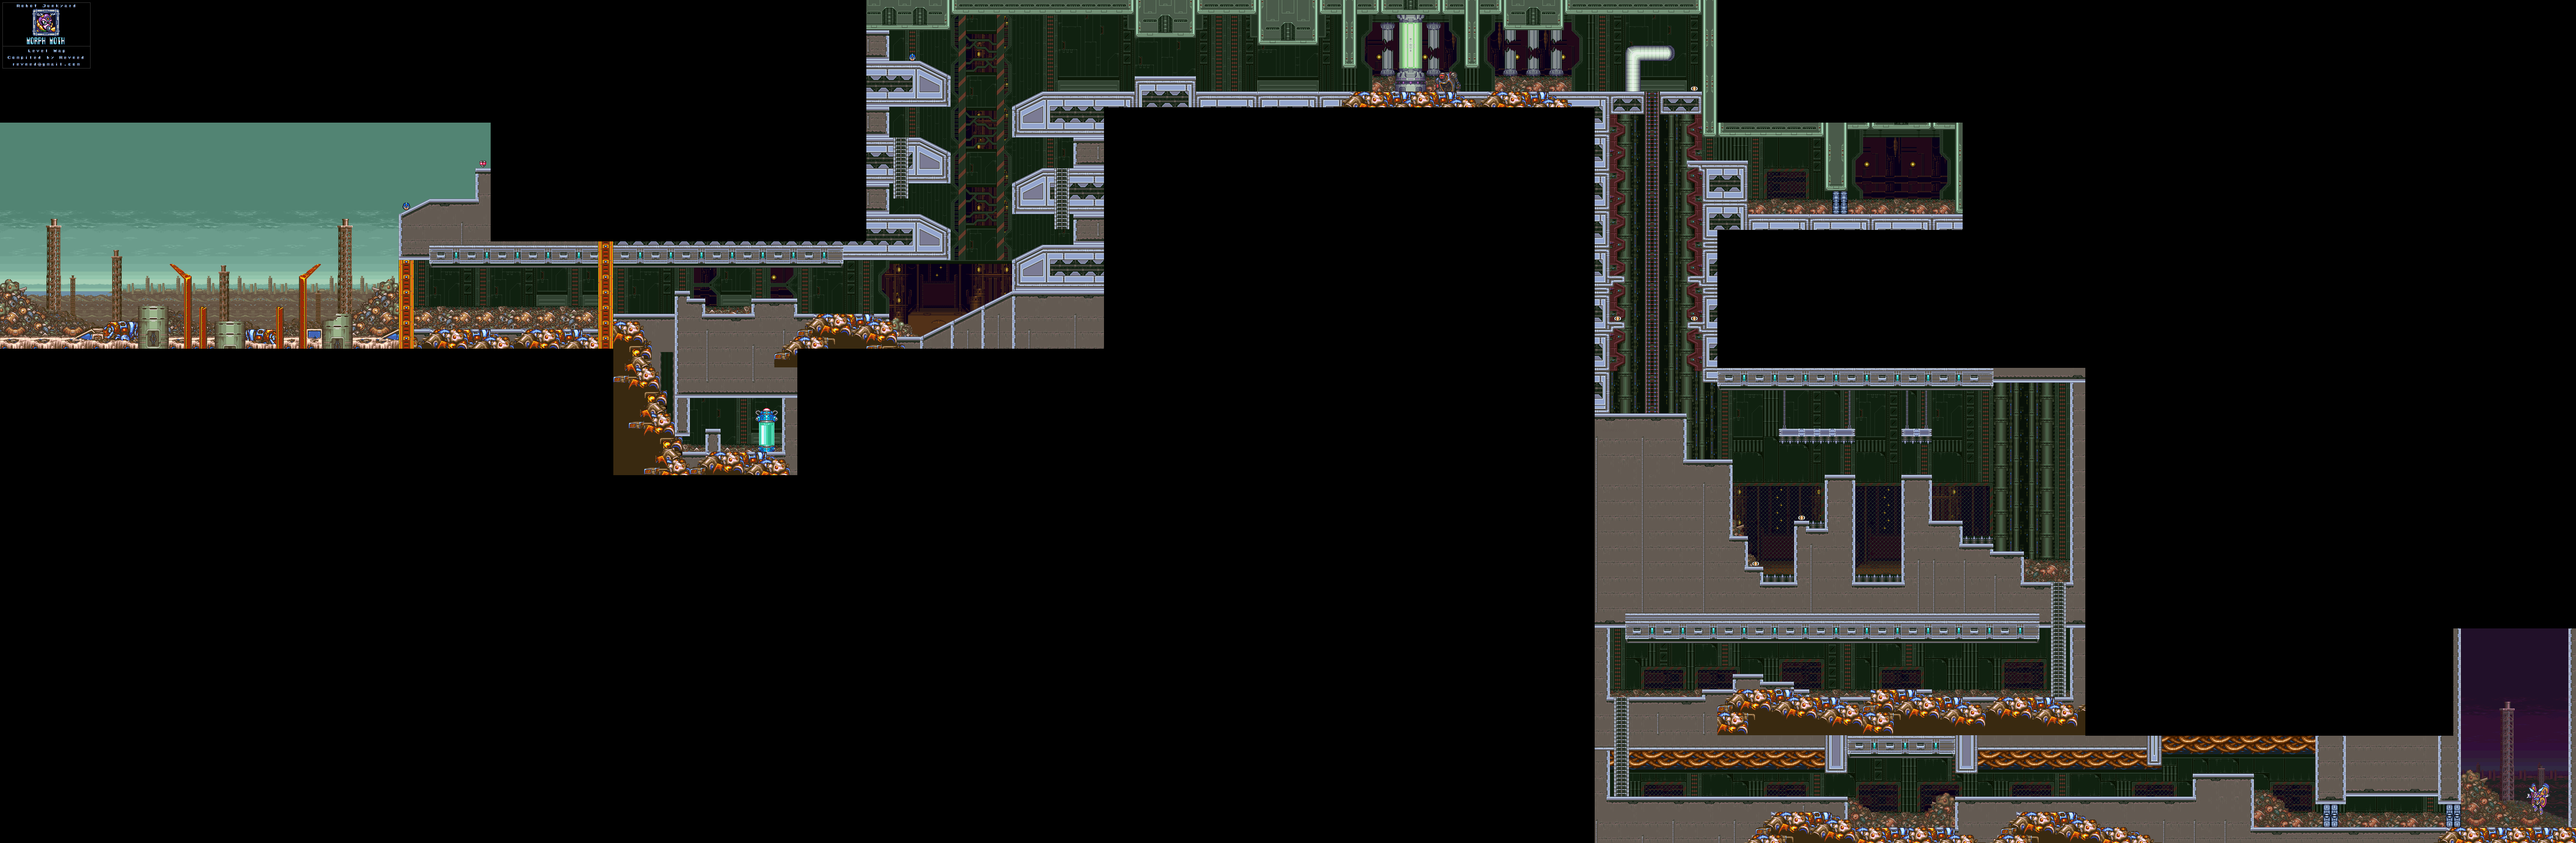
Morph Moth
Use the Crystal Hunter on the first shield robot in the level. Use him as a platform to leap to the wall to the right. You'll get a 1-Up and a Heart Tank for you efforts.
No comments:
Post a Comment