Tuesday, June 6, 2023

PrinceWatercress plays Bugs Bunny & Taz: Timebusters - Part 11 of 23


In this entry, we head to the Moon Valley for some more collectibles before taking on the second boss level.


1:30 - To take out the birds that grab the gears, switch to Taz, jump up to the birds and press Triangle to hit them. The game does not tell you in any way that you can do this at all and just expects you to figure it out.

1:56 - The first crate. Also, the path will open when the light strikes. You'll need to turn the symbols on the tops of these stone platforms around to complete this area.

2:12 - You can trap the wolves underneath the anvil shadows, or you can get them to chase you and hit them when they are worn down. The anvils fall when you approach the shadows...or when a enemy does the same. If the wolves get trapped in the anvil, you can hit them for carrots.

4:30 - Place the box on the platform with Taz to open the gate.

5:24 - The second crate.

5:46 - The third crate, which is to the right of the gate exit.

6:14 - Jump where the light is to turn it around, and you can drop the drawbridge a tad. You'll have to lower the drawbridge three times to get to the Viking ship.

7:11 - You'll need to place a box on the higher platform after putting Bugs on the lower one. This will allow you to go further into the level after you place both boxes.

7:34 - The fourth crate.

8:32 - The fifth and final crate.

8:53 - The two out-of-time characters are behind the obelisks.

9:41 - The second light. Bounce off Taz with Bugs to get up here.

10:12 - In this cave, hit all the posts with the hammer with Bugs, then spin the wheel with Taz to reveal a catapult.

11:47 - Spin on the whirl platform with Taz to set the catapult up, then get on the wooden platform with Bugs, press Triangle to sit down and press X to launch yourself to the third light. Once again, the game just expects you to figure this out.

16:15 - The last gear.

17:42 - When you cross the bridge, you'll get a boss battle. Pick up the shield with Taz, then wait for the boss to throw a bomb at Taz before switching to Bugs - who should always be kept close by - and throwing it at one of the wooden shields on the ship. When you do that, the boss will launch himself at you. Stay on the move to avoid getting hit. After three shields go down, the boss launches himself at you twice. The shield can only take so much damage before it breaks, and when it does, you'll need to get to the other side of the dock to get another shield and keep it going. Once all six shields are destroyed, the ship goes down.

Afterwards, grab the hammer to break the ice surrounding the Viking for the last gears, then grab the boss coin. When you head back to dry land, you'll go back to the normal level.

Brickroad plays Kid Icarus: Of Myths and Monsters - Part 3 of 4


In this world, we go back to moving vertically, but once again, the end of the game is in sight.


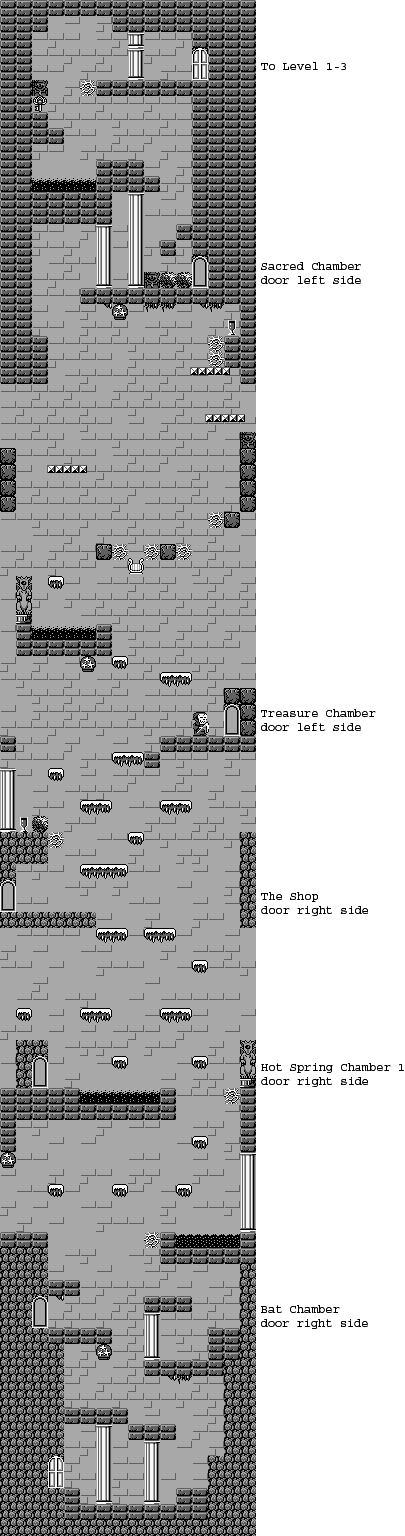
World 3-1


With World 3, you're back in the vertical stages again.

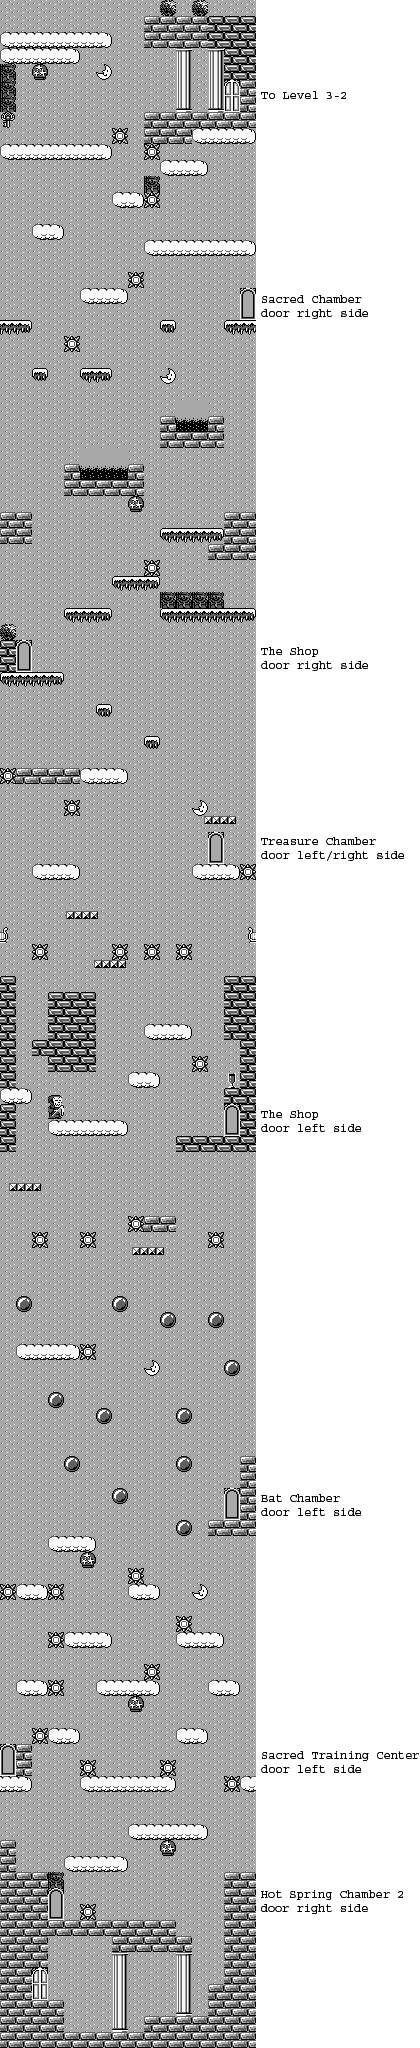
There is a hot spring chamber just above the exit, to the left of the spike.

When you start seeing more spikes, you'll find a sacred training chamber.

The blobs with the wings seem to have frowny faces and move back and forth, but they also move diagonally as they do. It's easy to anticipate where 

When you start seeing the balls, you'll find a bat chamber.

There is a shop to the right of the Grim Reaper, below the full chalice.

After the first two horizontally moving platforms, you'll find the treasure chamber. Shortly after that, you'll find another shop.

There is another Sacred Chamber just after the two pools of lava.

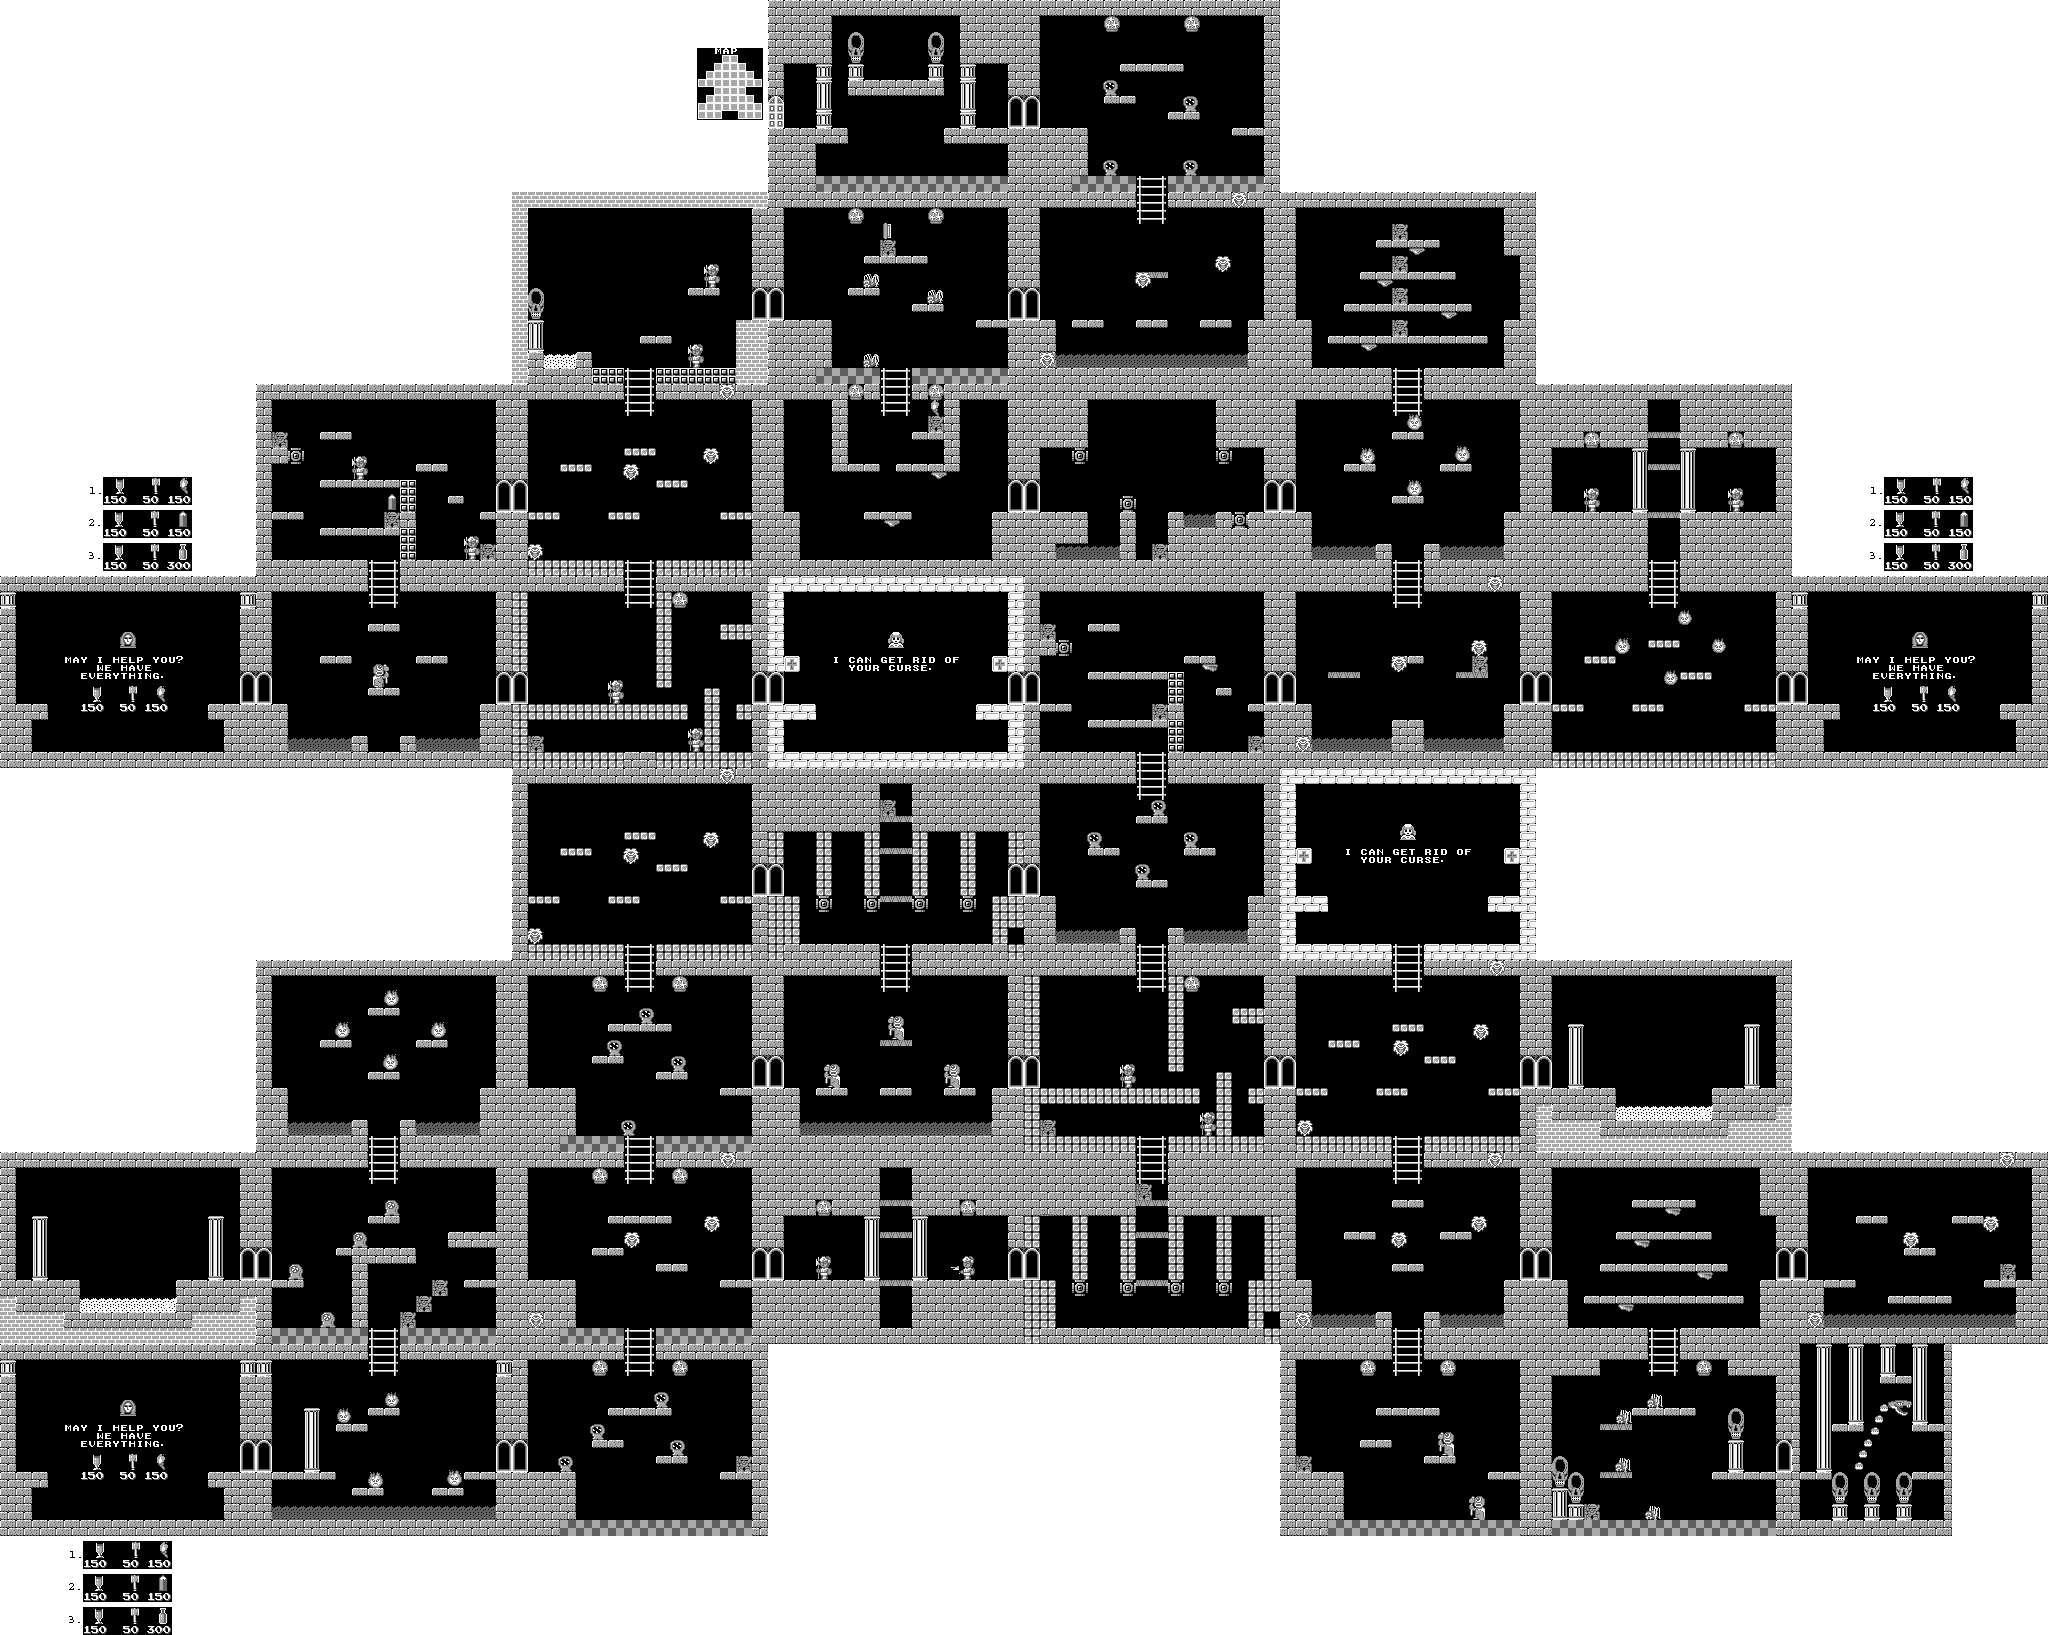
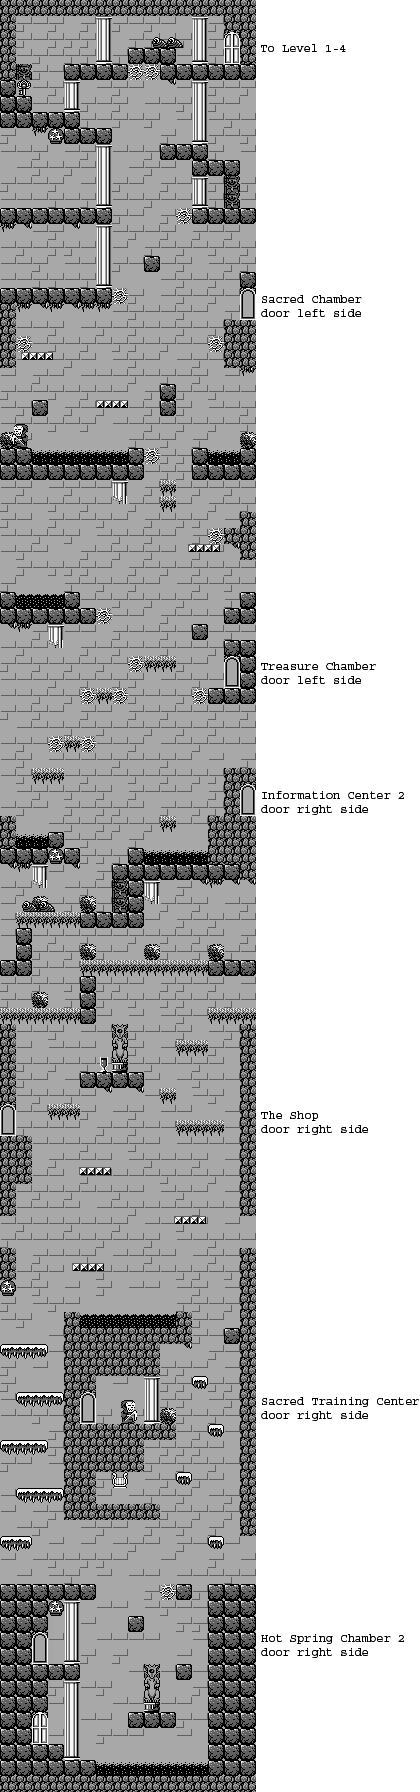
World 3-2


Just after the start is a shop as well as a bat chamber.

After the platforms, there will be a treasure chamber. The octopi nearby will fly around in a triangular pattern.

Near the second snake pot is another bat chamber.

After the Grim Reaper is a Black Market.

The men with the shields will throw spears at you if they see you. Amazingly, their shields do not protect them from being hit. You'll also find a hot spring chamber after dealing with them.

The evil smiley faces spit projectiles, but the smiley faces do not move, and both the monster and the projectiles can easily be shot down.

The stairs leading up to a snake pot also lead to a bat chamber.

There is a sacred chamber underneath the pool of lava.

You can get a fourth block of health somewhere around 17,000 points.

World 3-3


You'll have to break a wall near the big pit of lava at the start with hammers to get to the hot spring chamber. Of course, to get there, you'll have to break the wall to the left of the lava.

Shortly after the small cloud platforms is a shop.

After the horizontally moving platforms, you'll find an information center. It's more hot spring info, this time about the one in the level.

At the tall columns, you'll find a treasure chamber. 

Shortly after the treasure chamber, you'll find a sacred chamber. It's just before the full chalice that is out in the open. Shortly after that chalice is another shop.

After the men with the shields, you'll find another treasure chamber. 

There is a black market near where you deal with the ball platforms and the smiley faces.

There is a bat chamber near the small pool of lava near the end.

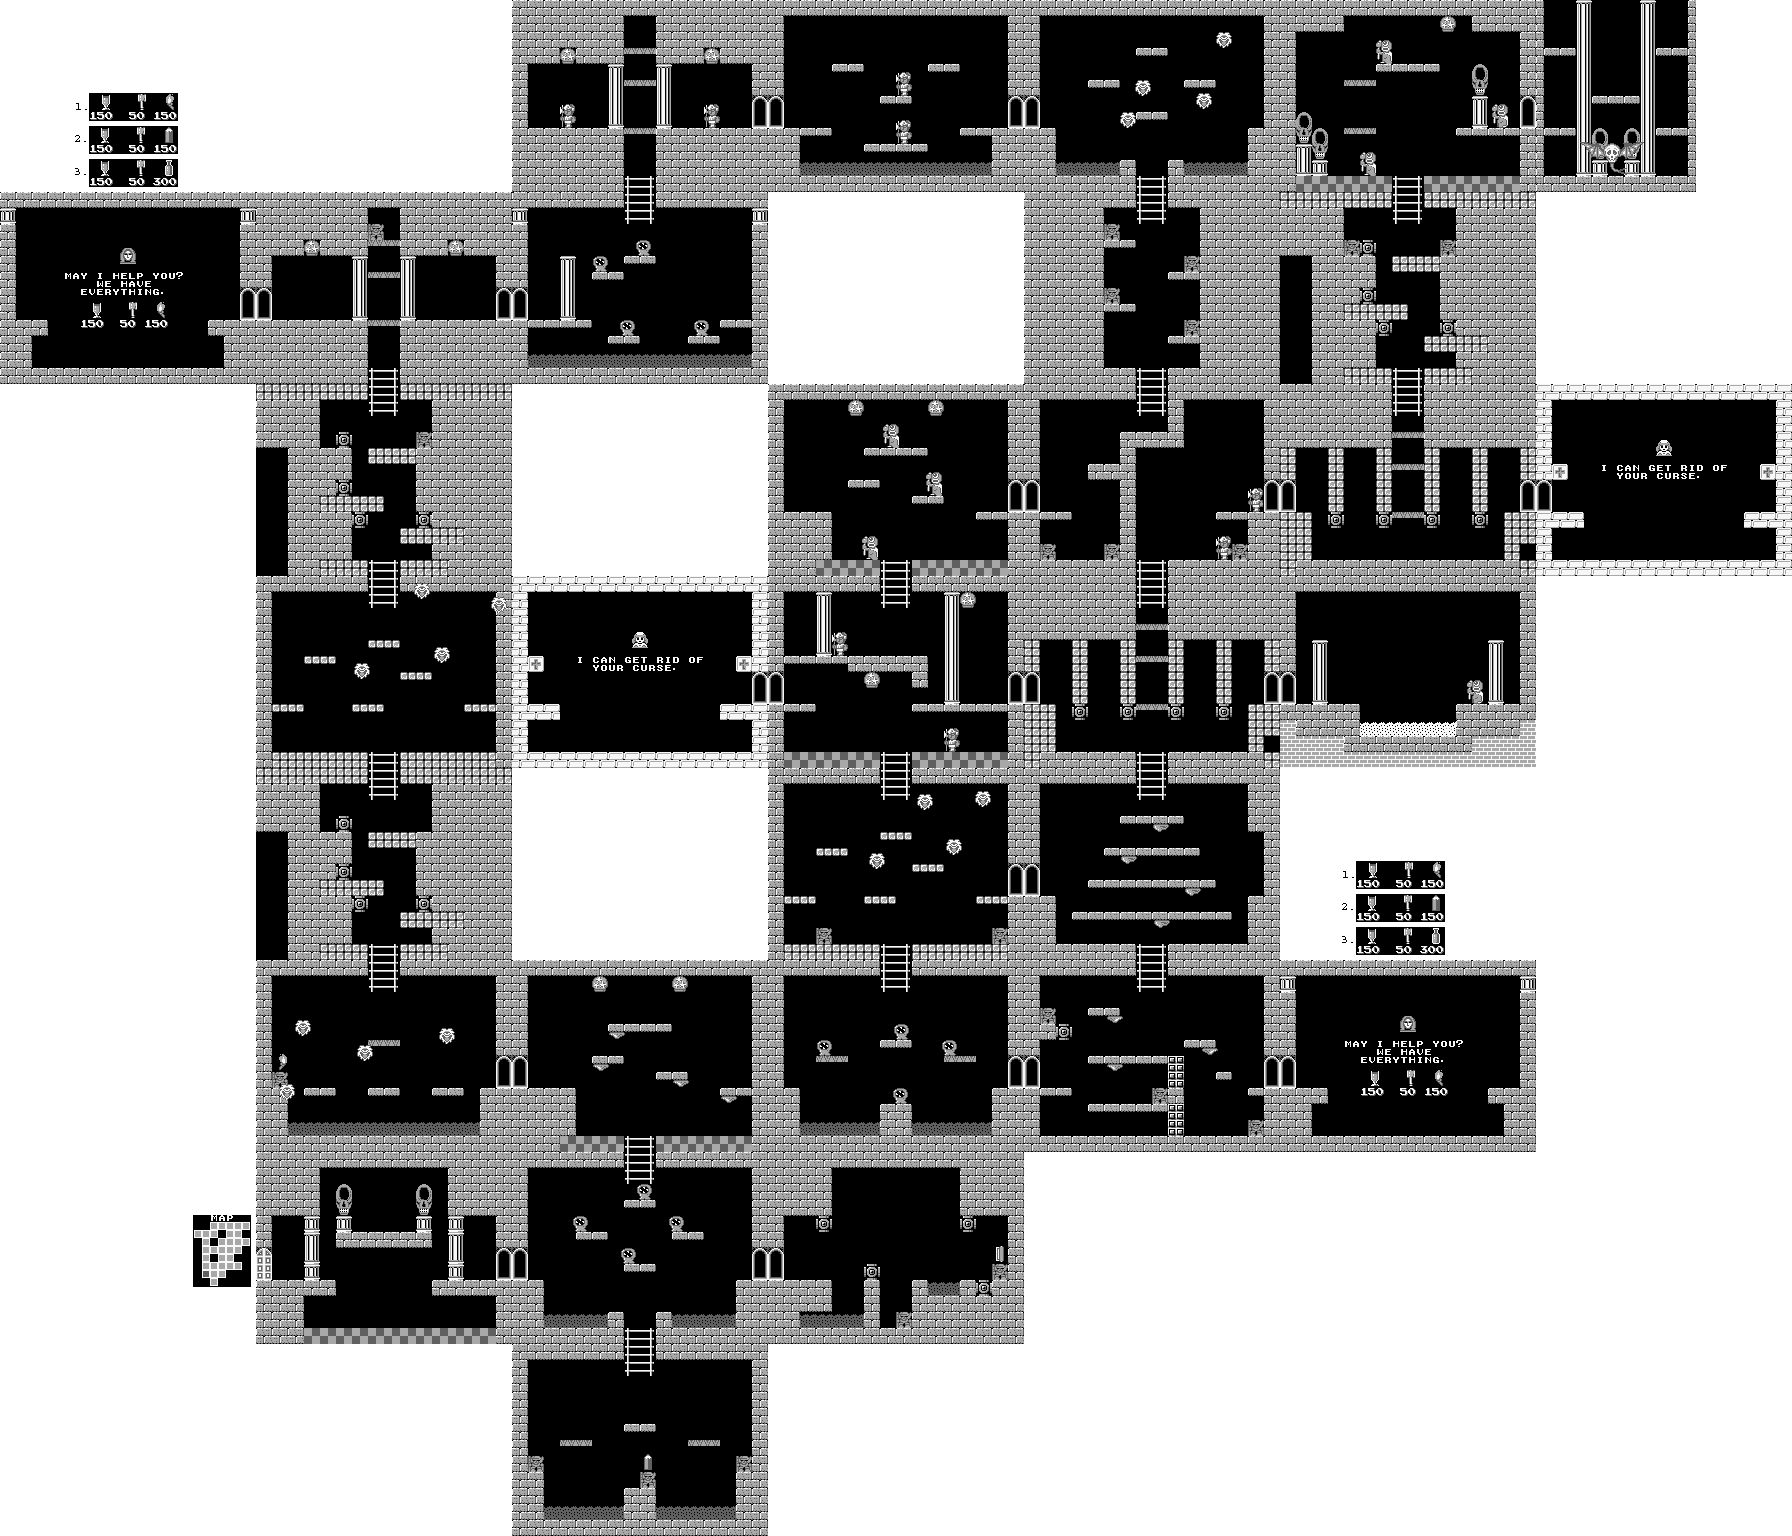
World 3-4


The route to get to the boss is right, down, left, left, down, down, right, right, down, down, right, down, right, down and right. For the part where you have to go through the one-room gap, you'll need to be hit with the Eggplant Curse to go right from the gap. From there, you'll need to go up to see the nurse, then you can get back on track.

The spiders move back and forth, but they also jump rather high at regular intervals.

The fireballs will fly towards you. If you have the barrier, they will run right into it.

To beat the Fire Serpent, you'll want to stay at the bottom and hit the serpent in the face while avoiding the three-way fireball shot. If your attack has a long range, this will be more doable. Winning the battle gives you the third and final treasure.

Afterwards, you'll meet Palutena. Depending on how well you did at the training, you can get anywhere from just one treasure (the wings of Pegasus) to all three. If you get less than three, you can get the other two treasures in the next level. After you are rewarded with the treasure(s), Orcos will show up and turn Palutena to stone and kidnap her, and the only way to free Palutena is to defeat Orcos.

Monday, June 5, 2023

CGR Undertow reviews Kid Icarus: Of Myths And Monsters


Another intermission, another review. Here's CGR Undertow reviewing Kid Icarus: Of Myths and Monsters!

PrinceWatercress plays Bugs Bunny & Taz: Timebusters - Part 10 of 23


Well, this didn't take long. Here, we just get everything left in The Shield Race. That's it.


In this video, I take what should be twenty minutes to get everything in The Shield Race. Amazingly, I get everything I missed in mere minutes. There's not much to this video, but next time, there will be plenty of timestamps.

Sunday, June 4, 2023

Brickroad plays Kid Icarus: Of Myths and Monsters - Part 2 of 4


It's time to go horizontal as we play the second world of the game.


World 2-1


Just like in the NES game, the second world is horizontal level. You're also going to have an easier time.

There is a hot spring above the start.

There is a shop just before the second snake pot.

The stuff that looks like moving plants are spikes that you do not want to fall into.

The falling feet drop straight down drop ten hearts when shot. The enemies that look like clouds move up and down. You'll also have spikes on the sides of some of the platforms.

To the left of the fourth snake pot is a treasure chamber, and you'll have to jump your way to it. There will also be another one after it.

Above the lava is another sacred training center where you can power up your arrows if you've been killing all the monsters to this point.

Underneath the fifth snake pot is another bat chamber. After that pot is the black market, where you can buy some more items...if you have even more cash. If you have the credit card, you can buy one item for free. To get a credit card, you'll have to complete a treasure chamber without getting the God of Poverty. Among the items you can carry is the barrel, which allows you to carry multiple Waters of Life to revive yourself with. To the right of the black market entrance is a couple of statues you can break with your hammers. Unlike the regular stores, however, you cannot change the contents of the black market by pressing Down.

World 2-2


There are a lot of spikes at the bottom, so you'll really be platforming around here.

At the first snake pot is a hot spring. If you jump your way up and to the right after it, you'll find a treasure chamber. You'll need to break the wall to the right of the pit where the snakes land to enter it.

To the right of that, above the second snake pot, is where you can find some more information. It's just the hot spring I mentioned earlier.

To the right of that is another sacred training chamber where you can power up your arrow if you've destroyed enough monsters.

Up and to the right of the land platforms above the spikes is another shop. The little white guy with the angry face just moves back and forth, but unless you have some power-ups, he's hard to kill.

Back down at the bottom to the left of the two snake pots that are together is a bat chamber. If you can get up in the air between those pots, you can find a sacred chamber.

The things that look like thumbs with grasshopper legs will jump back and forth while homing in on you. They're easier to hit when they are on the ground.

Up and to the right of the second set of land platforms is another black market.

If you can get around 8,000 points or so, you can get a third health bar.

World 2-3


First spikes, now lava.

The door just past the start is a bat chamber.

Past the second platform that moves up and down is a treasure chamber if you make your way up to the top.

Above where the second snake pot is is another bat chamber. If you stay up to the top, you'll find yet another bat chamber above the third snake pot.

The bird enemy with the sunglasses moves up and down while it moves back and forth.

A shop will be at the fourth snake pot where the full chalice will be.

To the left of the pair of snake pots after that is another shop (where the full chalice is).

After the white columns, you'll be able to make your way up and to the left to another hot spring chamber. Further to the right is the black market.

There is one more bat chamber before the exit, and you'll have to look up high to find it.

World 2-4


The way out is right, up, left, up, up, up, up, right, up, right, right, down, down, right, up, up, and right. Thankfully, there is a nurse nearby in case you get eggplanted by the eggplant wizards near the end, and you'll also find a shop along the way.

The shiny looking blocks are actually ice, and you'll slide around on them when you move.

The guy with the spears will slowly move towards you when you are on their level.

To beat Skull Wing, shoot at the skull as Skull Wing flies clockwise around the room and watch for the fireballs that drop down from above. The fireballs will not go through the platforms, so if you stand underneath one, you can protect yourself against some of the fireballs. Once Skull Wing goes down, you'll get the second treasure.

Brickroad plays Kid Icarus: Of Myths and Monsters - Part 1 of 4


Believe it or not, there was a second Kid Icarus game. It was also the last one we had for years until Uprising came out for the 3DS.


Goddess Palutena, the ruler of Angel Land, had a vivid dream of an evil force invading their beautiful world.

She called the valiant warrior, Pit, and sent him into a program of intense training for the upcoming attack.

Pit must now find the three sacred treasures hidden in Angel Land.

Be brave, Pit!

Your long mission is just beginning!

This game is the sequel to Kid Icarus. Amazingly, despite the original game being released on the Famicom Disk System, this game did not get released officially in Japan until 2012, as the series proved more popular in the West than it did there. This time around, the main antagonist is the demon Orcos (based on the underworld god Orcus who punished broken oaths), who has invaded Angel Land.

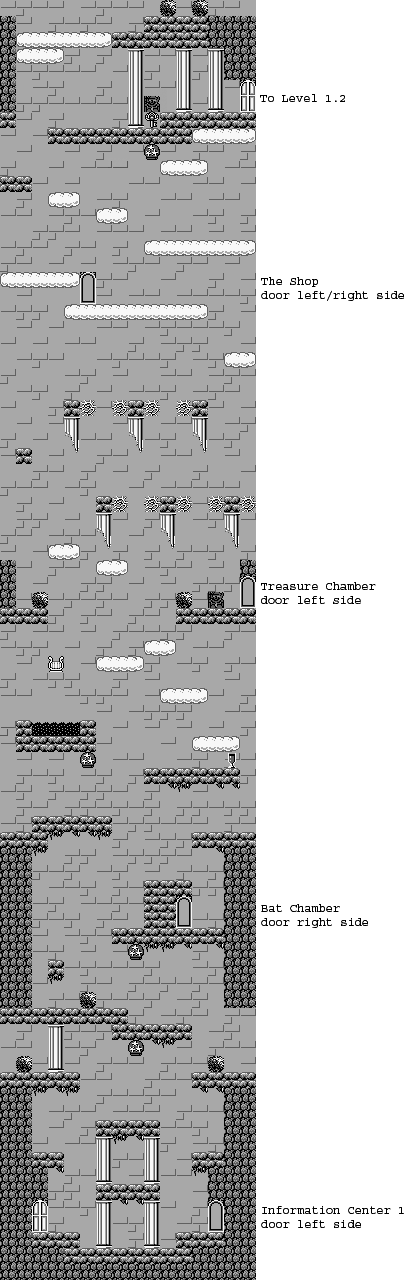
World 1-1


The game plays much like its NES counterpart, but you can flap Pit's wings in mid-air to slow him down as he descends by double-tapping the jump button A. As always, Left and Right moves around, you can duck with Down, aim upwards with Up, and fire arrows (and use hammers) with B. You can also use the D-Pad to look around where you are if you pause the game with Start, and if you press Start again, you'll enter the item menu that was present in the first game. A, B, Select and Start simultaneous resets the game, but also saves your progress, and if you hold Left, Select and B on the title screen, you can erase your saved game.

Also, the vertical stages in this game play much like the ones in the NES game, but due to the screen size and resolution of the Game Boy, going in one direction continuously eventually allows you to loop around the stage endlessly.

The door at the start contains a man who will tell you that you can break some walls with hammers to find secrets. Once you exit a room, you can't re-enter it unless you have a key.

The little serpent-looking creatures are back as normal enemies, and you can beat them up for hearts and points. You'll need the hearts and points in order to get stronger and be as prepared as you can for the final battle, as well as to buy items that will make getting through the game easier, so destroy your enemies and get those hearts! The snake enemies will keep popping up, but they won't pop up infinitely and you'll eventually run out. Take out as many as you can to get started at getting stronger.

The door after the upside-down jar full of tiny serpents is your first bat chamber. Fight off the bats for points and hearts as well as the occasional powerups, such as the half chalice that will refill some health. A full chalice will refill even more.

The skulls will fly at you and will give you five hearts for each one you kill. 

Once again, the harp temporarily turns enemies into hammers for as long as you have the audio cue playing in the background.

The next door leads to a treasure chamber. Thankfully, there is a way to uncover everything without getting the God of Poverty to pop up and cause you to lose everything else, and it's covered early in AstroBlue's guide on GameFAQs (just Ctrl + F and look for "Treasure Chamber," it's pretty early in the guide). Also, you don't have to shoot all the jars to get all the items. Here, you can get quite a few hearts and hammers if you know what you're doing. Just keep in mind that it takes five hearts to shoot a pot down and break it; if you have less than five, you won't be able to break one.

Watch out for the thorns as you jump from platform to platform, as they will hurt.

You'll soon find a shop. While things such as the hammer (which let you free soldiers and find secrets), chalice (health re-fills), Waters of Life (the bottles that provide auto-revives) are here, you'll also find a key. The key allows you to re-enter any room you've already visited once. The numbers below each item show how many hearts you need to buy an item. Also, if you press Down, you can get a different set of three items every time you do, so if you need health or a hammer, you can keep pressing Down until what you want is for sale.

The next room is the exit. When you enter the exit room, your score for the current level will be tabulated into your total score. You can also save your game from this room before heading to the next stage. You'll need 4,350 points for your first health extension, so fight off those enemies!

Palutena's Key is in the statue at the end, and can be found near the exit of all the normal, non-dungeon areas. The key will usually be found in a statue. Finding and grabbing it will re-open all the doors in the area.

World 1-2


The first door is another bat chamber. Once again, fight the enemies that you meet here for health, hearts and hammers.

The black liquid is lava that hurts you, so don't fall into it.

The second door, on the other hand, has white liquid that acts as a hot spring. Stay in the hot spring to quickly - as opposed to slowly in the first game - refill all your health.

The third door is another store.

Once again, the Grim Reaper enemies show up, and if they see you, they will send Mini-Reapers at you and the music will change while they are panicking. You can destroy the big Reaper for a full heart and the smaller ones for some smaller extra hearts. The door near him will contain another treasure chamber.

Once again, there are moving platforms. Watch them as they move so you can land on them.

If you can get into the door blocked by the solidified Centurion soldier with a hammer, you'll find a sacred chamber where you can get an arrow power-up. By fighting enemies, entering doors, collecting hearts and doing the best you can, you can power up your arrows for stronger attacks.

The monsters that pop up out of the ground to spit fireballs pop up near the exit, and once again, you can fight them before you leave for more points and hearts.

World 1-3


The first door is just above where you start and it contains a hot spring. You'll need two hammers to break the wall hiding the door leading into it; as a matter of fact, you'll need hammers to break the wall where it is hidden behind. If you can do that while you have low health, it is worth it. Since you don't regain health when you progress between levels, this is useful. In order to use this hot spring, you'll need to jump to a high platform and float over the totem enemies that shoot at you. When you land in the hot spring, the totem enemies will disappear.

The next door is behind the first Grim Reaper and contains a Sacred Training Center. Here, you'll be in one of those rooms where you shoot down those spinning tiles, and if you do well enough, you can get a choice between one of the extra weapons: the fire arrow, which gives you flaming arrows if you have at least two blocks of health; the long bow, which extends the distance of your arrows as long as you have at least three blocks of health; and the protective crystals that act as a revolving shield and show up if you have at least four blocks of health. It helps to get them early. For best results, come in with high health, stay in the center and keep shooting upwards. Also, stay out of the lava.

The leaping enemies can be easily taken out and you can easily anticipate where they are going to jump.

The door to the left of the full chalice takes you to another shop. Amazingly, the chalice will re-spawn when you come back.

The worms with the one eye will duck to avoid your shots. Take them out from a further distance to hit them.

The next door hints at the hot spring at the start that was mentioned earlier. If you need to go back, keep in mind that you can drop down from certain platforms (the ones that don't look like solid blocks) by holding Down and A.

If you die, you'll have to use one of your credits to get back in the game. When you run out of credits, the game is over, and you'll have to restore from the last area you saved from.

Shortly after that door is another treasure chamber.

The door after the second Grim Reaper contains another area where you can power up your arrows again if you're doing fine. You should be at arrow strength 3 (out of 6) at this point

The wall made of the two statues near the exit contain two half chalices, which you can get for health.

World 1-4


The last stage of every world is a labyrinth. Just like in the first game, you'll have the map, the torch and the pencil to map out your progress, show your position on the map and see where you've already been respectively, but once again, the Internet has made them obsolete, so you might as well use that if you need to.

Once again, the Eggplant Wizards show up, and if the eggplants they throw at you hit you, you'll be hit with the Eggplant Curse, which turns you into an eggplant with legs. You won't be able to attack, and you'll need to find a hospital to remove the curse and turn back to normal (which is thankfully at no cost). Thankfully, the Eggplant Wizards are easier to fight.

If you go off the beaten path, you can find rooms that contain hot springs 

To get out, you'll need to go right, up, up, left, down, left, up, up, up, right, right, right, down, down and then right from the start.

Some of the statues will contain the usual power-ups, but they can also contain monsters.

Most of the enemies are pretty simple to figure out. The mouth enemies just move back and forth, and the ghosts will move from right to left in diagonals. The slimes can move up and down and stick to floors and ceilings.

The narrow gap on the way to the end can only be entered if you're eggplanted and hit with the curse, and the path leads to the hospital. Of course, you'll need to take another way around to get back to where you need to go, and you'll have to be careful not to get eggplanted again.

The boss here is the Minotaur, who throws skulls in groups of four at an arc. Avoid the skulls and shoot at him with your arrows. The more powerful your arrows are, the better. Every once in a while, he will turn into a fireball and teleport somewhere else in the room, and you'll need to find him to attack him again. You'll have to move back and forth to avoid the skulls and hit him when you can, as appealing as it is to get right up to him and mash the B button to do even more damage (which you'll only want to do if your health is high). This makes it easier to play it safe.

Once you beat the Minotaur, it's on to World 2.

PrinceWatercress plays Bugs Bunny & Taz: Timebusters - Part 9 of 23


In this entry, we finish up what is left of the Viking Era.


0:30 - In "Rescue The Druid," explore the area first for some gears. Use Taz to push the barriers and break the rocks blocking some of the paths. 

You'll find a mouse on a pedestal, but make sure you clear all the paths and push the barriers so that the mouse can move around. Once you get that done, break the pedestal, then use Pull-A-Face to scare the mouse down the path. There is one barrier that requires spinning with Taz on a nearby button to move; once you move that barrier, you'll need to quickly get the mouse to the other side. Once you get the mouse to the elephant, you'll get 25 gears.

5:46 - Going back to "The Snowball Fight" for a gear.

6:46 - "The Ice Skating Challenge" is like "The Drum Challenge" from the Aztec Era. Once again, it's a Simon Says game and the same rules apply, but this time, the pace is slower due to all of the ice skating stunts. Beating this gets you another gold gear worth twenty-five gears.

12:30 - "The Shield Race" is the racing area for this era. You can press and hold Square to create a snowball and make it bigger, then throw it at the other guys in order to slow them down. Also, Left and Right let you move around, and X lets you jump. The game doesn't tell you this, but you also have to hold Up while moving in order to get better control. Once again, there are five crates to destroy, but unlike other areas, I won't timestamp them here. If you go through all the gates, you'll find a gold gear at the end. If anything is inside a crystal, you can move into the crystal to smash into it and grab whatever is inside. And of course, if you place first, you get the boss coin.