There's nothing else to do in the area where we showed up, so it's time to start exploring this miserable looking world.
.png)
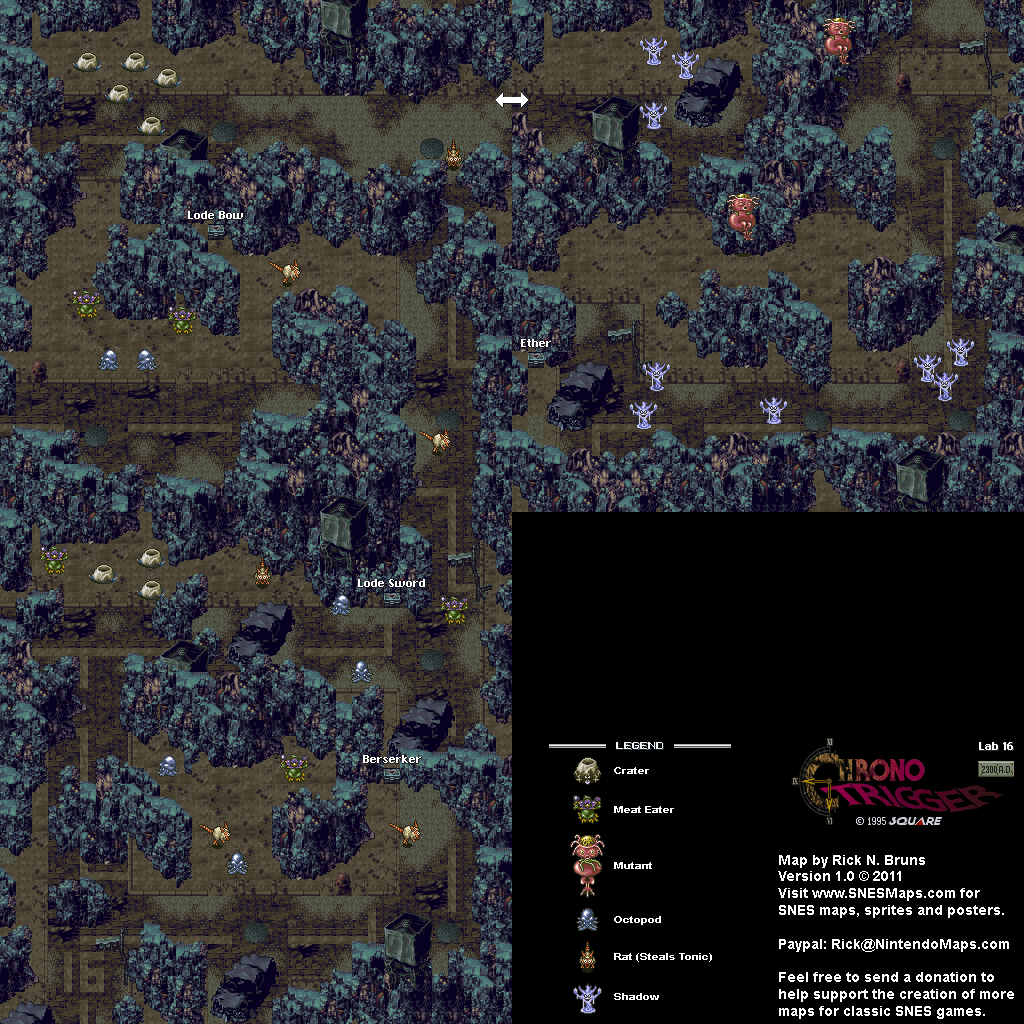
There's nothing left to do in this part of the world map, so it's time to head north to Lab 16. (Why it's a lab, I have no idea.)
Watch out for the rats. If you move into them, you'll lose a Tonic. Some of the enemies you'll be facing will drop some, though.
The Meat Eaters will heal the entire enemy party and can also shoot a dust attack at you that can confuse you, and the Octopods can also absorb a little bit of your HP into their own.
The Craters perform a volcanic rock attack that drops down rocks and attacks the entire party. They're pretty slow, and you can easily attack multiple Craters at once.
The Shadows cannot be hit with physical attacks; you must use magic. The only attacks you can use at this point are Crono's Slash and Lucca's Flame Toss.
The Mutants have 300 HP. Not only can they pack a bit of a punch, but they can also absorb a little bit of your HP into their own.
The Berserker allows anyone who has it equipped to attack with stronger physical attacks, but their skin will turn red and they will always perform a physical attack when their battle gauge fills up.
Not only can you find another Lode Sword, but you'll also find a Lode Bow, which you'll want to equip on Marle.
Once you reach the other end of Lab 16, you can head to Arris Dome to continue the game's plot, or you can head to the Sewer Access. While you're supposed to go through the Sewer Access area later in the game, the game sort of expects you to explore it now, with one of its items reflecting that.
Sewer Access
When you drop down, a guard will show up and relay your presence to Lord Krawlie. From here, head east and fight the Egders and the Nereid. The Nereids can hit you with Water and Lightning attacks, while the Egders will smack you and also eat you to absorb some of one party member's HP. Cyclone and Fire Whirl will help against taking down multiple enemies. After this battle, you'll be able to get the 600G out of the nearby chest and head to the west.
When you head towards the ladder leading down, you'll see two frogs: the Boss and the Underling. They will talk about some of the bridges in the area disappearing, then run away when they see you. You'll also get some dialogue from your other party members before you finally head down to the next area.
In the next area, go west for a diary entry you can read. The diary entry will tell you that if you make any noise, you'll have to fight monsters, and they will all be Nereids. You'll have to press A to interact with the cat, the soda can near the trash bin and the piece of cheese to get the first three battles, but if you walk into the save point, you'll trigger the fourth and final battle automatically.
At the end, you'll be back in the main area. After the battle you see automatically, go north. There are two hidden passageways that you can easily find in the wall to the east. One leads to the switch, which you'll need to press A in front of to open the door, and the other that leads to the door itself. When you open the door, you'll meet the Boss and the Underling again, trying to reach a switch near the exit before seeing you and fleeing again. The chest before you meet Krawlie contains the Rage Band, which gives whoever has it equipped a 50% counterattack rate upon being hit by an enemy attack.
When you reach Krawlie, Krawlie and his guard friend will boast about what Krawlie is going to do to you before the guard flies away (and never comes back) and Krawlie fights you. Krawlie will alternate between a multi-slam attack that takes the HP of whoever he uses it on to 1 and a clap attack that can do a lot of damage. If anyone gets slammed, heal them with a Mid Tonic; if anyone gets clapped on, use Marle's Aura to heal them. Be sure to use powerful attacks, such as Fire Whirl, and put the Rage Band on Crono in case Krawlie hits him for the chance at some free damage.
Eventually, Krawlie will go down, and you'll be able to head south to leave. As you do, head east of the ladder to find the Bolt Sword, which is more powerful that Crono's Lode Sword. (This sword is known as the Thunder Blade in all the post-Super Nintendo versions.) Also, hit the switch that the Boss and the Underling were trying to reach to open the bridge leading back to the Nereid maze. This will make getting around easier on your return trip. From here, take the nearby ladder up to leave.
There are two places to head to when you exit the other side of the Sewer Access.
At Death Peak, run north, then go to the west at the first tree to find a Power Tab. You'll be forced down the mountain by the wind and you won't be able to do anything here yet, but you can at least get this early on in the game.
There is also Keeper's Dome. You'll see a man in a trilby hat and a suit putting instructions into a creature, and the stuff that he makes says doesn't make any sense until later in the game. This part is completely optional.
From here, it's time to go back through the Sewer Access area. This time, you'll have the shortcut leading back to the end of the Nereid maze, which will make it quicker and easier to get back to Arris Dome, where you'll need to head next.
No comments:
Post a Comment