Saturday, August 31, 2024

PrinceWatercress plays Chrono Trigger (Super NES) - Part 2 of 70


There's quite a bit to cover here, much of it covering the battle system. Hope you're paying attention.

First | Next | End


There's not much else to do for the time being, so let's head to Leene Square.


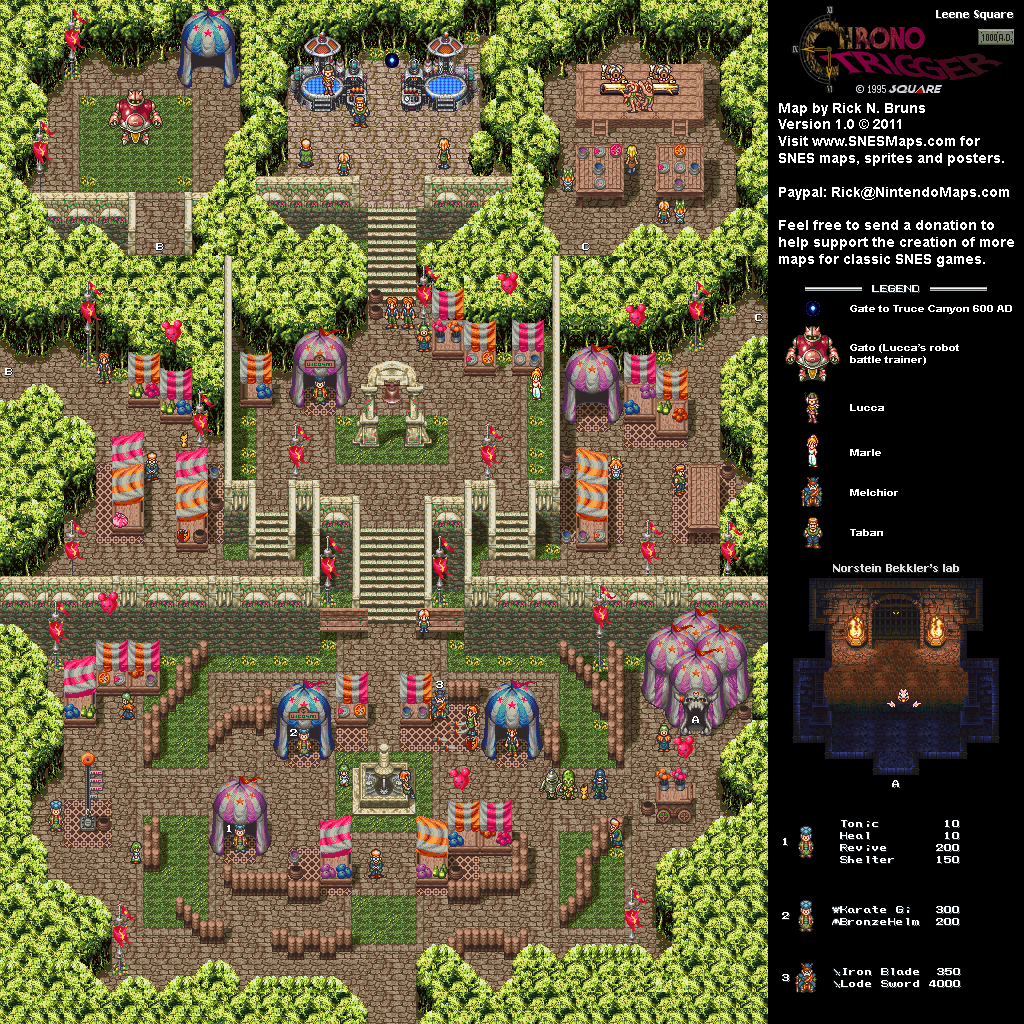
There are quite a few things that you can do in Leene Square.

There is a high striker all the way to the left side when you enter. Press A to start playing, then press A when you're all the way back to score one Silver Point. Silver Points are a currency only good in Leene Square in exchanges for a few things.

There are two stores near the fountain, but you won't be able to get much of anything from them due to not having a lot of money.

To the right of the fountain, there is Melchior's booth. You can afford the Iron Blade, but you'll need quite a bit of money to get the Lode Sword.

Further to the right is the foot race. When the next foot race is about to start with all four runners side-by-side, you can pick who will win between Steel Runner, Green Ambler, Catalack and G.I. Jogger. If you win, you get twenty Silver Points. You can hold B to run around the other racers to ensure that the racer you picked wins, but it doesn't always work. The man watching just near where the foot races start and end will tell you who he thinks will win, and it will be a different racer for every race.

Further to the right is Norstein Bekker's lab, where you can use some of the Silver Points you've earned to play games. The 10 point game allows you to play the shell game with the three soldiers Biggs, Wedge and Piette. The three soldiers walk around, and you're supposed to figure out which one is Biggs, Wedge or Piette, depending on which one you're told to identify. If you guess correctly, you'll get a Pozoyo Doll, which will play a tune in Crono's room when you go back to it and press A.

When you go up the stairs on the north end, you'll run into a girl. You'll need to move into her in order to advance the plot. When the bell rings, the girl will get up, and she will wonder where her pendant is. Talk to her first to check on her and see if she is okay, then go up and right and walk into the pendant and press A to pick it up. From there, talk to the girl again. When she asks for her pendant, return it to her. After that, you'll be introduced to your first new party member: Marle.

At the middle of the square, you can do a few things. Far to the left, you can fight Gato to get fifteen Silver Points upon winning, but you'll probably need to level up a few times in the Guardia Forest first.

There is an old man moving back and forth finding a place to enjoy his lunch. Do not press A while facing the pink bag. While it will refill your health, it will have negative consequences later in the game. Also near the old man is a cat, and if you press A to talk to it, it will follow you. (Do not press A again, or else it will run away and you'll have to leave the area and come back to get the cat to reappear.) From there, you can take it to the little girl on the right end of the middle area - who is looking for her cat - by talking to the little girl when her cat is nearby. Thankfully, the cat does not have much trouble following you. (For best results, do not talk to the little girl before returning the cat. This will come in handy later.)

In the middle of the square, you can exchange 10 Silver Points for 50G, which can be a little useful early in the game.

To the right of the little girl who is looking for her cat. For best results, do not talk to the little girl before returning the cat. This will come in handy later. Further to the right is a soda guzzling game. Press A as quickly as possible to drink all eight cans and get five Silver Points.

All the way to the right is a prehistoric band. A, B, X and Y will allow you to briefly pose characters as if to dance.

In the very middle of this middle section is the stairs leading up to the north end of the square. To open it up, go back to the lower section and talk to people. You'll eventually be told that Lucca's invention is ready at the north side of the square, which will advance the plot.

While here, if you talk to Melchior to look at his wares, Melchior will ask if you want to sell Marle's pendant. Pick "Sorry" to refuse (doing otherwise will work against you in the future).

We'll check out Lucca's invention in the next video. From here, I do some things that are more or less optional for this point in the game.

If you talk to Crono's mom with Marle in your party once, you'll introduce Marle to Crono's mom. You can do this with all of the other playable characters.

I also go to the Mayor's Manor in Truce. Here, you can get a basic tutorial on the battle system. Here, you'll learn that are multiple types of weapons in the game and that only one person in the game can equip each time. You'll also learn how to use the sparkles that work as the save points: press A on them and you can save your game. You can also press X to save your game anywhere on the world map. Aside from armor and accessories, you'll learn that swords get better by increasing Power while bows and guns get better by increasing Hit. Also, you'll learn about the "Shelter" item, which can be used to refill the HP and MP of the entire party at save points or on the world map.

You can open chests by walking up to them and pressing A.

You can walk while reading messages, but the message box will disappear if you go too far. Also, pressing Y moves the message or battle window up or down.

If you go up the stairs, you'll learn more things. The most important thing you'll learn about are techniques, which work like spells and cost MP (magic points) to use. Some techniques have an area of effect that will hit any enemies near the one you choose, while there are others that can hit enemies in a straight line on the way towards hitting the one you've targered. There are others still that can only be done when you are surrounded by enemies and hit all nearby enemies who are swarming you.

You'll also learn about status ailments.

  • Poison slowly decreases HP and weakens attacks. (indicated by blue bubbles above the character)
  • Slow increases the time between attacks. (indicated by the character's silhouette slowly flashing white)
  • Sleep lows your guard, and can be healed by an enemy's physical attack. (the character will be lying down with two Z's near them)
  • Chaos confuses you into attacking allies. (indicated by a rotating yellow star above the character)
  • Blind makes it harder to hit with physical attacks. (indicated with an eye followed by a blue X, with the status ailment image flashing between the two)
  • Lock keeps you from using techniques. (indicated by the blue question mark above the character)
  • Stop immobilizes and disables you. (indicated by the stopwatch above the character)

Status ailments go away after battle, and they can also be healed with a Heal item or a technique that can heal status ailments during battle.

If a character's HP goes down to zero, you'll need to use a Revive on them to bring them back to life. (You will have to heal them if you do that, though.) If all party members are down at the same time, the game is over.

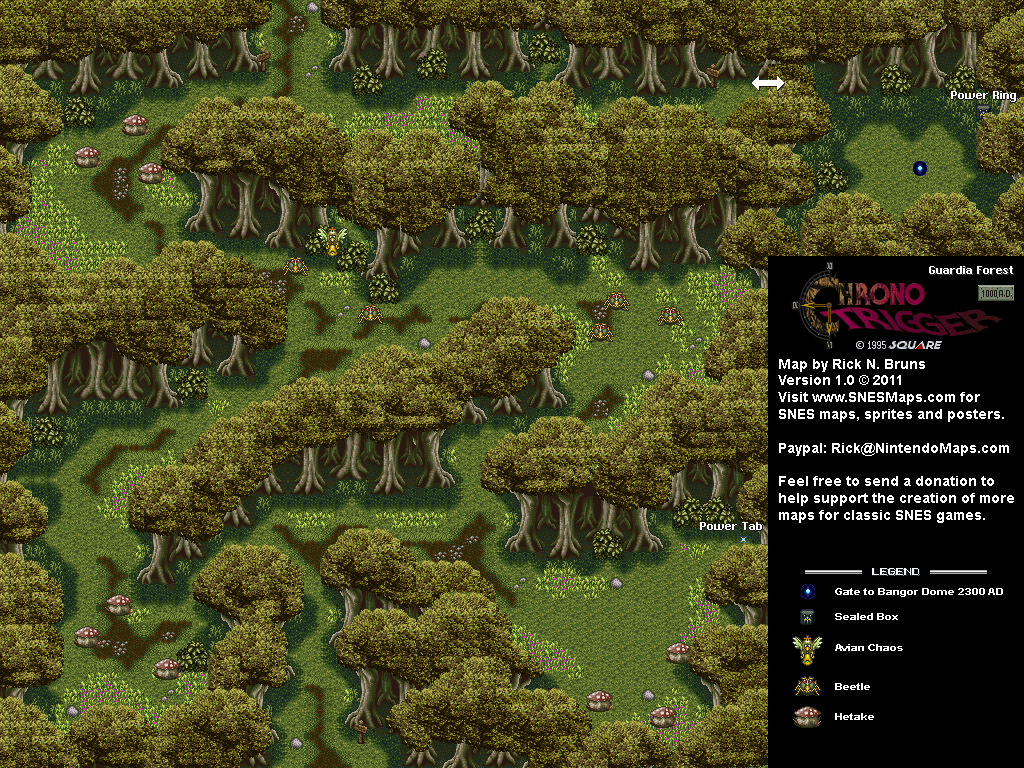
From the Mayor's Manor, we head to the Guardia Forest to fight some enemies. Unlike in other RPGs, in which enemy encounters are random, you can run into the monsters you see to fight them, and you can also choose to avoid them if need be.


The Hetakes just jump at us every so often. Bugs will attack whoever from wherever. The Avian Chaos can cast Chaos on either party member. When you win battles, you'll get experience points to level up and get stronger, tech points for learning techniques, gold and, if any monsters are carrying anything, items.

The D-Pad and the A button can be used to select things, while B cancels. Att. lets you attack, Tech lets you use techniques, and Item lets you use items. You can see the names of the enemies to the left, as well as the status of your character's HP, MP and battle gauges to the right. When a character's battle gauge is filled up, you can perform an action with them.

Here, I cover techniques a little bit further. By learning certain techniques, you can learn Double Techs and Triple Techs. If Crono learns Cyclone - a spinning slash attack that attacks any enemies near the one selected - and Marle learns Aura - a technique that can heal a single character for a few HP - both characters can cast Aura Whirl, which heals the entire party for even more HP. When both Crono and Marle have their battle gauges filled, Tech will turn to Comb on their menus, and you can use the technique. It requires MP from both characters casting it, so watch your MP! Triple Techs, when you have three members in your party, can be obtained and used the same way and work more or less the same way, but they are even more powerful than the Double Techs.

I also talk about the first three screens on the menu, which you can access by pressing X. The first one is the status menu, where you can see your party members' (and reserve members') stats, HP, MP, armor, weapons and so on, as well as how much gold you have. You can equip weapons, armor and accessories here.

The second one is the inventory, where you can see what you have in your inventory, what it does, who can use what, and so on. You can even use the Organize option to organize items by type.

The third one is the techniques menu, where you can see the techniques you've learned and what they do, as well as how many tech points it takes to learn the next technique. Unlike in other RPGs, where you learn certain spells at certain levels, you have to get points to learn techniques, which you can learn at any time. Only characters in the active party can get and accrue tech points.

Friday, August 30, 2024

PrinceWatercress plays Chrono Trigger (Super NES) - Part 1 of 70


I've been waiting to play this game for years...and now, I finally get to do it. Welcome to Let's Play #400!

Next | End

When you start the game, you can choose between Active and Wait for the Battle Mode. Active has enemies attacking you even as you are making choices during battle, while Wait allows you to take your time while picking spells and items to use and enemies to attack. If this is your first time, Wait is recommended, but if you're good at this game or you're good at thinking under such pressure, use Active.

You'll also get to name the main character, whose default name is Crono. You only get five letters to work with, so make them count.

The game starts with balloons being released at the nearby community square. You are Crono, and you live in Truce Village. As Leene's Bell rings throughout the village, someone keeps trying to wake you up. Press A to get through the dialogue, and you'll find out it is Crono's mom, who tells Crono to get out of bed and enjoy himself at the Millennium Fair. From here, you can move around with the D-Pad, and you can also hold B while moving to run. You can also hold Up in front of the window to let the sunlight in and out.

When you go down the stairs, Crono's mom will mention Lucca's invention, and you'll also get the chance to rename Lucca. From here, you're free to leave the house, but if you walk up to Crono's mom and press A in front of her to talk to her again, you'll get another 200 G from your allowance. You now have more money! Not only does pressing A let you talk to people, but it also lets you examine things.


When you leave the house, you'll be on the World Map. The D-Pad will let you move around, and A lets you enter buildings and other places should the name of a place show up on the screen. Pressing Select shows you the world map (which I don't mention until a little later).

Instead of heading to Leene Square to get further into the story as the game demands, I actually spend some time walking around the part of the world that I can walk around in, talking to people in residences, looking at mysterious boxes that can't be opened, crossing the bridge and the desert, checking out the other town and even riding the ferry. There's a little bit of things here that you can do that you don't even need to do to beat the game, which is why I show some of it off.

There's also the Mayor's Manor in Truce Village, but I wait until the next video to show it off.

Thursday, August 29, 2024

PrinceWatercress plays Berzerk (Atari 2600) - Game 2 Longplay


I don't do as well here. In future longplays, I do a lot better.

First | Previous | Next | End

Game 2 introduces Evil Otto. Evil Otto is a bouncing smiley face that hunts you down from the starting point of the room and does not stop. In some modes, he can be shot down temporarily only to return; in others where he shows up, he is completely invincible. In Game 2, Evil Otto can be shot down, but he will quickly come back. This will make it harder to get the room clearing bonus everywhere you go, but at least you can temporarily stop him.

Wednesday, August 28, 2024

PrinceWatercress plays Attack of the Killer Tomatoes (Game Boy) - The Longplay


Here's the whole game in one sitting, minus commentary and featuring the Zoltan battle glitch that I mentioned in the final part! Enjoy!


The game starts with Whitely White, local reporter, reporting on the adventures of Wilbur Finletter, the protagonist of the first Killer Tomatoes movie and the protagonist of this game. Doctor Gangrene has begun an assault on the world with his killer tomatoes, starting with San Zucchini, where the tomatoes have taken over the city and nearby countryside. As Wilbur Finletter, you are the only one who can stop the attack.

Level 1


Left and Right let you move around, and Down lets you duck. You jump with the B button and attack with A, which is the reverse of what A and B usually do in side-scrolling platformers. Holding Up while jumping lets you jump slightly higher. Pressing just A lets you kick, but holding Down and pressing A lets you do a low kick and Up and A lets you punch. Up and Down let you climb up and down a ladder when in front of him.

Select let you move forward in the direction you're facing on a skateboard to move more quickly. If you press Select in the air, Wilbur open the parachute, assuming you've already found it. It looks like a folded blanked tied up with string. Start lets you throw a sword forward, should you have one, and if you hold Up, you can throw one diagonally into the air.

To pause the game, press Select and Start simultaneously, and press any button to un-pause. Pressing A, B, Select and Start at the same time does a soft reset that takes you back to the title screen.

If you see any numbers in the air, you can pick them up for that amount of points. An X with numbers over it is a bonus multiplier. Multipliers not only multiply the amount of points you get, but also the number of cherry tomatoes you get when you collect one.

Kicking things such as tree stumps, mailbox, garbage can and buckets and other things can spawn items, including tomatoes you can defeat. When in doubt, hit it!

On the bottom of the screen, from left to right, you'll see your current amount of lives (hearts), your current amount of hit points (medals), the number of cherry tomatoes you've collected, your bonus multiplier, your current amount of swords in your possession, the current amount of time you have left, and your current score.

You'll need to attack rocks to get them out of your way. If a rock has enough space to move, it will roll forward. Do not touch a rolling rock, as it will cost you a hit point.

Tomatoes will spawn from out of nowhere. Pay attention to how they move before attacking or jumping on them. When you beat up a tomato, two cherry tomatoes will pop out. Collect them to get closer to an extra life (which requires 100 to get). If a cherry tomatoes bounces around on the screen for too long, it will turn back into an enemy tomato and you will have to defeat it again.

Certain parts of the ground as well as tree branches act as trampolines. If you hold A before leaping off of them, you'll bounce up higher.

Stationary cloud platforms are bouncy and will bounce you upwards if you leap on them. The moving ones do not, but they make rather nice moving platforms.

Whatever you do, do not pick up any flashing cherry tomatoes. You'll lose ten cherry tomatoes if you do.

Hearts give you extra lives, and medals give you extra hit points. Losing all your hit points will cost you a life, as will falling into a bottomless pit or running out of time. If that happens, you'll be taken back to the beginning of the level, as checkpoints do not exist in this game.

The can with the tomato on it is the tomato can, and you'll need to collect this before you can use the exit and go to the next level.

Some platforms will fall apart and disappear when you step or jump on them, so be careful. Speaking of platforms, the bridge is rickety and will fall apart, and you'll also want to watch out for the flying bat-like enemy as you make your way to the exit. Once you have the tomato can, jump onto the tree stump at the end and hold Down to climb into the tree stump to the next level.

Level 2

In this level, you'll be in the city.

Jumping through or attacking windows will break them and sometimes give you items.

Watch out for tomatoes with sombreros, as they can spit fire at you while moving back and forth.

The poles hanging out from the edges of buildings act as trampolines if you leap off the edges of them. Awnings can also act as trampolines.

The lighting bolt gives you temporary invincibility.

There is a hidden trampoline directly underneath the tomato can; use it to get back to solid ground after getting the can.

Level 3

Wilbur Finletter has made it to his own pizza parlor, which is now swarming with tomatoes.

Jumping into the fans will hurt you. If you run into the pizza making machine, you'll be turned into a pizza, and you may fall into a pit with help from the nearby conveyor belts.

Be careful with some platforms as you make your way through this maze of a pizza platform, as some parts of platforms and tables can collapse when you step or jump onto them.

You'll need to kick a pot shortly after the start to get the tomato can. Be sure to kick pots whenever possible for enemies to defeat as well as medals and swords.

The pizza pans act just like the rocks. If you kick one into motion, don't move into it or else you'll take a hit.

Level 4

For this level, you'll want to stay on the rooftops and take the high road the entire time. When you see the house with the dark colored arches below the roof, make your way down and hit the windows at the lowest point to find the tomato can.

Level 5

Beefsteak is your first boss. Be careful as you make your way through the maze-like corridors, as there are plenty of flying enemies and tomato enemies along the way. 

To beat Beefsteak, avoid the smoke-like projectiles that he snorts out and either throw a sword at him or jump on him. When he is destroyed, he will leave a tomato can, but watch out for the waves of energy that he shoots out after dying.

You'll be able to get some bonus points before the level ends proper.

Level 6

In this level, you'll be back in the countryside and you'll have to use the platforms and the branches to make your way upwards before eventually making your way back down to the exit. Pay attention and watch out for tomatoes on the way up. On the way down, stay to the left for some pick-ups, including the tomato can that is left of where the exit is.

Level 7

Be careful when climbing the ladders at the beginning, as Wilbur Finletter is pretty slow at climbing ladders.

Thankfully, there aren't as many bottomless pits here as there were in Level 4, and the tomato can is at the exit.

Level 8

It's another pizza parlor level. Be ready to jump over the machine at the start so you don't get turned into a pizza.

The tomato can is in a pot near the end in the upper-left corner that you'll have to hit. Also, some of the platforms near the end will have a springboard in the middle to launch you upwards.

Level 9

Once again, you're going though another dungeon level, and this time, you'll face Viper, the second of Doctor Gangrene's super tomatoes. There are a few hidden passages that will lead you to pick-ups, one of which is an extra hit points. Too bad you lose all your extra hit points when you reach the boss room, but you'll find two in the boss room itself..

Viper's projectiles will travel further, and he jumps around a lot more. When you land enough hits, he will have a second form where he spits out energy projectiles that move quickly, and he can also move quickly around the room. Be ready to jump on him when necessary. When he dies, he shoots out some desperation energy waves as he leaves the tomato can.

Level 10

You're on the rooftops here. Be very careful here, as you don't have a lot of leeway vertically as to where you can go.

You'll find the tomato can in plain view underneath the floor of a building with two dark arches, and if you drop into the pit between the arches, you'll find a bonus room where you can get a ton of points. You can get a lot of multipliers in this level to get some extra lives at the last moment with; just watch out for those shrapnel tomatoes near the end.

Level 11

This dungeon is the last level in the game, and if you make it to the end, you'll face Zoltan.

Zoltan has three forms. The first is the horned form that we were used to with Beefsteak that jumps around and snorts smoke, and there's the second form from Viper with the energy waves and the quick movement. But when you beat the second form, you'll get a third form that can move even more quickly along the room without hopping and will spit plenty of projectiles. If you have any swords, be sure to throw them at Zoltan. Also, make sure Zoltan is on-screen when he dies or else he will disappear and you won't be able to get the tomato can, and you'll have to wait for the timer to run out before you can try again.

Once you beat Zoltan, you'll beat the game! Congratulations!

Tuesday, August 27, 2024

PrinceWatercress plays Attack of the Killer Tomatoes (Game Boy) - Part 4 of 4


These two levels are the last, but you've got one more boss to beat before beating Doctor Gangrene at his own game.


Level 10

You're on the rooftops here. Be very careful here, as you don't have a lot of leeway vertically as to where you can go.

You'll find the tomato can in plain view underneath the floor of a building with two dark arches, and if you drop into the pit between the arches, you'll find a bonus room where you can get a ton of points. You can get a lot of multipliers in this level to get some extra lives at the last moment with; just watch out for those shrapnel tomatoes near the end.

Level 11

This dungeon is the last level in the game, and if you make it to the end, you'll face Zoltan.

Zoltan has three forms. The first is the horned form that we were used to with Beefsteak that jumps around and snorts smoke, and there's the second form from Viper with the energy waves and the quick movement. But when you beat the second form, you'll get a third form that can move even more quickly along the room without hopping and will spit plenty of projectiles. If you have any swords, be sure to throw them at Zoltan. Also, make sure Zoltan is on-screen when he dies or else he will disappear and you won't be able to get the tomato can, and you'll have to wait for the timer to run out before you can try again.

Once you beat Zoltan, you'll beat the game! Congratulations!

Monday, August 26, 2024

PrinceWatercress plays Attack of the Killer Tomatoes (Game Boy) - Part 3 of 4


In this entry, we face our second boss battle, and it's definitely harder than the first one.


Level 7

Be careful when climbing the ladders at the beginning, as Wilbur Finletter is pretty slow at climbing ladders.

Thankfully, there aren't as many bottomless pits here as there were in Level 4, and the tomato can is at the exit.

Level 8

It's another pizza parlor level. Be ready to jump over the machine at the start so you don't get turned into a pizza.

The tomato can is in a pot near the end in the upper-left corner that you'll have to hit. Also, some of the platforms near the end will have a springboard in the middle to launch you upwards.

Level 9

Once again, you're going though another dungeon level, and this time, you'll face Viper, the second of Doctor Gangrene's super tomatoes. There are a few hidden passages that will lead you to pick-ups, one of which is an extra hit points. Too bad you lose all your extra hit points when you reach the boss room, but you'll find two in the boss room itself.

Viper's projectiles will travel further, and he jumps around a lot more. When you land enough hits, he will have a second form where he spits out energy projectiles that move quickly, and he can also move quickly around the room. Be ready to jump on him when necessary. When he dies, he shoots out some desperation energy waves as he leaves the tomato can.

Sunday, August 25, 2024

PrinceWatercress plays Attack of the Killer Tomatoes (Game Boy) - Part 2 of 4


This is where the levels get interesting and also a little bit harder.


Level 4

For this level, you'll want to stay on the rooftops and take the high road the entire time. When you see the house with the dark colored arches below the roof, make your way down and hit the windows at the lowest point to find the tomato can.

Level 5

Beefsteak is your first boss. Be careful as you make your way through the maze-like corridors, as there are plenty of flying enemies and tomato enemies along the way. 

To beat Beefsteak, avoid the smoke-like projectiles that he snorts out and either throw a sword at him or jump on him. When he is destroyed, he will leave a tomato can, but watch out for the waves of energy that he shoots out after dying.

You'll be able to get some bonus points before the level ends proper.

Level 6

In this level, you'll be back in the countryside and you'll have to use the platforms and the branches to make your way upwards before eventually making your way back down to the exit. Pay attention and watch out for tomatoes on the way up. On the way down, stay to the left for some pick-ups, including the tomato can that is left of where the exit is.

Saturday, August 24, 2024

PrinceWatercress plays Attack of the Killer Tomatoes (Game Boy) - Part 1 of 4


Never thought I would be playing a game based on this movie franchise, but I guess there's a first time for everything. In this entry, we cover the first three levels of the game.


The game starts with Whitely White, local reporter, reporting on the adventures of Wilbur Finletter, the protagonist of the first Killer Tomatoes movie and the protagonist of this game. Doctor Gangrene has begun an assault on the world with his killer tomatoes, starting with San Zucchini, where the tomatoes have taken over the city and nearby countryside. As Wilbur Finletter, you are the only one who can stop the attack.

Level 1

Left and Right let you move around, and Down lets you duck. You jump with the B button and attack with A, which is the reverse of what A and B usually do in side-scrolling platformers. Holding Up while jumping lets you jump slightly higher. Pressing just A lets you kick, but holding Down and pressing A lets you do a low kick and Up and A lets you punch. Up and Down let you climb up and down a ladder when in front of him.

Select let you move forward in the direction you're facing on a skateboard to move more quickly. If you press Select in the air, Wilbur open the parachute, assuming you've already found it. It looks like a folded blanked tied up with string. Start lets you throw a sword forward, should you have one, and if you hold Up, you can throw one diagonally into the air.

To pause the game, press Select and Start simultaneously, and press any button to un-pause. Pressing A, B, Select and Start at the same time does a soft reset that takes you back to the title screen.

If you see any numbers in the air, you can pick them up for that amount of points. An X with numbers over it is a bonus multiplier. Multipliers not only multiply the amount of points you get, but also the number of cherry tomatoes you get when you collect one.

Kicking things such as tree stumps, mailbox, garbage can and buckets and other things can spawn items, including tomatoes you can defeat. When in doubt, hit it!

On the bottom of the screen, from left to right, you'll see your current amount of lives (hearts), your current amount of hit points (medals), the number of cherry tomatoes you've collected, your bonus multiplier, your current amount of swords in your possession, the current amount of time you have left, and your current score.

You'll need to attack rocks to get them out of your way. If a rock has enough space to move, it will roll forward. Do not touch a rolling rock, as it will cost you a hit point.

Tomatoes will spawn from out of nowhere. Pay attention to how they move before attacking or jumping on them. When you beat up a tomato, two cherry tomatoes will pop out. Collect them to get closer to an extra life (which requires 100 to get). If a cherry tomatoes bounces around on the screen for too long, it will turn back into an enemy tomato and you will have to defeat it again.

Certain parts of the ground as well as tree branches act as trampolines. If you hold A before leaping off of them, you'll bounce up higher.

Stationary cloud platforms are bouncy and will bounce you upwards if you leap on them. The moving ones do not, but they make rather nice moving platforms.

Whatever you do, do not pick up any flashing cherry tomatoes. You'll lose ten cherry tomatoes if you do.

Hearts give you extra lives, and medals give you extra hit points. Losing all your hit points will cost you a life, as will falling into a bottomless pit or running out of time. If that happens, you'll be taken back to the beginning of the level, as checkpoints do not exist in this game.

The can with the tomato on it is the tomato can, and you'll need to collect this before you can use the exit and go to the next level.

Some platforms will fall apart and disappear when you step or jump on them, so be careful. Speaking of platforms, the bridge is rickety and will fall apart, and you'll also want to watch out for the flying bat-like enemy as you make your way to the exit. Once you have the tomato can, jump onto the tree stump at the end and hold Down to climb into the tree stump to the next level.

Level 2

In this level, you'll be in the city.

Jumping through or attacking windows will break them and sometimes give you items.

Watch out for tomatoes with sombreros, as they can spit fire at you while moving back and forth.

The poles hanging out from the edges of buildings act as trampolines if you leap off the edges of them. Awnings can also act as trampolines.

The lighting bolt gives you temporary invincibility.

There is a hidden trampoline directly underneath the tomato can; use it to get back to solid ground after getting the can.

Level 3

Wilbur Finletter has made it to his own pizza parlor, which is now swarming with tomatoes.

Jumping into the fans will hurt you. If you run into the pizza making machine, you'll be turned into a pizza, and you may fall into a pit with help from the nearby conveyor belts.

Be careful with some platforms as you make your way through this maze of a pizza platform, as some parts of platforms and tables can collapse when you step or jump onto them.

You'll need to kick a pot shortly after the start to get the tomato can. Be sure to kick pots whenever possible for enemies to defeat as well as medals and swords.

The pizza pans act just like the rocks. If you kick one into motion, don't move into it or else you'll take a hit.

Friday, August 23, 2024

PrinceWatercress plays Berzerk (Atari 2600) - Game 1 Longplay


Now that all of the game variations have been covered, it's time to do a longplay for each one.

These will be spaced out to upload between Let's Plays, so as not to take any time away from future Let's Plays than I would like, so have fun with these when they show up!

First | Previous | Next | End

Here is the story, according to the manual:

The Astro Date is 3200 and you are the last survivor of a small group of earth people who came to explore the planet Mazeon. Soon after landing, you discovered the planet is a dark, apparently uninhabitable place. But by then it was too late to turn back because your space craft had been destroyed by Automazeons.

Now you are a prisoner here. You are trapped in a maze where even the walls are death to touch. Grim robot thugs known as "Automazeons" stalk you relentlessly and you must systematically pulverize them with your laser gun before they eliminate you with theirs.

You are never safe on the planet Mazeon. Even when you've destroyed the mechanical heavies, Evil Otto, the mad and merciless mind behind the robot gangs, leaps out from where he's been observing the battle. You flee in panic because you know that you cannot kill Evil Otto and that, once he catches you, you'll never escape.

He will pound you to a lifeless pulp, grinning like a maniac all the while. Your only hope is to get out of the electrified maze before Evil Otto catches you.

If you do get out, you find yourself in another maze. Again the faceless robots shoot at you, again Evil Otto pursues you, again you must dodge and shoot and run ... into yet another maze. It's enough to drive you bonkers!

The fire button fires a bullet in the last direction you travelled, while the joystick is used to move in eight directions. You can fire in any of the eight directions, including diagonally, in order to take down the robots that slowly hunt you down and fire at you.

Shooting down the robots will obviously give you points, and if you defeat all of the robots in a room before moving on to another one, you'll get some bonus points of top of all that destruction which is bigger the more robots you have to shoot down in a room. You'll get an extra life after getting enough points (which depends on the game variation), and you'll need all the lives you can get for the highest score. You lose a life if you get hit by an enemy laser or by Evil Otto (more on Otto later) or if you run into a wall. Lose all your lives, and the game is over.

There are twelve game variations, and have different rules such as whether or not enemies shoot at you, how many points you need for an extra life (or in some variations, whether you can earn extra lives at all) or if Evil Otto is nonexistent, temporarily stoppable or invincible (again, more on Otto later).

The robots will shoot at you if you are completely lined up with them, and the more rooms you go through, the faster their lasers will be. You'll need to be ready to move as well as have more than enough distance between you and them as you get further into this never-ending game. Interestingly, they don't start shooting at you until you exit your first room, after which the lasers start out slow and get faster and faster as you progress. Unlike the robots, however, you can fire in the four cardinal directions as well as diagonally, allowing you to take some pots shots at the robots when they will least expect them.

As you go through the rooms, the robots will be yellow and go from that color to orange to green to blue and finally purple before going back to purple. Once you loop back to yellow from there, the robots will be at their most dangerous and their lasers will be at their fastest speed. Once you get through the "first loop," you may have to be a little crafty to take out some enemies. Thankfully, the walls are just as bad for the robots as they are for you, and if they run into the walls, they will die. It is possible to get a robot to inadvertently shoot another robot and kill it, giving you the points.

Every once in a while, a bullet will not kill a robot. If that happens, just shoot the robot again and it will go down.

In Game 1, the robots will shoot at you, but Evil Otto is nowhere in sight and you'll get an extra life every 1,000 points, making it the easiest of the "default-style" variations.

Game 1 is not the easiest game variation, but it is not the hardest one, either. You may get bored with it once you hone your skills enough, and you just might find yourself playing the other game variations, which you can access with the Game Select switch (the difficulty switches are not used in this game). Thankfully, the other game variations will be covered in future videos.

Thursday, August 22, 2024

PrinceWatercress plays Berzerk (Atari 2600) - Part 13 of 13


Just when you thought this was done, I get to show off a ROM hack of the game that allows for digitized speech. Better late than never, and what's there is pretty awesome.

First | Previous | Next | End

In 2002, Mike Mika hacked digital voice samples similar to those in the arcade version into the Atari 2600 port of the game. It includes the phrases "Intruder Alert! Intruder Alert!", "Chicken, fight like a robot," and "The humanoid must not escape" as you move from one room to another. The game also has darker blue walls and a green player character to more closely resemble the arcade version.

There were also physical copies of the game sold at the 2002 Classic Gaming Expo, which quickly sold out, giving this ROM hack physical form.

You can find the ROM hack here.

Wednesday, August 21, 2024

PrinceWatercress plays Berzerk (Atari 2600) - Part 12 of 13


...and now for the easiest game variation of all!

First | Previous | Next | End

Game 12 is the easiest game variation of all. The robots don't shoot at you, the game gives you an extra life every 1,000 points, and Evil Otto does not show up at all. As a result, this is a very good game mode to play for young children or anyone who is not used to how the game plays.

Tuesday, August 20, 2024

PrinceWatercress plays Berzerk (Atari 2600) - Part 11 of 13


What's this? The game modes are suddenly getting easier near the end? Well, this is something.

First | Previous | Next | End

Game 11 is just like Game 10 in which the robots don't shoot at you and you get an extra life every 1,000 points, but this time, Evil Otto can be shot down and taken out temporarily, making this variation easier than Game 10. But the easiest game mode is yet to come...

Monday, August 19, 2024

PrinceWatercress plays Berzerk (Atari 2600) - Part 10 of 13


At this point, the game variations get a little simpler again...

First | Previous | Next | End

Game 10 is a little different. You get an extra life every 1,000 points, but this time, the robots don't shoot at you. Also, Evil Otto is invincible instead of non-existent, breaking the pattern from the other sets of game variations and going in reverse with the Evil Otto appearances. Game 10-12 allows for players to practice with enemies without enemies shooting back.

Sunday, August 18, 2024

PrinceWatercress plays Berzerk (Atari 2600) - Part 9 of 13


It's time for the hardest game variation with this entry. Good luck with this one!

First | Previous | Next | End

Game 9 is just like Game 8: the robots shoot and there are no extra lives to help you. Unlike Game 8, however, Evil Otto can't be destroyed. At this point, survival is absolutely essential.

Saturday, August 17, 2024

PrinceWatercress plays Berzerk (Atari 2600) - Part 8 of 13


Game 8 may be a little more difficult than Game 7, but just wait until Game 9...

First | Previous | Next | End

In Game 8, the rules are the same as Game 7 - robots shoot at you and extra lives are completely obtainable - but this time, Evil Otto is involved. It is possible to temporarily get rid of him, but what do you consider choosing...points or safety?

Friday, August 16, 2024

PrinceWatercress plays Berzerk (Atari 2600) - Part 7 of 13


Looking for a challenge on the Atari 2600 version of Berzerk? This and the next two variations have it!

First | Previous | Next | End

In Game 7, Evil Otto is gone, but the robots will shoot at you. The worst part? There are no extra lives in Game 7. If you lose a life, you lose it for good. Games 7-9 are the "survival modes" of the game, with each successive game variation more difficult than the last. You'll need to play very, very well on this variation as well as Game 8 or Game 9 to get a high score.

Thursday, August 15, 2024

PrinceWatercress plays Berzerk (Atari 2600) - Part 6 of 13


If you think this is hard, you ain't seen nothin' yet!

First | Previous | Next | End

We have the same rules for extra lives and shooting robots as in Games 4 and 5 for Game 6, but this time, Evil Otto is invincible. Once again, survival is the main mission.

The next three game variations are going to be the hardest...

Wednesday, August 14, 2024

PrinceWatercress plays Berzerk (Atari 2600) - Part 5 of 13


Game 5 is the same as Game 4, except Evil Otto is involved. At least it's not as hard as Game 6.

First | Previous | Next | End

In Game 5, Evil Otto is back, but at least you can take him out of the picture temporarily with your bullets. Otherwise, it's the same as Game 4: the robots still shoot at you, and you'll need 2,000 points to get an extra life.

Tuesday, August 13, 2024

PrinceWatercress plays Berzerk (Atari 2600) - Part 4 of 13


Ever felt getting extra lives in this game was too easy? This and the next two game variations may be the ones for you!

First | Previous | Next | End

In Game 4, things get a little more interesting. This variation is much like Game 1, except that you'll need to earn 2,000 points to gain an extra life, so you'll need to be a little more careful while getting a high score. At least Evil Otto isn't here.

Monday, August 12, 2024

PrinceWatercress plays Berzerk (Atari 2600) - Part 3 of 13


When Evil Otto can't be killed (temporarily), everything hits the fan.

First | Previous | Next | End

In Game 3, Evil Otto is invincible. This changes the game even more, as you'll be forced to make decisions once Evil Otto shows up. Do you risk getting the "all robots destroyed" bonus? Or do you get the heck out of there? Either way, you still get an extra life at 1,000. Just don't be surprised if it's slightly harder here.

Sunday, August 11, 2024

PrinceWatercress plays Berzerk (Atari 2600) - Part 2 of 13


Game 2 introduces Evil Otto, and his presence definitely changes the game both figuratively and literally.

First | Next | End

Game 2 introduces Evil Otto. Evil Otto is a bouncing smiley face that hunts you down from the starting point of the room and does not stop. In some modes, he can be shot down temporarily only to return; in others where he shows up, he is completely invincible. In Game 2, Evil Otto can be shot down, but he will quickly come back. This will make it harder to get the room clearing bonus everywhere you go, but at least you can temporarily stop him.

Evil Otto was named after Dave Nutting Associates employee Dave Otto, who smiled when he chewed people out, locked everyone out of the office to enforce an hour-long lunch break and piped muzak and easy listening music into every room in the office. I'm guessing Dave wasn't very well liked.

Saturday, August 10, 2024

PrinceWatercress plays Berzerk (Atari 2600) - Part 1 of 13


It was only a matter of time before I played this one. This is one I've wanted to cover for a while.

Next | End

Here is the story, according to the manual:

The Astro Date is 3200 and you are the last survivor of a small group of earth people who came to explore the planet Mazeon. Soon after landing, you discovered the planet is a dark, apparently uninhabitable place. But by then it was too late to turn back because your space craft had been destroyed by Automazeons.

Now you are a prisoner here. You are trapped in a maze where even the walls are death to touch. Grim robot thugs known as "Automazeons" stalk you relentlessly and you must systematically pulverize them with your laser gun before they eliminate you with theirs.

You are never safe on the planet Mazeon. Even when you've destroyed the mechanical heavies, Evil Otto, the mad and merciless mind behind the robot gangs, leaps out from where he's been observing the battle. You flee in panic because you know that you cannot kill Evil Otto and that, once he catches you, you'll never escape.

He will pound you to a lifeless pulp, grinning like a maniac all the while. Your only hope is to get out of the electrified maze before Evil Otto catches you.

If you do get out, you find yourself in another maze. Again the faceless robots shoot at you, again Evil Otto pursues you, again you must dodge and shoot and run ... into yet another maze. It's enough to drive you bonkers!

The fire button fires a bullet in the last direction you travelled, while the joystick is used to move in eight directions. You can fire in any of the eight directions, including diagonally, in order to take down the robots that slowly hunt you down and fire at you.

Shooting down the robots will obviously give you points, and if you defeat all of the robots in a room before moving on to another one, you'll get some bonus points of top of all that destruction which is bigger the more robots you have to shoot down in a room. You'll get an extra life after getting enough points (which depends on the game variation), and you'll need all the lives you can get for the highest score. You lose a life if you get hit by an enemy laser or by Evil Otto (more on Otto later) or if you run into a wall. Lose all your lives, and the game is over.

There are twelve game variations, and have different rules such as whether or not enemies shoot at you, how many points you need for an extra life (or in some variations, whether you can earn extra lives at all) or if Evil Otto is nonexistent, temporarily stoppable or invincible (again, more on Otto later).

The robots will shoot at you if you are completely lined up with them, and the more rooms you go through, the faster their lasers will be. You'll need to be ready to move as well as have more than enough distance between you and them as you get further into this never-ending game. Interestingly, they don't start shooting at you until you exit your first room, after which the lasers start out slow and get faster and faster as you progress. Unlike the robots, however, you can fire in the four cardinal directions as well as diagonally, allowing you to take some pot shots at the robots when they will least expect them.

As you go through the rooms, the robots will be yellow and go from that color to orange to green to blue and finally purple before going back to purple. Once you loop back to yellow from there, the robots will be at their most dangerous and their lasers will be at their fastest speed. Once you get through the "first loop," you may have to be a little crafty to take out some enemies. Thankfully, the walls are just as bad for the robots as they are for you, and if they run into the walls, they will die. It is possible to get a robot to inadvertently shoot another robot and kill it, giving you the points.

Every once in a while, a bullet will not kill a robot. If that happens, just shoot the robot again and it will go down.

In Game 1, the robots will shoot at you, but Evil Otto is nowhere in sight and you'll get an extra life every 1,000 points, making it the easiest of the "default-style" variations.

Game 1 is not the easiest game variation, but it is not the hardest one, either. You may get bored with it once you hone your skills enough, and you just might find yourself playing the other game variations, which you can access with the Game Select switch (the difficulty switches are not used in this game). Thankfully, the other game variations will be covered in future videos.

Friday, August 9, 2024

PrinceWatercress plays Wizard Adventure - The Longplay


Now to blow through this game silently before going on to another game. Enjoy!


Wizard Adventure is a text adventure for the BBC Micro and is also one of eight games in The Soft Centre Collection. In this game, you have been turned into a troll by a witch, and you'll need to enter a valley where quite a few adventurers have been killed in order to find two items for a wizard who lives in the area and turn back to normal. It's a pretty short text adventure, and while nothing here will kill you and getting lost is more or less impossible, you actually have the luxury of more than one ending and it's a fine text adventure game for beginners.

After choosing whether to play as a male or female character (which doesn't affect much of anything in the game), you'll get the story and the instructions. The game takes the usual adventure commands such as TAKE, DESCRIBE and DROP. The function keys will act as NORTH, SOUTH, EAST, WEST, INVENTORY, LOOK, DESCRIBE, TAKE, DROP and HELP from Function Keys F1-F9 followed by F0, respectively. You can also type them out, which I do throughout the playthrough, anyway. HELP takes you back to the commands and function key shortcuts if you need them.

You'll start near a demon. Despite the island being dangerous, the demon does not hurt you. Go NORTH to find a large rock. EXAMINE ROCK to find out that the rock has writing on it. READ INSCRIPTION, and you'll find out that the word "WALROG" is on it. Go back SOUTH to the demon, then head WEST to the huge wall and SAY WALROG. You'll open the wall up to reveal a cave with some bones inside. TAKE BONES.

Go EAST and NORTH back to the rock, then go EAST again. There will be a piece of fresh, raw meat on the ground. TAKE MEAT. Go EAST to find a pile of leaves. EXAMINE LEAVES to find a shovel. TAKE SHOVEL. Go NORTH from where you found the SHOVEL to find a bronze sword. TAKE SWORD.

Head back to where the demon is (SOUTH, WEST, WEST, SOUTH) and KILL DEMON with the sword in your inventory. You'll kill the demon and drop the sword. The demon will also drop a bangle, which is completely useless.

Go NORTH back to the rock, then go NORTH again. There will be a sack here. DESCRIBE SACK to find out that something is in it, then EXAMINE SACK to find out that that something in the bag is flour. The flour is useless, so don't take it. Go NORTH to find an ordinary stretch of bare ground. DIG with the shovel in your inventory to find a bottle of rum. You'll also drop the shovel. Leave the shovel and the rum; they're both useless.

Go EAST from the rum to find a wild dog, which much like the demon, is also incapable of killing you. FEED DOG with the fresh, raw meat in your inventory to pacify the dog and also drop the meat. The dog will drop some herbs, but the herbs are actually useless. Go NORTH from here to find a bucket full of water. TAKE WATER, as the game does not recognize "take bucket" for some reason.

Go back to the sack of flour (SOUTH, WEST, SOUTH), then go WEST again. You'll meet a fire-breathing dragon. THROW WATER with the bucket of water in your inventory to extinguish the dragon's flame. The dragon will cower in fear and drop some black jet. TAKE JET.

Go back to the rock (EAST, then SOUTH), then go EAST, EAST, and SOUTH. You'll meet the wizard, and you'll be ready to turn back to normal. Type "GIVE ITEMS" to start giving the items. The two items you need to give are BONES and JET, as those are the two items that will turn you back into a human again. Any other combinations will turn you into a dragon and give you the bad ending. You've just completed Wizard Adventure!


Thursday, August 8, 2024

PrinceWatercress plays Wizard Adventure


It's been a while since I played a BBC Micro game...so let's play another text adventure, shall we?


Wizard Adventure is a text adventure for the BBC Micro and is also one of eight games in The Soft Centre Collection. In this game, you have been turned into a troll by a witch, and you'll need to enter a valley where quite a few adventurers have been killed in order to find two items for a wizard who lives in the area and turn back to normal. It's a pretty short text adventure, and while nothing here will kill you and getting lost is more or less impossible, you actually have the luxury of more than one ending and it's a fine text adventure game for beginners.

After choosing whether to play as a male or female character (which doesn't affect much of anything in the game), you'll get the story and the instructions. The game takes the usual adventure commands such as TAKE, DESCRIBE and DROP. The function keys will act as NORTH, SOUTH, EAST, WEST, INVENTORY, LOOK, DESCRIBE, TAKE, DROP and HELP from Function Keys F1-F9 followed by F0, respectively. You can also type them out, which I do throughout the playthrough, anyway. HELP takes you back to the commands and function key shortcuts if you need them.

You'll start near a demon. Despite the island being dangerous, the demon does not hurt you. Go NORTH to find a large rock. EXAMINE ROCK to find out that the rock has writing on it. READ INSCRIPTION, and you'll find out that the word "WALROG" is on it. Go back SOUTH to the demon, then head WEST to the huge wall and SAY WALROG. You'll open the wall up to reveal a cave with some bones inside. TAKE BONES.

Go EAST and NORTH back to the rock, then go EAST again. There will be a piece of fresh, raw meat on the ground. TAKE MEAT. Go EAST to find a pile of leaves. EXAMINE LEAVES to find a shovel. TAKE SHOVEL. Go NORTH from where you found the SHOVEL to find a bronze sword. TAKE SWORD.

Head back to where the demon is (SOUTH, WEST, WEST, SOUTH) and KILL DEMON with the sword in your inventory. You'll kill the demon and drop the sword. The demon will also drop a bangle, which is completely useless.

Go NORTH back to the rock, then go NORTH again. There will be a sack here. DESCRIBE SACK to find out that something is in it, then EXAMINE SACK to find out that that something in the bag is flour. The flour is useless, so don't take it. Go NORTH to find an ordinary stretch of bare ground. DIG with the shovel in your inventory to find a bottle of rum. You'll also drop the shovel. Leave the shovel and the rum; they're both useless.

Go EAST from the rum to find a wild dog, which much like the demon, is also incapable of killing you. FEED DOG with the fresh, raw meat in your inventory to pacify the dog and also drop the meat. The dog will drop some herbs, but the herbs are actually useless. Go NORTH from here to find a bucket full of water. TAKE WATER, as the game does not recognize "take bucket" for some reason.

Go back to the sack of flour (SOUTH, WEST, SOUTH), then go WEST again. You'll meet a fire-breathing dragon. THROW WATER with the bucket of water in your inventory to extinguish the dragon's flame. The dragon will cower in fear and drop some black jet. TAKE JET.

Go back to the rock (EAST, then SOUTH), then go EAST, EAST, and SOUTH. You'll meet the wizard, and you'll be ready to turn back to normal. Type "GIVE ITEMS" to start giving the items. The two items you need to give are BONES and JET, as those are the two items that will turn you back into a human again. Any other combinations will turn you into a dragon and give you the bad ending. You've just completed Wizard Adventure!


Wednesday, August 7, 2024

PrinceWatercress plays GG Doraemon: Nora no Suke no Yabou - The Longplay


Managed to pull a longplay of this game off after tweaking the final boss battle strategies. Now I can finally put this game behind me.


World 1-1

Left and Right lets you move left and right, Down lets you duck, and Button 1 jumps. If you hold Up while jumping, you can grab onto ceilings and platforms from underneath. From there, you can hold Up and jump again to pull yourself up a platform, or you can move left and right to shimmy across platforms and ceilings.

The boxes contain power-ups. To open them up, just move into them. The things that look like sandwiches are really candy, and if you pick up five of them in a level without dying, you'll get a 1-Up at the end of the level. The cat collar bell is an extra life that you can get right out of the gate.

The laser pistol lets you shoot a shot with Button 1 that stuns enemies. From there, you can pass by them or more easily jump on them, which you'll need to do to defeat enemies. The two enemies here are robot dogs that slowly move back and forth and occasionally stop to bark at you and the little orange guys that throw projectiles and also spin the drills on their heads. Be careful when fighting enemies, because it is one hit and you're dead. If you have a weapon in your hand, however, you can take an extra hit at the expense of the weapon. Any weapon you have at the end of a level is out of your possession in the next. Also, you have almost no invincibility frames, and if you die, it's back to the start, as the game has no checkpoints.

The thing that looks like a razor gives you temporary invincibility. As long as you are flashing, you can pass through enemies, but you won't damage them when you do.

World 1-2

The bats will move up and down. Watch where they go and jump on them when they come down to your level.

If you jump into a wall, Doraemon will latch on and slowly slide down. You can use Up and Down on the D-Pad to climb, and you can also jump straight up or to the side while latched onto a wall.

The pick-up that looks like a shotgun barrel shoots a blue shot that destroys enemies entirely. It can pass through enemies and take out more than one at a time, too.

Near the end, go right from the platform to find Suneo. The four kids who act as the protagonists as the series are hidden in each world, and you'll get the better ending if you find them all. Rescuing one of the kids also acts as one of the few checkpoints that the game has, so in case you die after this, you'll go back to where you rescued the kid instead of going back to the beginning. The "C" stands for continues, by the way. Also, keep in mind that when you come back from finding one of the kids, enemies will re-spawn.

World 1-3

The one-eyed enemies will stop at regular enemies to jump. If you need to, wait for them to jump, then hit them on the way down.

Besides the sides of the buildings, you'll also be able to climb some pipes to get higher up in the first section of this level.

After that, you'll need to jump off some rooftops before you face your first boss.

World 1-4

The boss is some floating one-eyed robot with hands. Jump on it when it dives towards you as well as when it lowers straight down and then hovers towards you. This boss is as easy as it gets, and it goes down after ten hits.

World 2-1

The fat orange robots will start moving around when you jump. The monkeys on the trees have hammers which can cause coconuts to come down.

To swim, just move around in any direction with the D-Pad. Some paths do have currents that push you in a certain direction, and the nautilus enemies will shake before they move somewhat quickly in one direction. Be ready to keep your distance and avoid them.

The eggs will contain the power-ups in this world.

World 2-2

The platforms that lead down to other areas disappear when you jump onto them. If you take the right path at the start, you'll get a magic mantle. It only attacks up close, but it still gives you an extra hit and can help take out enemies in tight spots.

The lava monsters will shoot lava projectiles in two directions, but you can still stomp on their heads.

You will slide down slopes automatically, but you can duck to get through the narrow gaps.

Be ready to grab onto ceilings to get past tough gaps.

Near the end, jump right into the ceiling while holding Up, then hold Right to find Jaian.

World 2-3

This is one of two flying levels in the game. You can move in eight directions while flying, but that's about it. Thankfully, you can't fly down past the bottom of the screen and accidentally lose a life.

The main enemy you'll see here are the blue seahorse-like creatures. Some of them will fly in and out and shoot projectiles at you as they do, while some of them will bounce upwards as they fly towards you.

If you stay low, you can find all five of the sweets and some invincibility easily. Be sure to tread carefully so you don't get hit, as there are a few instances where you can get caught out if you're not careful.

World 2-4

The boss here is a pig with boxing gloves. When he hops six times, duck to avoid the projectile. After two projectiles, he will jump around. Keep jumping on his head and backing away before jumping on his head near ground level, and when he stops jumping to do the hops and the projectiles again, be ready to duck again. 

World 3-1

The snakes will start moving when you get towards them. Some of them will dive at you, while others will slide.

The enemies with the ponchos and the guns can shoot bullets, and it can be hard at times to dodge the bullets when you cannot see them coming. Ducking usually doesn't help, so you'll more often than not have to jump over the bullets instead of crouching under them. Some of them will hide in and out of barrels, so you'll need to tread carefully as you go through the stage.

You'll get a mantle to hit the enemies with at the beginning of the level. That's a good thing, as it gets harder in the second half of the game and the lack of checkpoints will become more annoying from this point.

You'll need to climb up the roof and walk across it to get the extra life near the end.

The game goes back to using boxes to contain the power-ups.

World 3-2

Two new enemies on the train: the vultures that drop bombs which will explode soon after hitting the ground, and the robots with springs that will sometimes throw what look like hammers. If they jump slightly forward, they'll just jump; if they jump in place, they'll be throwing things and will be harder to jump on unless you can time your jumps and maneuver them carefully.

Midway through the level, you can get a gun that will outright destroy enemies. Make sure you keep it for the whole level, as it makes the level easier.

Also near the end, you can drop into the train cars to pick up the power-ups inside.

World 3-3

Be careful when making your way up in the cave, as there are areas where you can climb directly into an area where a vulture is waiting to drop a bomb on you and hit you. You can jump into the ropes like you would any wall and climb them, but be careful going up.

There is a laser gun near the breakaway block platforms near the end; be sure to get it. Also, be careful on the single blocks that disappear when you jump on them, as it can be too easy to fall to your death and/or become unable to make your way back up. Near the end, you'll want to drop down and find a cave where Nobita will be waiting.

World 3-4

The dragon boss will double back twice on the right side before moving to the left side and double backing once. When he returns to the right side, he will fly upwards and shoot a fireball towards the ground. Avoid the fireball and the fire that remains after the fireball hits the ground. After that, the pattern repeats. You'll want to keep jumping on the boss' head, but you don't want to get too greedy with the damage, either, as it can be too easy to end up inside him when he stops flashing or have him move right into you and immediately hit you if you are too close.

"World 4-1"

Despite having three regular sections and a boss, World 4 is considered one whole level, and you don't get section screens in-between levels.

The bomb tossing robots can get you from off-screen if you are not careful, and their bombs from their cannons can go pretty far. The robots on wheels will speed up and move back and forth once you're on their levels.

There are conveyor belts throughout this level, but you can easily see where they slowly push you if you stand there for a second.

You'll need to climb across a long ceiling to get some invincibility, which will make it a little easier to take on some of the enemies near the end of the first section.

The sirens contain the power-ups for this world.

"World 4-2"

The moving holes have fists, and when you are directly under them, the holes will stop to open up and punch you. If you're moving directly under them, keep moving so you don't get hit. When the fist is out, you can jump on it or hit it with the moving mantle you'll find in the maze shortly after the start.

Speaking of the maze, you won't be able to see Doraemon while you're in it, but there is a trick. If you go all the way down and to the left, you can find the magic mantle in a hidden container. If you swing the mantle in the maze, you can see the mantle through the wall. Use it to gauge where you are, and jump up and to the left in the fourth column of the maze. You'll be able to find a hidden passage that leads to Shizuka, who is in the bath, as usual. You've now rescued all of the kids. If you swing the mantle and the mantle can be seen inside the fifth column, you've positioned yourself correctly and you can get to where Shizuka is, which can be pretty tough.

As for the maze itself, you can easily get through it, but you'll have to feel your way through it and even jump around to see where you can get to. Holding Up will help, as you may grab onto a wall and climb upwards, which makes it easier to get to the end. 

The satellites will point in a certain direction. When they flash, they are about to fire a laser. They can change the direction they are pointing before firing, and you can use that to get them to fire in a certain direction and hit them with a mantle later.

Near the end, there is a platform where the hole with the fist is moving. Drop down to it, then get to the right to exit.

"World 4-3"

The spiked balls will move around in a circle. The balls with the orange cores are the center of where these spiked balls rotate, and you can stand in them and be safe. You'll need to keep this in mind near the end, as some of the spiked balls have wide ranges in which they spin around and it can be a little too easy to get smacked by them as you position yourself. Keep that in mind if you're trying to get the invincibility and all of the sweets for the extra life.

There are also meteors that fly forward in some sections of this part of World 4, and you'll need to inch forward carefully so you can easily move back and avoid them where necessary. Near the end, there will be seven meteors flying forward, and you'll need to move up from the bottom (if you're at the bottom), to get away from the last one.

"World 4-4"

The boss stands in the middle of the screen and will look at you. If he looks to the side, he will fire the gun in the hand that he is looking towards, and the three-way shot from the left gun as well as the bouncing shot from the right gun can be hard to avoid. You'll want to stand near the boss' head at the inner edge of the left hand and keep jumping on the boss' head. If you can position yourself just right, the shots won't hurt you, and you'll be just outside of the hitbox for the head to the point that you can jump on the head and damage it while the head won't be able to hit you. Also, the boss will be looking at you, the player, and not to the side. He'll do a fire breath attack that goes straight down, but that's about it. This boss is easy to defeat if you know what to do and how to do it.

Another way you can do this is jump to the center of the room between the shots onto the boss' head and onto the hand you jumped from. When you head left, immediately stop moving and go to the right when he shoots the three-way shot, but make sure you land on the hand and jump on the head again. It takes a little bit of timing and practice so that you can keep doing this without the shots hitting you at all, but it can be done.

Once you beat this boss, that's it! You've beaten GG Doraemon: Nora no Suke no Yabou! If you rescued all four of the kids, Doraemon makes one final appearance on the final screen.

Tuesday, August 6, 2024

PrinceWatercress plays GG Doraemon: Nora no Suke no Yabou - Part 4 of 4


The last world takes place in the future. Can we find Shizuka and make things right?


"World 4-1"

Despite having three regular sections and a boss, World 4 is considered one whole level, and you don't get section screens in-between levels.

The bomb tossing robots can get you from off-screen if you are not careful, and their bombs from their cannons can go pretty far. The robots on wheels will speed up and move back and forth once you're on their levels.

There are conveyor belts throughout this level, but you can easily see where they slowly push you if you stand there for a second.

You'll need to climb across a long ceiling to get some invincibility, which will make it a little easier to take on some of the enemies near the end of the first section.

The sirens contain the power-ups for this world.

"World 4-2"

The moving holes have fists, and when you are directly under them, the holes will stop to open up and punch you. If you're moving directly under them, keep moving so you don't get hit. When the fist is out, you can jump on it or hit it with the moving mantle you'll find in the maze shortly after the start.

Speaking of the maze, you won't be able to see Doraemon while you're in it, but there is a trick. If you go all the way down and to the left, you can find the magic mantle in a hidden container. If you swing the mantle in the maze, you can see the mantle through the wall. Use it to gauge where you are, and jump up and to the left in the fourth column of the maze. You'll be able to find a hidden passage that leads to Shizuka, who is in the bath, as usual. You've now rescued all of the kids. If you swing the mantle and the mantle can be seen inside the fifth column, you've positioned yourself correctly and you can get to where Shizuka is, which can be pretty tough.

As for the maze itself, you can easily get through it, but you'll have to feel your way through it and even jump around to see where you can get to. Holding Up will help, as you may grab onto a wall and climb upwards, which makes it easier to get to the end. 

The satellites will point in a certain direction. When they flash, they are about to fire a laser. They can change the direction they are pointing before firing, and you can use that to get them to fire in a certain direction and hit them with a mantle later.

Near the end, there is a platform where the hole with the fist is moving. Drop down to it, then get to the right to exit.

"World 4-3"

The spiked balls will move around in a circle. The balls with the orange cores are the center of where these spiked balls rotate, and you can stand in them and be safe. You'll need to keep this in mind near the end, as some of the spiked balls have wide ranges in which they spin around and it can be a little too easy to get smacked by them as you position yourself. Keep that in mind if you're trying to get the invincibility and all of the sweets for the extra life.

There are also meteors that fly forward in some sections of this part of World 4, and you'll need to inch forward carefully so you can easily move back and avoid them where necessary. Near the end, there will be seven meteors flying forward, and you'll need to move up from the bottom (if you're at the bottom), to get away from the last one.

"World 4-4"

The boss stands in the middle of the screen and will look at you. If he looks to the side, he will fire the gun in the hand that he is looking towards, and the three-way shot from the left gun as well as the bouncing shot from the right gun can be hard to avoid. You'll want to stand near the boss' head at the inner edge of the left hand and keep jumping on the boss' head. If you can position yourself just right, the shots won't hurt you, and you'll be just outside of the hitbox for the head to the point that you can jump on the head and damage it while the head won't be able to hit you. Also, the boss will be looking at you, the player, and not to the side. He'll do a fire breath attack that goes straight down, but that's about it. This boss is easy to defeat if you know what to do and how to do it.

Another way you can do this is jump to the center of the room between the shots onto the boss' head and onto the hand you jumped from. When you head left, immediately stop moving and go to the right when he shoots the three-way shot, but make sure you land on the hand and jump on the head again. It takes a little bit of timing and practice so that you can keep doing this without the shots hitting you at all, but it can be done.

Once you beat this boss, that's it! You've beaten GG Doraemon: Nora no Suke no Yabou! If you rescued all four of the kids, Doraemon makes one final appearance on the final screen.