Showing posts with label part 83. Show all posts

Wednesday, April 8, 2026

PrinceWatercress plays Super Mario Odyssey - Part 83 of 92


Now that the Seaside Kingdom is pretty much over and one with, it's time to head back to Bowser's Castle and see what we can get after beating the game.


Our Power Moon Hunting now takes us to Bowser's Kingdom.


Seaside Kingdom


49. Secret Path to Bubblaine! - There are two ways to get to this Power Moon.

In Bowser's Kingdom, you can get here through a painting on the left building at the Main Courtyard Entrance.

In the Mushroom Kingdom, there is a painting between some trees near the Odyssey.

Thankfully, neither entrance is tied to which choices you took at the two forks in the road during the game, and both of them are amazingly easy to find and will take you to the same place.

Bowser's Kingdom


39. Sphynx Over Bowser's Castle - At the Main Courtyard, take control of the binoculars and search the sky for the Sphynx on a sail. Focus on the Sphynx for a Power Moon.

40. I Met a Pokio! - Take control of a Pokio at the Main Courtyard, then take it across the roof on the east side to a Bonneter, who is looking for a Pokio to study. You'll get a Power Moon.

41. Bowser's Kingdom Regular Cup - At the Beneath the Keep Checkpoint, you'll find the Koopa Freerunning game. You'll be doing a lot of long jumping to get this one, and the more stuff you can skip with a long jump and some hat/dive jumping from a high place, the better. This is the longest race, but it is also the easiest as long as you don't royally mess things up.

42. A Rumble Under the Arena Floor - There is a certain part of the floor in the Showdown Arena that you can ground pound for a Power Moon. To get this one, you have to position yourself between the two flags on the west side of the arena nearest the pipe, then keep moving away from them and ground pounding the floor every so often until you can find it. This one can be pretty tough to get a hold of.

43. Secret Path to Bowser's Kingdom - After defeating Bowser, you'll be able to enter the painting behind the large waterfall in the Cascade Kingdom. Entering it will take you to the Island in the Sky in Bowser's Kingdom as well as a Power Moon.

44. Peach in Bowser's Kingdom - Peach and Tiara are near the Crazy Cap Shop; talk to them for a Power Moon.

45. Found with Bowser's Kingdom Art - You'll need this hint art in the Main Courtyard to get this Power Moon. Head to the Moe-Eye Habitat and find the cactus near the bushes that Poochy was standing in front of, then ground pound the air between the cactus and the two bushes for a Power Moon.

Thursday, December 26, 2013

brickroadbrickroad and SovanJedi play Secret of Evermore - Part 83 of 88


The greenhouse.

OH DEAR GOD THE GREENHOUSE

All maps by Grizzly.

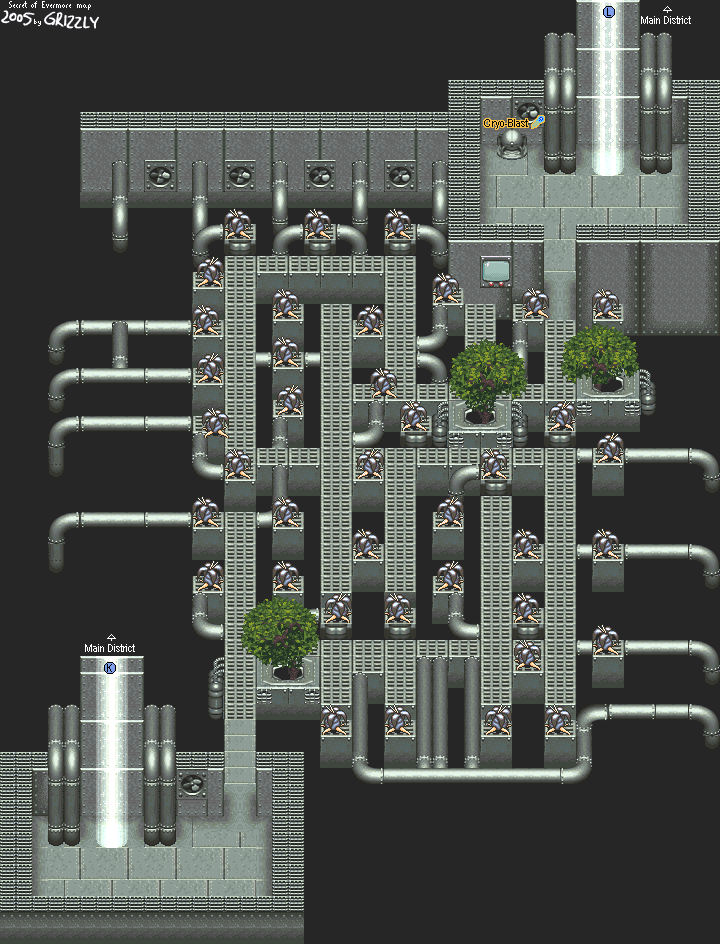
Greenhouse


Map

> checks map to see which flowers are alive
> finds out there's absolutely no way to tell on the map at all

FFFFFFUUUUUUUUUUUU

If you come in here while the lights are on, you'll get the Prehistoria jungle music and some of the flowers will try to attack you as soon as you come near them. These flowers are called Flowering Death, and if one lands a successful attack on you, it instantly causes a 999 HP which puts The Boy out for the count via an insta-kill. Unless you use Pixie Dust and you have six of those things (and a hell of a lot of gall), I wouldn't even recommend going in here while the greenhouse lights are on. Instead, you'll have to turn them off, and to do that, you'll have to go to the Security Access Chamber and turn the greenhouse lighting off.

Security Access Chamber


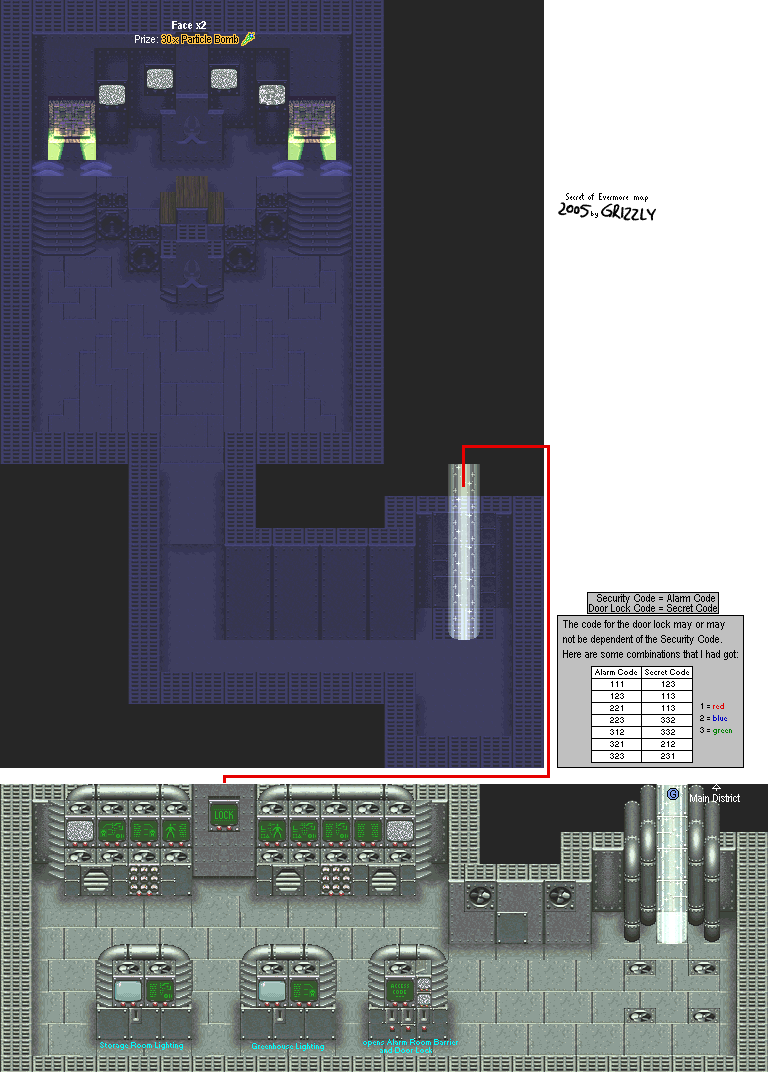
Floor Plan

When you come down the transporter beam, take down all the fans that come out of the floor. They may look like they're powerful, but they're not. Now you can do stuff around here without being very slightly hassled.

The console in the middle is the greenhouse lighting switch, while the one to the left is the storage room lighting switch. They're both connected to each other, so if you light up the storage room, you're also going to light up the greenhouse. Keep this in mind.

If you don't flick the storage room lighting, you'll have to fight some monsters if you go into it.

The console on the right controls the alarm. If you used this before you went into the alarm room and used the code for it, you won't have to fight the eight Guardbots (which aren't very hard, anyway) in the Alarm Room.

There is a green monochrome screen that says lock. Play around with all the possible combinations after turning on the greenhouse and storage room lighting and you'll eventually open a passage that leads to a hidden boss through trial and error.

Boss: Face Man


The two faces will cast powerful forms of Flash on both The Boy and The Dog. It's easier to take one face down before taking the other one on. Keep both characters healed and give one face all you have as quickly as you can. Spells, Level 3 Dog Attacks, Level 3 spear strikes, everything. Use. It. All.

When you win, you'll get 30 Particle Shot bullets. That's it, really. Powerful boss, wimpy prize. But it is optional.
 

Greenhouse


Map

Now that it's dark, you can actually do some stuff. Head to the transporter beam on the other side of the maze. Open the treasure bubble to get some Cryo-Blast ammo, which is even more powerful than the Particle Bomb.

All you'll have to worry about in the maze now are the grey mosquitos that show up near the north end of the maze. They're just like the ones in Prehistoria, so trust me when I say that they aren't that powerful.

You'll come out through A-3. Go right to A-4...and you'll finally meet Professor Ruffleberg!
 

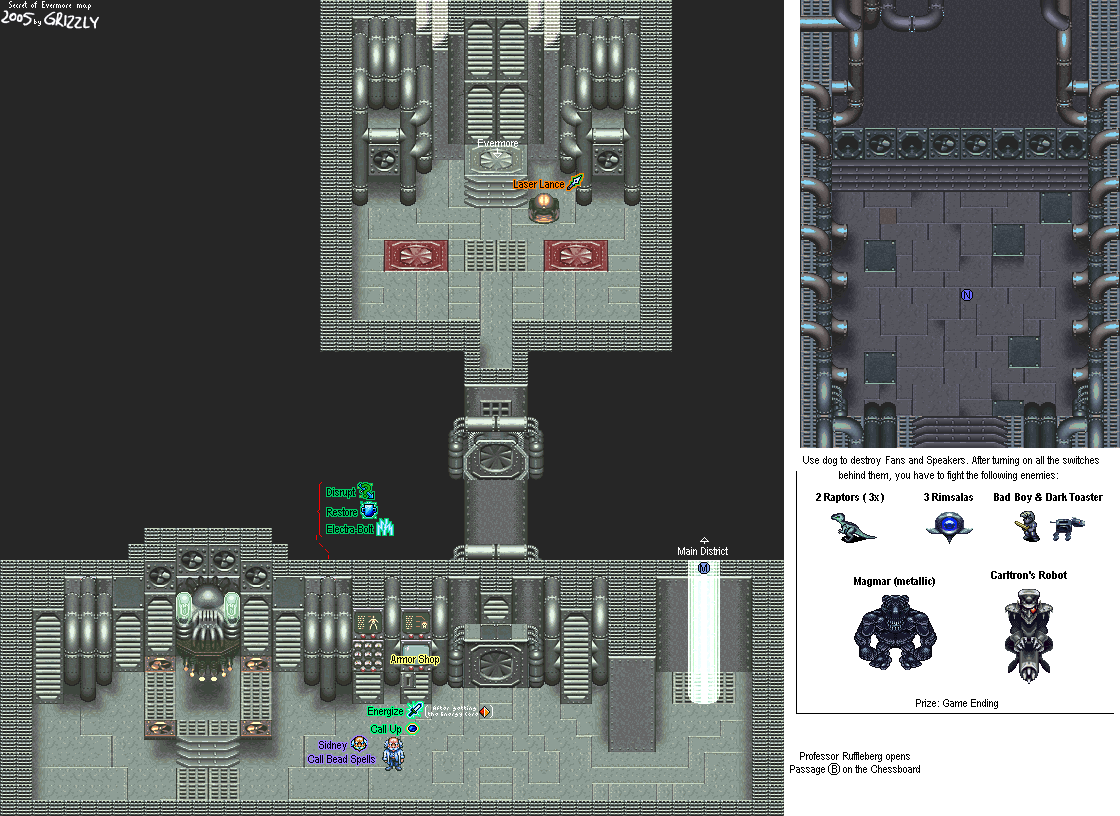
Professor Ruffleberg's Laboratory


Map. Also, this kinda spoils the final battle, so sorry about that.

When you meet Professor Ruffleberg, he'll tell you how all this started:

It was all a scheming plan by his household robot servant, Carltron (the guy who sent you into the room with the two Guardbots at the very beginning of the game). The AI that he had from being programmed into a very good chess player also gave him free will. Carltron got tired of being the Professor's household servant and sabotaged the Evermore experiment. He then schemed throughout the years, which led to the creation of the robot body doubles and all the problems going on in Evermore. Now the Professor needs your help to stop him.

TL;DR: The butler did it.

He'll then tell you about the Energy Core that's located at the base of the Chessboard in Gothica. He will then open the door to it so you can get. You'll be able to use the spaceship (which actually works this time) in order to head down there and get it. He'll also give you Call Up, which uses the super-rare Meteorite and Dry Ice ingredients (there's only 13 of each in the entire game). It lets you create Call Beads. He'll also give you his Call Bead spells as well.

Call Up

1 Meteorite, 1 Dry Ice

The switch that the Professor was standing at will give you the most powerful armor in the game. Go buy it. You'll need it for the final battle.

Go through the door that led to the Guardbot chamber in the game. The treasure bubble that used to hold the Bazooka now carries the Laser Lance, which is the fourth and last spear weapon in the game. The porthole you went down to Prehistoria from now takes you to a working spaceship, which controls exactly like the Windwalker.

Tinker's Lab


When you head back to Tinker's Lab, you'll find the treasure box closed again and another spell on the table. The chest now contains the Atom Smasher, the last axe in the game. There is also the spell for Nitro.

The formula on the table next to the chest is the one for Nitro.
 

Nitro

1 Gunpowder, 2 Grease