Showing posts with label part 70. Show all posts

Thursday, March 26, 2026

PrinceWatercress plays Super Mario Odyssey - Part 70 of 92


In this entry, we complete not one, but two kingdoms!


The Moon Rock in the Cloud Kingdom is far to the north. Activating it extends the amount of Power Moons in the kingdom from two to nine.

If you mix and match costume pieces in 3D, you'll just get a regular red-shirted, blue-overalled Mario in the 8-bit areas. In order to get custom looks in 8-bit mode, you'll need to wear like hats and suits.

Lake Kingdom

34. Behind the Floodgate - At the beginning of the path leading to the other half of the kingdom, unzip the upper level of the floodgate, then turn around to find this Power Moon.

35. High-Flying Leap - Southwest of the Water Plaza Terrace, there is a Power Moon in mid-air. Bounce off the nearby flower to get it.

36. Deep, Deep Down - Take control of a Cheep-Cheep and head back to where you found Captain Toad at the Water Plaza Entrance. This time, turn around to find a Power Moon.

37. Rooftop of the Water Plaza - One of the columns in the Water Plaza has a glowing light above it. Ground pound that light for a Power Moon.

40. Lake Kingdom Master Cup - For the Master Cup race, you'll need to triple jump and then hat jump and dive jump over the wall across from the Odyssey, as the stairs won't be there. From there, you can head to the Water Plaza Terrace to the goal. (You can also use this strategy for the Regular Cup.)

Cloud Kingdom

2. Peach in the Cloud Kingdom - Peach is in the east side of the kingdom; talk to her and Tiara for a Power Moon.

3. Digging in the...Cloud? - In the southeast corner of the kingdom, you'll need to use controller rumble and visual cues from Mario to ground pound the ground and find this Power Moon. 

4. High, High Above the Clouds - On the west side is another set of hat clouds leading to a ground pound lift. After you ground pound the lift, you'll see another series of hat clouds; throw and jump your way to the end to get this Power Moon.

5. Crossing the Cloud Sea - After activating the Moon Rock, you will expose a key block. Behind where the Moon Rock is a series of hat clouds to strike and use to get to the key on the other side. Get back to the key block for the Power Moon. 

6. Taking Notes: Up and Down - To the east is a lift that you have to ground pound to raise up. At the top is a treble clef. When you touch it, twelve notes will appear, three each in four lines. You'll need to ground pound the lift and stand at the "compass points" at the edge while facing the notes and throwing your hat at the proper time as you make the lift go up and down. If you can get all twelve notes before time runs out, you'll be able to get this Power Moon.

7. Picture Match: A Stellar Goomba - This is located in the pipe in the center of the kingdom, and you'll need to get Power Moon #1, "Picture Match: Basically a Goomba," to get this one. This is the same as that Power Moon, but you'll only have the outline of the Goomba to work with, and the puzzle pieces vanish after you place them. If you can get 80 points or more, you'll get a Power Moon.

8. King of the Cube - This is in the Moon Rock Pipe in the southwest corner of the kingdom. This leads to an 8-bit area inside of a cube that has six screens. Go through the screens with some basic platforming skills and collect the five Moon Shards to get a Power Moon back at the start.

9. The Sixth Face - In the area with the lava, Podaboos and the moving platform, there are some invisible blocks you can hit to reach an out-of-the-way pipe. Enter that pipe to find this Power Moon.

Thursday, November 7, 2024

PrinceWatercress plays Chrono Trigger (Super NES) - Part 70 of 70


Well, time to bring this to a close. I believe I've shown as much of this game as I can, as much as I love it to death. See you next Let's Play.


In this video, I do a couple of things. I show off the battle with Magus in 12,000 B.C., which is pretty easy. If you have Frog in your party, it will be Frog vs. Magus; otherwise, it will be your entire party vs. Magus. Magus will just have Lightning 2, Fire 2, Water 2 and the scythe attack. When you beat him, he will tell you about Gaspar and the Chrono Trigger, then die. The sparkle that is where he once stood is the Amulet, which anyone can equip to protect against status ailments.

I also get the Mop by Charming a Nu in the Hunting Range in 65,000,000 B.C. The Mop is even weaker than the Wood Sword, and is Crono's weakest weapon. It also has no slash animation.

I also get the Slasher 2 in this one. It is one of Crono's stronger weapons, but has no special effects added to it like increasing stats, protecting against anything, etc.

I beat Lavos with and without Magus, both times with the Epoch crashed into Lavos. The "Reunion" and "Beyond Time" endings, both with and without Magus, are similar to each other in every way except with the "Reunion" endings having the scene where Marle heads to Death Peak to get Crono back. Frog will only be in human (read: Glenn) form during the "Reunion" ending with Magus dead in 12,000 B.C.; neither the "Reunion" and "Beyond Time" endings without Magus with the Epoch crashed will not show Frog/Glenn in his human form. So you're not missing much in that department. 

Other things to mention:

The Boss Orb and Side Kick battle in the Black Omen does not let you use techs and items at all, even before Lock All is cast by the Boss Orb. The spell is just a formality and does absolutely nothing, as techs and items are turned off before the battle even begins. This is also true of the Turret battles on the Blackbird as well as any battles with Rubbles.

Azala is female. I mention it in another video, but I'm mentioning it in this blog entry. You don't get to see her pronouns in the Super NES English translation due to how Ted Woolsey had to do everything just to meet Nintendo of America standards; the DS version and beyond with the translation closer to the original Japanese text as well as the Super Famicom version do refer to Azala as female.

Ayla gets the Iron Fist at Level 72. It replaces the fist, has a different strike animation, and inflicts Chaos on any enemy upon landing a critical hit, should the enemy survive. She also gets the Bronze Fist at Level 90, which has a different strike animation and does 9999 damage upon landing a critical hit.

With that, that's all that there is to say about Chrono Trigger, which is my absolute summit of favorite games of all times. I will probably never find another game like it. I apologize for the long video, as I myself do not like long videos, but I had to do this to get it out of the way for other games. See you next Let's Play!

Saturday, June 1, 2019

HCBailly plays Final Fantasy IV (Super Famicom) - Part 70 of 70


Here's the best equipment in the game. Good luck getting these.

This video shows off the ultimate equipment in the game: the Adamant Armor. It stops a lot of status condition and blocks fire, ice and bolt. It is supposed to have a weight of 10, but due to a bug, it gives the user 99% evade.

The Artemis Bow is a 1 in 64 drop from a Moon Goddess, and is the most powerful bow in the game for Rosa.

The Crystal Rings are the best arm equipment, and the chances of getting it off a Red Dragon are 1 in 64.

The Ribbons are the best headgear in the game, having the ability to stop many status ailments and the most magic defense of all the headgear, and are a 1 in 64 drop from Toad Witches and Dark Wizards.

Judging by the battles in this video, having the ultimate equipment really helps a lot if you can get your hands on it.

Thursday, June 21, 2018

HCBailly plays Terranigma - Part 70 of 75


We finally expand one more city before we take on Beruga!

World map by Tropicon. Nirlake map and Suncoast maps by Amir Azadur.

Nirlake


You can go inside Mic Burger and try a burger if you want. You can even ask for a smile and get a special animation from the girl at the counter. You can also buy a cola and fries, and everything costs 10 gems. Obviously, Ark will enjoy it when he eats it.

You'll also learn that Mick sold off his land when he hit it big with Mic Burger if you talk around inside the place.

There is also a farm to the west of the town. The people who still want to farm are still here, and if you talk around, you'll learn that people fear the lake god less and that farms got smaller as the town got bigger. Such is progress...

Will's house will be relocated. It will be northeast of the runway. Talk to Will, and he'll ask you to give any town that is interested in air travel the Airfield Plans. Say yes and he'll hand them to you. We'll be taking these to Suncoast in Australia.

Be sure you've shared all the photos you have with all the towns with a tourism center before you try the next town expansion, by the way. Also, this will be the very last one.


Suncoast


Head to the house to the left of the Sea House and give the old guy the Airfield Plans. He'll get the airfield built. Leave the town, head to a place in another region, then come back. The airfield will be there and the town will be a city.

There is a hut to the southwest of the town. There's not much here, to be honest. It's just the cattle ranch.

Suncoast - The Expansion


The inn in the town is in the lower-right corner, and it has two floors and rooms. The left room on the second floor houses a bride and groom, and the groom has a fever. Remember the fever medicine you got from Litz? Give it to the bride. In return, you'll get a WaterPin as well as six Magirocks, giving you a total of 94 Magirocks. Leave the room, come back, and the groom will be cured.

Northwest of the stairs is the Merchant shop. The AlphaRod is sold here, and it's the last special weapon you can get in the game. It decreases Strength and increases Luck. Next to the Merchant is the Magishop.

You'll learn about the nearby zoo if you talk around.

The building to the left of the Sea House at the north end not only houses Keinz, but also the mayor. Talk to the old man in the room to the left, and he'll let you have Magirock #95. The old man likes the progress, but his wife misses the sound of the sea.

The guy on the right tells you the animals in the zoo were caught in Safarium.

Monday, March 19, 2018

skorch82 plays Brave Fencer Musashi - Part 70 of 70


All good things...


...must come to an end.


This is it!

When you step on the Sky Scroll, you'll encounter Fuhrer Flatski, Princess Fillet and Capricciola. When Flatski tells Capricciola to take Lumina, Capricciola turns on Flatski. Turns out it's Jon, and he was in disguise the whole time. Turns out Jon is the Prince and true heir of the Thirstquencher Empire, and that Flatski murdered his parents, who were the King and Queen. When Jon tries to shoot him, Rootrick shows up from behind and shoots him. Yes, Rootrick is somehow still alive from being knocked off the edge of a cliff (or being squashed by a boulder, depending on how you beat him last time). Also, Rootrick is Flatski's son.

Musashi surrenders Lumina to Flatski, and Flatski pushes Princess Fillet. When Flatski uses Lumina on the Sky Crest, instead of getting special powers or taking over the world, Flatski unleashes a large demon. This is Dark Lumina, the Wizard of Darkness. When Flatski commands Dark Lumina to kill the Princess, Musashi and Jon, Flatski is instantly flattened by Dark Lumina's foot.

A fatally wounded Jon explains that Dark Lumina was not sealed by Lumina, but within it, which explains why the Musashi of legend had Crest Guardians protect the Scrolls. Jon tells Musashi to take care of Leno as he is crushed and killed by Dark Lumina, and Musashi and Princess Fillet escape. Before Musashi can high-tail it out of there, the sword Lumina returns to him. Musashi is bewildered by the whole thing.

The Wizard of Darkness

Dark Lumina


You'll be in control as soon as you start escaping. Head to the left and don't get caught on the bridge segments or platforms when they're dropping down. When you make it to the end, you'll meet Kojiro, who's kidnapped the Princess again and is more preoccupied with a duel that the current situation at hand. Dark Lumina catches up and absorbs Kojiro, and the Princess is knocked into the sky to land somewhere far away. Dark Lumina then transforms into a deadlier green, lizard-like form.

You'll be doing some more bridge and platform hopping, and this time it'll be in 3D. You'll then be jumping from one platform to the next on the side of the tower, and you'll want to be careful when you double jump from one platform to another, as it can be all too easy to slide off the edge and fall to your death. You'll also want to be fast too, as Dark Lumina will try to smash himself into the side of the tower and destroy the platforms that are around him. If you see a light green shadow, you know he's coming.

At the end, you'll find Princess Fillet. She's fine, and Musashi heads onto a block platform for the final battle.

Dark Lumina

Part Two


Jump over Dark Lumina when he spins around and swipes his tail, and jump straight up to avoid his grab attack. If Dark Lumina grabs you, he'll toss you away and he may toss you off the top of the tower. Use a jumping Lumina slash or Rumparoni-SP to hit the orb on Dark Lumina's head until it turns red. When that happens, step back a bit from him and stay away from the fireballs. After a few fireballs, Dark Lumina will be tired. Whack the orb on his head with Lumina in order to damage Dark Lumina.

Dark Lumina has another attack where he will stomp the ground and produce shockwaves. Double-jump over them to avoid being knocked off the edge of the tower. In case you do fall off, it's not instant death, but you will take some damage.

When you beat Dark Lumina, a bright white core will be in his place, sucking away everything except Musashi. Lumina will then be a fluorescent white being with two red eyes and a red jewel on his forehead.

Dark Lumina

Finale


Dark Lumina's attacks in his final form are based on the Scrolls. He'll glow a certain color depending on which attack he's using. Red will be fire.

Whenever Dark Lumina becomes white again after performing an attack, he'll return to the center and stand still for a few seconds. When that happens, Assimilate him and fill up the Lumina gauge. When you fully Assimilate him, Dark Lumina will turn into a white core for a brief amount of time. You'll want to hit him with Lumina while he is a core in order to deal damage. Once you hit him, he will try to suck you towards him. Keep running away from him so he doesn't get you, and he'll turn back into his humanoid form after a few seconds.

Here's all of Dark Lumina's attack, and they always occur in this order:

When Dark Lumina glows red and the screen turns red with him, he will send a red starburst into the air. Stay on the move so that the fireballs don't hit you.

When Dark Lumina glows pink, you'll want to move around him in a circle and stay a fair distance away so that the two projectiles - the trail of fire and the flying wave - don't hit you. That also keeps you from being slashed by Dark Lumina's sword arm.

When Dark Lumina glows green, equip the Wind Scroll and use it to keep yourself from being blown off the side of the tower.

When Dark Lumina glows light blue, he'll make five copies of himself. Stay on the move so they don't all damage you. 

When Dark Lumina glows yellow, jump over the shockwaves that he creates.

When Dark Lumina glows dark blue and the screen turns blue with him, stay on the move so the water droplets don't hit you. It's the same as the red screen fire attack, except the water doesn't stay on the ground.

When you beat Dark Lumina, you'll beat him for real this time. Dark Lumina is sealed within Lumina again, Princess Fillet will be safe, and the new legend of Brave Fencer Musashi must be told if Dark Lumina is never to be freed again.

You'll finally meet Princess Fillet's parents, King and Queen Allucaneet. Fillet and Ribson hide the fact that the Thirstquencher Empire tried to take over the world away from them. We also see Musashi speak one last time at the end, and this time we see his mouth move with the speech very, very well for a PS1 game. After that, the credits finally roll, complete with hand-drawn art of certain parts of the game. You'll also see Musashi return Lumina to Spiral Tower before being teleported back home.

After the credits roll, you can save the game again. Do so, as you'll be able to start the game again with all your stats and everything you had, minus the Sky Scroll, which you'll have to earn again. Use this as your opportunity to get all the things you missed.

But with that, that will wrap things up for this one. It's been about nine months of me slacking off and just desperately willing myself into finishing this one and three years of waiting due to other things to show it all. Thanks for reading. Until next time...

Thursday, December 19, 2013

brickroadbrickroad and SovanJedi play Secret of Evermore - Part 70 of 88


We finally go north of the entrance to the sewers and tear some stuff the hell up.

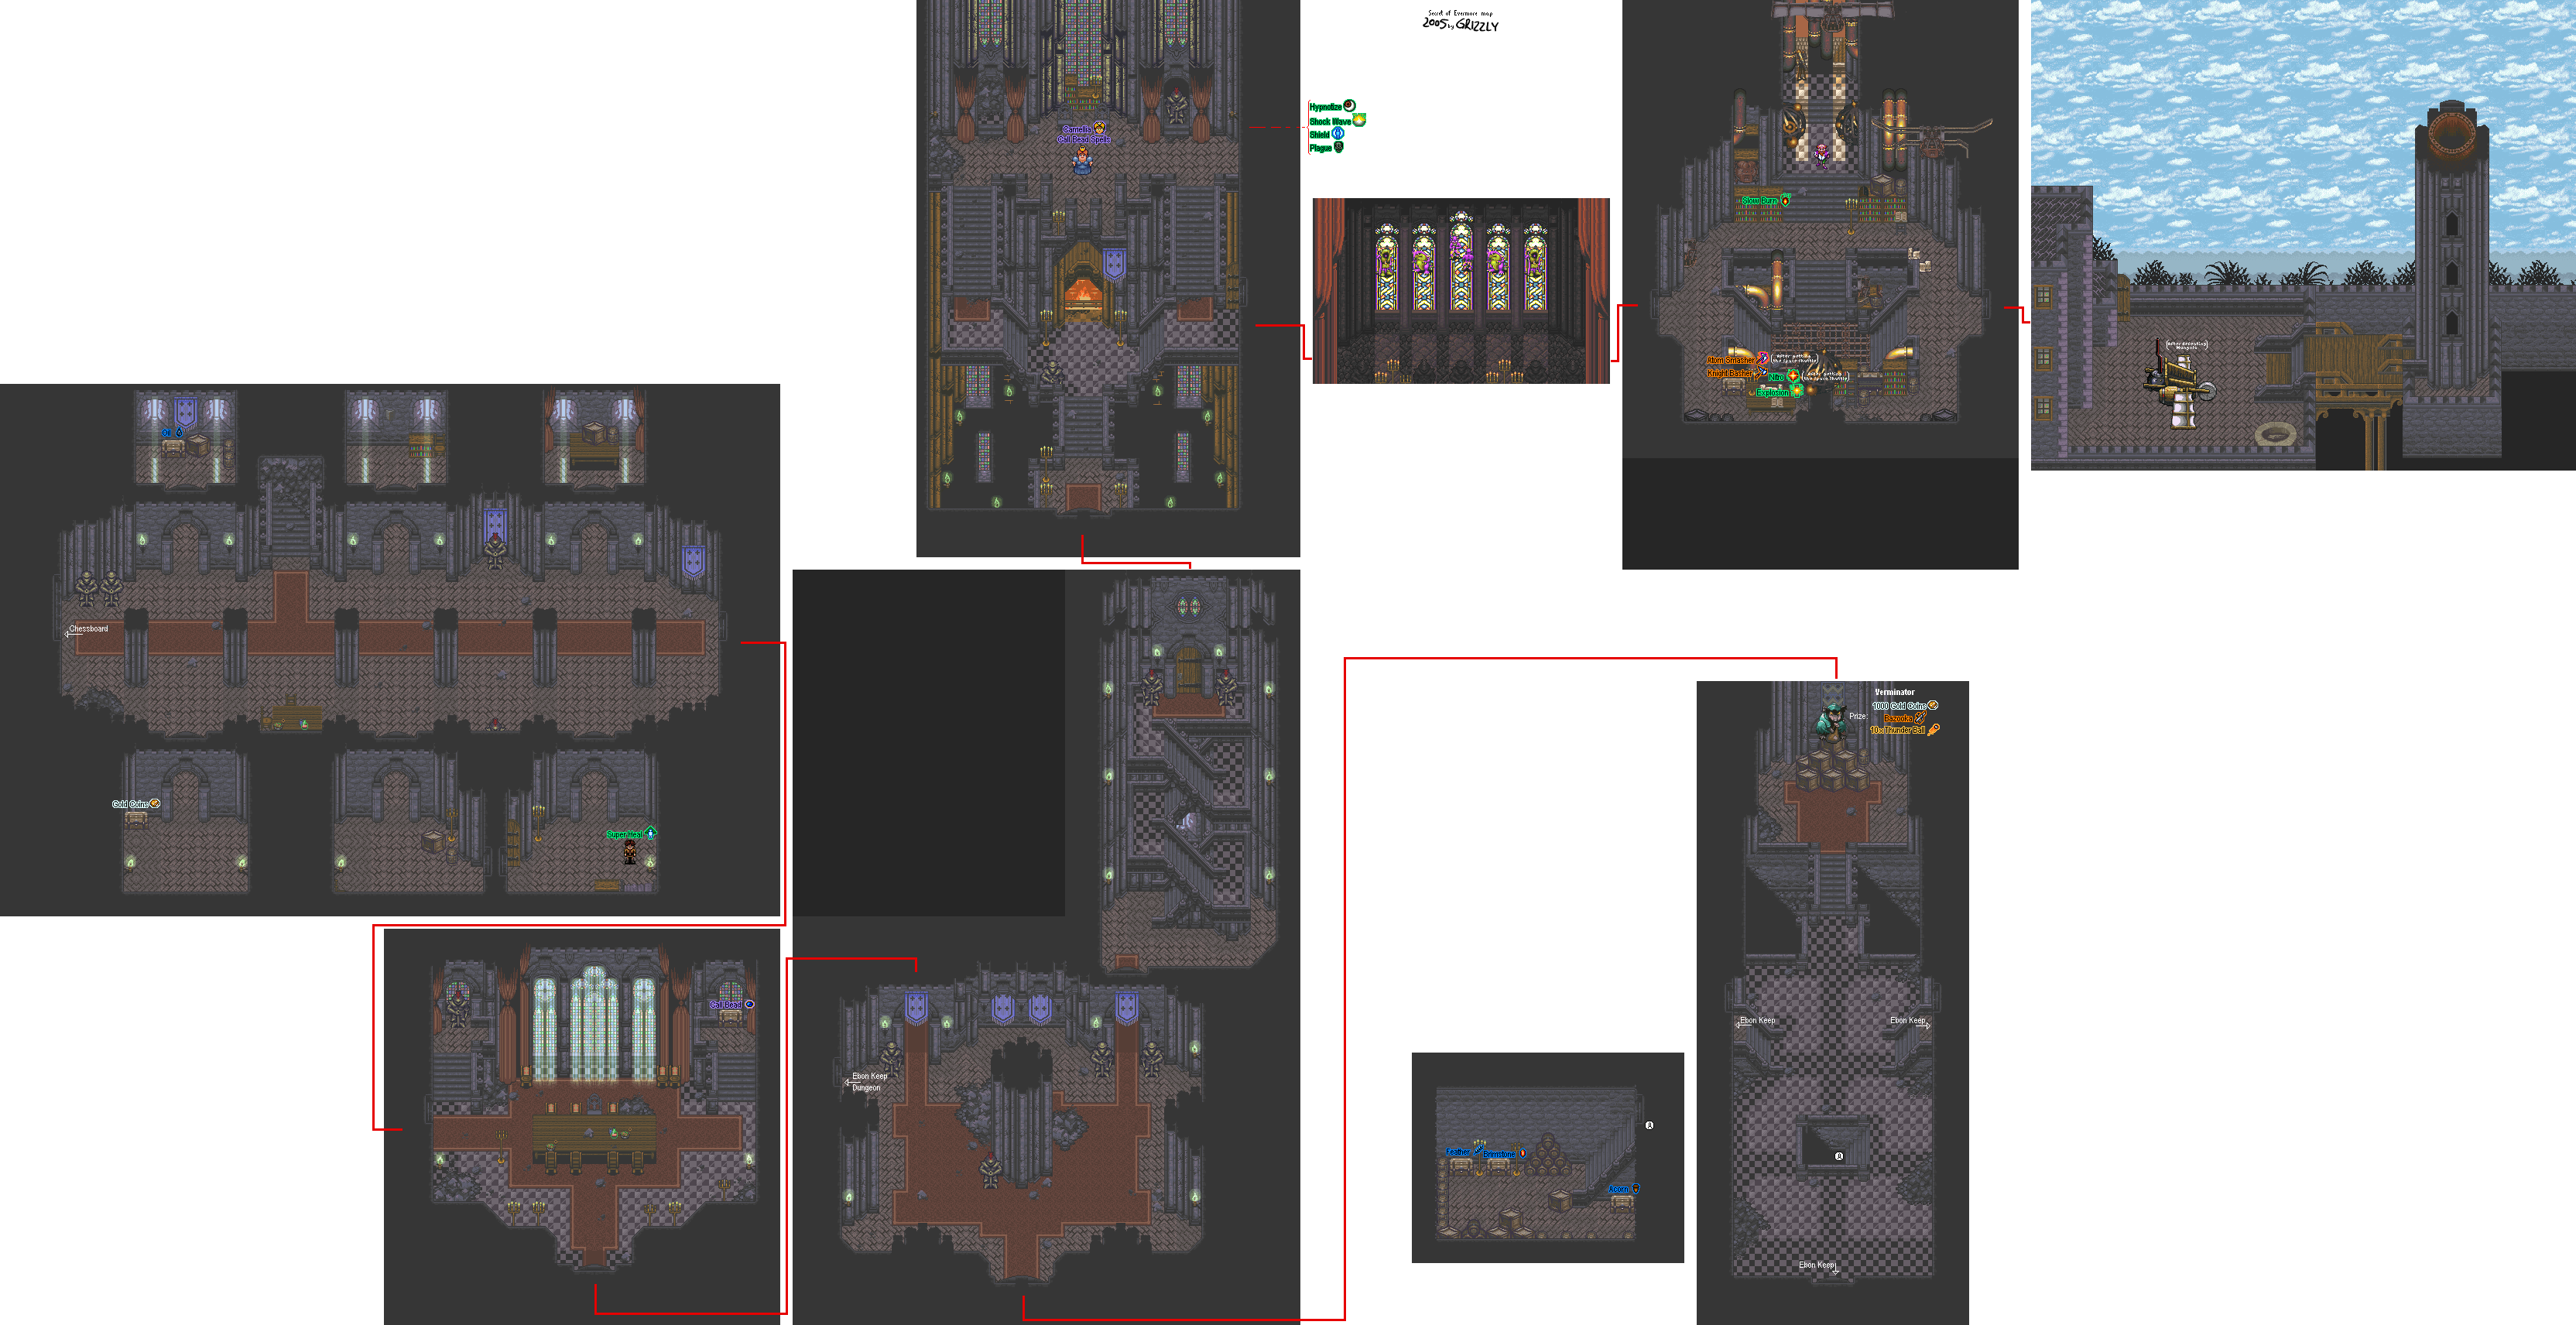
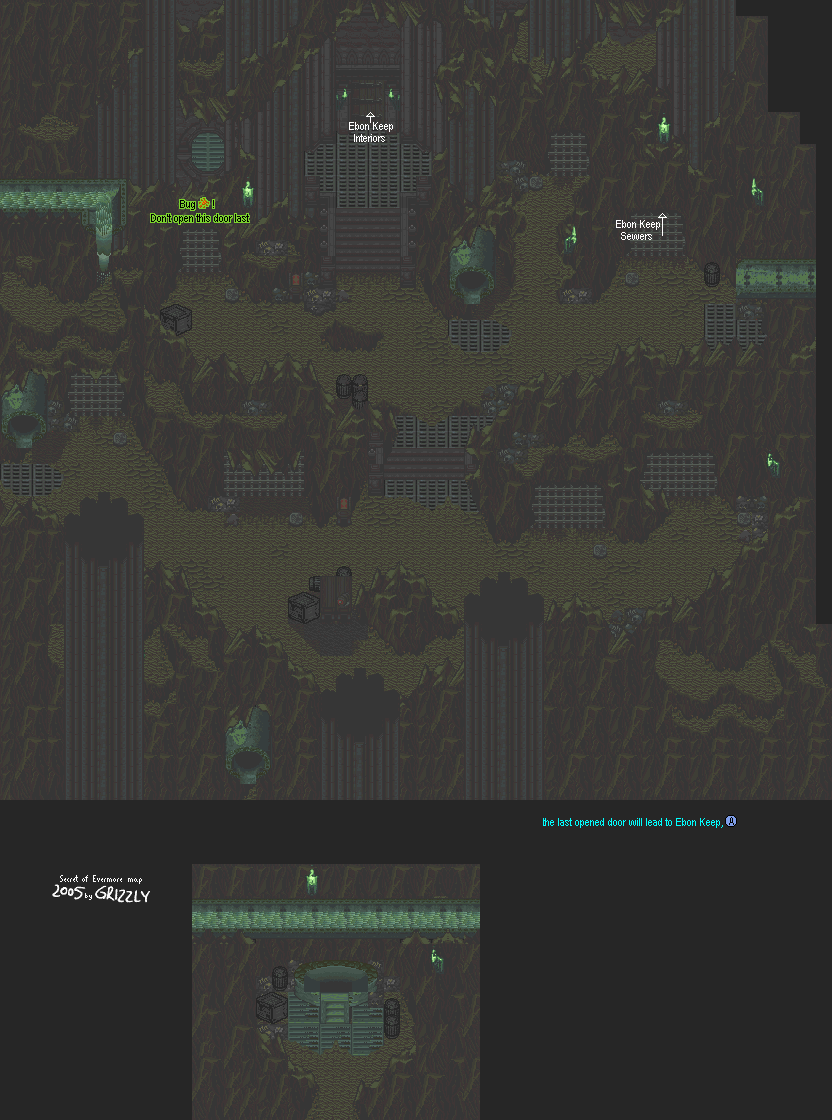
All maps by Grizzly.


Tinker's Lab


Now that you've seen through the fake Queen's even faker nice demeanor, Tinker will tell you to go to the sewer entrance and break the barriers to the north. You can do that with the axe in the treasure chest in his lab. Go get it. You now have the Knight Basher.

There are also two spells here. One of them (Slow Burn) in is in the bookcase, while the other (Explosion) is on the table next to the chest where the Knight Basher was.

Slow Burn

1 Iron, 1 Brimstone

Explosion

2 Ethanol, 1 Ash

Slow Burn gradually diminishes the target's HP (levelling it up can be quite awesome), while Explosion is...just that. An explosion.

Tinker will also let you buy alchemy ingredients if you need them.
 

Ebon Keep - Dungeon


Map

Here's the map, in case you need it again.

Ebon Keep - Sewers


Same here.

Now that you have the Knight Basher, you can break the stone barriers in the maze. Try it out.