Sunday, April 14, 2024

PrinceWatercress plays Willow for NES - Part 10 of 11


In this entry, we find the entry to Nockmaar Castle, but we need a key. Once we get it, however, the end of the game is finally in sight.


Had you come in here earlier, there would have been a chest shortly after you came in that had nothing in it and was there solely to block your path. At this point in the game, the chest with nothing in it won't be blocking your path anymore.

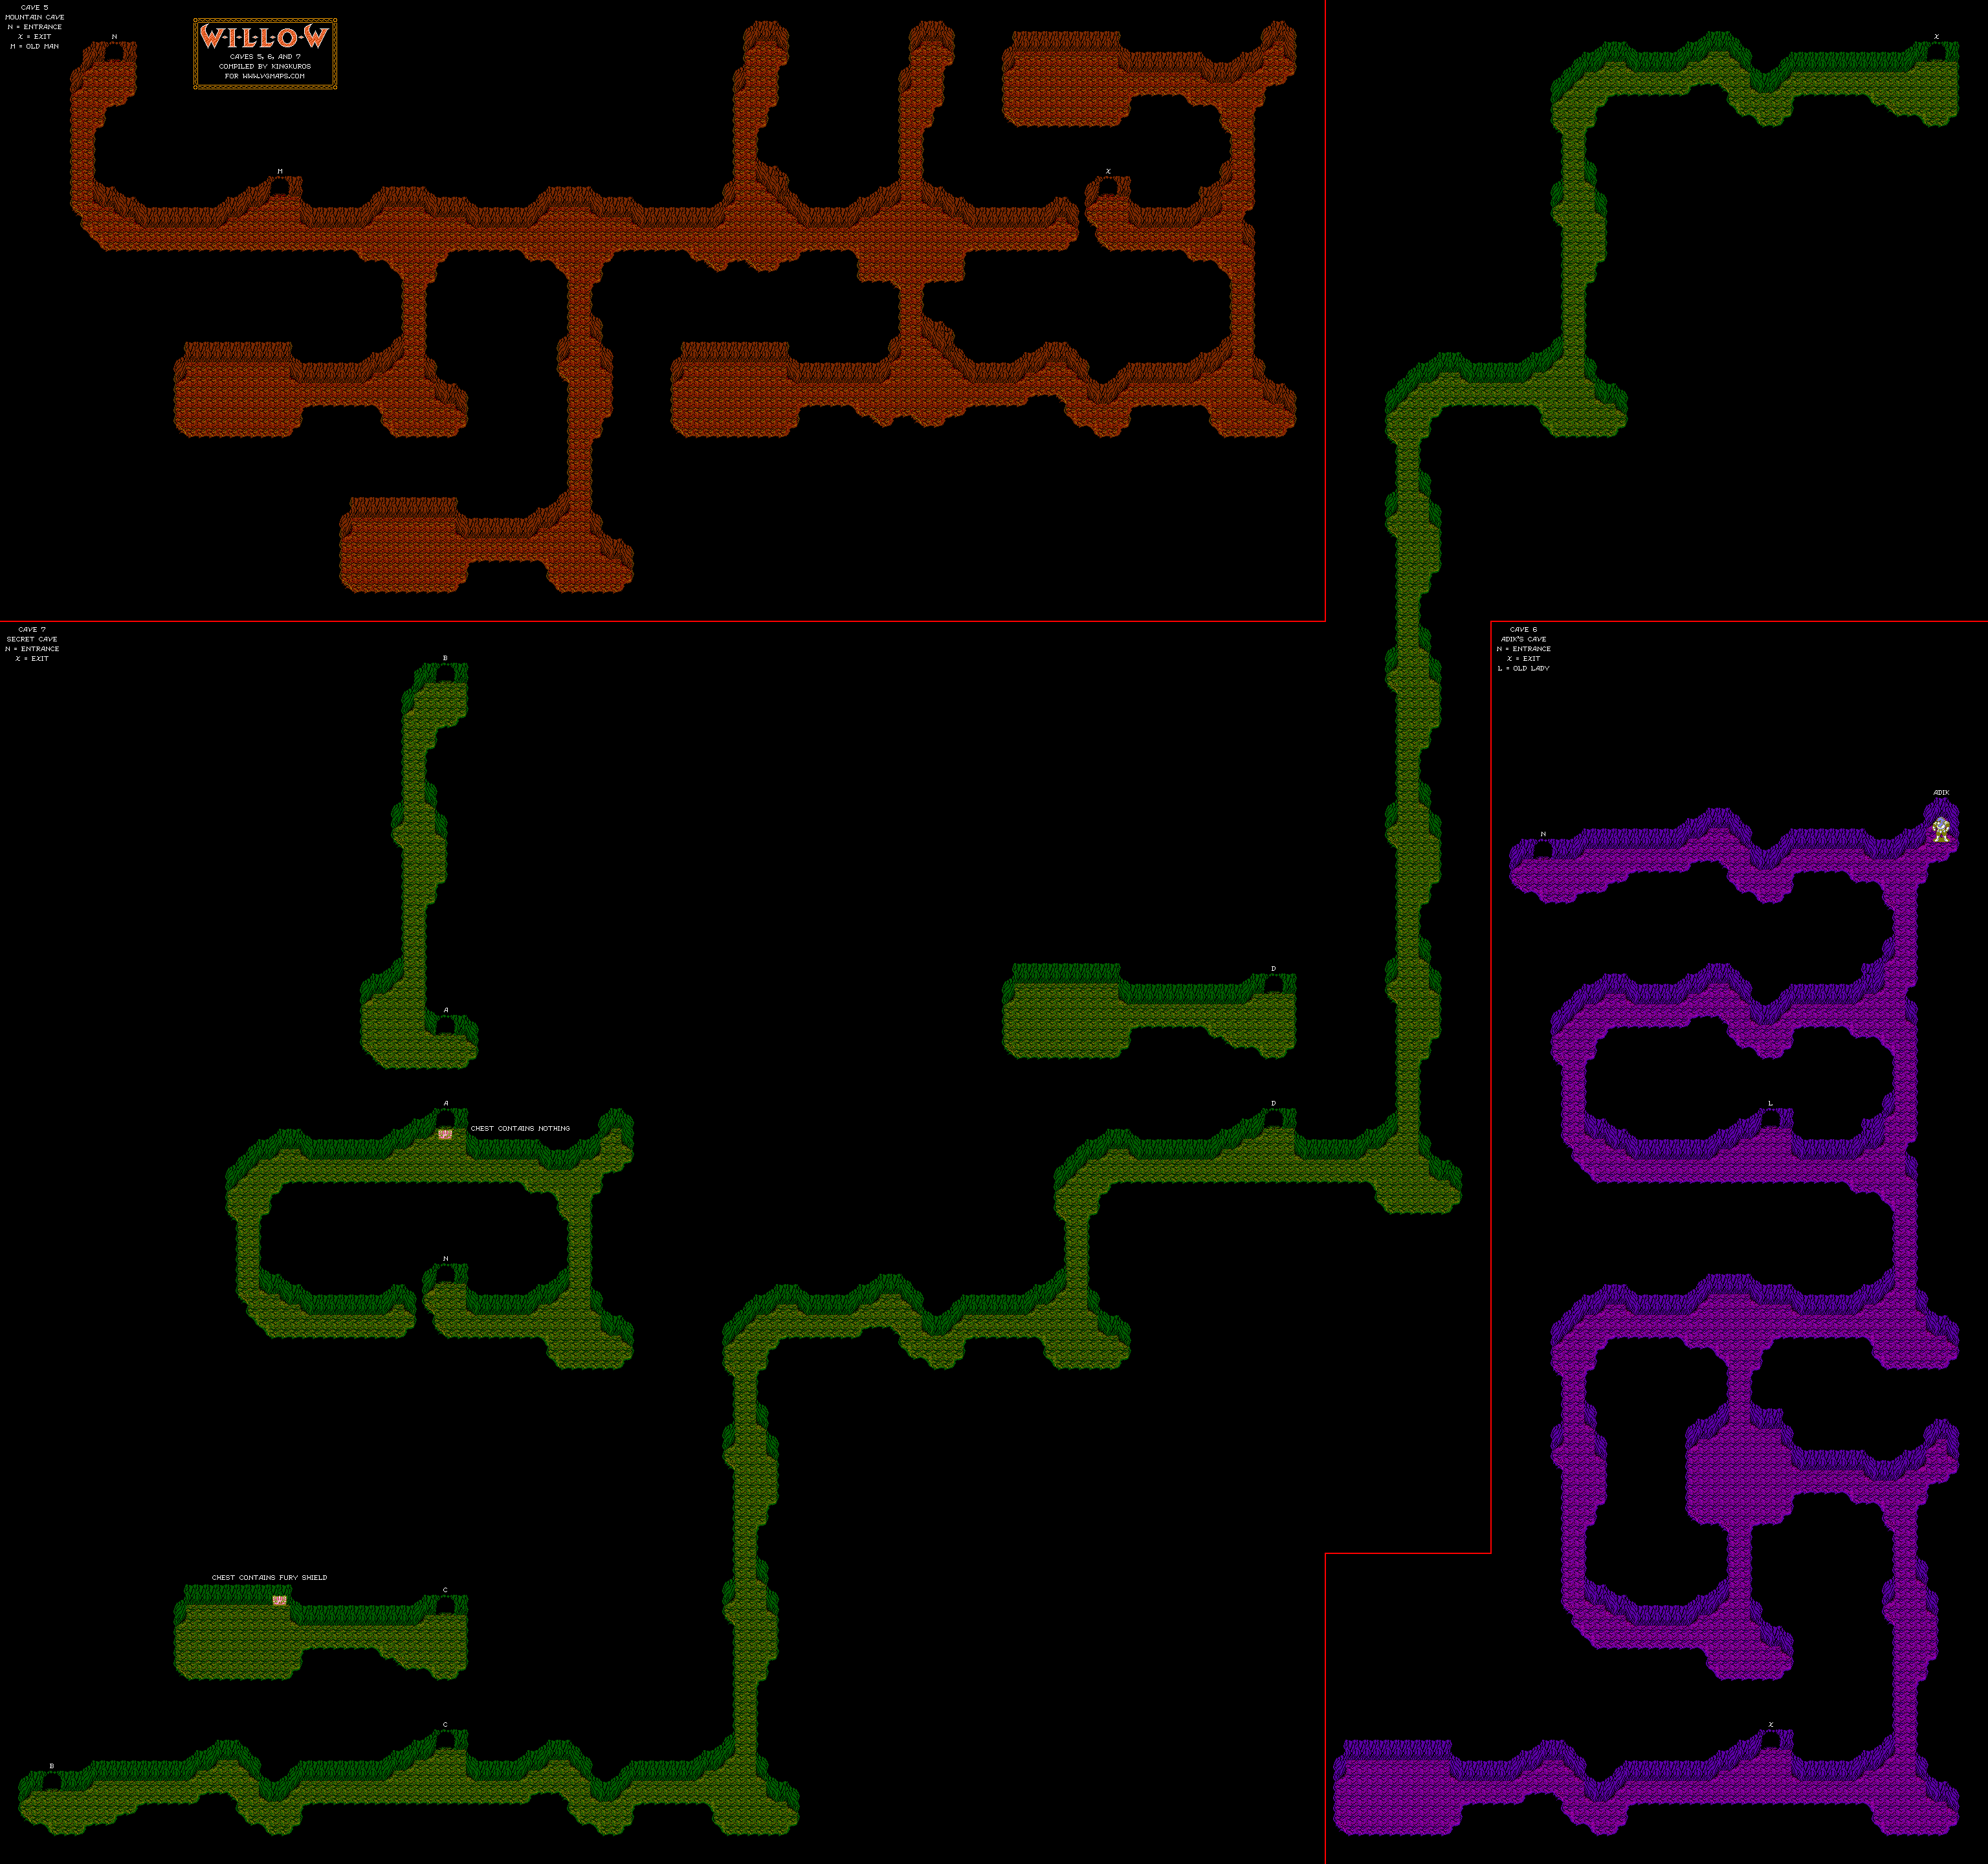
Follow the path normally, and after the first two doorways, enter the first one you see immediately after. This leads to the Fury Shield. Be sure to equip it.

From there, you can just follow the path all the way to the end and take the exit there.

You're now at the other side of where the Healball chest was. If you hadn't already noticed, it blocked your path too. Just go north and follow the path. You'll be able to reach Nockmaar.

If you go back to the house where you learned Thunder from (which is the screen south of here), you'll find out Sorsha has the Crest of the Spirits.


Well, we've done just about everything in the game. Next up, we head towards Nockmaar.

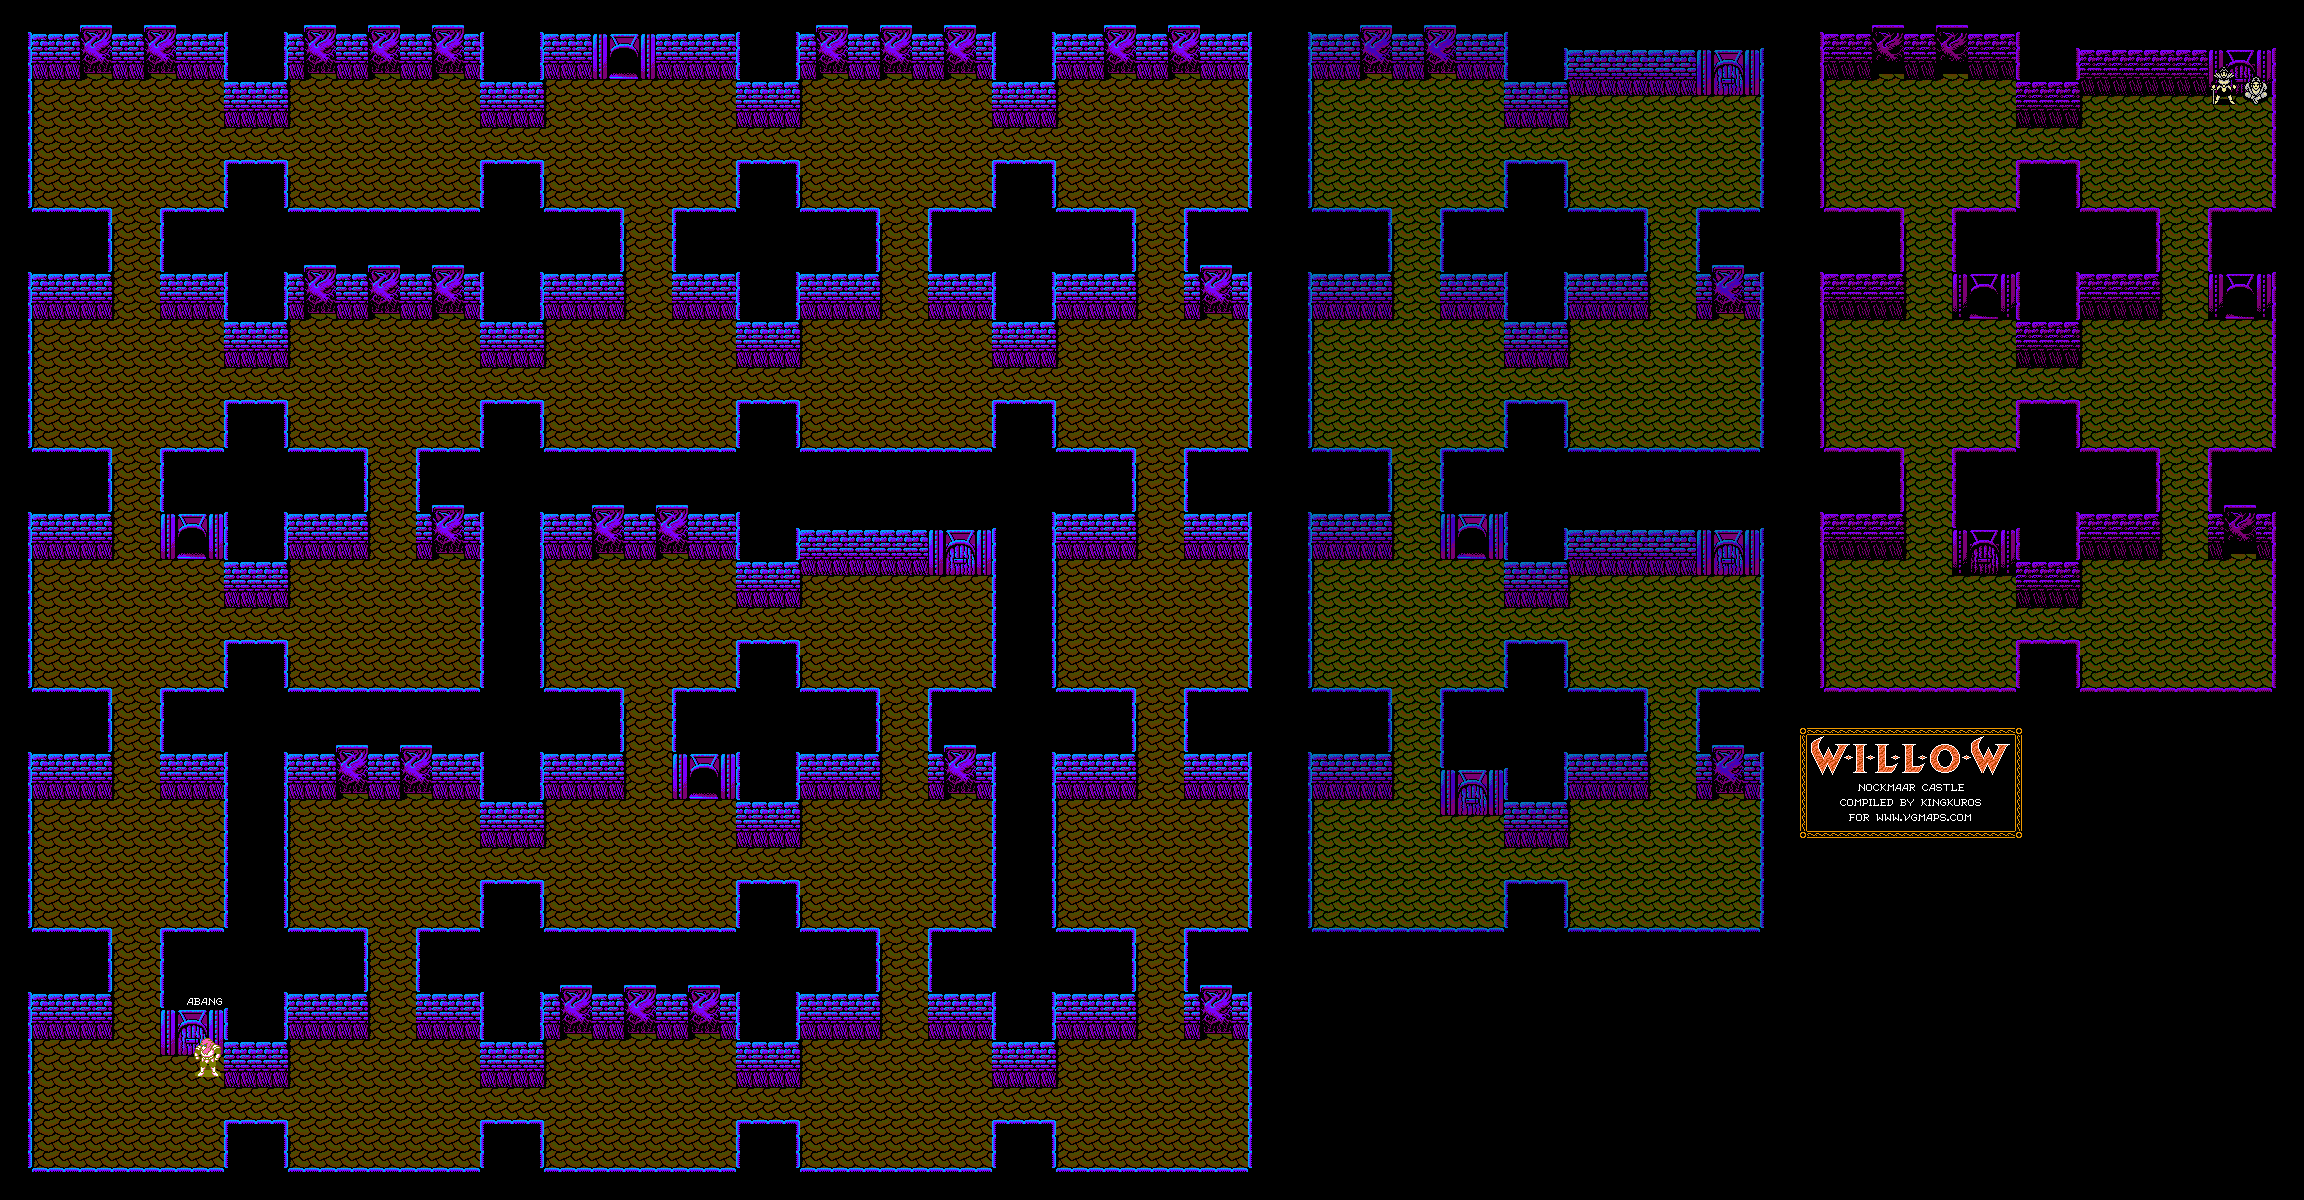
There will be a guard near the entrance. He won't let you in, but if you use the Monster's Bone and turn into a monster, you'll be able to scare the guard away and enter Nockmaar.


The red zombies are nasty. You'll have to wait for them to shoot 16 bubbles before you can change back from the pig form.

The room in the lower-left corner of the entry area houses Abang. Since Adik has given you Abang's sword and asked you to return it, he'll be able to put his strength behind his sword. You'll need a key to get further into the castle, and that the old woman Adik rescued has it. Turns out, the old woman was on the cliff near Nockmaar castle, and you can talk to her to get the key...except she's not there anymore and you'll need to look for her elsewhere.

Check out the Wing Sword. Instead of being the weakest sword in the game, it is now the strongest. Equip it before you do anything else.


Before you head out, be sure to use the Ocarina to call Po, and teleport to Tir Asleen if you need to heal up.

Go back to Tir Asleen, and go back to the house on the path left of the castle entrance. This house is usually locked, and if you go to where you first met her, she's gone. Turns out, this is where you're supposed to meet her...and the game doesn't tell you to go over here at all. She'll give you the key to Nockmaar Castle.

All the loose ends are tied up, so you can now go to Nockmaar without having to do anything else.

Saturday, April 13, 2024

PrinceWatercress plays Willow for NES - Part 9 of 11


In this video, we enter the castle in Tir Asleen...and things get worse.


Go back to Fin Raziel. If you're Level 13, you should be able to transform her back into her normal form. She'll channel her energy into the magic cane, allowing it to not only damage enemies, but also Queen Bavmorda. From here, head to the castle north of Tir Asleen, since you'll have nothing else to do at this point.

The armored men with the swords have no shields to defend themselves with, and they fight just like the skeletons. That's a recipe for disaster for them, since you can just chug away repeatedly at them.

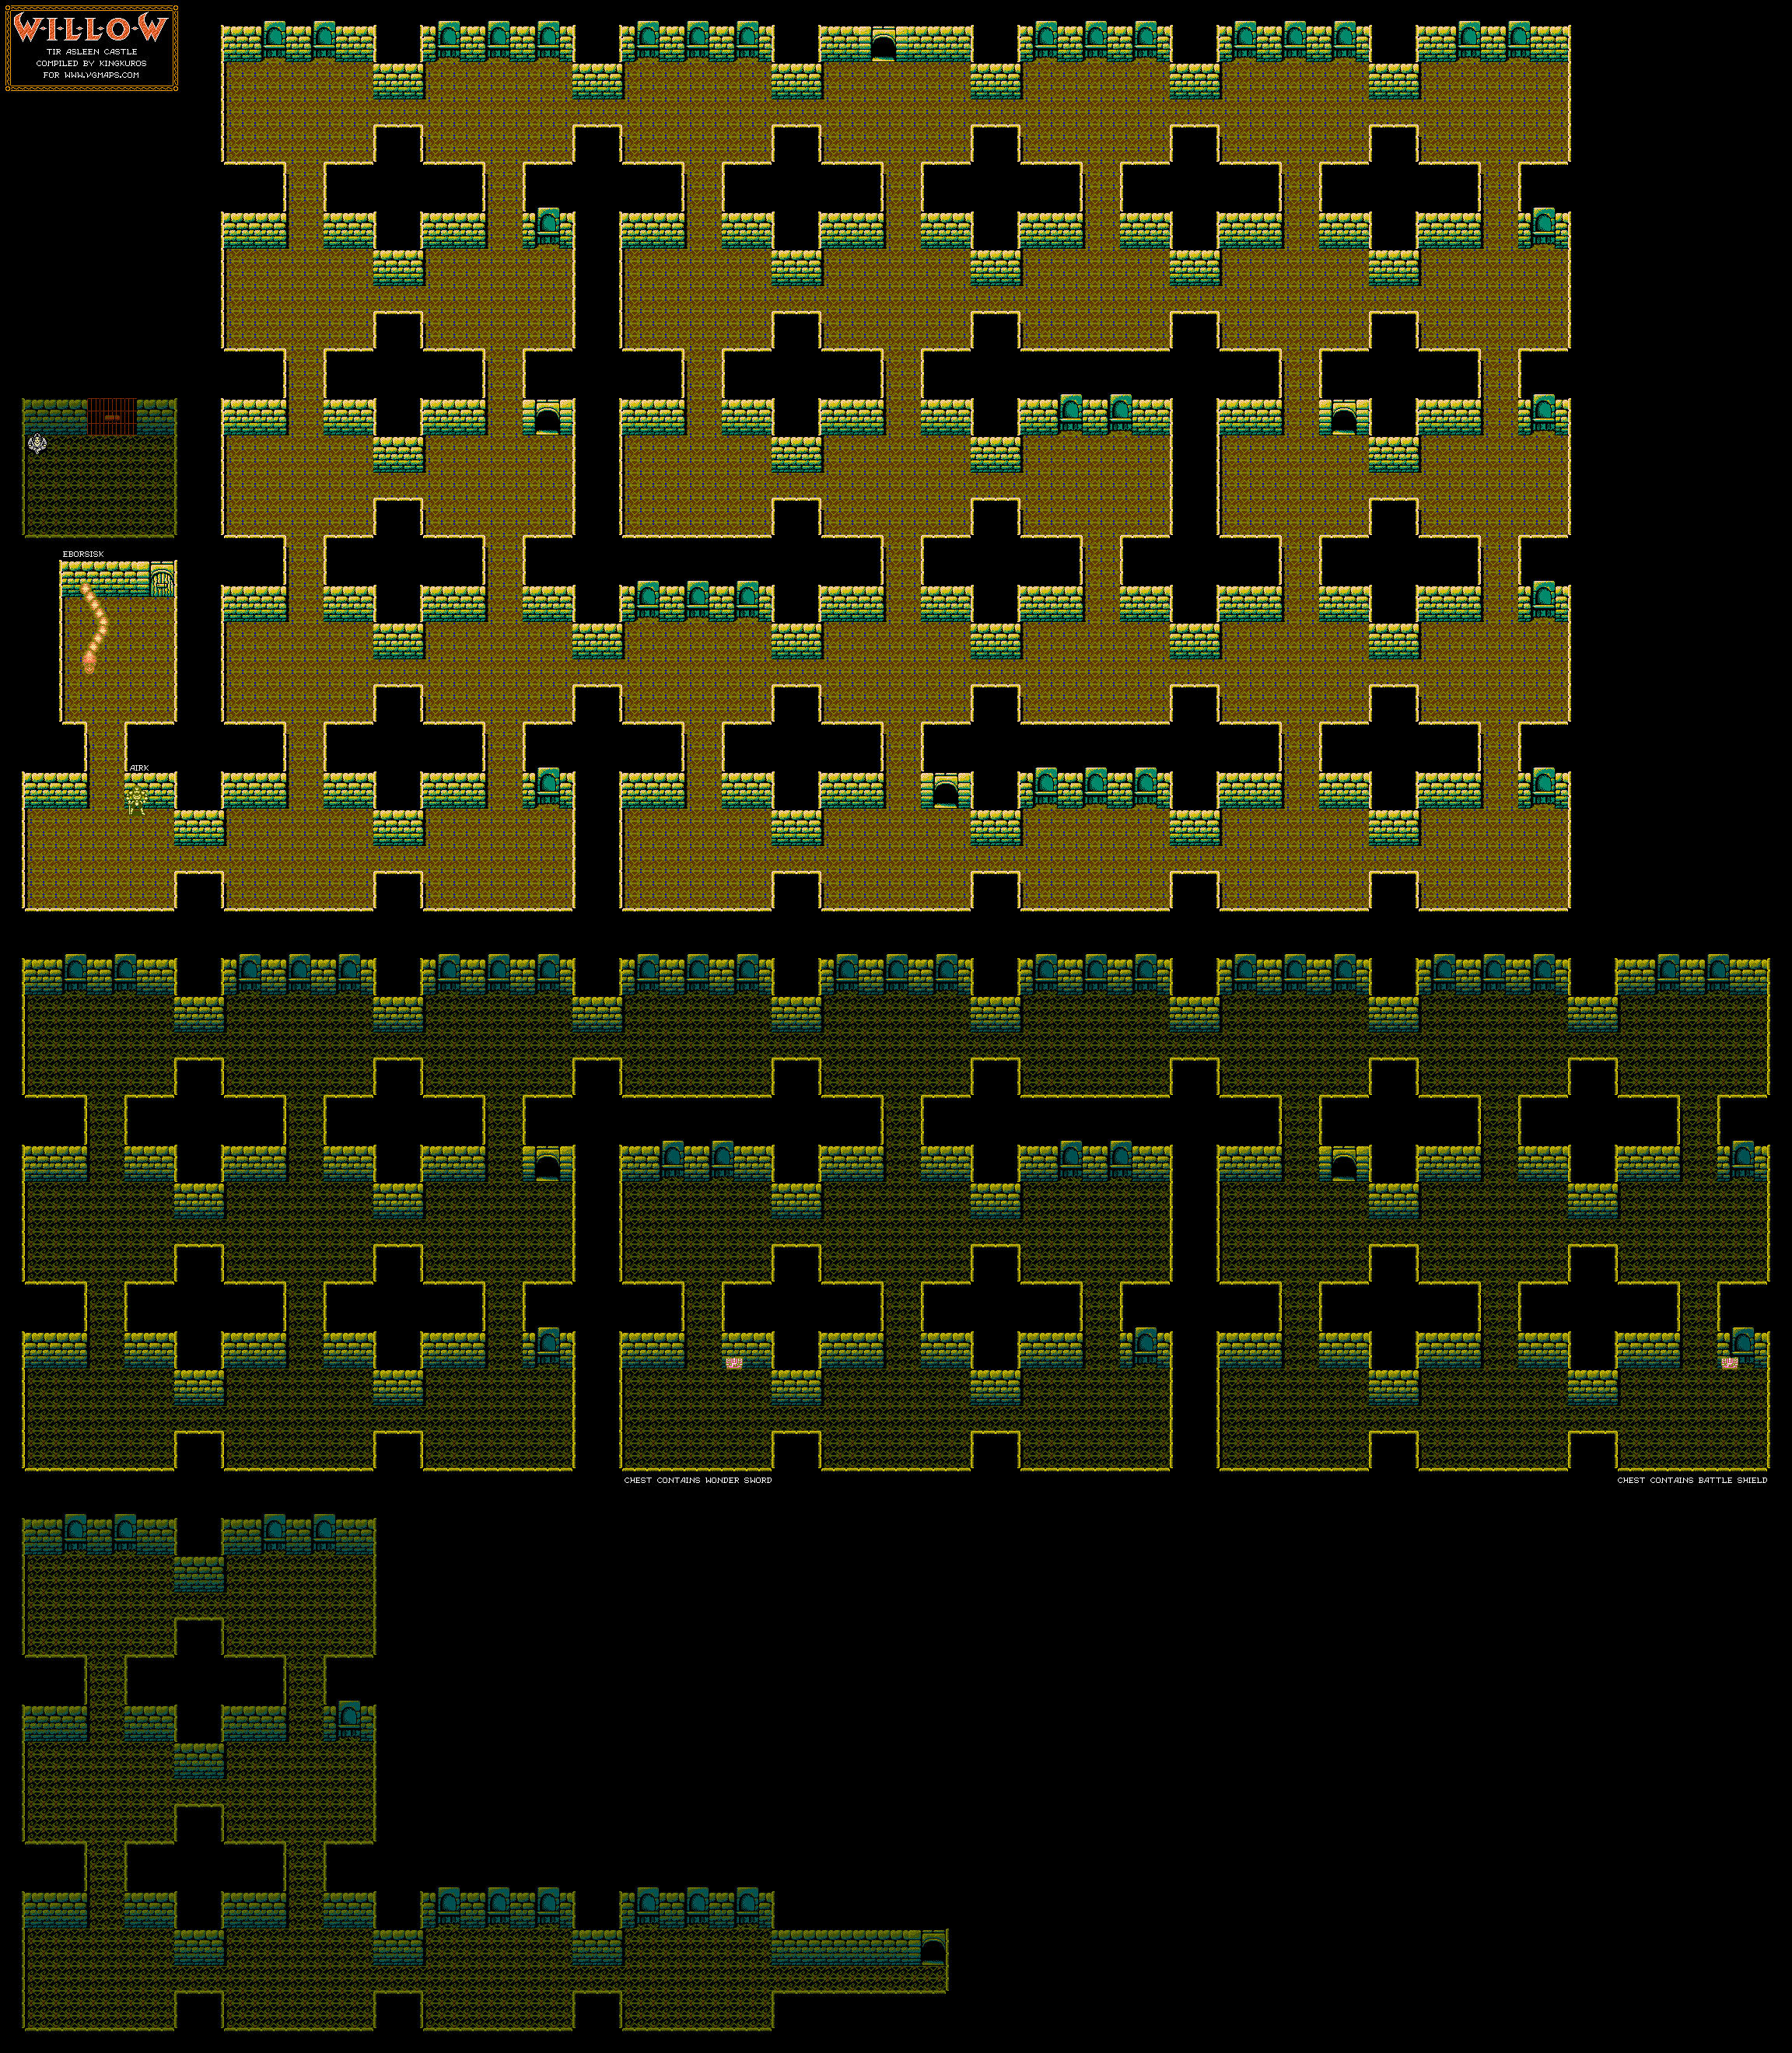
Go east two rooms and south two rooms. Enter the door. Go up the stairs and into the next doorway. Go south and east until you reach the chest with the Battle Shield in it, and equip the Battle Shield when you get it.

From there, go north and then keep going west until you stop seeing three-way intersections. From there, go west again. You'll reach a three-way intersection on the next screen. Go south here, and explore this set of hallways. You'll find the Wonder Sword in the lower-left corner.

Go back to the northern hallway and go west. When you see a three-way intersection again, go south and enter the doorway. At this point, you'll be seeing the red-outline skeletons again. Go down the stairs, and you'll be back on the lower floor and in the lower-left portion of that area when you enter the doorway.

When you reach the room in the lower-left corner, you'll meet Airk of Tir Asleen. He'll tell you about Eborsisk in the next room. He's too weak to fight Eborsisk, and he gives you his sword, the Kaiser Sword.

First of all, why did we just get another sword? We just went all the way to the upper floor and got the Wonder Sword, which is more powerful than the Dragon Sword. Now we get the Kaiser Sword...and guess what? It's weaker than the Wonder Sword. What was the point?!?

Eborsisk is dead easy at this point in the game if you're Level 15. You have to be Level 14 to swing the Wonder Sword quickly, which seems to answer my question...but at this point in the game, you've probably just leveled all the way up to the penultimate level, which makes it rather moot to have the Kaiser Sword if you are. Anyway, just stand near the Eborsisk's face and just swing the sword repeatedly until it dies. That's it.

Oh, and Eborsisk is named after Siskel and Ebert. Nice one, George Lucas.

When you go through the door, you'll be in a cell. Kael, General of Nockmaar, taunts you as you're locked in. You've also lost the Crest of the Spirits, as Kael has taken it and given it to Bavmorda to be destroyed.

You'll also meet Madmartigan again. Talk to him and he'll tell you he's met Airk, and that he's told him of a secret cave connecting Tir Asleen to Nockmaar Castle.

You'll need to move onto a specific tile at the south end of the jail cell for an opening will appear in the upper-right corner of the cell. Franjean and Rool have made an opening in the wall. They'll tell you to head out and find this secret cave. They'll give you the Powder of Unrequited Love (known in the movie as the Dust of Broken Hearts) for use as a magic item. It will give any being it touches a heart of justice. You'll then be able to leave the cell.

After a short corridor that leads back to the upper floor, you can just keep going north and exit the castle.

Head back to the entrance to Cave 7. You'll meet Franjean and Rool again.

Friday, April 12, 2024

PrinceWatercress plays Willow for NES - Part 8 of 11


After some more cave exploration, we finally make it to Tir Asleen...


Refer back to the map with Cave 5, because it also contains the equally short Cave 6. The upper-right corner of the cave houses Adik of the Eagle Clan, who is an original character made for the game. He gives you the Wing Sword and asks you to return it to his brother Abang if you see him. You can equip it, but it's the weakest sword in the game, so why bother?

The path south of Adik will run in a circle. You'll find a cave here with an old woman. The old woman will tell you that the bridge to Tir Asleen is cursed, and that nobody can go near the town. Unfortunately, that's all this old woman can do for you. To the south is the other exit out of the cave. You'll have to take it in order to find an alternate path into Tir Asleen.

Head back to Cave 5 and talk to the old man there. He'll give you the witch's shoes, which allow you to cross the bridge to Tir Asleen.

When you reach Tir Asleen, you'll find out that nobody is in the town. If you go all the way to the left after entering the town, there will be a house with a woman in it. The woman will tell you that she knows nothing and that if Bavmorda knew someone was living here, she would attack again. She also asks you to go to the rocky mountain east of the castle and find the old woman there. She will tell you that the old woman was taken from Tir Asleen by Bavmorda, but was saved by Airk, a warrior of this country.

The house in the upper corner gives you an opportunity to rest and recover your HP and MP. Your next mission is to go to the castle north of the town, but you'll still have to get some stuff done before you can get inside. The path to the right of the castle forks into two directions, and if you go left, you'll see the last cave in the game. You won't be able to do anything there, however, as a chest that contains nothing will block your path.

Instead, take the path to the right and go all the way to the north. You'll meet an old woman who tells you that she has been waiting for the warrior of the prophecy to appear. From here, you can head back to the castle, and the door will finally open.

Thursday, April 11, 2024

PrinceWatercress plays Willow for NES - Part 7 of 11


We go from one cave to another on the way to Tir Asleen.


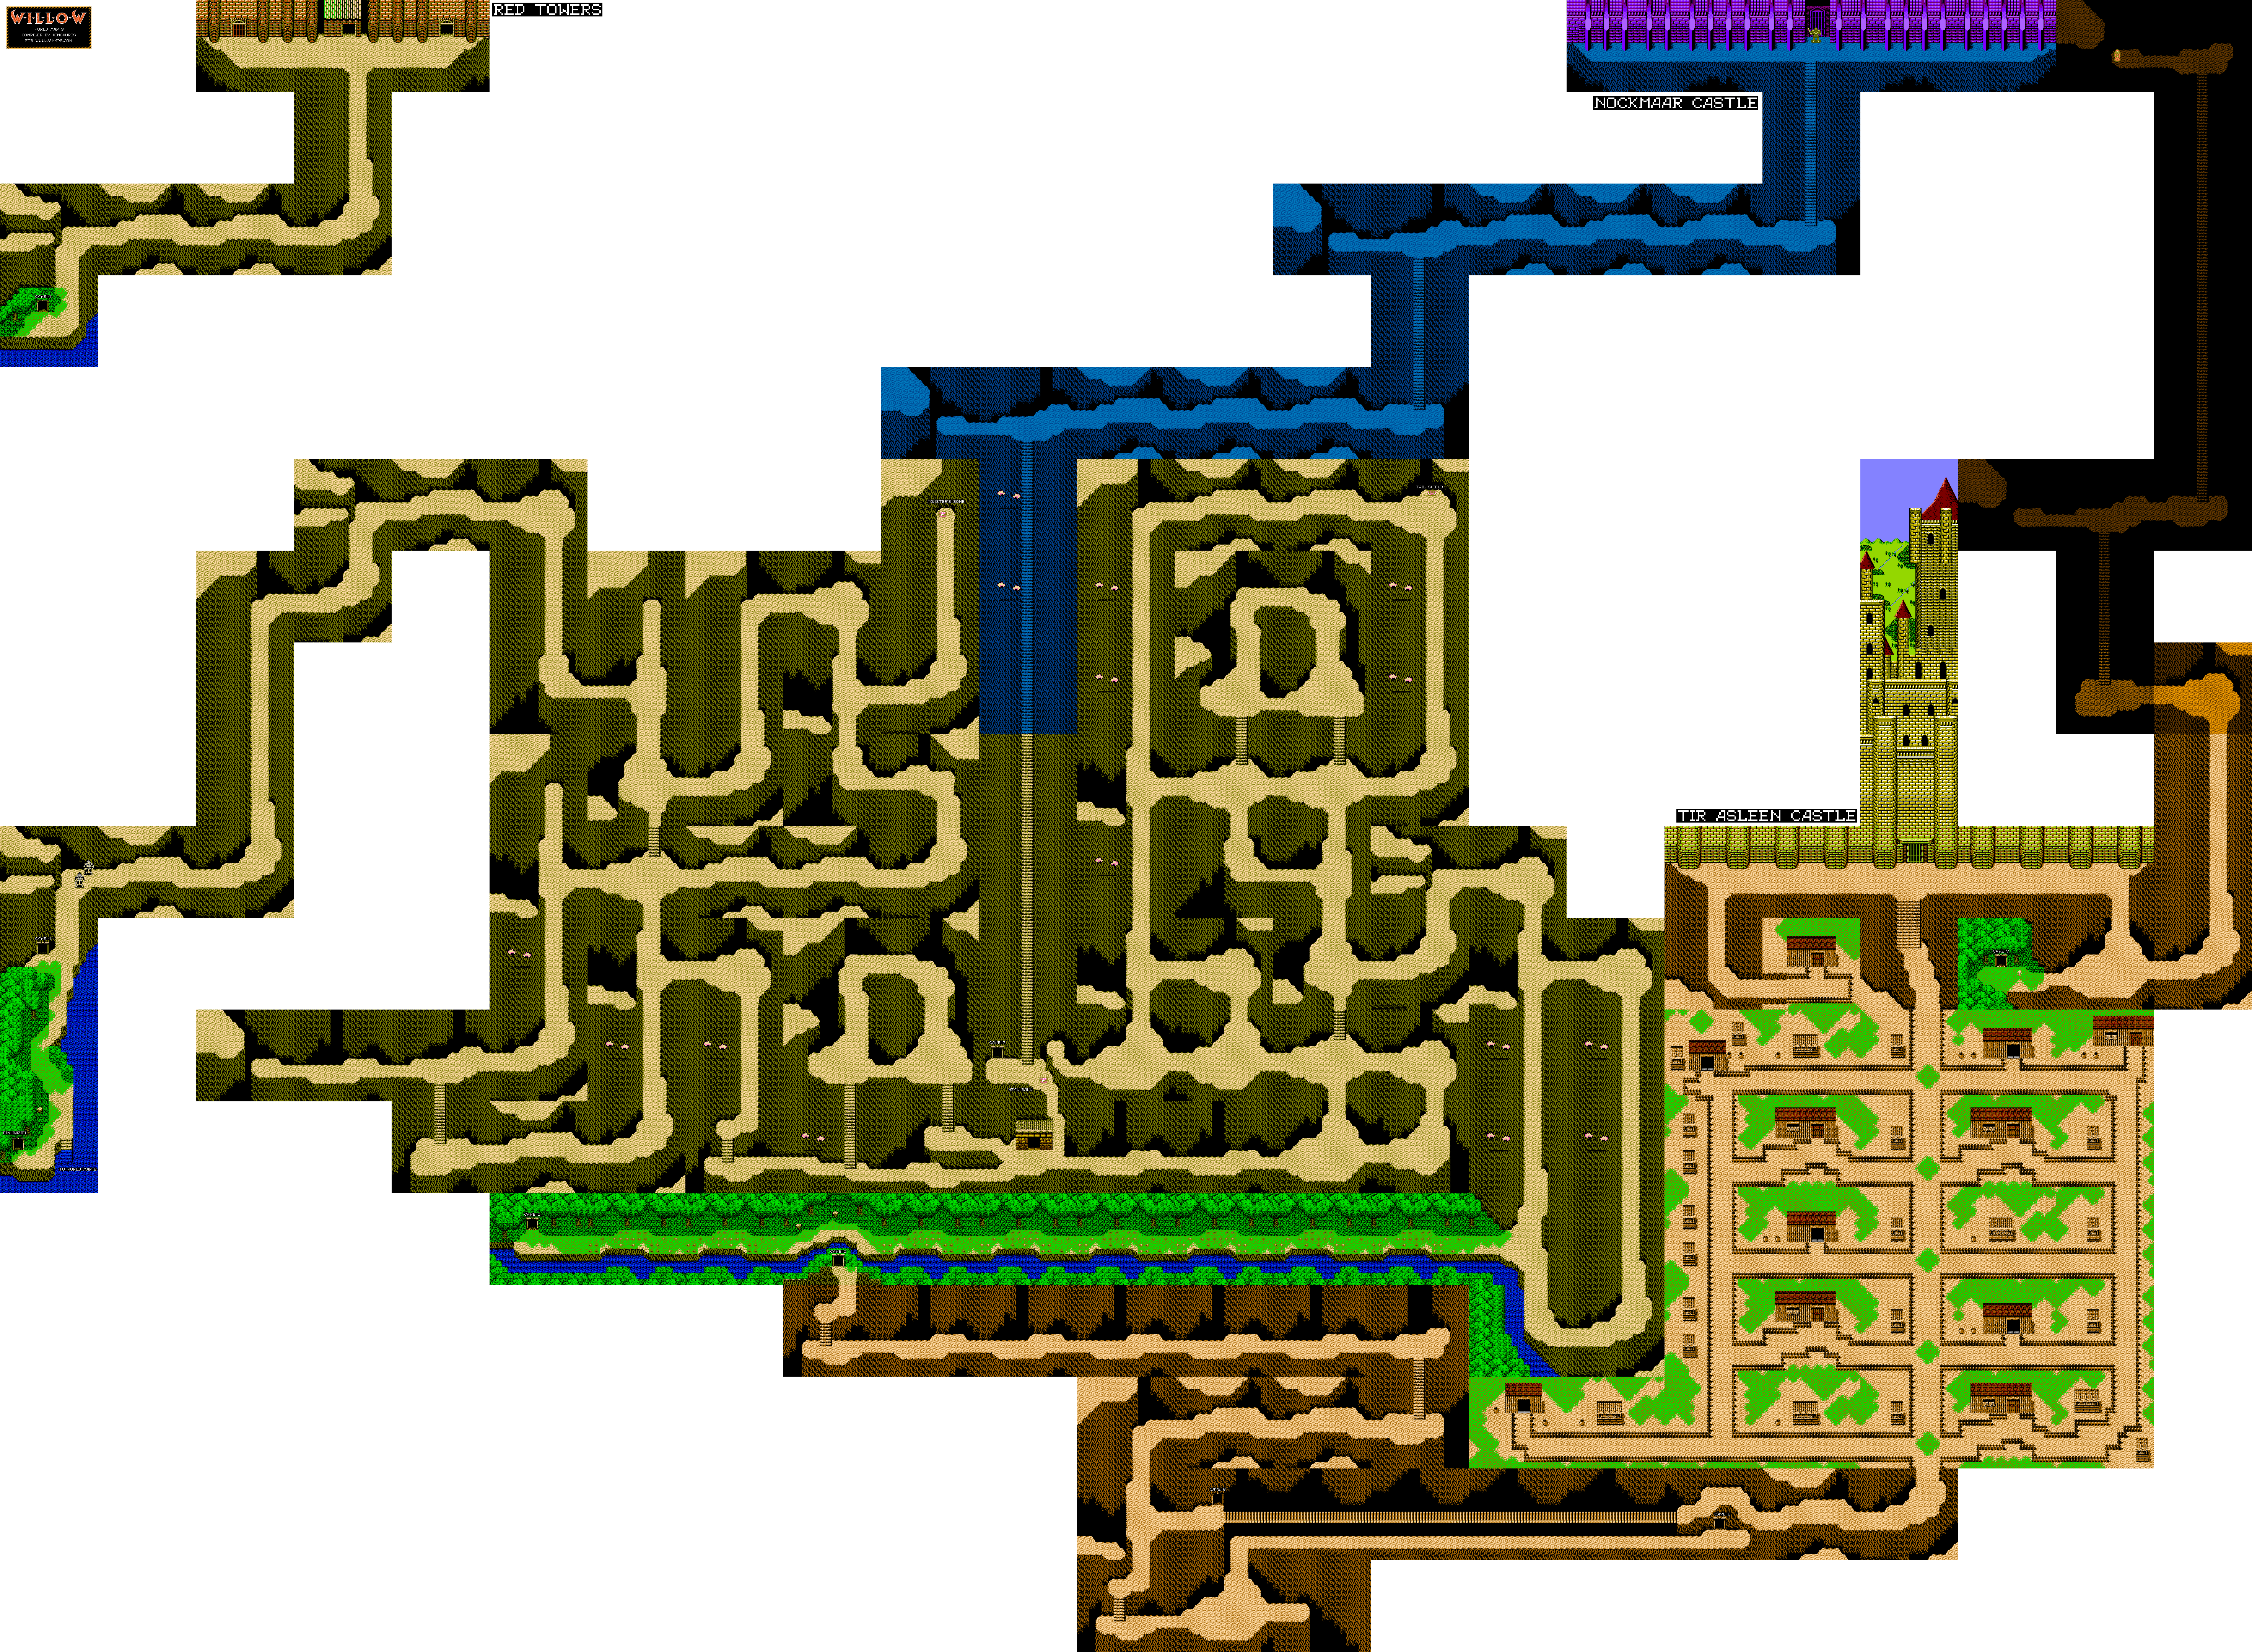
To Tir Asleen

As you go east, be careful as the rocks can hurt you. (At least they won't kill you in one hit like they did shortly after the beginning.) Interestingly, they will move from one side of the screen to the other, and if you pay attention to where the rocks are going, you can find a safe spot or two. You'll also see red palette swaps of the fly enemies, gray wasps and dirt-brown versions of the floating skulls.

When you reach the first intersection, go south then keep going east. You'll eventually be able to go north and get the Monster's Bone. By wearing it on your head and uttering Spectre's magic word, you can transform into a monster and disguise yourself as the enemy.

Return to the intersection before the Monster's Bone and go south two screens, then follow the path and keep going east at the first intersection you see. (For those of you not using a map, hugging the left wall even as it U-turns at the dead end and becomes the right wall - in a way - works very well. And if you are using that strategy, don't go up the stairs.) You'll see large, projectile-spitting faces show up in the rock walls. Just carry on.

If an enemy drops a bubble, pick it up. It will refill some of your HP.

The house you'll see on the way will have an old man who will tell you he's never heard of Nockmaar Castle (even though he lives near it). He also teaches you the Thunder spell, which is the most powerful magic in the game. You can also heal here, too. Go north from the house and you'll find a chest that contains the Heal Ball. This costs 30 MP to use, but it heals even more than the Healmace does, effectively making the Healmace obsolete.

Go back to the house, then go east. When you reach the four-way intersection, go north until you reach another four-way intersection. Go east to get the Tail Shield. Equip it when you get it. You can talk alternate paths to get to the Tail Shield chest. If the rock faces give you a hard time, you can kill them off with the Thunder spell, but be warned that it uses a lot of MP. At least the face enemies give you 200 experience points each.

The brown enemies that spit fireballs can be easily killed with Thunder, and they also drop balls of MP that will both refill the cost of a Thunder casting.

You'll eventually head back to the four-way intersection that you saw shortly after going east from the house where you learned Thunder. If you hit that area (and you probably will if you returned differently than when you went in), go north, then east. The next part of the path goes in a circle, so go west and you'll eventually find a new path...and trees.

You'll want to use the Monster's Bone here. The holes in the ground are actually mouths that try to eat at you, but if you've transformed into a monster, they won't even bother you. It won't last forever, so you'd better step it up to the other side.


This one is pretty easy. The first opening you see is the house of an old man, who will tell you about Tir Asleen. Tir Asleen is the future castle of the future Queen, Elora Danan.

Go east until you see a four-way intersection, then go south and follow the path to the east. You're done here.

Follow the path (which has a lot of falling rocks) and you'll eventually come across an intersection. Both paths lead to the cave, but you'll want to go east as this leads to Tir Asleen. Unfortunately, when you try to cross the bridge, you won't be able to move past the cave. You'll have no choose but to go into the cave.

Wednesday, April 10, 2024

PrinceWatercress plays Willow for NES - Part 6 of 11


It's time to head to the two towers. By going through them, we'll be able to get the Crest of the Spirits and stop Queen Bavmorda.


The Two Towers

The path north leads to the two towers that you heard about earlier. When you first reach this area, go to the first doorway that you see, which is in between the two towers. Inside is a woman caring for Elora Danan, the sacred future queen that will overthrow Bavmorda. She wants you to call the Spirit of Earth down to the Sacred Tower, as the two spirits - the Spirit of Sky and the Spirit of Earth - are waiting for you at the top of the towers. When you summon them, change shall come.

To the right of Elora's caretaker is the first tower.


The path here is relatively straightforward, and the torches light up as you go. The fact that they also light up in the floor below you (which you can also see) is a pretty nice touch.

It may seem to take forever, but you'll eventually reach the top, where you'll meet the Spirit of the Sky. He has taken Bavmorda has made his voice inaudible, and has inhabited an old man's body to tell you what's going on. He then puts his power and essence into a blue crystal, which he gives you, before telling you to scale the west tower.

Since you've completed the east tower, you can now use the Fleet magic to get back to the bottom and enter the west tower. Be careful, as you will see monsters on the way up this time around, despite this being a palette-swapped mirror image of the tower you just left. You'll also need to keep the Devil Eye ready, as there are monsters here that require it.

Remember the bubble monsters that can only be killed with the Devil Eye sword? Well, you'll find them in the third floor. When you have four on the screen, you can keep killing two so that they can continue to split into four. Just make sure there's no more than four, or you're going to be pushed back while taking a lot of damage. Since you get 180 experience points - 90 per bubble monster - every time they split, and they don't really attack you, this is one of the best ways to grind for experience points if you really need them.

Just like last time, you'll reach the top, and you'll meet the Spirit of Earth. Talk to him. After takling about how Queen Bavmorda has confined the power of Fin Raziel, whom he has placed on the earth, he'll put his power and essence into the Red Crystal, which he gives to you. He then tells you to meet Elora Danan in the center tower. Go there and you will obtain the Crest of the Spirits. The Crest must not fall into evil hands, especially Bavmorda's, or else the power of the spirits will disappear and Bavmorda will live forever. You must head to Nockmaar, Bavmorda's castle, and destroy the evil once and for all!

It takes a while to go up a few more levels (tens of thousands of experience points' worth of fighting) but it makes a difference. For starters, you'll be able to better swing the Devil Eye when you're standing still.

Now that you've done everything you can do at the towers, there's only one place left to go: back to where Sorsha was north of the entrance to the fourth cave. The easiest way to get there is to equip the Ocarina spell, call Po and fly to the Bar (which is the Tavern of the Traveller). When you get there, Sorsha and the soldier accompanying her are gone. You can now pass.

Tuesday, April 9, 2024

PrinceWatercress plays Willow for NES - Part 5 of 11


On our quest, we come across the cave with the demon that guards the treasure...


The Cave and The Ghost


You'll definitely want to have the Devil Eye ready, as some of these enemies (such as the flying grey wizard robe of a ghost as well as the faces we fought in the last video) require it.

There are enemies that look like floating bubbles. When they split into two, they'll take 10 MP away from you. You can kill the two bubbles created to get that back and more. You'd better be quick, or else they'll continue to split into two. If there's too many onscreen, they'll knock you back a screen. Oh, and those zombies that turn you into a pig? They're back, but the Devil Eye kills them in two hits at this point in the game. 

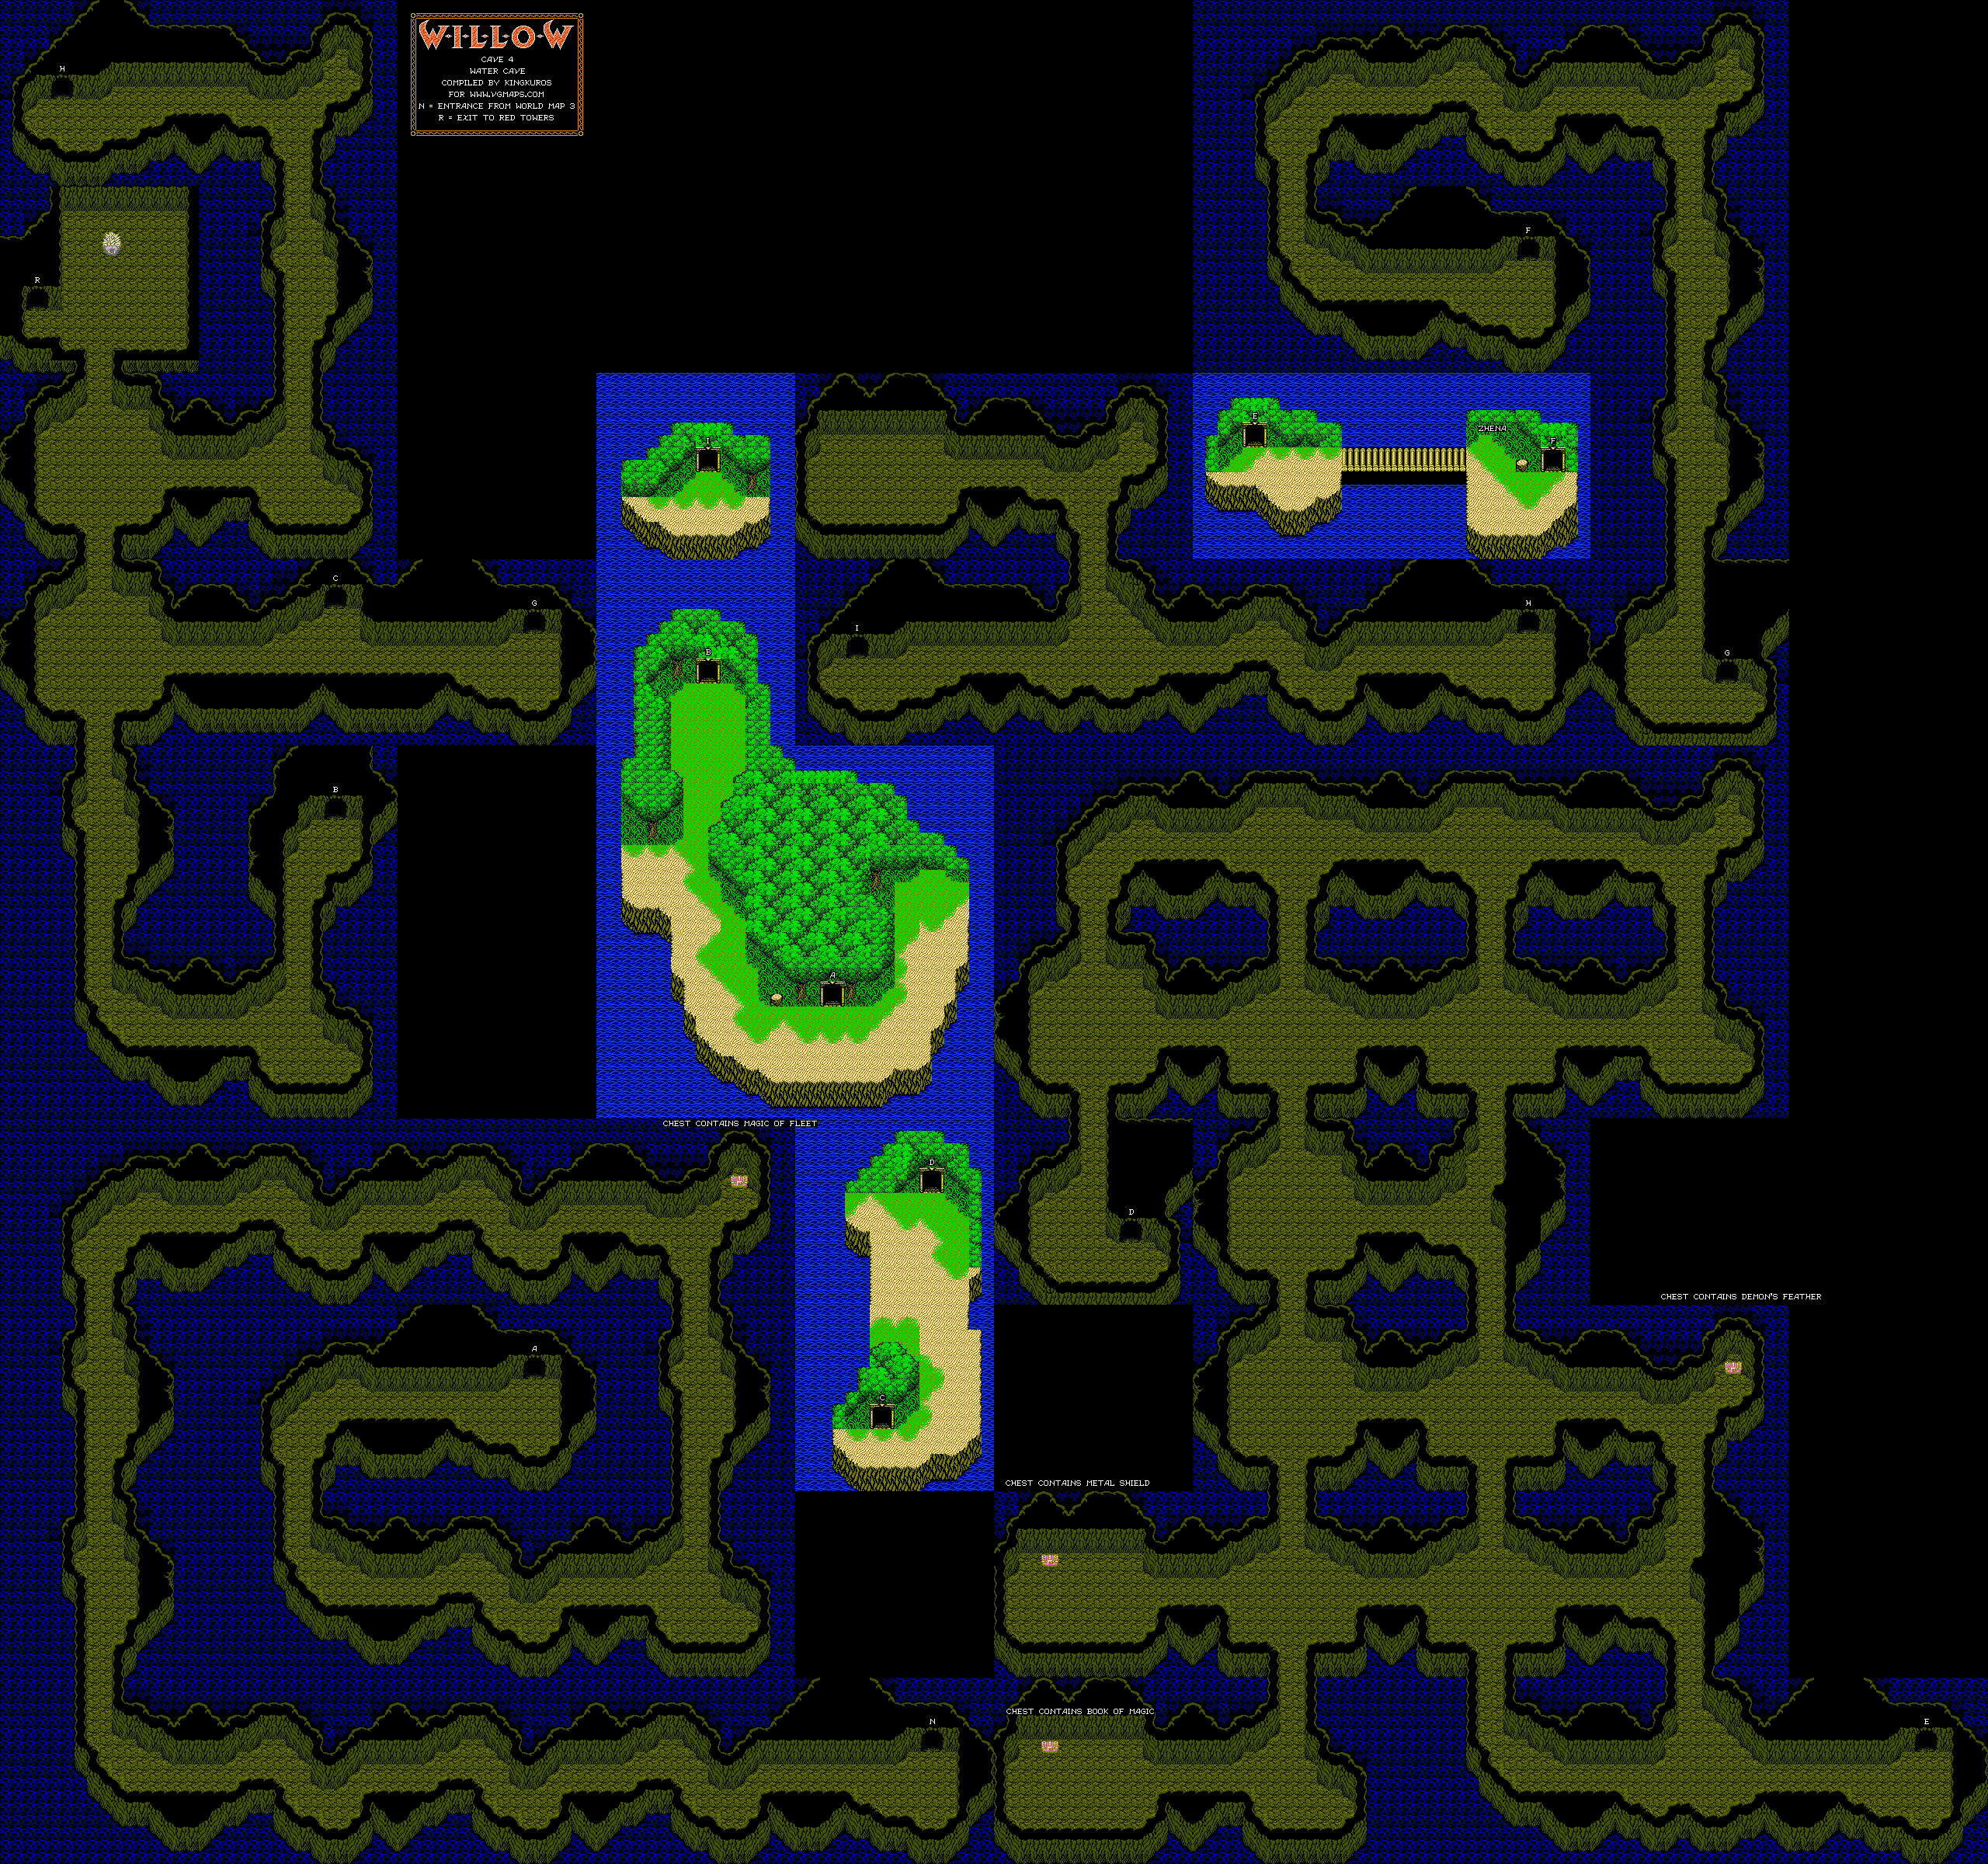
Soon after you progress from the entrance to this cave, you'll find a chest. Open it, because it contains the Fleet spell, which lets you instantly exit the cave when you cast it. No longer will you have to walk all the way back to the entrance when you're done!

When you go west and then north to the next part of the cave, you'll be able to take on the boss immediately. Don't even dare, because you won't be able to win just yet. Instead, go east of the first intersection and enter the first cave you see. You'll then be able to go to another cave, where you can find three things: the Demon's Feather, the Metal Shield, and the Book of Magic. The Book of Magic casts the Renew spell, which changes magic-based enemies into weaker ones. The Metal Shield brings your defense up a further 15 points compared to the Dragon Shield, and the Demon's Feather casts the magic of Terstorm, which creates a gust of wind. Be sure you have all of these things before you leave through the opening at the southeast corner, and be sure to equip the Metal Shield.

When you head east from here, you'll meet Zhena, the ghost of the woman who was waiting for her lover. She asks you to find her lover, and gives you her Cross Flute. Enter the cave nearby, and you'll be able to take a shortcut to the intersections that takes you to the boss. Go west, then go north two screens. You'll finally fight the boss, and he's dead easy. Walk up to him, stab him, then stand there as the the needles it shoots out bounce off your shield. Rinse and repeat until it's dead. The demon will turn into Muzh, Zhena's lover. Bavmorda turned him into a demon and commanded him to guard the door forever. The battle has left him half dead, but the Cross Flute plays and summons Zhena, who disappears with Muzh. Muzh leaves a note saying that Bavmorda fears the power of the spirits as well as just people. You'll also learn the Bombard spell from this note. From there, you can leave the cave from the door near the boss room.

Monday, April 8, 2024

PrinceWatercress plays Willow for NES - Part 4 of 11


As we explore new frontiers, we meet Madmartigan for the first time as well as some of Bavmorda's forces.


The Journey North


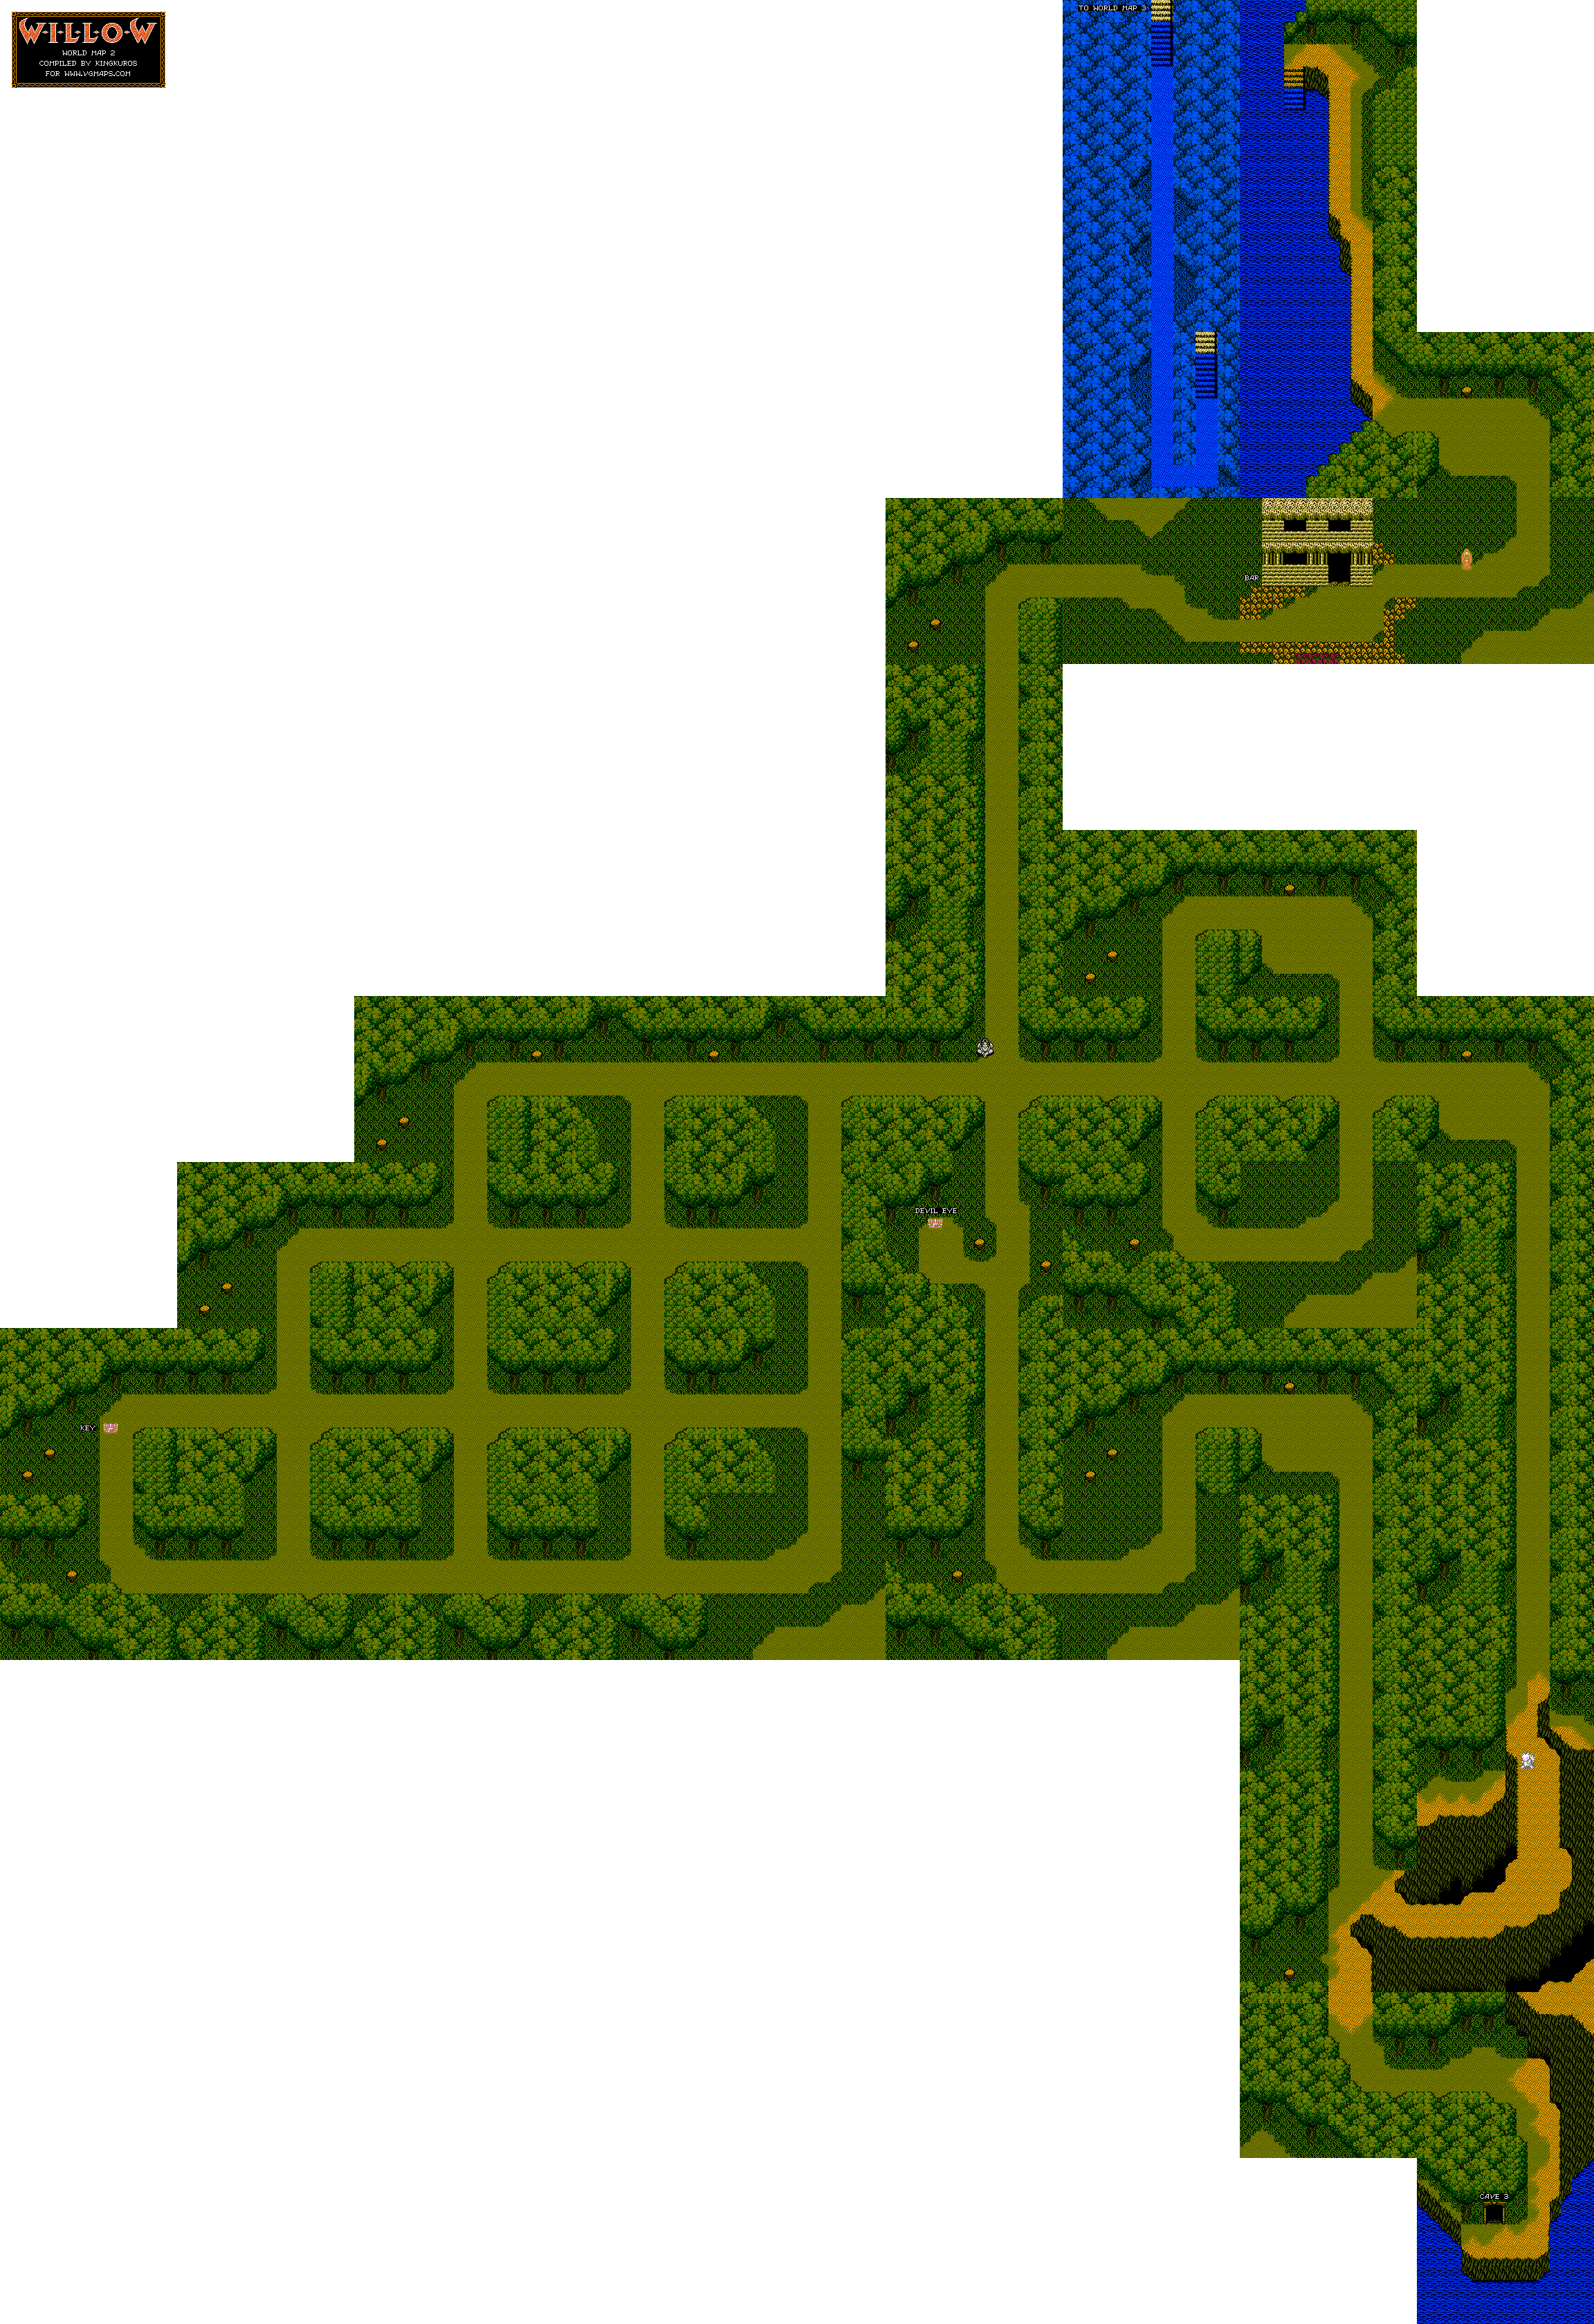
Now that you're able to explore this new world, go north. Take the left route when you reach the fork in the road. Keep going and you'll find a chest. Open it to get the Devil Eye. It's a powerful sword, but it only works on certain enemies. Keep it unequipped for now.

North of here is Madmartigan, a warrior of the Daikini clan. He's sitting on the ground with his hands cuffed behind his back, and he'll tell you that the key is hidden somewhere in the forest. It's actually hidden in the maze to the right. You'll need to move to the left-most part of this area to find the key. As you do this, you'll have to take on more of those blue-outlined skeletons.

You'll come across some spinning face monsters that shoot out a shield of fireballs and also shoot unblockable fireballs at you. It turns out you can actually defeat them. Here's the thing...the Devil Eye you found earlier is a sword, and a very powerful one. The only drawback to it is that it can only hit the monsters the other swords won't. (In other words, switch back to the Dragon Sword when fighting the skeletons here as well as any other normal enemies, or else your attacks will have no effect.) It's still better than nothing, and if you stab them repeatedly, you'll take them out and find a flashing circle where they once stood. Picking these flashing circles up will replenish 20 MP. Don't swing while standing still with this sword as you use it, though, as your swing speed with this weapon will be slow for quite a while.

When you free Madmartigan, he'll give you his necklace. Go north and keep going. Enter the house you see. This is the Tavern of the Traveler. As you heal, you'll learn about a nearby cave where a ghost guards treasure and kills anyone who gets near it, and that the ghost was that of a woman whose lover went on a dangerous journey. When her lover made it back, he found that she has mysteriously disappeared.

You'll then find out that the guy talking about the cave isn't talking to you, but instead to Madmartigan! Apparently he's happy that he's free, then he thanks you for freeing him after someone named Sorsha took him prisoner. He tells you that you'll need a Wakka Seed in order to cross the lake. The only people who could possibly have one are the Nail clan. (They happen to be rabbit-like creatures with antlers. Ah, so that's what I was looking at.) Guess what? You'll have to backtrack to get that, as you won't be able to progress further without one. Just head back towards the cave leading into where you entered this section from, and you'll find K'Chil along the way. You'll get the Wakka Seed.

To the east of the Tavern of the Traveler, you'll meet another old man. He'll tell you about two red towers standing side by side at the other side of the lake. Unfortunately, Bavmorda has closed off the road to them.

On the way to the staircase leading into the lake, you'll be attacked by what look like Koopa shells spinning endlessly. There are enemies under the shells that you can beat up, but at this point you can go without fighting them if you want to. If you must, however, block the bubbles with your shield, and make sure you're not standing still when they are spinning so that they will not fly into where you are currently standing.

If you enter the Tavern of the Traveler again, you'll find out Madmartigan mumbled something about defeating Bavmorda before he left.

Now that you have the Wakka Seed, you can return to the staircase that takes you into the lake and walk to the other side without incident. At the other side is a cave. Enter the cave and you'll meet Fin Raziel. You'll use the Magic Cane to try to restore Fin Raziel back into human form, only to change her into a bird. Well, at least that's an improvement. (If you don't at this point, you're going to lose your HP as long as you're in the water and you're going to die before you can reach the other side.) You won't be able to change her back until you are Level 13.


You're now in another part of the land. If you go any further north, you'll see another cave. Further north still is Sorsha, daughter of Queen Bavmorda. She'll ask if you've seen Madmartigan, totally unaware that you've helped him escape. You won't be able to go past her, so don't even try.

With that, there's nothing else to do but enter the cave north of Fin Raziel.