Sunday, April 7, 2024

PrinceWatercress plays Willow for NES - Part 3 of 11


Our quest leads us to unlocking fast travel and receiving magic that will allow us to restore Fin Raziel back to normal.

First | Previous | Next | End


To The Lake!

With healing in town out of the way, we can now exit the village from the west side.

The trolls will leap at you and also try to surround you. If you've levelled up a little bit since completing the first cave, you should be able to take them out in no time with the Battle Sword.

Remember the skeletons from earlier? This is where they start showing up for me. Get close so they come at you, then be ready to turn around and stab when they stab without getting stabbed yourself.

One of the best ways to level up is with the floating skulls with the blue outlines in the path just to the south of the western entrance to Dew. They give you 20 experience apiece, and 100 in all. You should be able to go up a few more levels and get to maximum swinging speed with the Battle Sword.

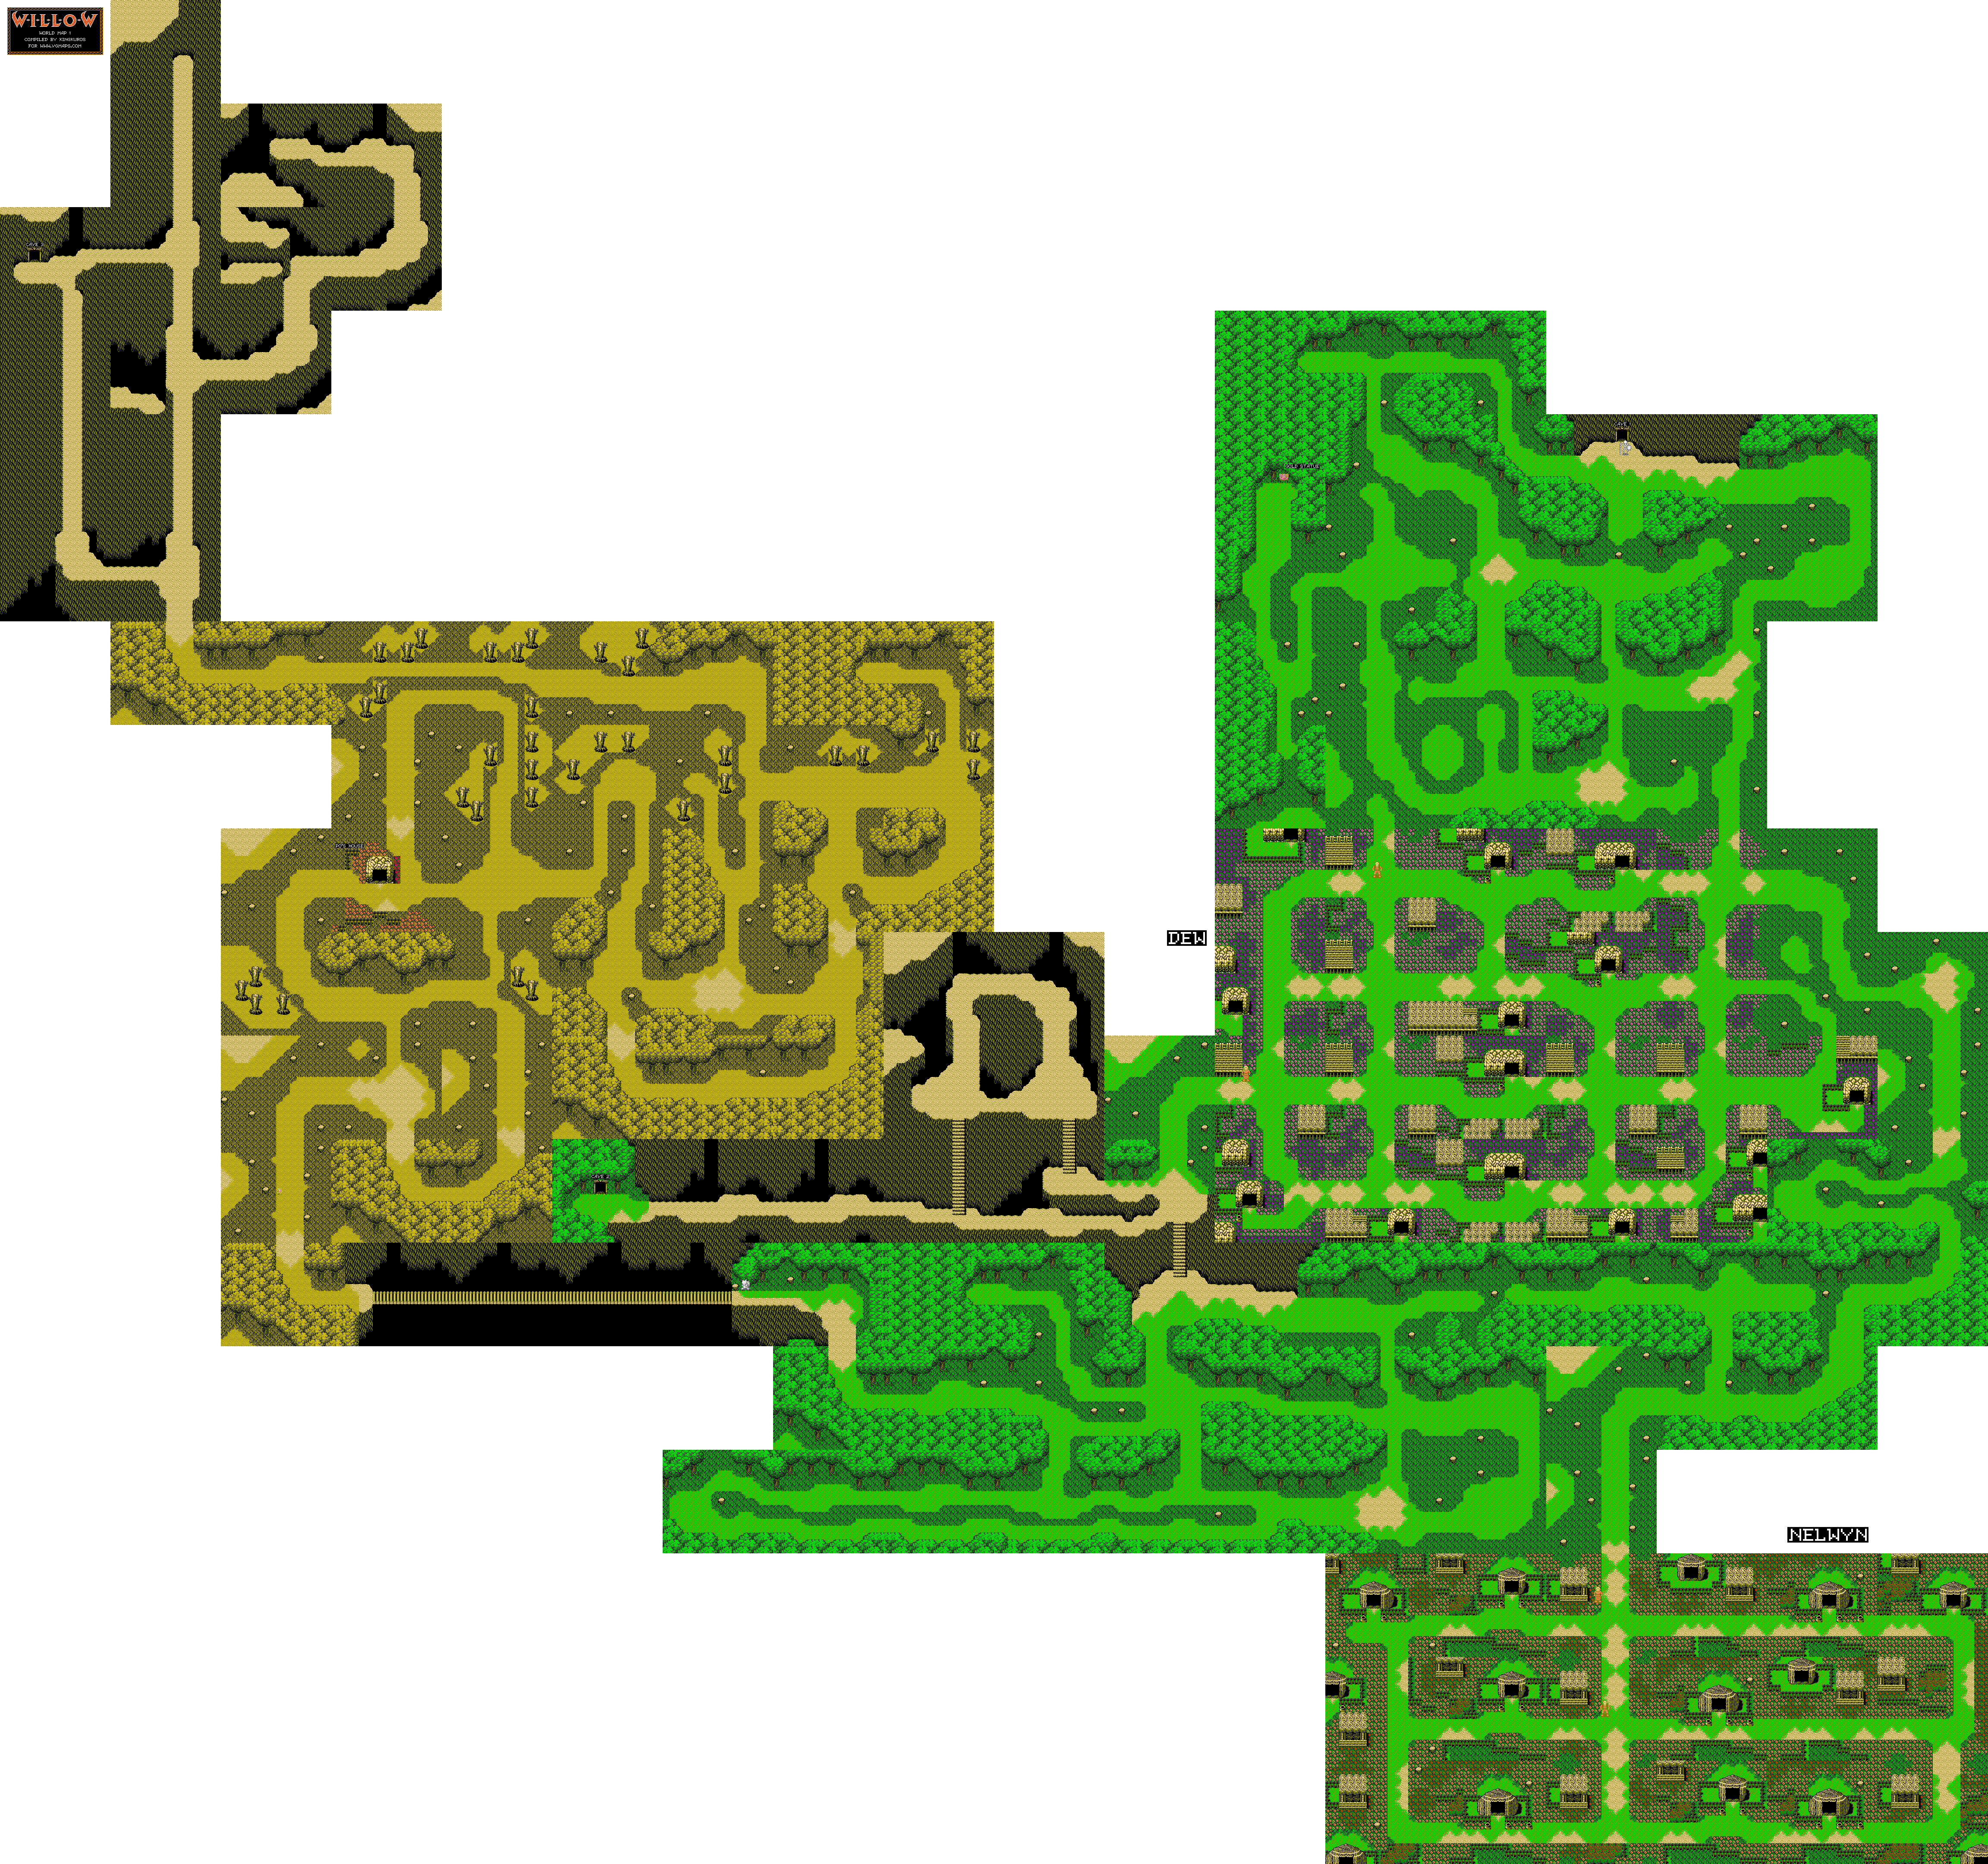
There is a fork in the road where you have four paths to choose from. There are two paths to the west. Take the lower one, as the rest just lead to nothing except more battles. You'll reach a bridge and meet Kchil of the Nail Clan. A spell has been cast by Bogarda on his village, making it impossible for them to get out. I'm guessing he's some sort of white dragon, even though he looks like a silver hedgehog in-game. Since you've made some progress here, Kchil's clan can now return home and you can now cross the bridge and head further west. You'll still have to fight some bees, but at least the spell that Bogarda cast on the bridge no longer works.

You'll meet Franjean and Rool of the Brownies. The Brownies stole baby Elora in the movie, but here they're just a slight nuisance. They'll tell you to go north into the Death Forest. There will be a cave where the dragon Matanda lives. You'll have to beat Matanda and give Franjean and Rool the Crystal Ball of Life.

Some of the bare trees will come alive and shoot projectiles at you. If you're just going through the maze normally and not taking time to double back, they won't be a problem. You can also block the projectiles with the Small Shield, so make sure you equipped it before you entered this area!

You'll soon come across a cave that acts as a home for an old man. You'll regain your HP and MP here, and find out that the old man's pet, Po, has gone missing. He asks you to bring him back. He'll give you Medicinal Herbs in case Po is hurt.

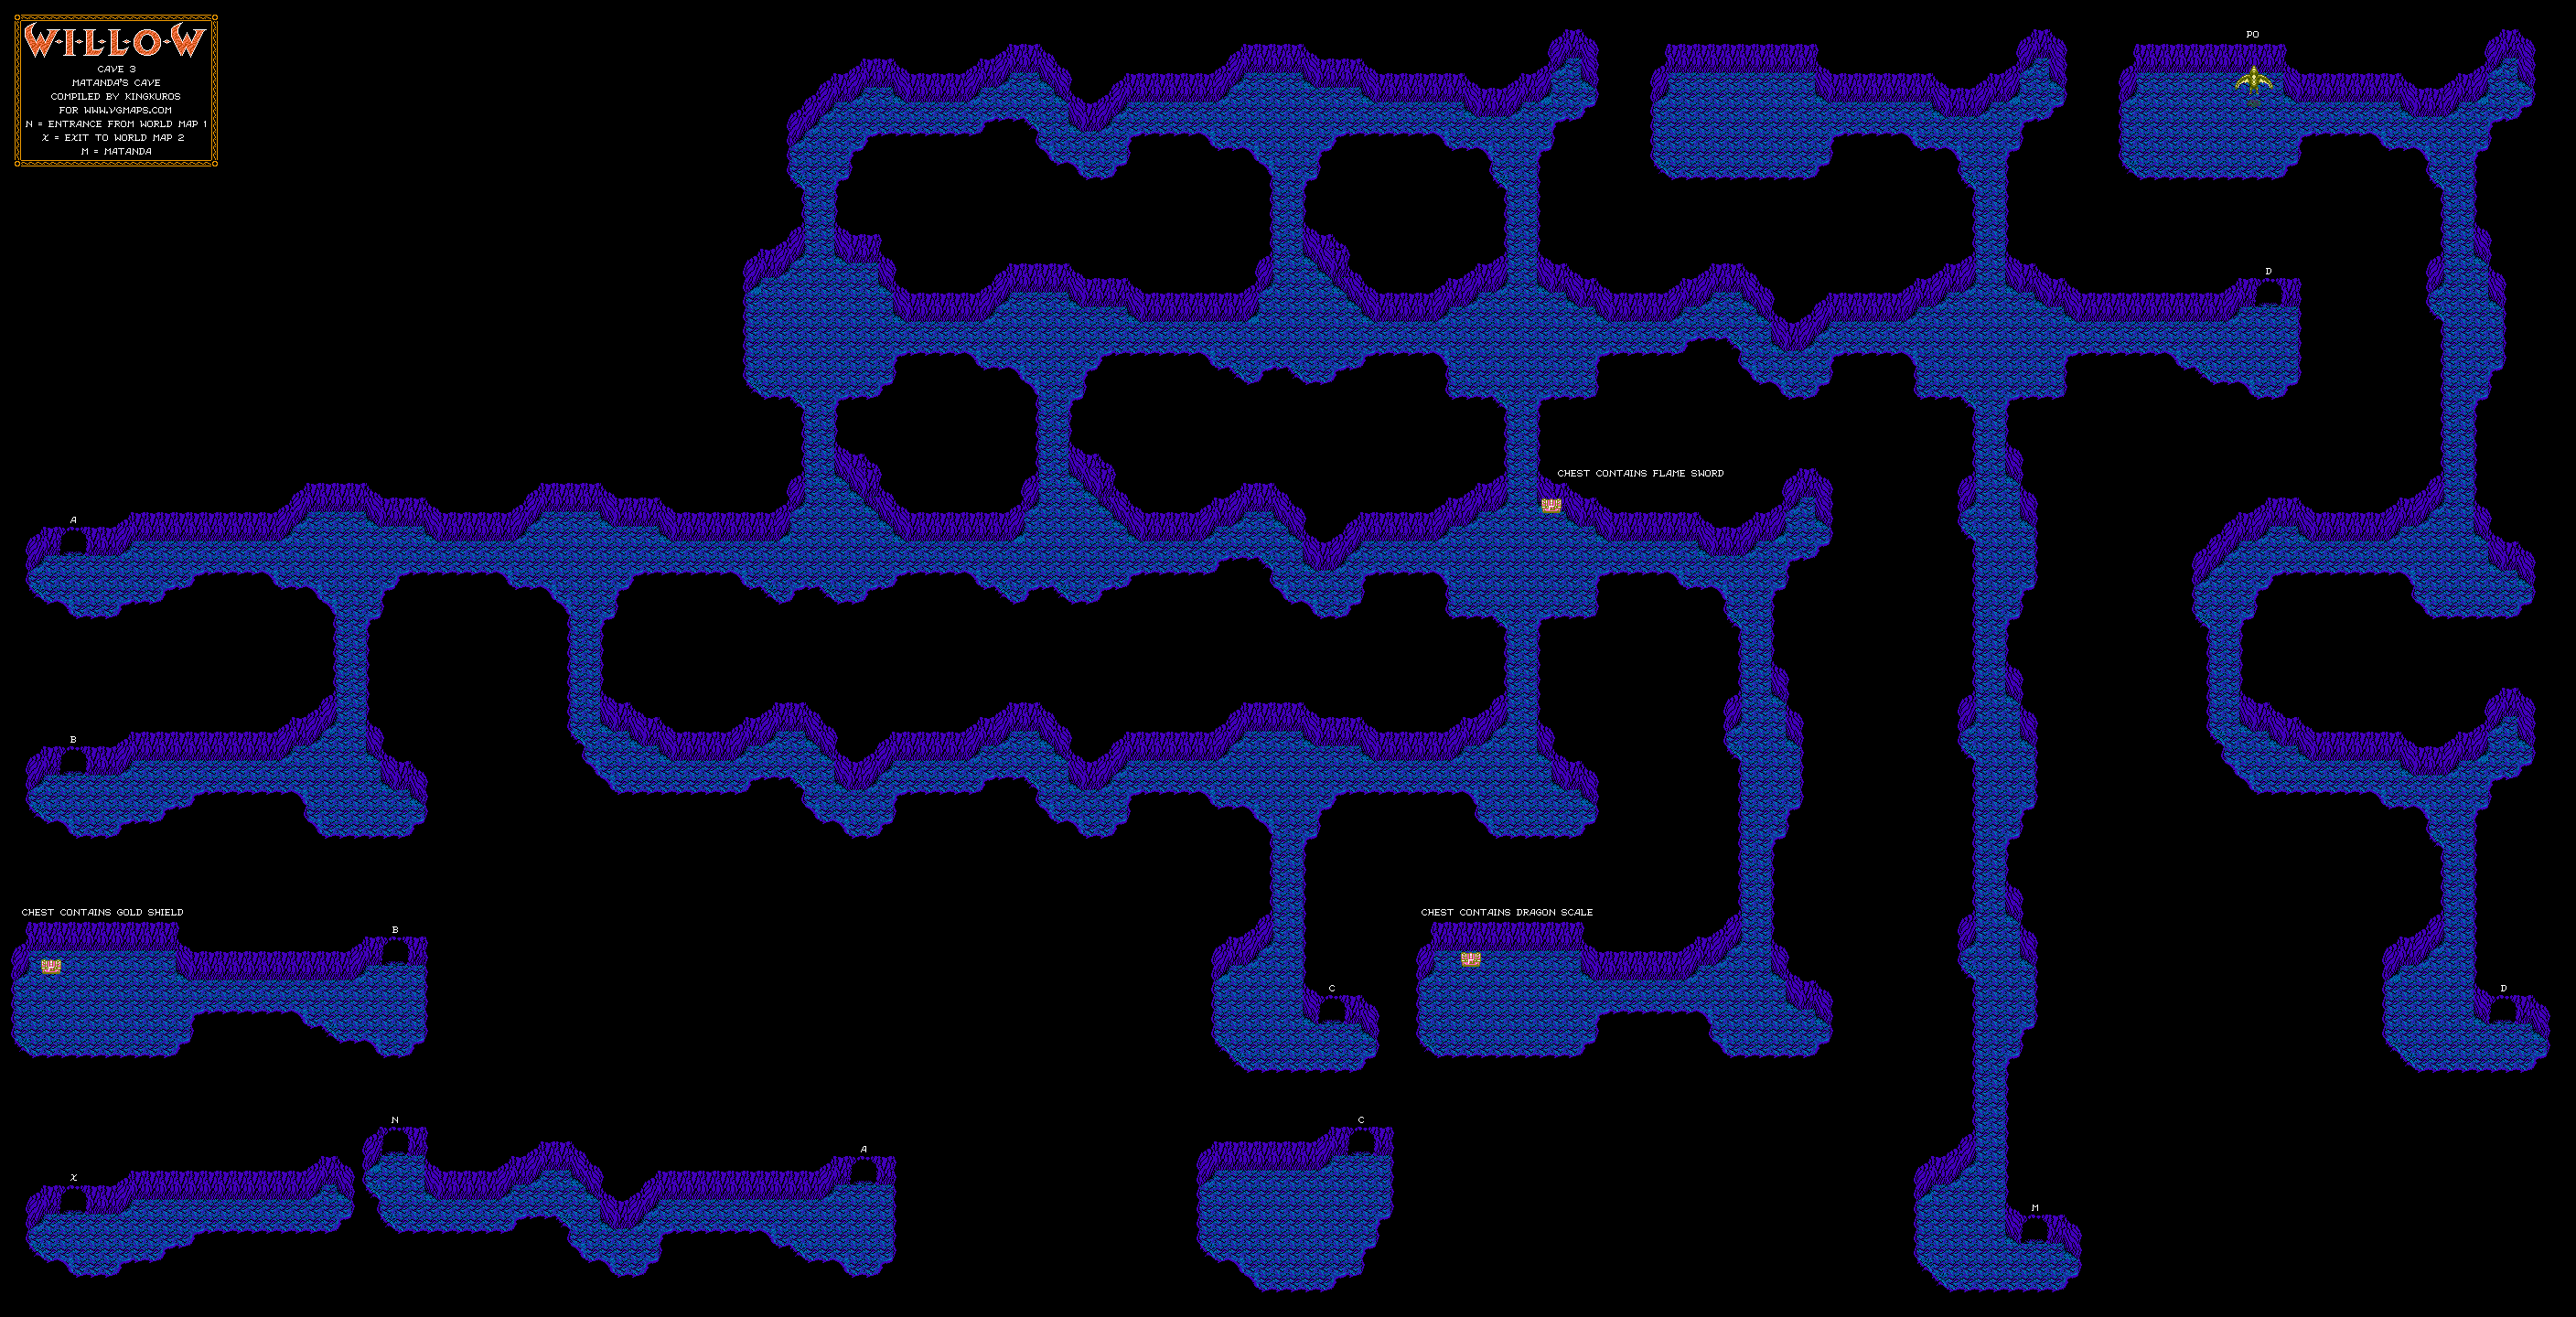
From the old man's home, go east and go east again at the fork in the road. Otherwise, you'll just be going in circles. Go east at the next fork in the road. Go north immediately afterward, and keep going in that direction. From there, making it to Cave 3 is a snap.

You'll be facing palette swaps of the gray flying enemies from earlier along the way.

When you take on the red guy with two heads, avoid the two sets of fireballs he shoots, as you won't be able to block them. Then rush in and stab the guy until he dies. You'll get 50 experience points every time you face him, so beating him is strongly advised.


At the intersection after the start, go south and west. You'll enter another cave that gives you the Gold Shield. Amazing how we have another shield so soon! This shield has a name on it, but the shield is too old to read the name on it.

Go back to the intersection you passed and keep going east. You'll find the Flame Sword here. If you're at Level 7, congratulations. You'll be able to swing the sword quickly while standing still.

The bats you'll meet on the way to the Flame Sword are a little more powerful, but they fight just like the bats in the first cave. Also, you may see the zombie from the first cave again. If you see him, go back and then return. He may or may not disappear. If he does, great.

Going all the way south from this intersection will take you to yet another chest. This chest contains the Dragon Scale, which you'll need to bring back to Dew.

Go back to where you found the Flame Sword, then head north and east. On the intersection to the north, you'll fight some skeletons, but thankfully you only have to fight the one that is blocking your path to the east (unless, of course, you want to fight the other ones). For best results, keep them away with the sword, and when they stop to strike, be ready to stab them immediately afterwards. It's better if you can stab them from a bit of an angle, though. Keep heading east until you find another cave. Enter and you'll find Po. Some of them will have blue outlines, but there are others will red outlines that will do even more damage...so be careful.

Since you've found shields other than the Wood Shield, you can now block the fireballs from the lizardman you'll have to face before you can rescue Po. His wings have been damaged by Matanda as a result of playing with Matanda's crystal ball, but since you have the Medicinal Herbs, he'll be alright. Po will give you the Magic Ocarina. Use it to call Po if you need him. He'll take you to a few places that you've already been.

Go back west to the intersection and then keep going south from there. You may have to take on some skeletons with red outlines, but you should know how to fight the skeletons by now. The cave at the end will take you to Matanda, who refuses to give you the Crystal Ball of Life. He will, however, give you a bracelet that a thief left behind if you leave him be, as Matanda needs the Crystal and can't fight.

When you make it back to the entrance, the wall near the point where you first entered from will open up. If you head through the new area, you'll end up in a new area. You'll be in Lake Cheef. You won't be able to move here. After some really awesome music, you'll meet the fairy Cherlindrea. She'll give you a Magic Cane, and tells you to use it to its utmost to put an end to wicked beings. She then tells you to go north and find Fin Raziel, who has been turned into an opossum by Bavmorda.

If you head back to Dew and give the Dragon Scale to the old blacksmith, you'll get the Dragon Sword. You'll need to level up a little bit before you can swing it quickly.

Saturday, April 6, 2024

PrinceWatercress plays Willow for NES - Part 2 of 11


In this entry, we head out to save the village of Dew from Bagorda, and it turns out that Bavmorda's magic is the cause of all this.


Once you're done here as well as with everything in Dew, exit from the north side of the village. You'll have a choice between north and west. From here, you'll be in a bit of a maze.

The dogs will block your path and run into you as they leave the battlefield, but they can be easily cornered, and they can also get trapped in the grass-like walls. The snakemen, however, are the worst. When the snakemen advance towards you, stab them twice and avoid the fireballs that it spits out each time you land a hit. If you have the Small Shield, however, you can block these fireballs. Keep doing this until it dies. They're powerful now, but just you wait...

The skeletons give you 50 experience points, but they'll take a long time to kill. You have to stab the skeletons when they move their shields to the side as they attack. If you're at the proper distance when you plug away at them, you'll be able to hit them without taking damage.

Some of the floating skull heads here will have a blue outline to them instead of a grey one, and they'll be more powerful. Even with what you have equipped, these monsters can still rip you to shreds in just a few hits.

Turns out, you're not even supposed to be here even though the game lets you. You're supposed to go north, like the villagers say. Let's go ahead and do that.

You could go to the cave in this area, but you'll be turned away by the guard blocking the cave until you find a Gold Statue. You'll have to go west in this forest area, and then north to find a chest. This chest contains the Gold Statue.

Sometimes, when you pick up an item, you'll get a message saying "You have the Light of Life." When this happens, you'll be healed. You can only get this from a chest you haven't opened yet, and you can only get it from that chest once.

When you hit Level 3, you'll be able to swing even faster when standing still. At this point, you're at the fastest sword swing speed that the game will give you with your current sword.

The grey flying creatures are pretty fast, and they'll take quite a few hits before they go down. You won't see these guys unless you're near the cave, and fighting them isn't really worth it at this point. You'll have to wait until you are Level 5 and have the Battle Sword from the next cave to easily defeat them.

Bring the Gold Statue back to the cave. Now you'll be able to go in.

The Forest Cave


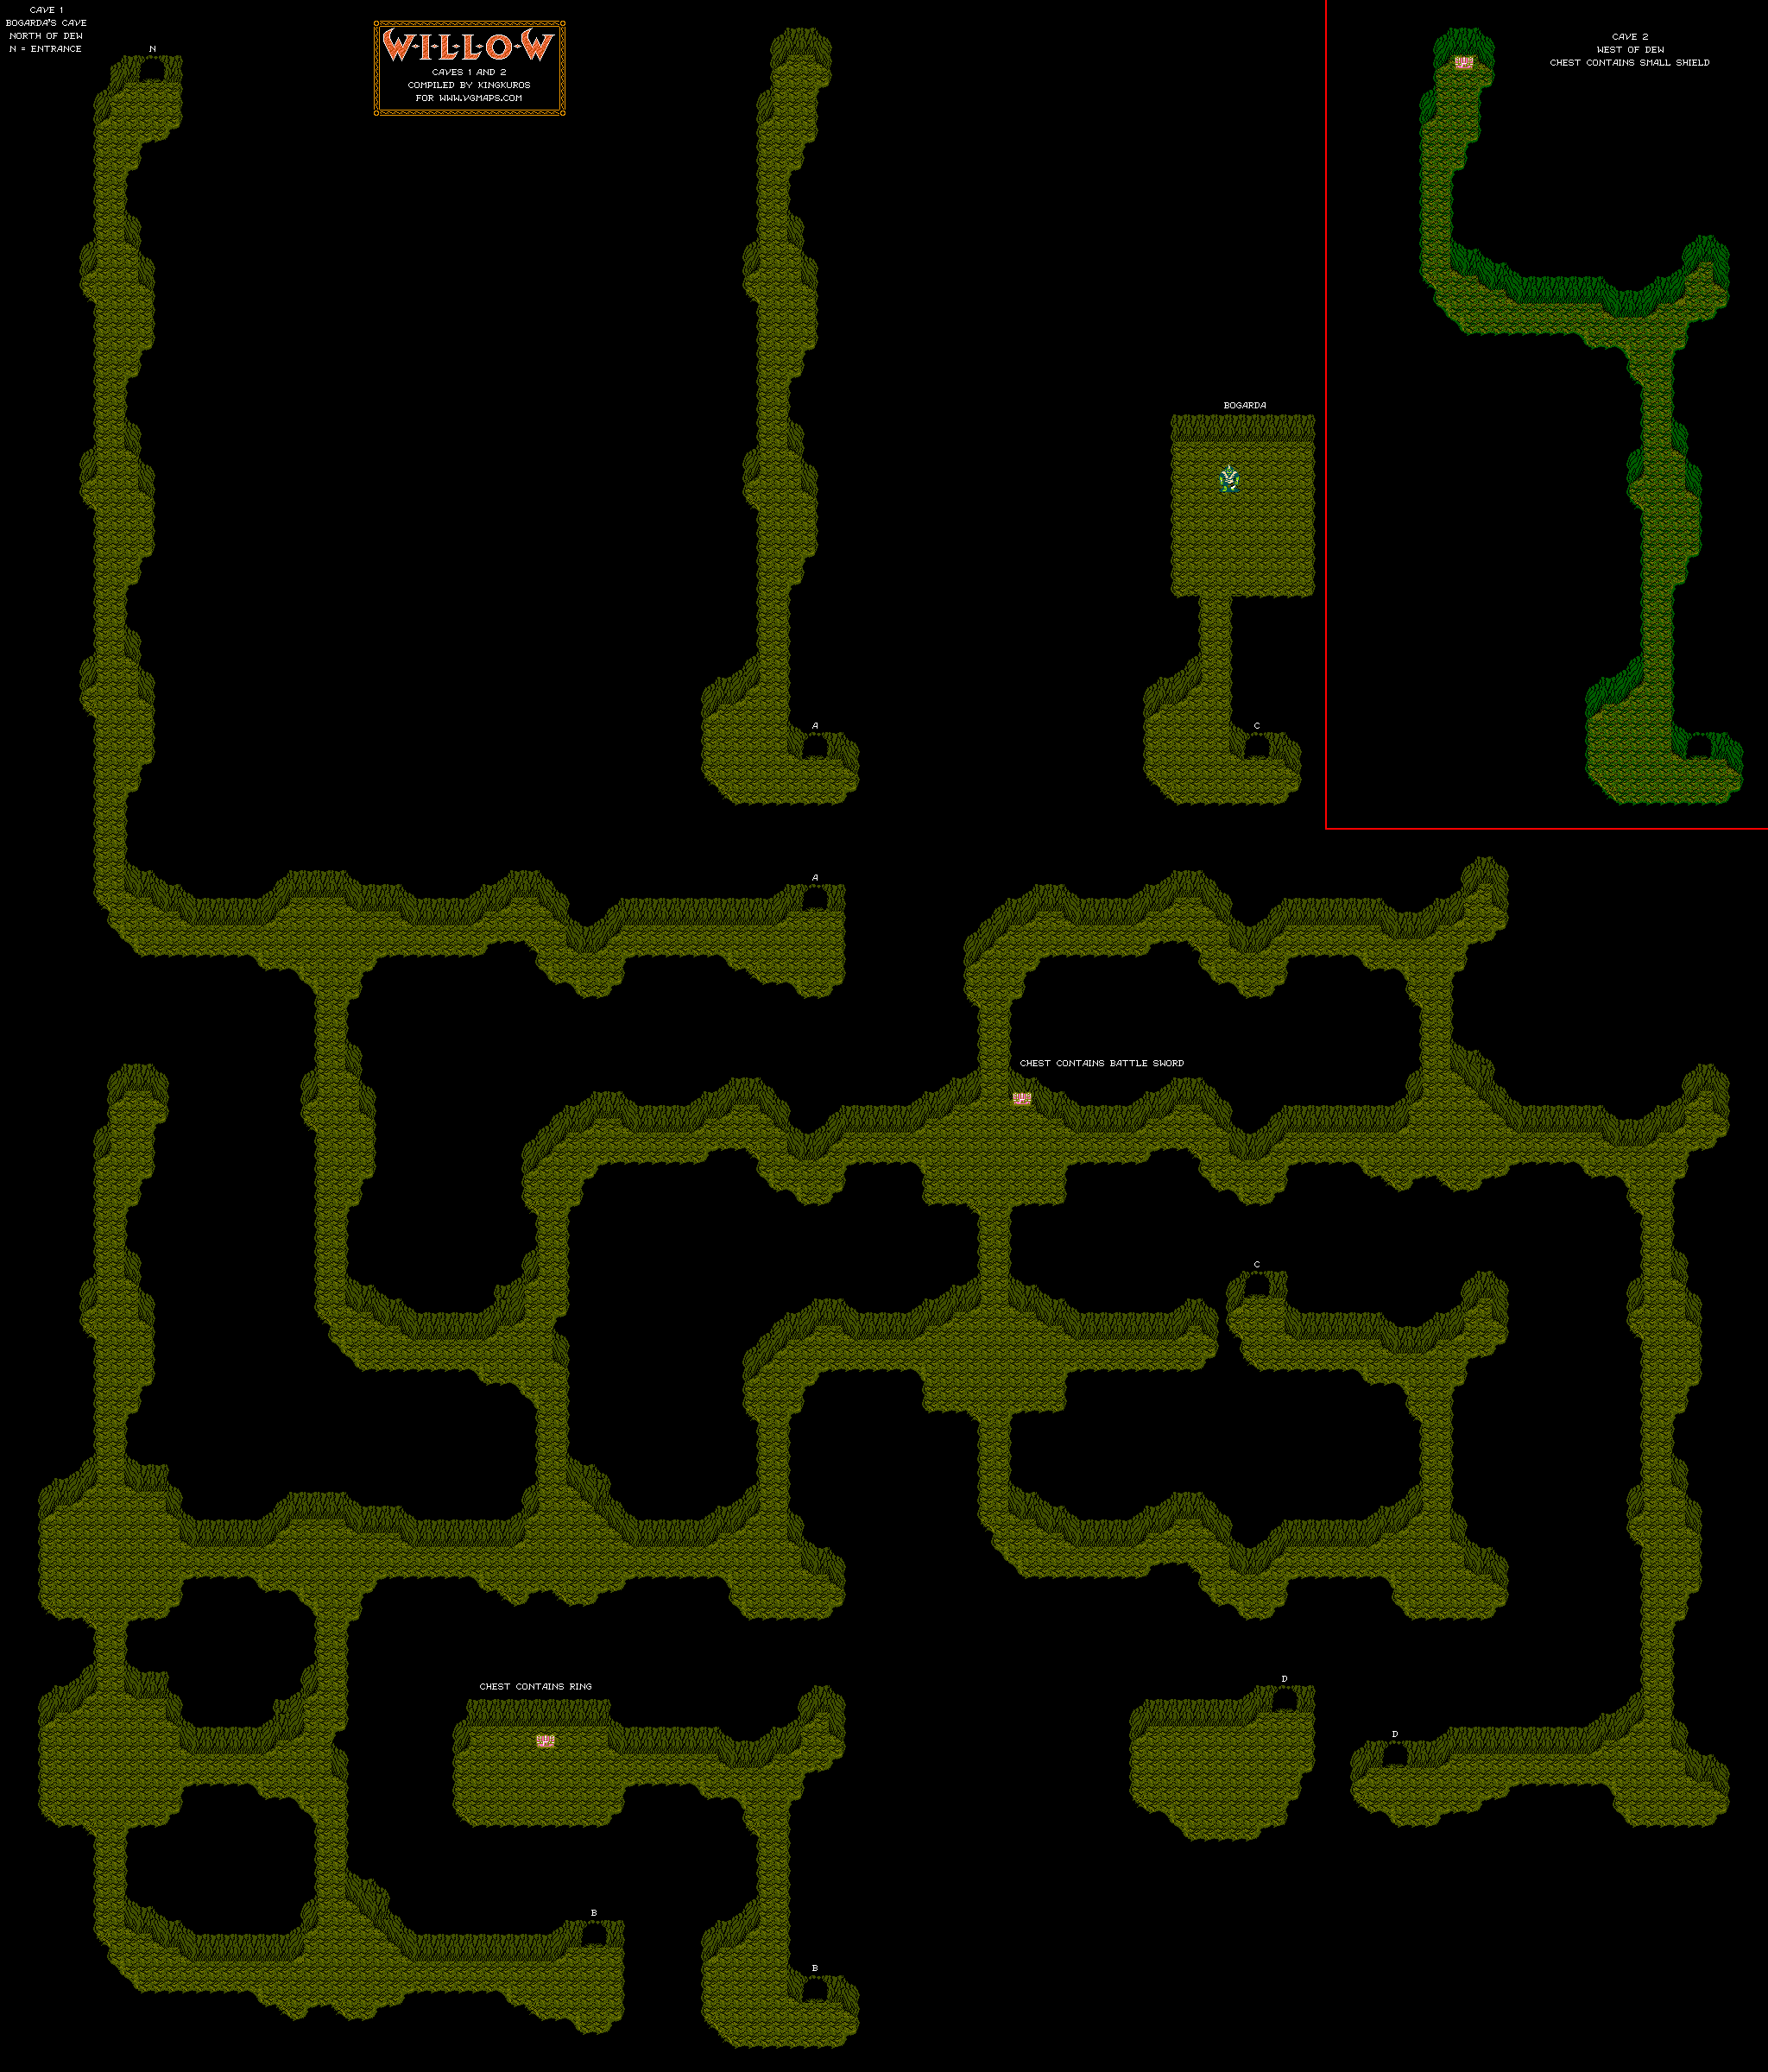
At least we have maps, folks. This game is pretty easy to get lost in...but then again, what games have I covered that aren't easy to get lost in?

As you go deeper into the cave, you'll take on bats and cave zombies. The small bats can be destroyed just like the floating skulls. Some of them will sometimes turn into big bats if given enough time, but the big ones can be stabbed a few times before they die. The cave zombies, however, are not as easy. If they lift their arms and their hands turn pink, Willow will be transformed into a defenseless pig, which lasts until the game lets you leave the screen (which is usually after these guys throw four bubbles). When you're a pig, these guys will throw bubbles at you which do some damage despite turning you back into your normal form. To make matters worse, the sword will have no effect on them, and they have the tendency to turn you back into a pig if you don't escape fast enough after turning back into your dwarven self. If that happens, you'll have to dodge their attacks while still in pig form before you can get out of the area in human form.

You'll eventually find a chest in the center of the cave that contains the Battle Sword. It's much more powerful than the Long Sword, but when you equip and swing it while standing still, you'll have the slowest sword swing in the world once again. This will happen every single time you pick up a sword, and you'll have to level up a bit to be able to swing it at the fastest speed again.

Also, the wasps will tear you apart at this point much like the skulls and skeletons west of Dew unless you're able to swing the sword fast enough. They just fly around wherever they want to go, and if you get them flying around, they will come at you.

The ring increases your strength when you wear it. Since Willow wears it as soon as you get, you'll want to grab it before entering the big square room where the boss battle is.

The boss here is some green guy with a horn on his head. This is the village chief's father, Bogarda, and he wants the gold statue. Willow refuses to give him the gold statue, which triggers the first boss battle in the game.

Boss battles are a little different. The playfield is on the right, while the two energy gauges - P for the player and E for the enemy - are on the left along with your experience and MP.

You'll want to avoid this guy's boomerang and strike him once with the stab before running away. If you can get a standing swing on him, great. When you beat the boss, you'll gain about 700 experience points and your life will be restored.

You'll restore the village chief's father back to his human form, and he asks you to fight for peace. He teaches you the magic of Flowing Fire, which creates a circle of fire around you when you casts it. While enemies can still walk past the flames, the flames can still damage them on contact. He then tell you to see Cherlindrea, a fairy who lives in Lake Cheef to the west of Dew.

Of course, before you can do that, you'll have to leave the cave, because the game's not gonna do it for you!

Once you're in Dew, head back to the house that lets you restore your HP. The old man there will tell you about the Dragon Scales, proof of a battle between an adventurer and a vicious dragon named Matanda. The old man used to be a blacksmith, but would love to make a weapon out of those scales, and asks you to bring them to him if you find them.

If you talk to the people of Dew now, they will thank you for beating Bogarda.

With healing in town out of the way, we can now exit the village from the west side.

Friday, April 5, 2024

PrinceWatercress plays Willow for NES - Part 1 of 11


After watching two other Let's Players make their way through this game, I finally decided to give this one a shot.


Believe it or not, this was one of a few video game adaptations. Despite being made by Lucasfilm, the NES game was developed by Capcom, even though Lucasfilm Games (later LucasArts) was around at the time. I guess they were too busy making other adventure games for IBM-compatibles at the time, since they had no input in the DOS game.

The Story So Far...

Tales of dreams and imagination.

There are two spirits watching over the world. One, the spirits of the skies, gives light and power to all beings. The other is the spirits of the Earth who give courage and hope. The two spirits each sent a messenger in order to bring peace to the world. And the beautiful messengers were given special power to protect the people's future.

That special power was.........magic. The people were living peacefully, protected by a great magic.

Bavmorda, the messenger of the skies, became greedy for power. In arrogance, she decided to conquer the world with her magic.

Fin Raziel, the messenger of the earth, realized her plot, and tried to persuade Bavmorda to return to the skies. But her magic was sealed and she was turned into an opossum by Bavmorda's wicked magic.

Bavmorda declared herself queen of the world, and started to build up her strength to rule the world.

Nelwyn


You'll play as a dwarf farmer, Willow Ufgood. Your mission is to take the infant Elora back to the human (or Daikini) homeland, and protect her from the evil Bavmorda. Elora is prophesized to be the one who will destroy Bavmorda and save the world for good.

The house you start at is your family's home. If you rest here, you'll be able to fully recharge your HP. Keep pressing A to go through the text and eventually leave.

Your family will tell you to see the High Aldwin next door. Enter the house to the east to talk to him, and you'll learn the Acorn spell. For just 5 MP, this allows you to temporarily stun enemies by turning them to stone. You'll also get 17 MP to start the game with. Returning to his house will fully recharge your MP.

The box in the upper-left corner is your basic stats. The number at the top is your level. The highest is 16. E is your experience points, and then you have your HP and MP (which are self-explanatory).

By talking to people, you'll learn about Vonkhar, the best swordsman in the village. You'll also learn that the village of Dew is north of Nelwyn, and that it is being terrorized by monsters.

The house in the upper-left corner of the town is Vonkhar's house. He will give you the Long Sword, which is your first weapon. He'll tell you that after a few fights, you'll eventually get used to the heavy weight of the weapon.

Since you have both a magic spell and a weapon, be sure to open up the menu screen with the Start button and equip them both. You can also use this screen to see much more experience you need to level up as well as see your strength, defense and agility. Just remember: B swings the sword and A casts magic, which is the reverse of The Legend of Zelda.

The Road to Dew

Well, you're as ready as you're going to be. Head north and you'll hit the road.

You have two ways to attack with the sword. Stand still to swing the sword, or swing while moving around to stab forward. The swing attack is slow at first, but as you level up, it gets faster and more reliable. As much as you'll want to stick to the stab, the swing will be useful at certain times even at the weakest experience level.

The music changes and the screen shows some wild action when monsters are on screen. Seriously, take a look at that grass. It just starts moving like heavy winds are blowing it around. Take out the slimes as they move around. They're pretty easy, for the most part, and you'll need the experience. Sometimes the slimes will split into smaller slimes, but if you swing your sword, you should be able to get them even at Level 1.

When you see the floating skull heads, stay in a corner and repeatedly swing the sword. You'll be able to dish out damage to more than one skull if you're lucky enough (which will happen somewhat often), and hopefully defeat more than one at a time. Again, you're gonna need the experience.

Enemies will pop up randomly, so pay attention to your surroundings and be ready to fight. When you reach Level 2, you'll be able to swing the sword a lot faster when you're standing still. If you die, you'll start at the last visited village with your stuff unequipped, and you'll also drop down to the amount of experience points needed for the last level you reached. Equip all of your stuff and try again.

Dew

The house just south of the entrance will let you recharge your HP.

Go to the house in the bottom-left corner to receive the Wood Shield. Remember to equip it, because you'll need the defense it provides. As you get this shield, you'll learn that Bogarda is the father of the village chief, and that he was changed into a demon by Bavmorda's magic. He'll tell you to hear the story from the village chief.

I also strangely like what the guy says when he gives you the Wood Shield. "Yeah, the village chief's father was changed into a demon by Bavmorda. Oh, uh, hey, have a shield!" The only thing funnier than the fact that the game takes great liberties with the movie's plot is that everyone you meet just runs with said liberties.

Talking around will net you some info. To the west is a road that goes through the rock mountain. You'll find a cave with a weird voice inside if you go further along. I know what you're probably (not) thinking: "I hear voices in my head, they counsel me, they understand..."

You'll also find out that Bogarda is in the forest north of Dew.

The village elder is near the road to the north. After talking to the other villagers and finding out it's true his father was a courageous and just man before being corrupted by Bavmorda's magic, you'll get different dialogue the Magic Healmace, which lets you regain HP in return for 20 MP. You won't be able to use it yet, but you will after powering up for a while. By the time you reach your first boss, you should have the Healmace equipped when you need it.

Leave Dew through the west. Going west and up the stairs leads to another area where you won't be able to do much, so take the lower path near it leading to the path that goes further west. Watch out for the brown enemies - the trolls - and stay away from them; you won't be able to fight them yet. You'll soon see a cave. Enter it.


This is a fairly short cave, and opening the chest at the end will award you the Small Shield. Equip it, because you're going to need the defense.

Once you're done here as well as with everything in Dew, exit from the north side of the village.

Thursday, April 4, 2024

PrinceWatercress plays Super Bomberman 2 - Part 6 of 6


...and now: the battle mode.


Battle Game

When you start this mode, you'll get a choice between a single match and a tag match. Single Match is the traditional "every Bomberman for themselves" battle mode that we've seen before, while Tag Match is a two-on-two team battle.

With Single Match, you can have up to four individual opponents, each with their own color Bomberman and bombs. If you have the Super Nintendo Multi-Tap, you can play with three or four human opponents. The bombs and their explosions are color coded depending on who dropped them. After picking which Bomberman you want active, you can set the computer AI level (1 being the weakest, 9 being the strongest), the number of rounds you need to win in order to win a match, the amount of time each round is, and whether or not "G-Bomber" is on. G-Bomber allows for the winner to turn gold and get an advantage in the next match, and it is only available in Single Match. The advantage is in the form of a power-up that activates for that player in the next match in case everyone plays again, and while it is possible to get something good from the post-match roulette wheel, it is possible to get the wooden sandal which slows the player down. Not surprisingly, I get the wooden sandal.

After that, you can pick from any of ten stages. Here are the stages, according to the manual:

Stage 1: This is a normal stage without any traps. Items hidden in blocks are the key to winning.

Stage 2: This stage is slippery with ice and includes six warp holes. Blocks can be moved by pushing against them.

Stage 3: This stage is separated into outside and inside sections by destructible blocks aligned in rows. Warp tunnels are located at the top and bottom of the screen.

Stage 4: On this stage, drum-shaped soft blocks have been lined up. If a bomb blast hits the trench dug around the center it will ignite a fire that travels throughout the trench.

Stage 5: On this stage, leaves block your field of vision. Full power ground sections, allowing bombs to blow up with maximum fire power, are hidden under flower garden blocks.

Stage 6: There are two sets of warp zones included on this stage. You may move from red to red or from blue to blue warp zones.

Stage 7: On this stage, Bomberman will travel different speeds after passing through the numbered signs. (1 is slowest, 5 is fastest.) If he touches a ! mark he will be immobile for several seconds. If you need power-ups, you'll need to blow up the re-spawning tire in the middle of the arena.

Stage 8: On this stage, belt conveyors can be used to transport bombs. The switches in the center of the screen can be used to change the speed and direction of the belt conveyors.

Stage 9: After obtaining a Kick item, any bomb kicked over an arrow on the ground will turn and move in the direction of the arrow.

Stage 10: On this stage, Bomberman can be made to jump using the Y button so that he can move on top of the blocks. Bomberman can also jump across screen border to appear on the other side.

There are a few exclusive items you can find in the Battle Game. The bomb with the red P on it is a Power Bomb, allowing the first bomb you lay in a set of bombs to have maximum explosion range. The shiny bomb icon is the Slime Bomb, which will have slime-like properties and bounce around if kicked or thrown.

There is also the Skull, which can do crazy things to your Bomberman if grabbed, such as making them super-fast or super-slow, forcing you to drop bombs at all times (or keeping you from dropping any at all), making them invisible, and other things. If you run into anybody while cursed by the Skull, you can pass your curse on to them.

When you have one minute left, blocks will start dropping in the outer reaches of the arena and cut the amount of room you can run around in by about half. If any blocks hit anybody, they are eliminated for that round. If there is more than one Bomberman on the field when time is up, or if everyone blows each other up at the same time (especially when there are two Bombermen on the field) the round will end in a draw.

In Tag Match, you'll have the White Bomberman versus the Black Bombermen. Both members of a team have to be defeated for the team to win a point. The rules are more or less the same, but the Gold Bomber roulette wheel cannot be used here.

Wednesday, April 3, 2024

PrinceWatercress plays Super Bomberman 2 - Part 5 of 6


The game saves the best/worst for last! The game gets more difficult again, but if you can get past this round, you'll beat the game! Tune in next time for the Battle Mode!


Round 5-1

The things that look like buttons are the soft blocks that you can blow up, and they go down when hit. They act much like the flames in Round 2, and they can come back up at any given time. Plant your bombs carefully.

Even if you have maximum range on your bombs, you can still light up all the stages and exit the level, as the levels have been made with maximum range in mind. You'll just need to be a tad creative.

The square yellow panel acts as a light switch when blown up. Certain enemies will behave differently depending on whether the lights are on or off.

The blue dolphin-looking things with the yellow eyes take two hits. If the lights are on, their eyes will be white and they will move more slowly.

The gray square panels with the flashing red lights are mines. You'll need to blow them up to get out of your way. They will be visible at first, but later in the level, they will be invisible until you are standing right next to them.

Round 5-2

There will be a little bit of slowdown in this stage until you get rid of some enemies.

The red ball-shaped enemies that walk around take two hits to kill. If the lights are on, they will sprout spikes out of their head and they will move more quickly.

Round 5-3

The little gold guys with the headsets shock in four directions and take two hits to kill. The pink Pac-Man guy also comes back here.

Tread carefully. Not only are there areas where the floor cracks and turns into a pit that blocks your path if you walk on them twice, but there are invisible mines that will show up and flash if you are standing right next to them. Thankfully, blowing up the invisible mines will get rid of them, but it can still be easy to accidentally walk into one.

Round 5-4

The coin enemies from the first game make a one-time appearance. Like last time, they take one hit to defeat, but they are fast.

If you need the Remote Bombs, you can get them here.

Round 5-5

Be careful when getting the invisible mines out of your way at the start, as it can be easy to blow yourself up while doing it. At least there is a 1-Up hidden in the blocks at the start.

The blocks at the beginning can only move a certain distance away from where you found them. Also, watch out for mines as you approach these blocks and push them around to clear a path.

The ice cream icon just gives you bonus points.

Round 5-6

A little blue dolphin enemy from Round 5-1 and 5-2 will come at you at the start. Take it out quickly so you can focus on the invisible mines!

There is an extra life and a Heart hidden in the soft blocks near the start. There is also a Power Glove hidden here. Get it, because you're going to need it for the boss battle.

Round 5-7

The boss here is Plasma Bomber. His bombs can be pretty powerful. See if you can throw your bombs at him with the Power Glove or use the Power Glove to mess up whatever he's doing and hit him.

If you need them you can get the Remote Bombs, a Heart, and a Power Glove here. Again, you're going to need the Power Glove for the boss battle ahead.

Round 5-8

Plasma Bomber's machine takes quite a few hits. Whenever you are lined up with it, it will lunge at you. Use this as an opportunity to place a bomb between the blocks near the bottom and get a hit in. The machine can also shoot out skull projectiles that are see-through and can move around. You'll have to wait for them to disappear, as your bombs' explosions will not affect them.

After enough hits, you'll blow one arm up, and after some more, you'll blow up the other. Eventually, the machine will go down. Plasma Bomber will want to shake hands with Bomberman in a sign of respect, but the machine shoots an arrow into his back and kills him before a giant one-eyed alien - probably one of the lifeforms that created the Bad Bombers - pops out of it.

To defeat this alien, you'll need to stay away from it as it flies around and you'll need to use the Power Glove to throw bombs at it. To throw a bomb with the Power Glove, you'll need to double tap A while facing the alien in order to throw a bomb at the alien. If the bomb touches the alien, you'll damage it. After six bombs, this thing's history. You'll blow up the Bad Bomber's base and the credits will roll. You've just beaten Super Bomberman 2!


Tuesday, April 2, 2024

PrinceWatercress plays Super Bomberman 2 - Part 4 of 6


Enjoy the break in the difficulty while you can, because it ends after this.


Round 4-1

Unlike other areas, the enemies will be hidden in soft blocks, and you'll need to fight them all in order to open the exit. The gray blocks are the soft blocks, while the gold blocks are the hard blocks.

The red spinning machine moves back and forth and takes one hit to kill, and they can generate soft blocks if left alone. The pink Pac-Man enemy takes one hit to kill but can eat your bombs. The black enemy takes two hits to kill, but he tends to move away from your bombs and he moves faster after the first hit.

Round 4-2

The blue machines on the tracks are indestructible and cannot be rid of. You also cannot place bombs on the tracks, either. Get past them and move on.

This time, you will have to hit all the floor globes to open the exit.

The moving platforms get you to other areas. Thankfully, you can't fall into the pit below.

The black floor tile will activate a platform.

Round 4-3

The red bomb enemies are much like the real red bombs that you can lay, so take them out as soon as possible. Also, you can find two Hearts here!

Round 4-4

Whatever you do, do not lay a bomb and detonate it near the stairs. The stairs will crumble and you will not be able to get the extra life here.

Round 4-5

You can get the Remote Bomb if you need them. If you can get past the blue robot on the track, you can get three extra lives.

Round 4-6

You can find a Heart here if you need it. Thankfully, these stages have been pretty short.

Round 4-7

Here, you'll face Brain Bomber. If you have the Remote Bombs and you're quick on the draw, you can easily defeat him. Otherwise, you'll have to trick him into running into your bombs or getting him to hurt himself with his own, which can be a pain. You can get a Heart and the Remote Bombs if you need them, so if you need them after defeating Brain Bomber, get them here and now.

Round 4-8

The boss here is a giant Bomberman. He will always take the shortest path towards you, and he can drop a big bomb that can set of a series of smaller explosions. It is possible to get the giant Bomberman to self-damage itself with it. If you have Remote Bombs, this is easy. Just be careful here.

Monday, April 1, 2024

PrinceWatercress plays Super Bomberman 2 - Part 3 of 6


The difficulty goes down a little bit here, making this round one of the more fun ones in the game.


Round 3-1

From here on out, the buttons you have to hit to open up the exit door are replaced with globes. Unlike the buttons, you can accidentally turn the globes back off with your bombs' explosions. If you turn all of them on and the exit door opens, the globes will thankfully stay lit up no matter what.

The yellow Lego blocks are the soft blocks, while the green blocks with the screws in them are the hard blocks.

The gold group of circles is a trampoline. When you walk into one, you'll bounce into the air, and you can use the Control Pad to control where Bomberman goes. Be sure to watch your shadow so you land on flat ground. If you land on a slope, you will slide down the slope, and if you land in water, it's instant death.

The floating cannons are indestructible, and the only way to defeat them is to hit the green tile with the light in the center with a bomb explosion. Doing this will get rid of the cannons. There is only one in this round, but in future levels in Round 3, there will be multiples of these types of tiles, and you'll need to hit all of them to get rid of the cannons.

The yellow guys in the green floating machines can be defeated by your bombs. One hit will get the little guy out of his shell, and another hit will get rid of the yellow enemy for good. You'll also need to bomb the green floating machine, too.

The door has the blue and orange stripes.

The icon of a foot kicking a bomb allows you to kick bombs by moving into them. If you need to stop a moving bomb, press X.

Round 3-2

The cannon will launch you into the air when you walk into it, but you'd better be ready to jump off the trampolines and control a jumping Bomberman to get him over to the other side.

The glove allows you to throw bombs. Double tap A to drop a bomb and immediately throw it three spaces in the direction that you're facing.

Round 3-3

The yellow guys are in tanks now. The tanks can shoot bullets. Once again, one hit knocks them off the tank, and you'll need to hit the yellow guys to get rid of them for good. Feel free to blow up the tanks, too.

You can get a heart here, as well as a red bomb.

Round 3-4

The penguins just move around and go down in one hit.

Round 3-5

The yellow smiley faces go down in one hit, and they can also stop at random times to sleep and get in your way.

The submarines will take you to the island in the center if you move into them. 

The wall icon lets you move through soft blocks.

If you need the Remote Bombs, you can get them here.

The black domes with the red openings shoot out fireworks when you blow them up.

Round 3-6

The jellyfish enemies are see-through. They take only one hit to kill, but they can move through soft blocks.

Be careful with the trampolines. Once you start moving up or down towards each one, be ready to keep that direction held down on the D-Pad and watch your shadow so you don't fall into the water.

The tiny, flashing Bomberman is a 1-Up. Grab it to get an extra life.

Round 3-7

Here, you'll face Pretty Bomber. Her pink heart bombs will move around before exploding, and once again, it is possible to get them to explode on her and hit her if you know how to position yourself and your bombs. You can also get a Heart here if you need one.

Round 3-8

The boss is the sun. The sun will move around the room diagonally and send heart bombs that home in on you, and when he gets angry, he will follow you around briefly. Hit him from a distance, and whatever you do, don't let this guy run into your bombs or else the bombs will disappear. This is one of the easier bosses - and rounds - in the game.