Tuesday, September 4, 2018

PrinceWatercress plays Super Mario World - Part 14 of 17


It's time to clean up Valley of Bowser before we finally knock on Bowser's door!

Overworld map by Rick Bruns. All other maps by Stefan Mahrla.


Valley of Bowser 3


You'll meet a new kind of platform here: countdown platforms (which have been seen in many a Super Mario World ROM hack). They have a number on them, and once the number disappears, it's dropping down. The higher the number that is in the circle in the center, the more time it will have before it drops down into nothingness. You want to get on another platform when that is about to happen.

You'll also meet a whole bunch of Para-Troopas throughout the level, as well as a few Banzai Bills near the end, but that's nothing new.

If you go down the pipe where the yellow pipes are, you'll enter the three block mini-game yet again.

Valley of Bowser 4


For some reason, the Chargin' Chucks are using the pugil sticks from American Gladiators to dig soccer balls out of the ground, which in turn slowly bounce towards you. That, or the soccer balls could be huge dirt clods. They looked like soccer balls to me, but at a closer glance, the patterns on them aren't soccer balls, so they're more than likely clods of dirt.

You'll also be leaping from one end of the lava to the other with platforms that sink when you jump onto them. You'll want to be careful on them, especially past the checkpoint, since there will be Chargin' Chucks who will send those dirt clods your way.

Both exits are at the end. The key and keyhole will take you to Star Road and Star World 5, while the goal gate will take you to #7 Larry's Castle. To get the key into the keyhole, you will need to have Yoshi at the end so you can slurp up the key and get it to the keyhole.


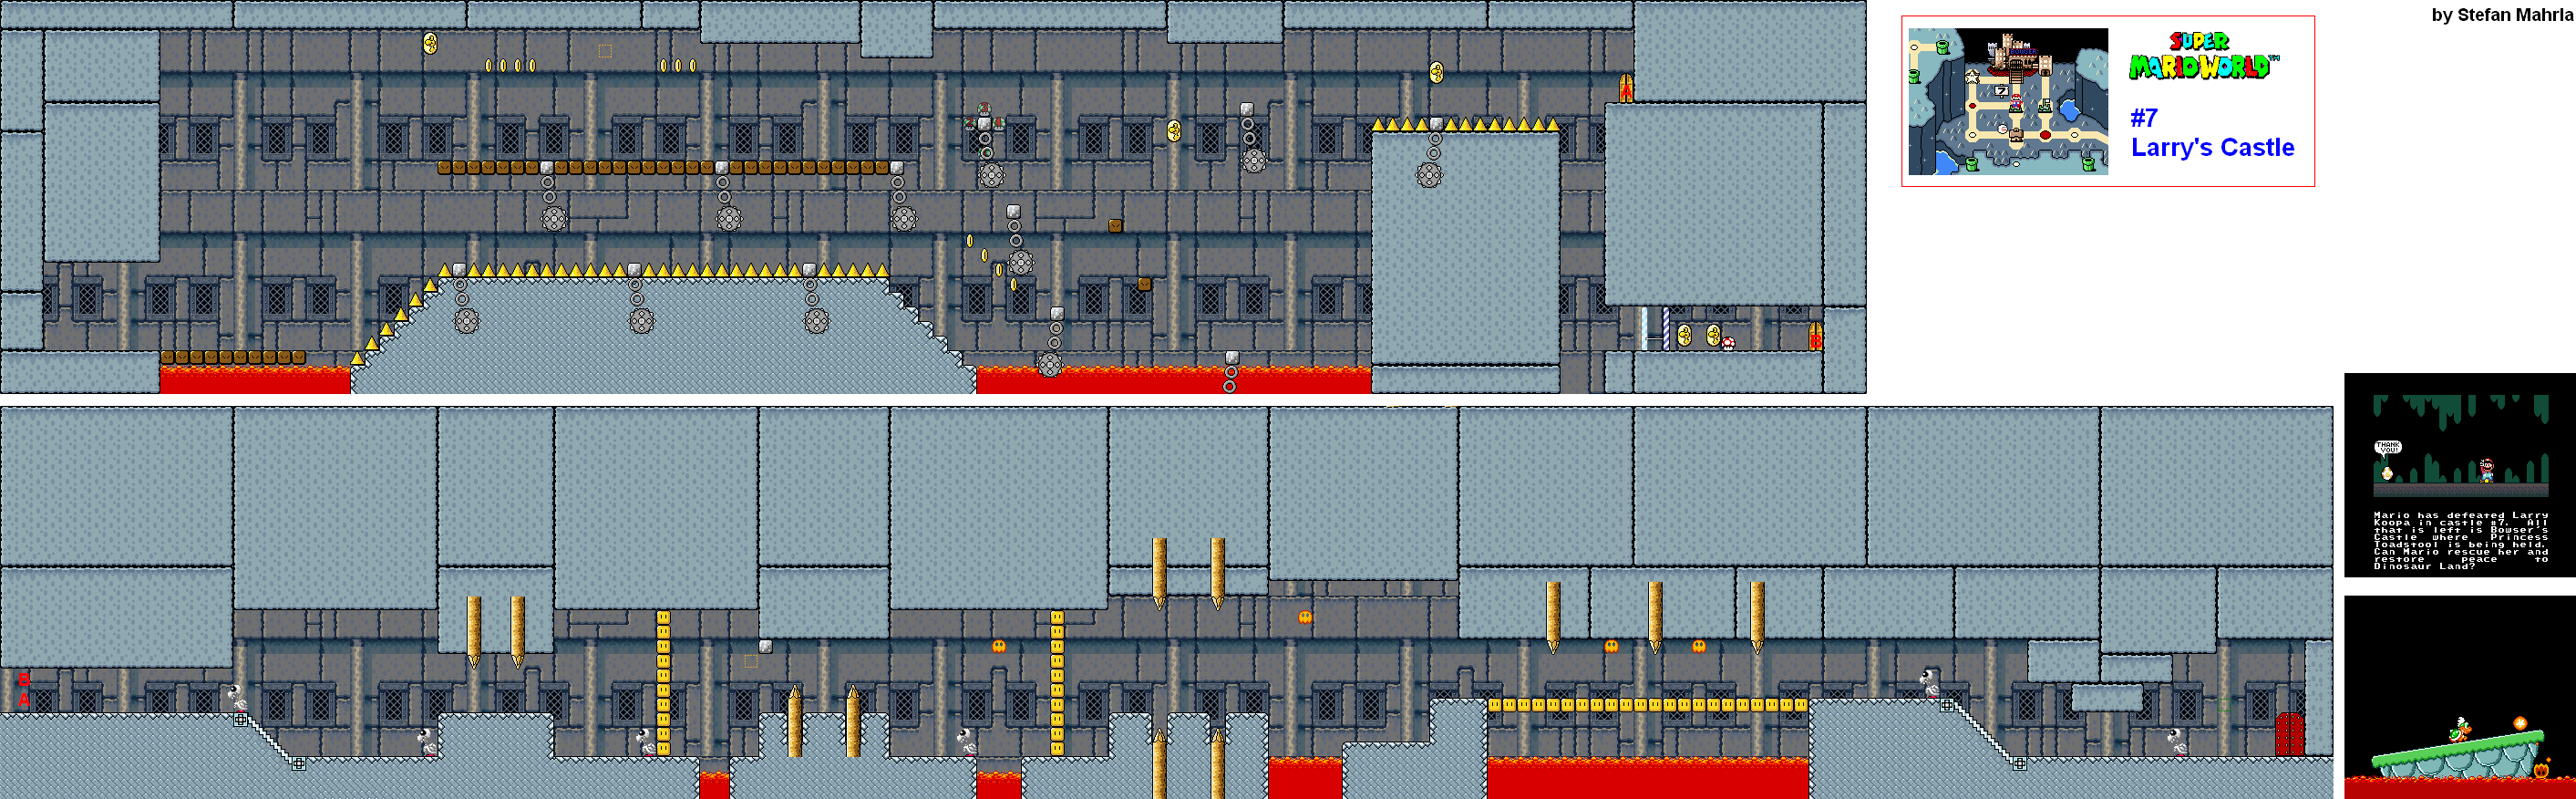
#7 Larry's Castle


The first section of Larry's Castle is a block snake section. Once again, you will have to stay on the block snake while avoiding rotating ball and chains as well as the spikes and the lava. Move carefully! When you reach the end, you could enter the first door that comes your way, but if you ride the back of the block snake all the way down, you'll find the last two Dragon Coins as well as the checkpoint and a Mushroom. Regardless of which door you enter, you will enter the next section.

In the second section, you'll be dealing with the Choco Fortress spike pillars, a couple of Dry Bones...and the Magikoopa. Yes, he's back, and you may need him to get past a wall of blocks unless you're Caped Mario. Be sure not to accidentally spin jump on the block bridge near the end.

The fight with Larry Koopa (named after U2 drummer Larry Mullen, Jr., news talk show host Larry King or nobody at all; the origin is disputed) is the same as with Iggy. The only difference is that he slowly moves towards you and ducks out of his shell to throw fireballs at you. Also, there are Podaboos that jump in and out of the lava below at the sides of the platform as well as at the center of the platform. This can make the battle tough, especially when you have Larry so close to the edge. You can still jump on him to knock him back, but you will have to keep a close eye on him to see what he does, as he does the fireball toss at regular intervals.

Your best bet to beating this battle quickly is to wait for the platform to tilt to the right, then jump on his head twice in quick succession.

When you beat Larry, you'll rescue the last of Yoshi's friends and it is on to Bowser's Castle. However, there is still work to do with one of the side paths...

Valley Fortress


You thought Wendy's Castle was nasty with the gargantuan spikes? This one has even more of them, and I'm amazed that I was able to find a way through.

In areas where there are a ton of them are next to each other, your best bet is to know where the safe spaces are between them and get the locations for them down pat. Make sure to bring prenty of lives; these gigantic spikes are the hardest part of the level, and there is no checkpoint. If you die at any point, it's back to the beginning.

After that, there is a spiked ceiling with a few brown spikes that come down as soon as Then, there is an area with a few Dry Bones, a Bony Beetle and a couple of Podaboos. After this, the gargantuan spikes will go up and down in quick intervals while Podaboos leap in and out of the gaping lava pits. You'll have to time your jumps so you not only keep from getting crushed, you have to keep from getting burned midway over the gaps as well.

Also, this is the last time you fight the Reznors. Hooray. And yes, they are named after Trent Reznor from Nine Inch Nails. Thanks for asking.

Beating the Valley Fortress takes you to the back door of Bowser's Castle, which takes you straight to the last corridor before Bowser. I'll go over that next time...

Monday, September 3, 2018

PrinceWatercress plays Super Mario World - Part 13 of 17


Here we are. The final world. Let's do this.

Overworld map by Rick Bruns. All other maps by Stefan Mahrla.


Valley of Bowser


Here it is: the final world of the game. Here, you'll take on the last few courses in the game, but they're not going to be easy.

Valley of Bowser


Here, you'll be entering a maze where you will see Mega Moles in greater number. You'll also see the occasional Chargin' Chuck, and even on occasion, they can be annoying.

There is a series of blocks if you take the low road. Be careful if you go through them with Caped Mario, as you can accidentally fall through the floor and die.

You'll want to take the high road through much of this maze, especially if you want to avoid a lot of the Chargin' Chucks and hit the checkpoint. Stand on the Mega Mole's head to avoid the Munchers.

There is another three-block mini-game if you enter the blue pipe near the end. You can fly up to reach it, but you can also hit a block at the bottom to find a vine to climb up.

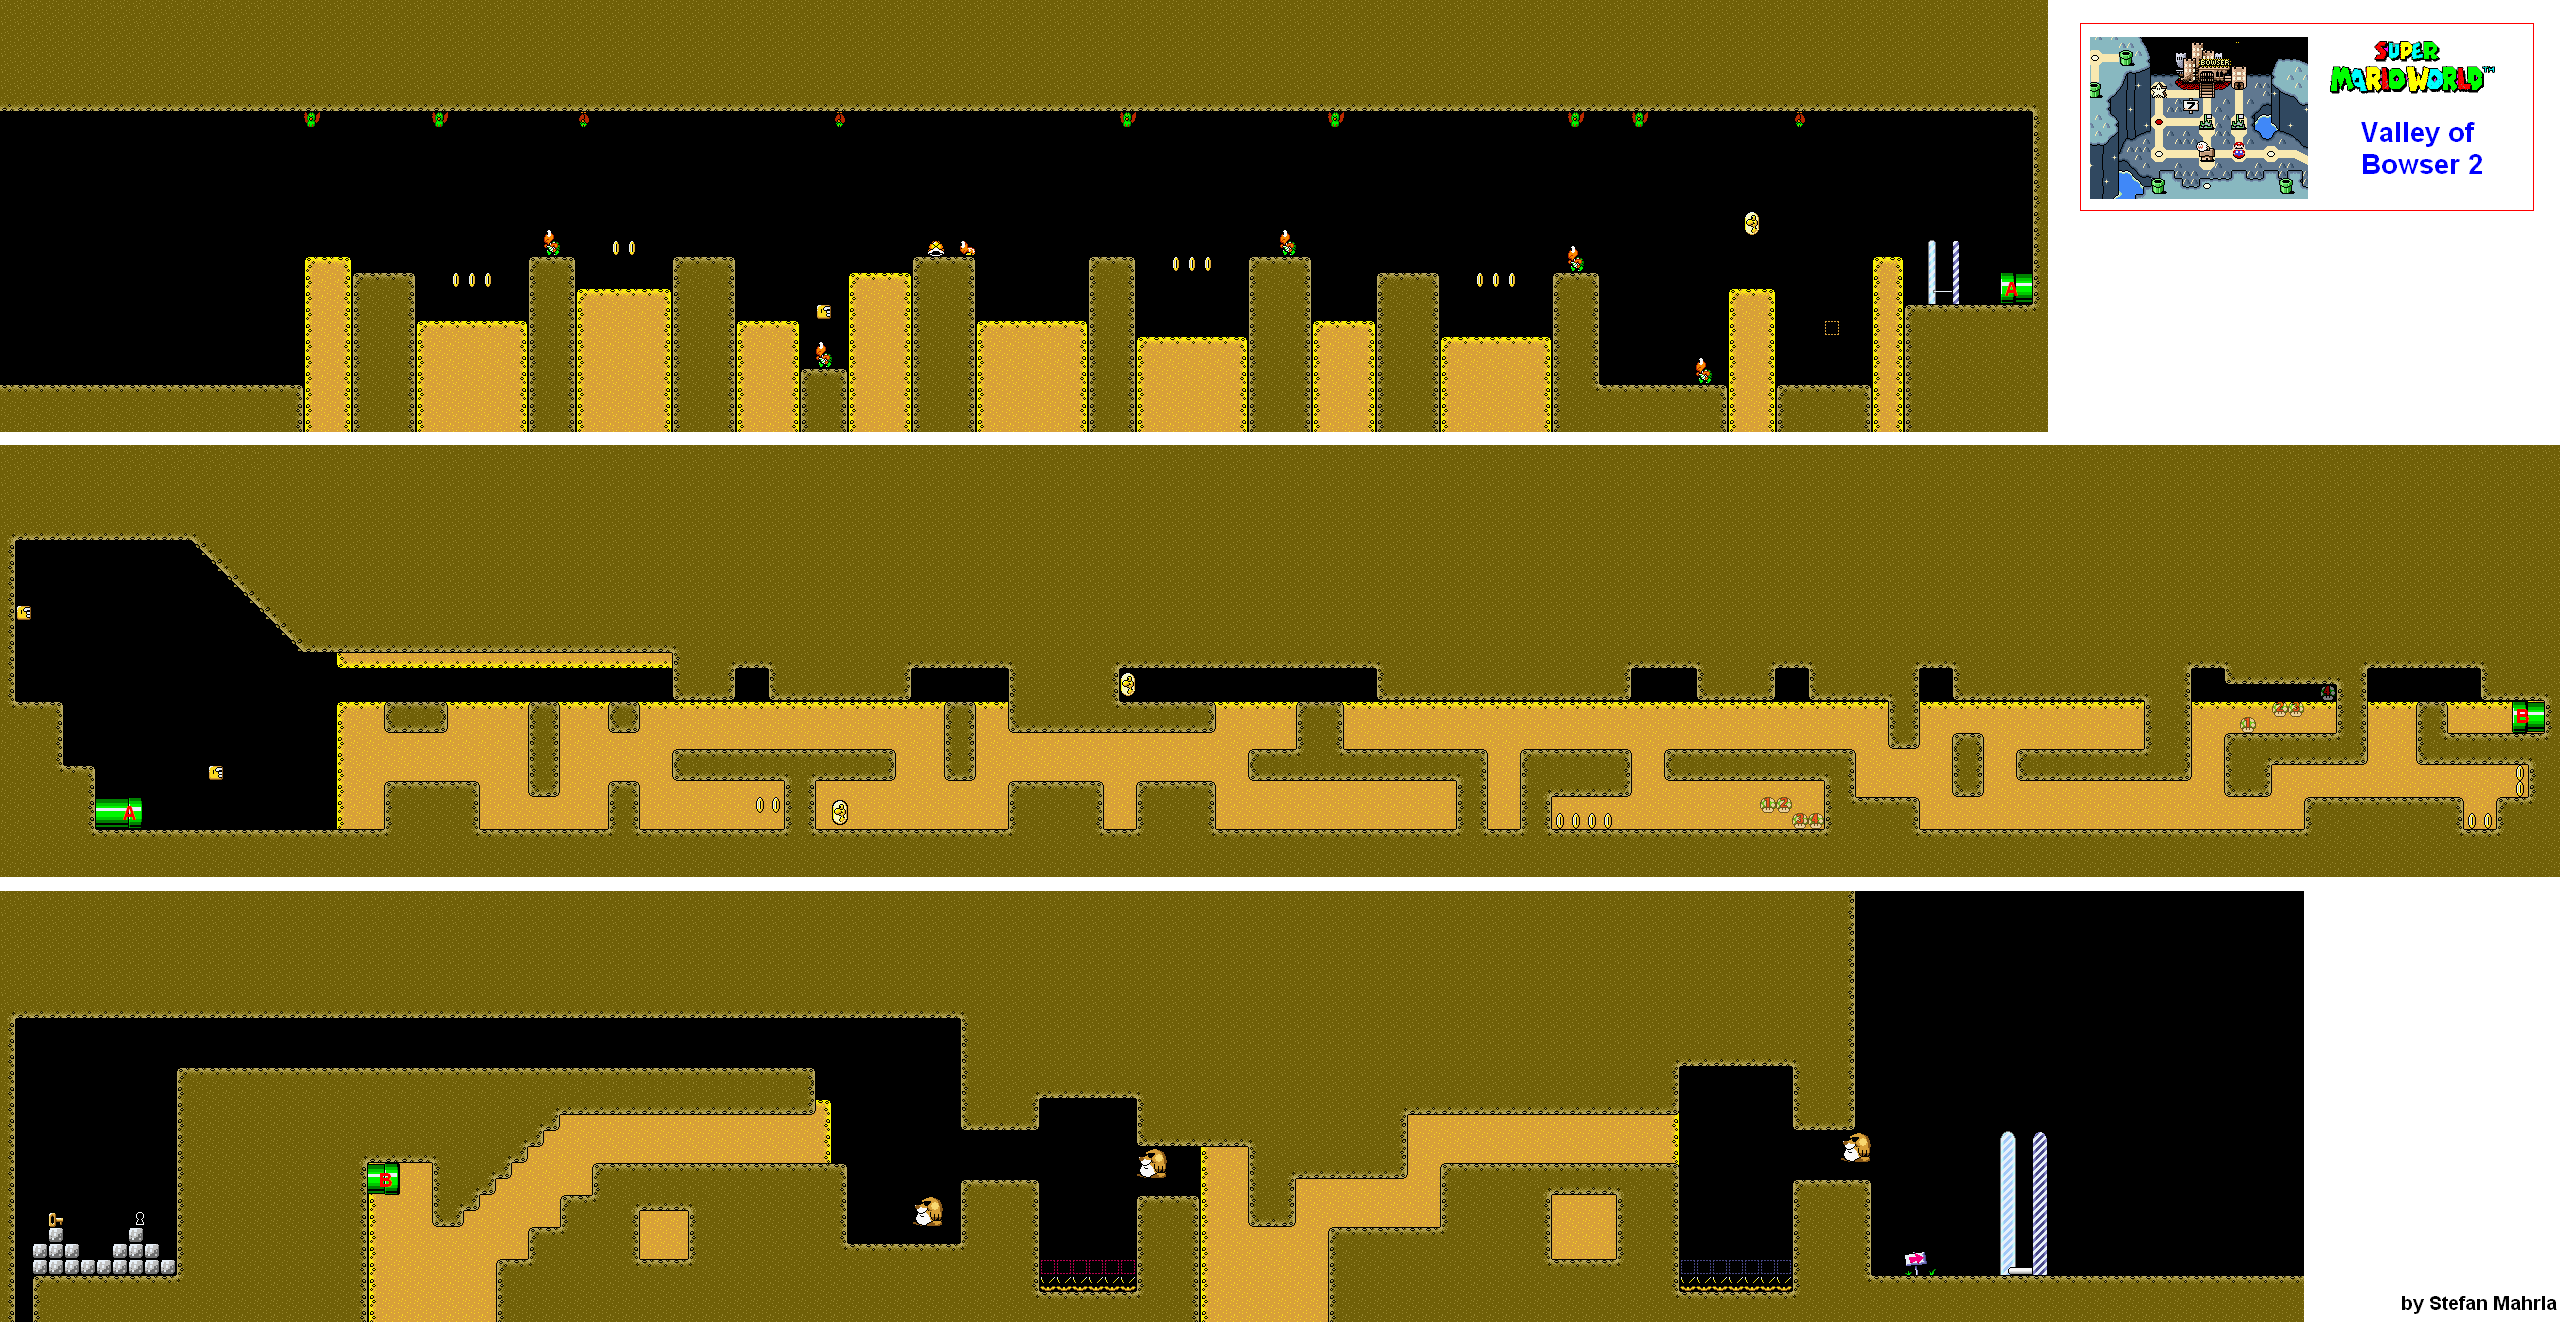
Valley of Bowser 2


The course starts out simply enough. You will see yellow platforms rising up and down while Swoopers and Koopas line the first section. Halfway through, there will be a Koopa entering a Yellow shell and sliding around while invincible.

The second section is where it starts getting nuts. Thankfully, you can get credit for the stage by hitting a block and getting the Wings to fly out, but we're doing this the hard way to get the secret exit. Here, you will have to watch the yellow floor and ceilings carefully, as they will go up and down and you do not want to be crushed while you are in the maze. There are two areas in the maze where you can get multiple 1-Ups, but do you really want them?

The third section is the last. To reach the secret exit, you will have to reach higher ground when you come out of the pipe. Don't drop into the next chasm; however, instead, wait for the rising floor to catch up with you when you get out. Make sure you're on it before it stops, then jump to the left and keep going in that direction. You'll reach the key and the keyhole, which will take you to Valley Fortress.

If you keep going right from here, you'll have to deal with more Mega Moles as well as the Munchers, assuming you haven't hit up the Red and Blue Switch Palaces. If you have, you'll just have the Mega Moles to deal with. Be sure to rush through the areas with the yellow floors so you don't get crushed and you should have no problem.

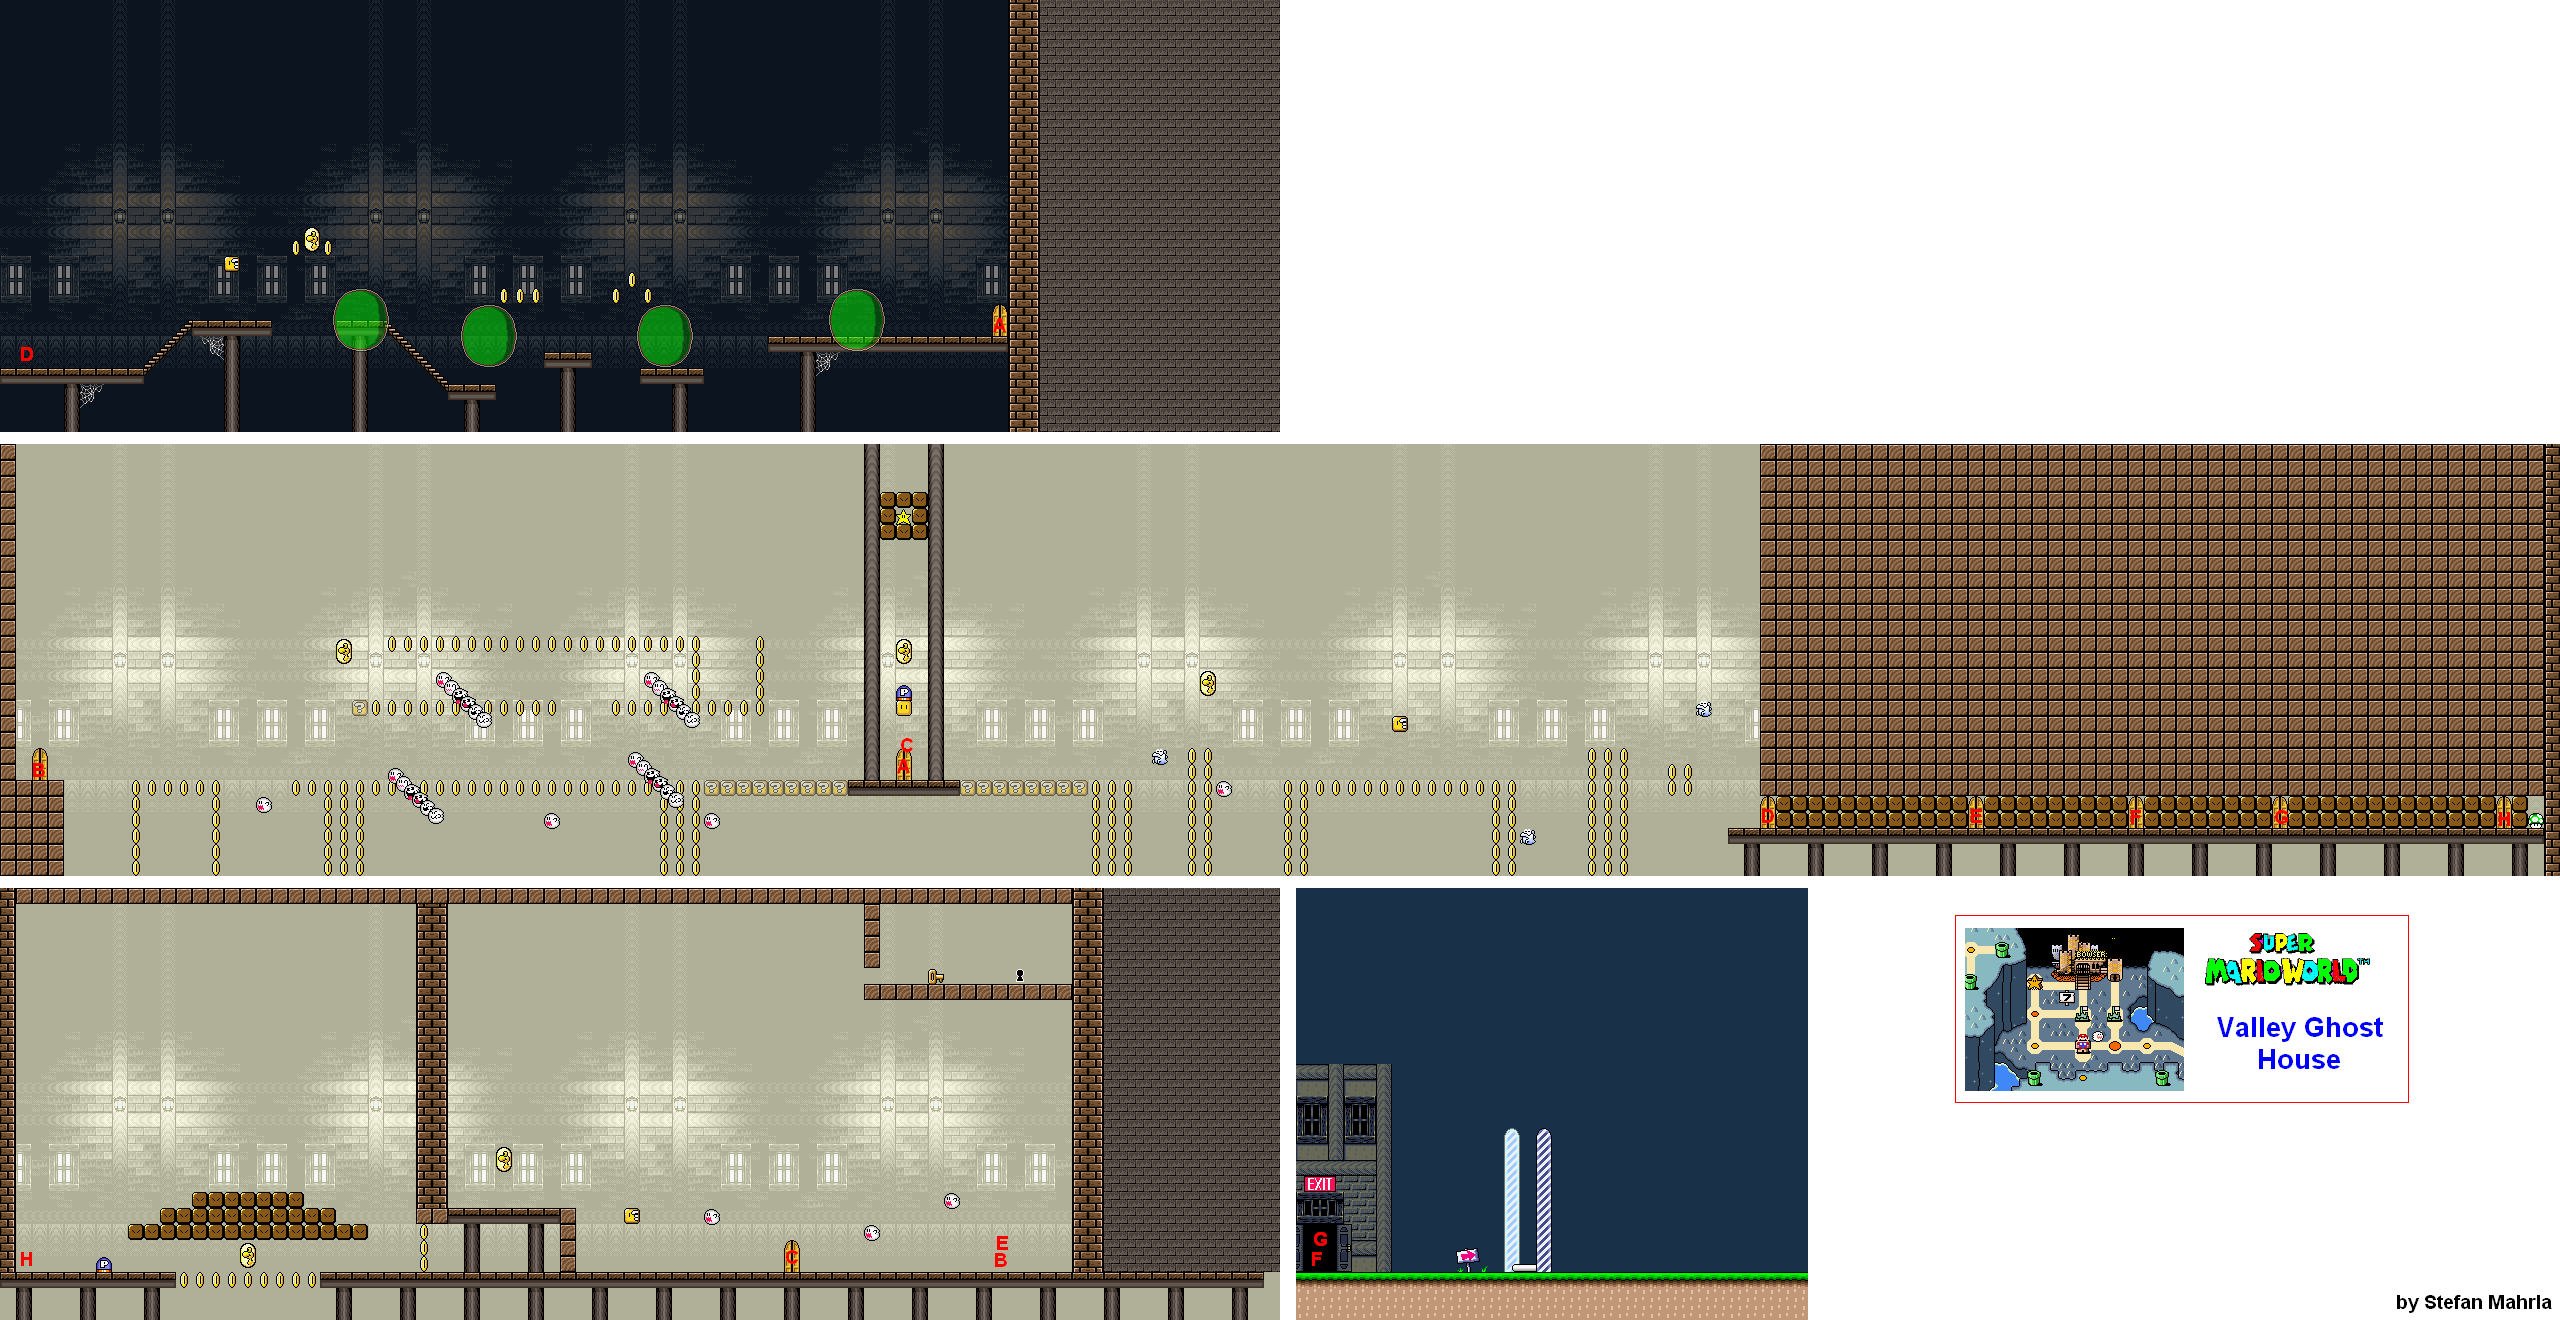
Valley Ghost House


For the beginning, make your way to the right, and spin jump off the green photoplasms if you have to. From there, enter the door at the end.

In the next section, straight up. This lets you grab the P Switch. Hit it, then run to the right as quickly as you can. After you make it across the bottomless pit, keep going right past all the doors. The third and fourth doors will take you to Valley of Bowser 3, but if you enter the fifth door, you'll enter another room.

Here, grab the P Switch and take it to the right. Jump to the platform above, then hit the nearby ? Block and use the Control Pad to make a staircase to the key and keyhole above. This may take several tries and re-entering the room a few times to make it work, but if you can do it, you can make a coin staircase upwards that will allow you to reach the key and keyhole when you hit the P Switch. Just make sure to duck when you get in that area, and try not to get hit by the Boo Buddies. The secret exit will take you to #7 Larry's Castle.

PrinceWatercress plays Super Mario World - Part 12 of 17


We're getting pretty close to the end of the game, but we've got some challenging stages to get through before we can knock on Bowser's door...

Overworld map by Rick Bruns. All other maps by Stefan Mahrla.


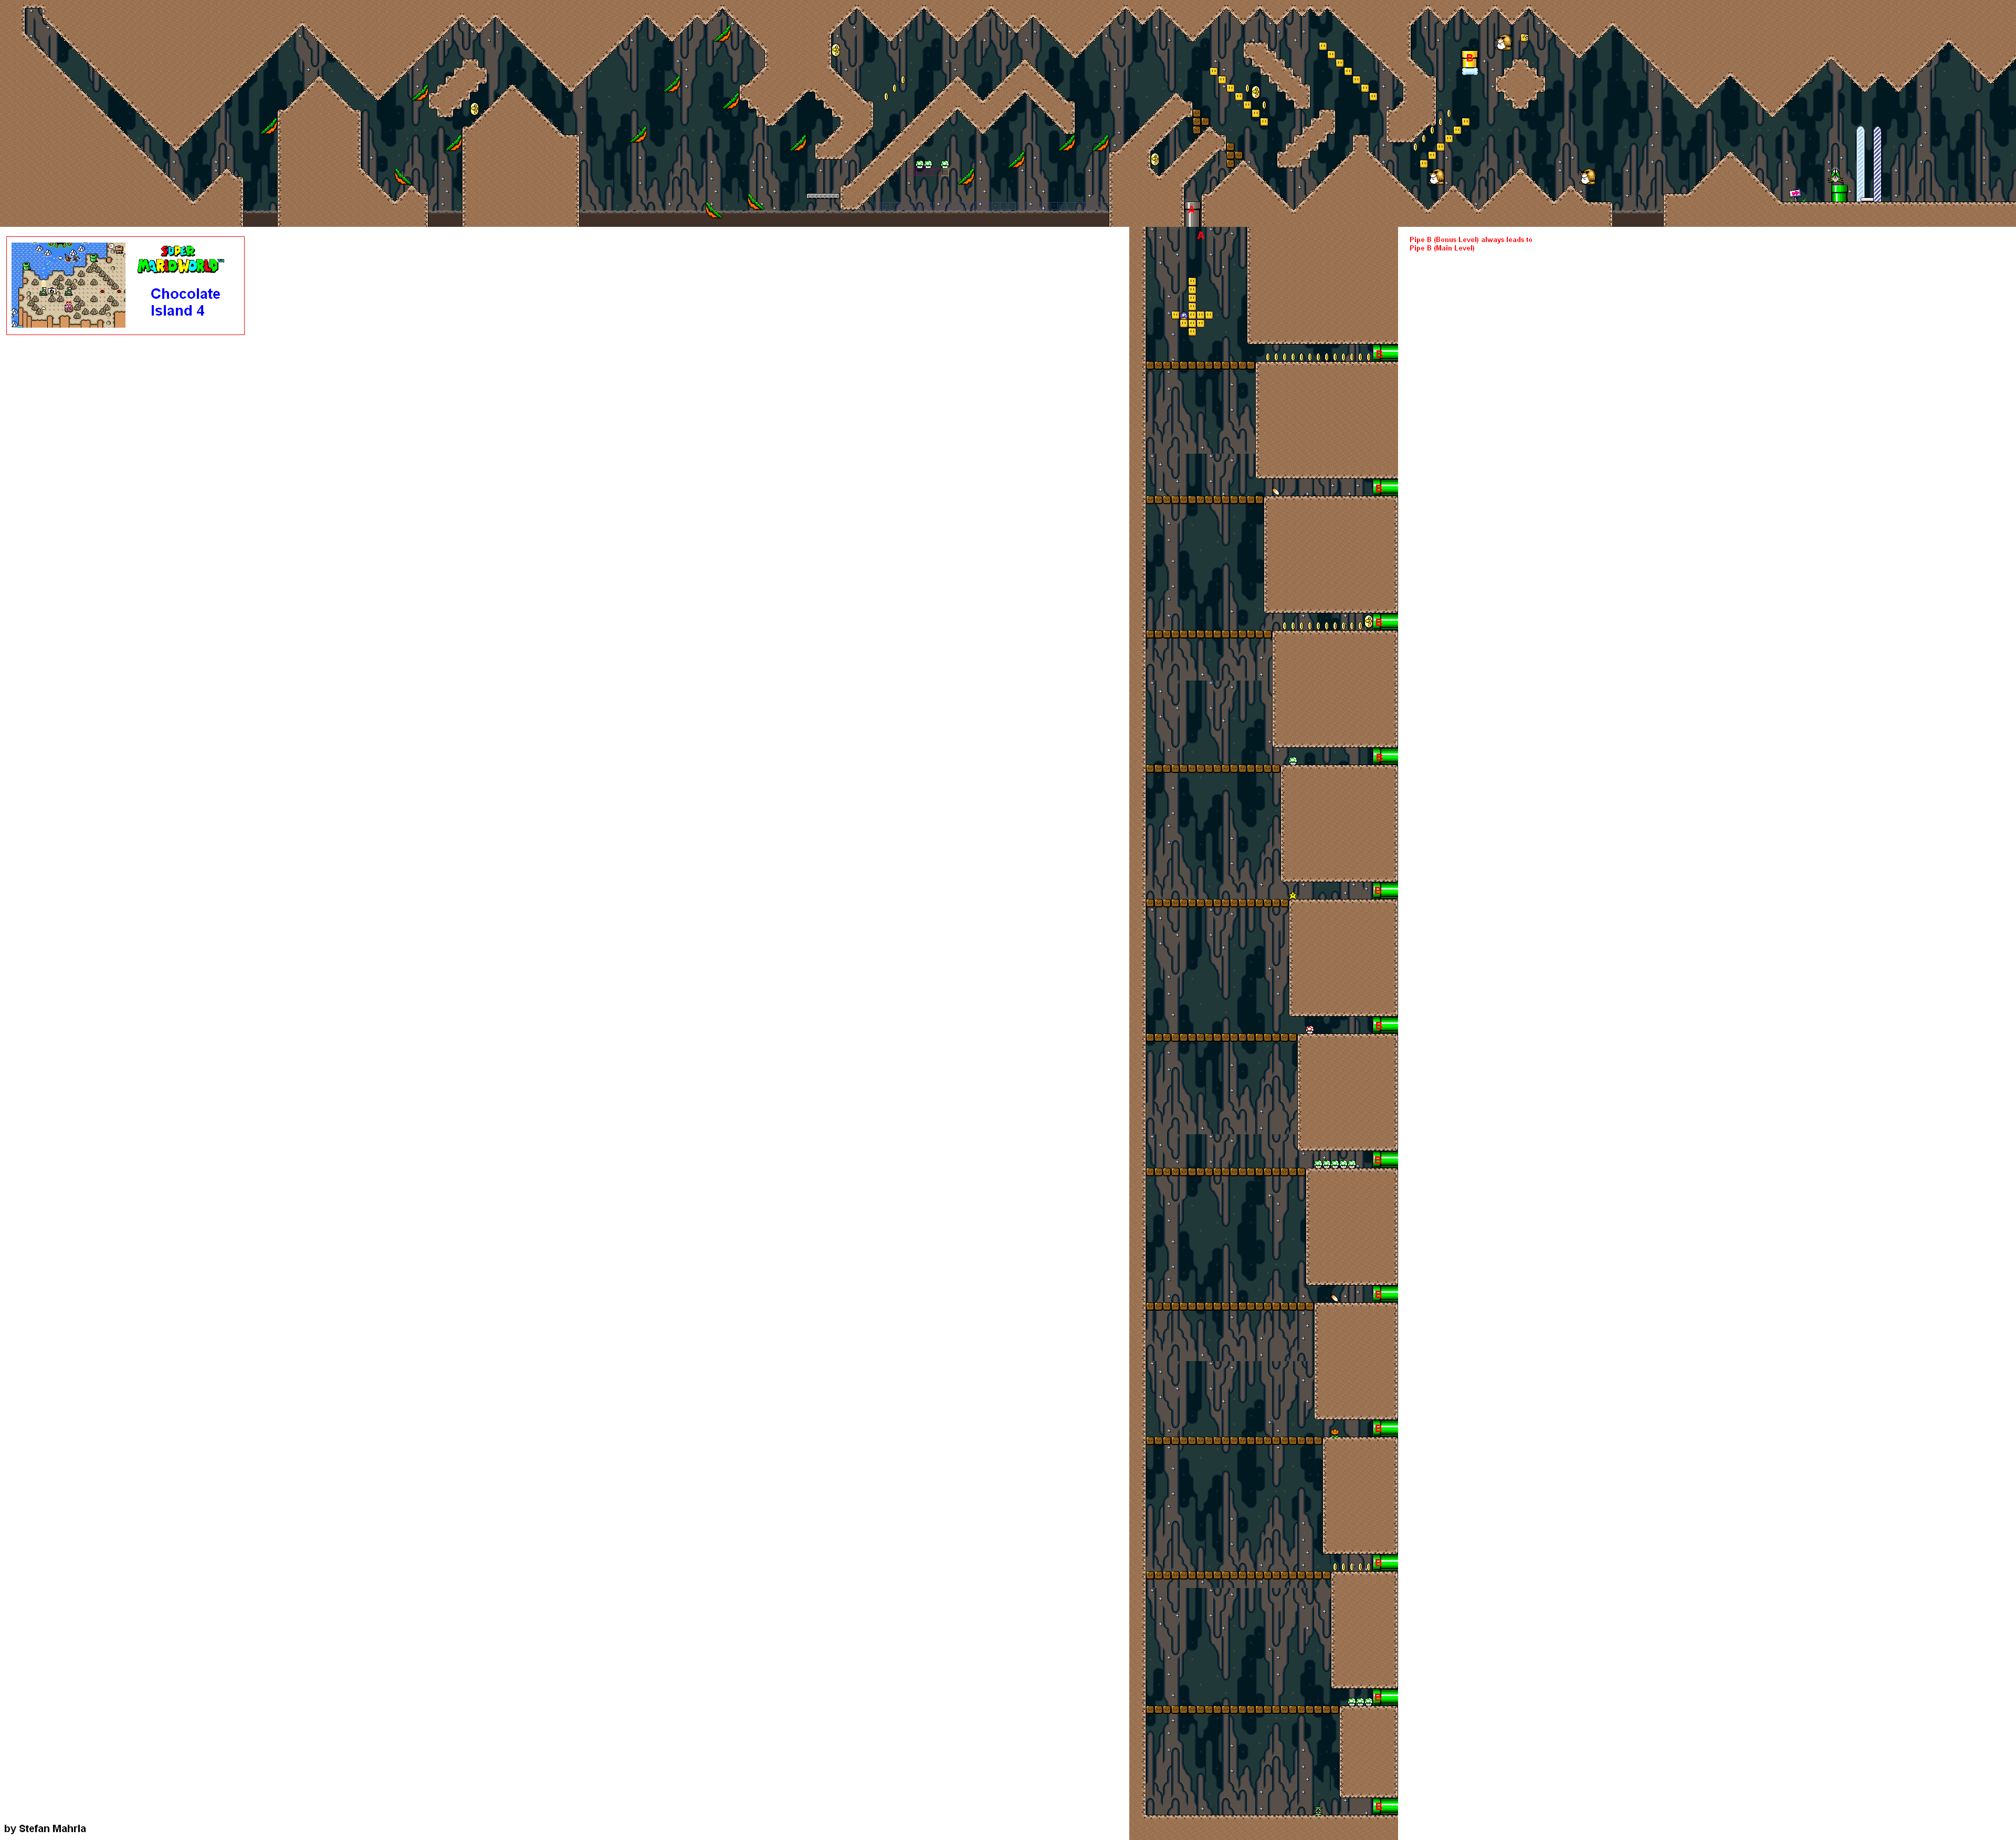
Chocolate Island 4


For this area, there are a lot of slopes as well as some sloped platforms that move around in mid-air. You'll need to use these platforms in order to get over the lava. Thankfully, you At one point, there are three 1-Ups that you can pick up if you have activated some of the switches in the Switch Palaces. 

When you reach safer ground, there will be a block with a P Switch in it. If you want to, use the P Switch to get to a gray pipe blocked by blocks. Here, there will be a bonus area where you can hit another P Switch and try to get to one of the many pipes that will all take you back to the yellow pipe on the bone platform. The best level to stop at when the coins turn back into blocks is the seventh level, as that one will give you five 1-Ups.

At the pipe with the bone platform, you'll meet Mega Mole, the giant version of Monty Mole. He can only be killed with a Koopa shell or a Starman, as your cape and fireballs will not work. You can also ride on their heads, too.

Chocolate Island 5


This is a pretty wacky course. It starts with a bunch of Spinys surrounded by blocks. There is a Blue P Switch in plain sight, but if you fly upwards, you can find a silver one as well as one of the Dragon coins.

The yellow pipe surrounded by blocks will take you to the three-block mini-game, while the one that is not will take you to an area with Cheep Cheeps in bubbles as well as two of the Dragon coins.

Both yellow pipes will take you to the same exit, which lets you skip two areas with water in them. The first one has one of the Dragon Coins and has Para-Goombas and Para-Bobombs slowly floating down towards you. The second has red, blue, yellow and green Koopa shells, all empty, and you will not see them all unless you are there with the Blue P Switch's ability still in effect.

After the checkpoint, you'll deal with pipes that grown and shrink in height, then you will have to deal with some platforms that expand and contract. You'll then deal with Chargin' Chucks as you go for the last Dragon Coin.

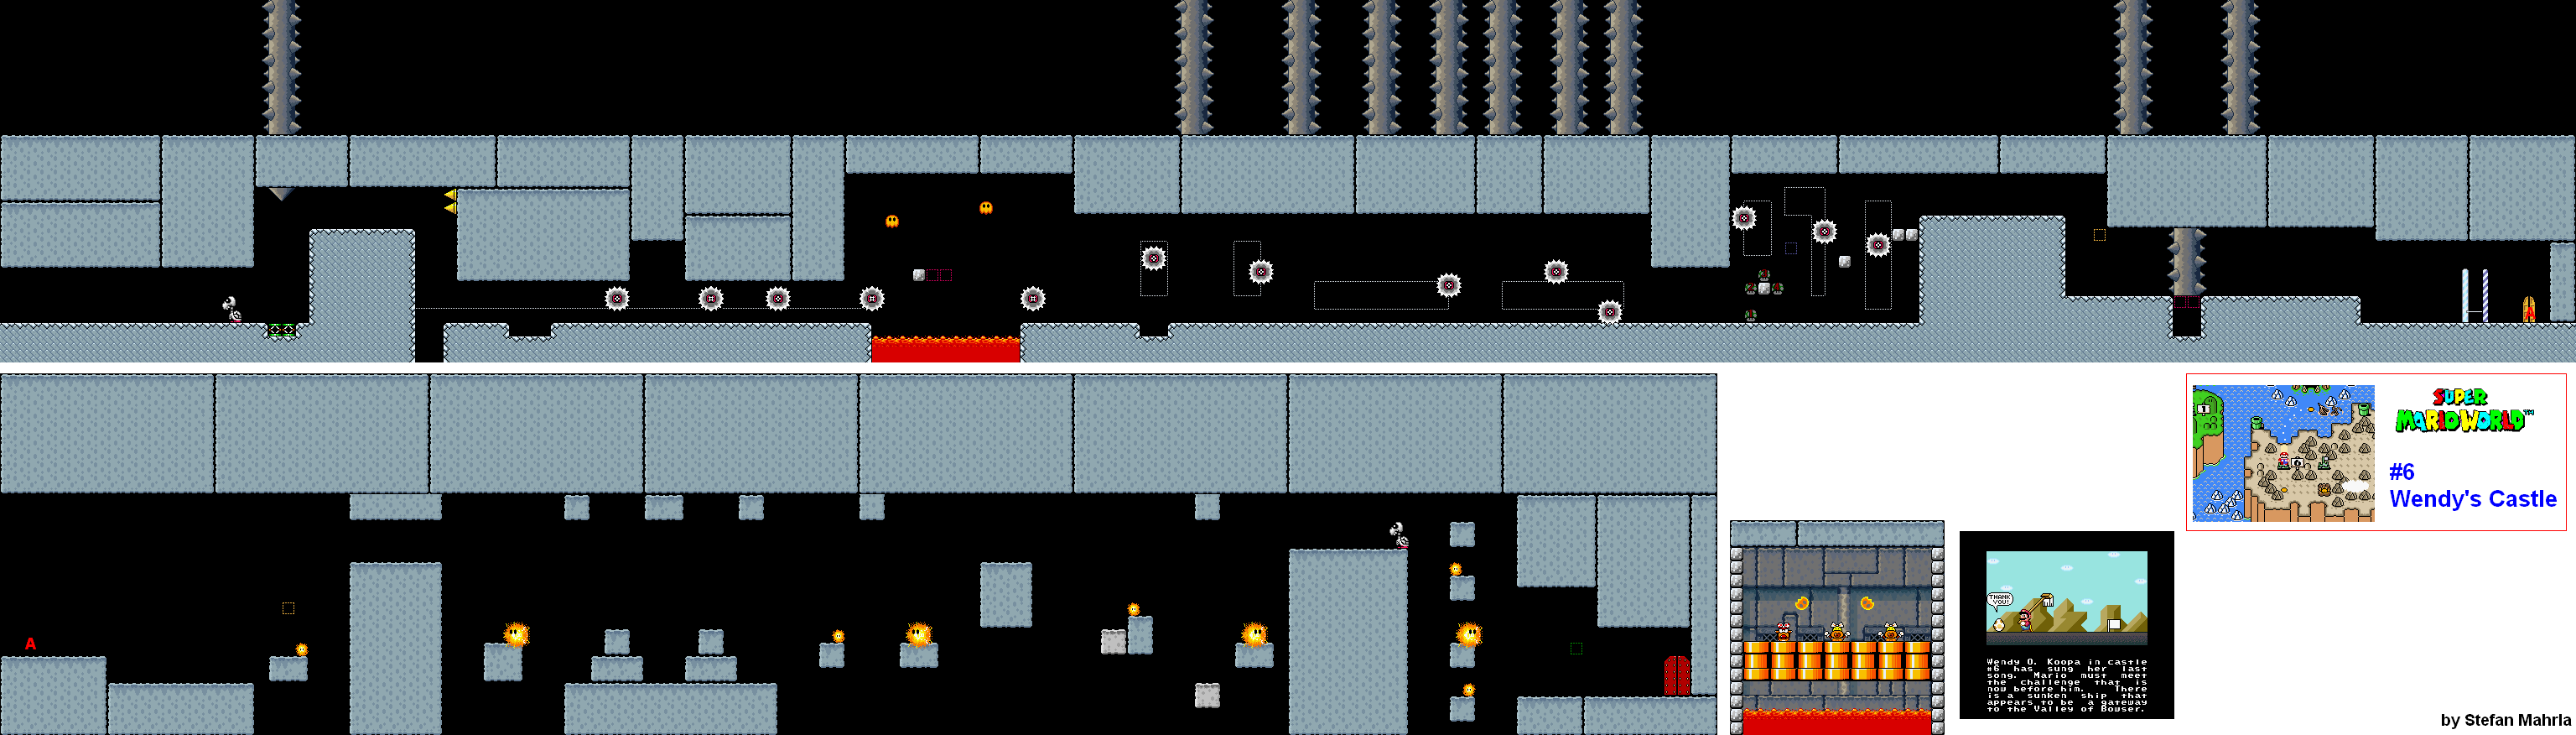
#6 Wendy's Castle


This castle has a brand new hazard: giant spikes that come out of the ground and ceilings and jut out in an attempt to crush you. Looks like Bowser and the Koopalings are going over the top here.

You'll also be dealing with a couple of buzzsaws, and you'll also be dealing with them and the giant spikes of doom at the same time. It will take a little trial and error to see where the gaps are between them as well as to figure out what to do in that part.

After some more spikes of doom, one of them coming out of the ground and all of them moving in and out in a faster pattern that is easier to understand, you'll hit the checkpoint and move on to the second half of the stage. Here, you'll meet orange sparks, both big and small, moving around platforms. The big ones move a lot slower than the small ones, but thankfully you can spin jump off of them. There are also walls and ceilings that move up and down as well as gray ones that move back and forth. Try not to get crushed.

The boss here is Wendy O. Williams (named after Wendy O. Williams of The Plasmatics), who fights just like Lemmy. The only difference is that all of the tops of the pipes are at the same level and there are two Podaboos bouncing around in diagonal directions. While this set-up can seemingly be easier, it does provide its own set of challenges when it comes to avoiding things. Just like with Lemmy, three bops on the head will do Wendy in and you will save the sixth of Yoshi's friends.

Next up is the Sunken Ghost Ship, but we have one more place in Chocolate Island to deal with: Chocolate Secret.

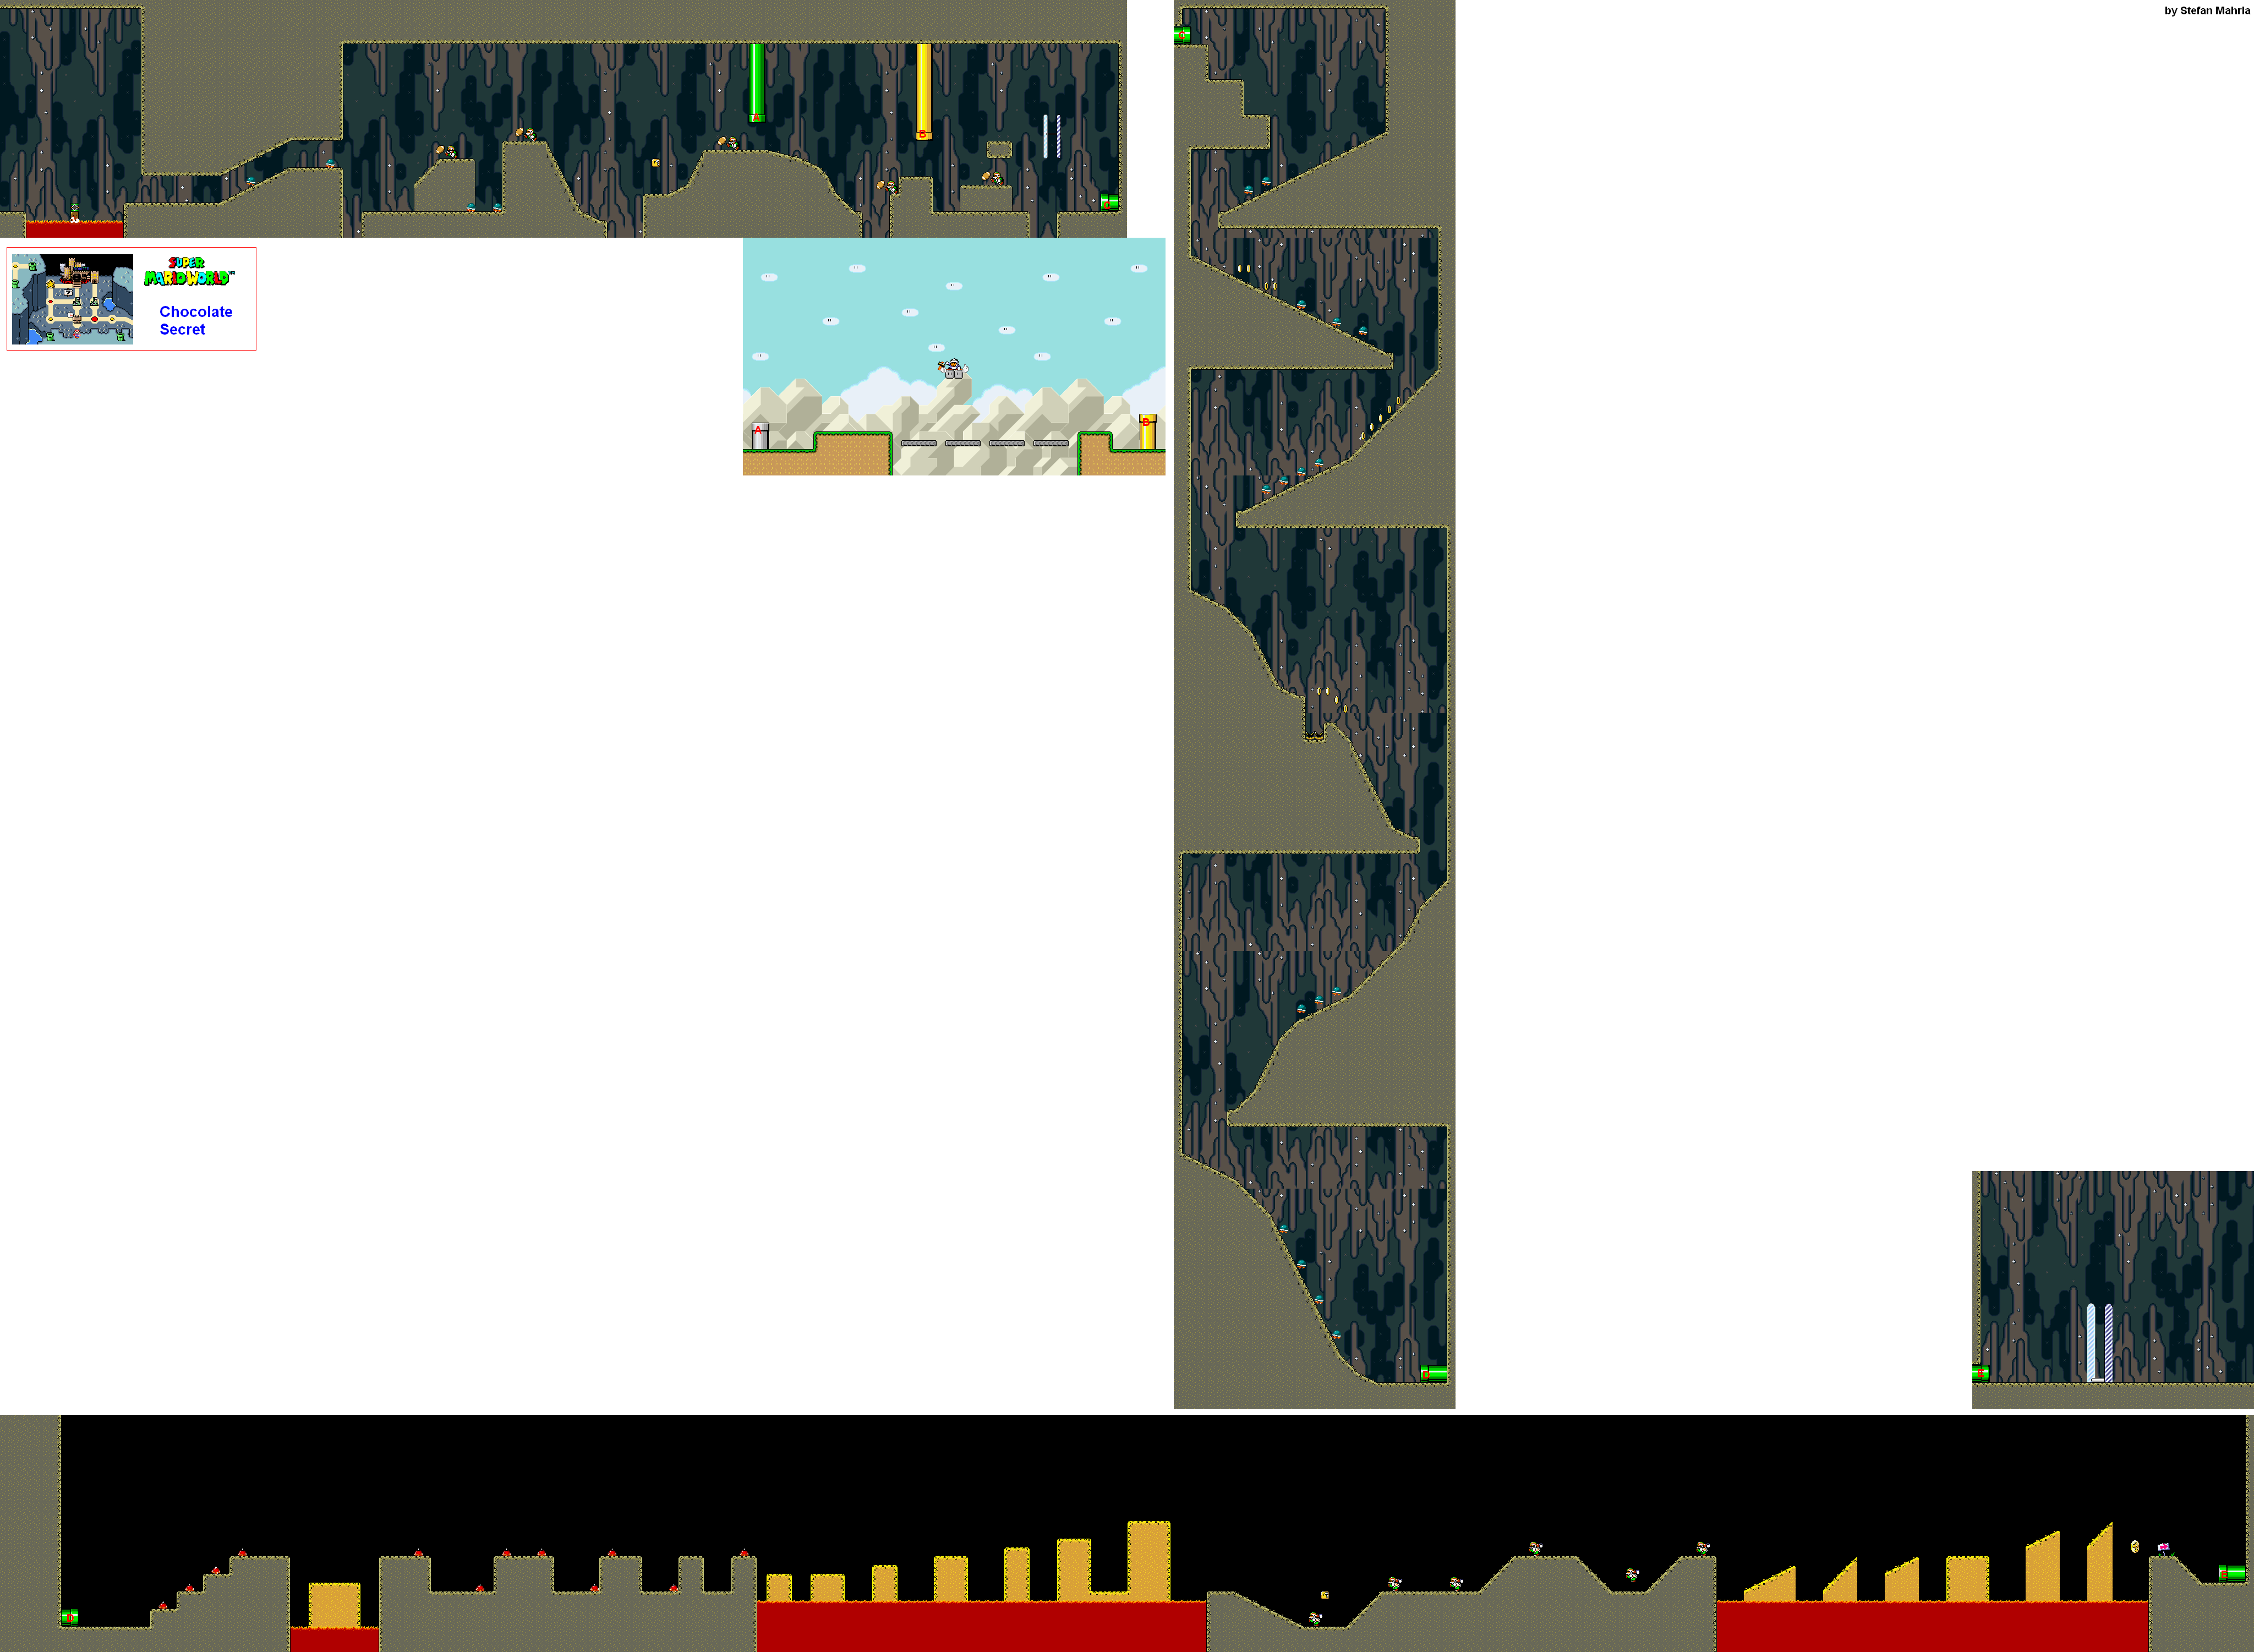
Chocolate Secret


You'll start out using a springboard to get over the lava, and after a few Buzzy Beetles, you'll start seeing the Chargin' Chucks kicking footballs. They seem to two low bounces followed by a high one, which is not how footballs act in real life. Having Fire Mario works well with the Chargin' Chucks here.

There is a green pipe shortly after the start that lets you go above ground, but you don't get to skip much of the level at all if you take it.

After you hit the checkpoint, there is a whole section dedicated to slopes. If you ever wanted a whole section where you wanted to just hold Down and get through everything, here is your chance! Just hold down and take out all those Buzzy Beetles! Watch out for the pit with the Munchers halfway through.

After that, you'll be dealing with a bunch of Spiky Tops as well as series of platforms that sink all at once into the lava when you stand on the first one. You'll want to be quick with those sections.

When you're done with this course, you'll get a shortcut back to #6 Wendy's Castle.

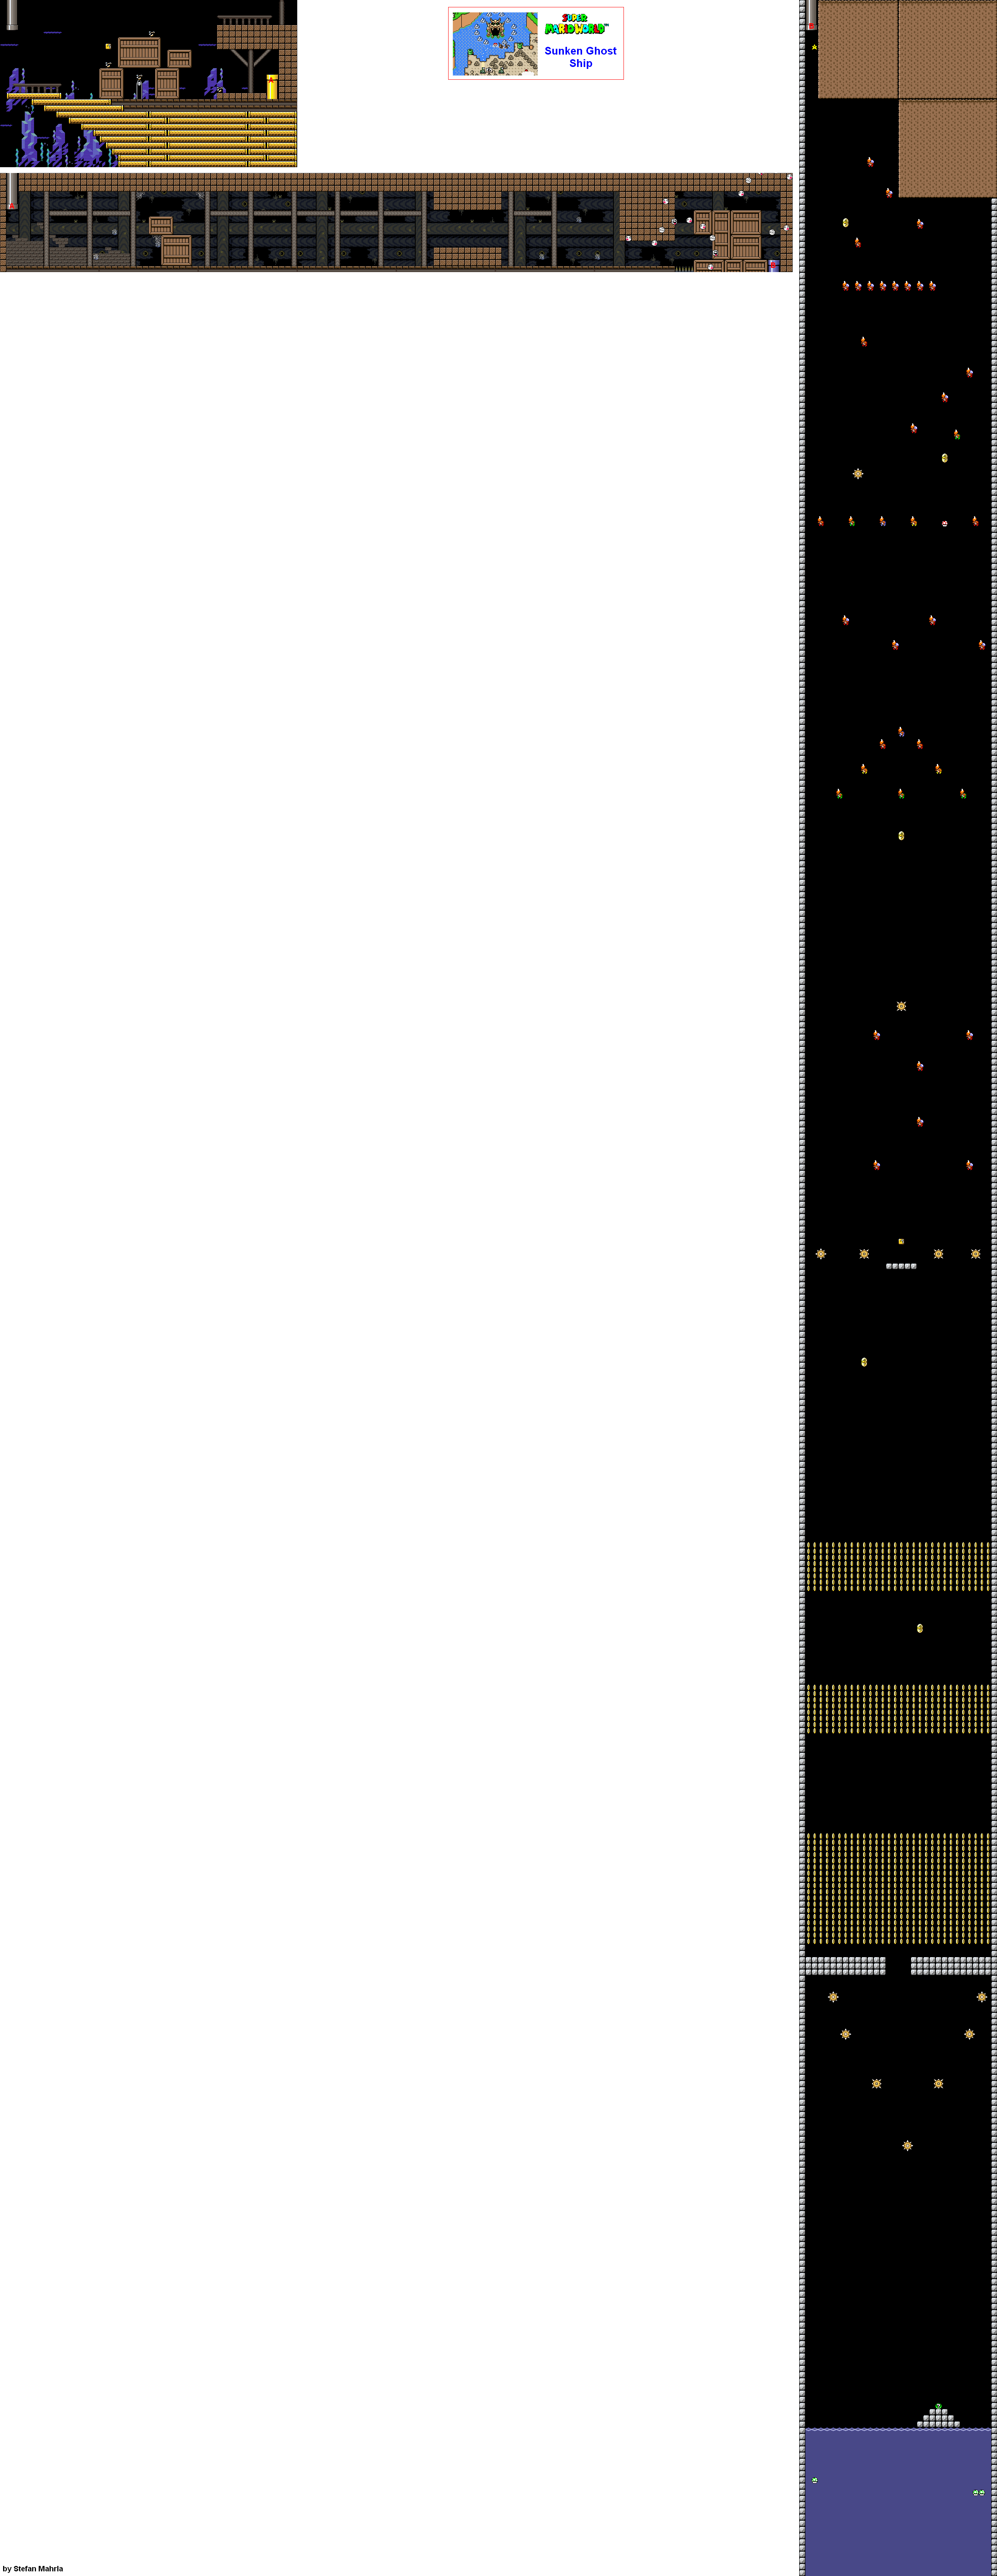
Sunken Ghost Ship


Here it is: the bridge between the sixth and seventh worlds.

Unlike the other Ghost areas, you can bring Yoshi here for a free hit, but it makes you a slightly bigger target and is probably not worth it.

When you enter, just swim to the right and avoid the Bullet Bills that come out of the cannons. There is a ? Block with a power-up inside if you need it.

From here, you'll have to swim slowly and carefully to avoid the Boo Buddies that pop in and out at random locations. Hold Down while swimming in place if you need to. After a while, they will go away and you'll just have a few Eeries and a Boo carousel to deal with.

When you go down the pipe at the end, you'll take a huge drop. Grab the Starman and take out as many enemies as you can as you take the long drop down. All the Dragon Coins will be here, it's just a matter of figuring out where they are if you want to get them all in the Game Boy Advance version.

There is a pit of water, but it leads nowhere but death if you go all the way down it. Swim to the platform with the green ? orb to finish the stage.

Sunday, September 2, 2018

PrinceWatercress plays Super Mario World - Part 11 of 17


It's time to take on Chocolate Island...and there is a method to the madness in the second stage.

Overworld map by Rick Bruns. All other maps by Stefan Mahrla.


Chocolate Island


Here's a nice change of pace. Though it may not be as confusing as the Forest of Illusion, there are still a few secret areas to find as well as a course with an interesting gimmick.

Chocolate Island 1


You'll meet a few new enemies here: Dino Rhinos, big green triceratops-looking dinosaurs who will slowly move towards you and also jump over short obstacles if need be. If stomped on with a normal jump, they turn into Dino Torches (also known as Mini-Rhinos), who are a lot faster, have a higher jump, track where you are and also breathe fire. They can breathe it either straight up or straight forward. The Dino-Torches can be kiled with fireballs, the Dino Rhinos cannot.

Thankfully, for an area that introduces these two enemies (and interestingly for a late-game area), this area is surprisingly easy.

There is a blue pipe near the end that you can enter for more coins (assuming you can avoid the big spiky puffer fish), as well as a white pipe nearby that you can also entry. Both of them take you to the same location: a pipe cannon that launches you to the right. Hold Right and Y, and hold B as you land on the Para-Troopa for a boost if you need it. You'll need to do this to get to the goal, as well as to make it to the checkpoint.

Choco-Ghost House


Unlike most Ghost Houses, this one has only one exit.

Avoid the gaps in the floor that move back and forth as you also avoid the Eeries that come your way. Halfway through the section, you'll meet a Fishin' Boo. Keep heading right while avoiding the blue flame on his fishing pole. It won't be long until you make it to the door.

In the second section, there will be some blocks covering a pit. When you face away from the blocks, they turn into Boo Buddies and try to creep up on you. When you look at them, they turn back into blocks that you can stand on. You will have to avoid the lines of Boos that travel in 45-degree angles and bounce off the walls as you coax the "block Boos" to the door. Once you have them in an acceptable position, you can then get up to the door above and go through it, which will lead to the goal. If you go all the way to the end here, you can get a 1-Up and two more "block Boos" to work with, if you want to use them.

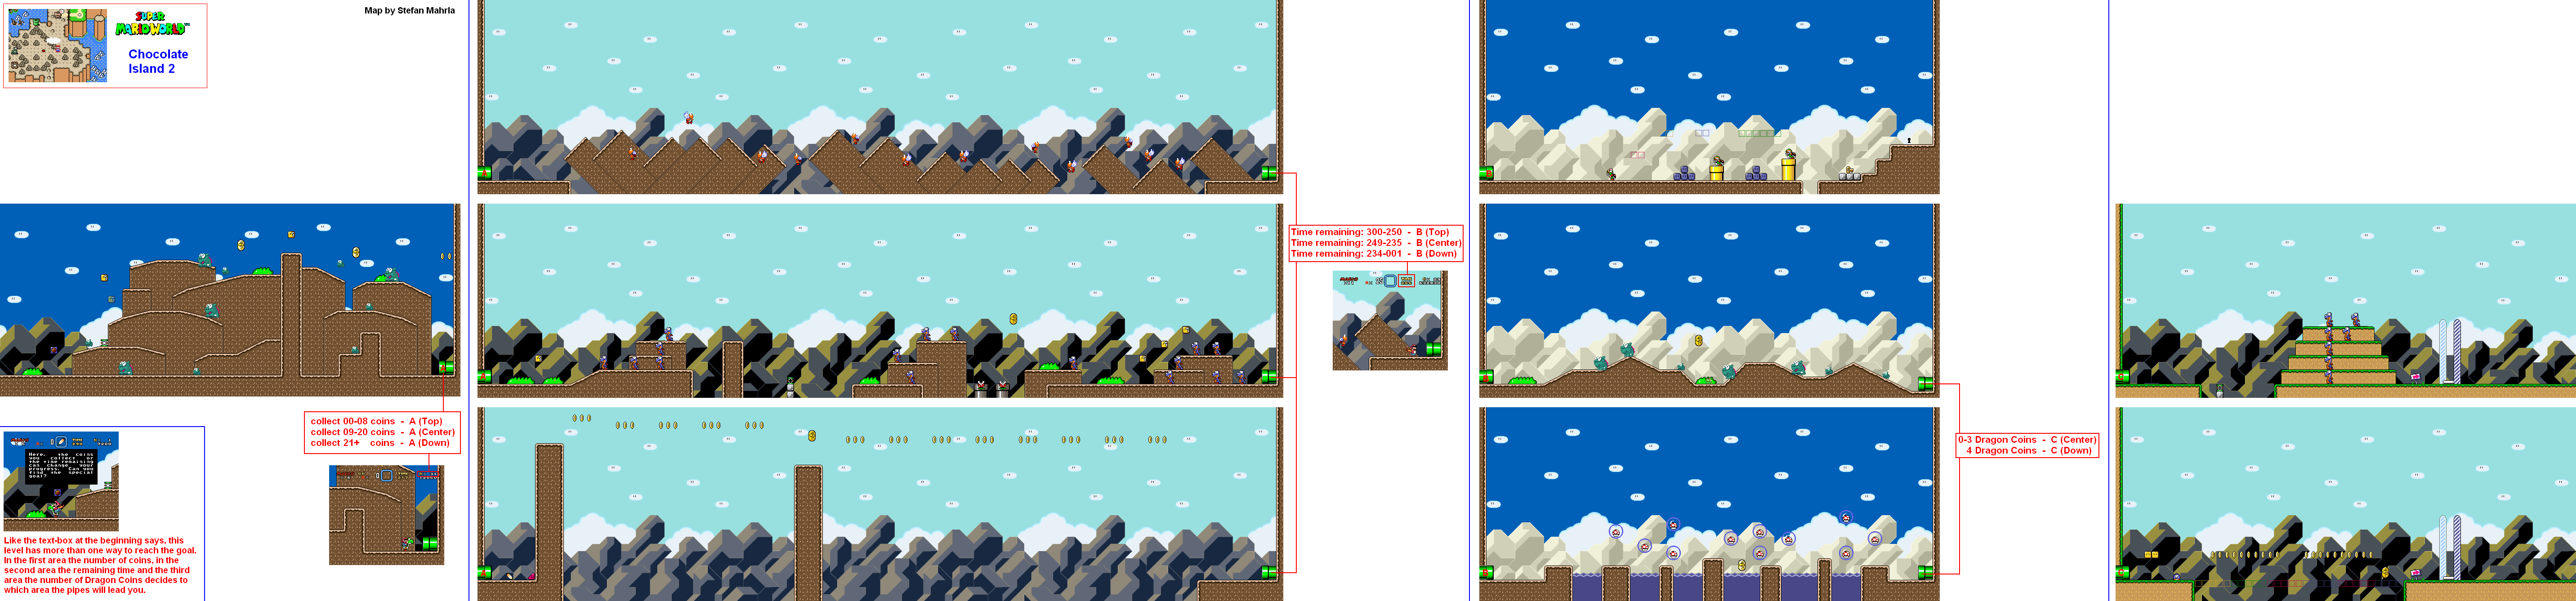
Chocolate Island 2


Here is the course with the interesting gimmick I mentioned earlier. Your path through the course will be determined by certain variables.

You will always start in a mountainous section full of Dino Rhinos and Dino-Torches. The next part depends on how many coins you have collected in this section.

If you collect eight coins or less, you will have to deal with a bunch of slopes and Para-Troopas. Having Caped Mario is good here. If you collect between nine and twenty coins, you'll have some easier platforming, but you'll also meet a lot of Rexes.

If you collect twenty one coins or more, you'll have an area where you will have to fly to the right as Caped Mario. Don't forget to grab the Dragon Coin here.

The appearance of the third section depends on how much time you have remaining.

If you have 250 seconds or more, you will be able to exit through the secret exit. Just get through the Chargin' Chucks and the key and keyhole are yours. Taking this exit will take you to Chocolate Secret.

If you have between 235 and 249 seconds left, you'll be in an area with Dino-Rhinos and Dino Torches. It's pretty simple, for the most part.

If you have 234 seconds or less, you will get a section with water pits as well as a bunch of Mushrooms in bubbles.

The final screen, assuming you didn't get the secret exit, depends on how many Dragon Coins you have. If you have three Dragon Coins or less, you'll get an area with a spring, a bit and a bunch of Rexes followed by the normal exit. If you have four Dragon Coins, you'll get a ! Block bridge. If you activated at least the Blue Switch Palace, you can get the fifth and final Dragon Coin. If you activated all the Switch Palaces, you won't need to use the P Switch to get across. You must get four Dragon Coins in order to get the fifth and last one here. The normal exit will take you to Chocolate Island 3.

Chocolate Island 3


This area has a lot of rotating platforms and a lot of Koopas.

There is a pipe before the checkpoint that you can enter which takes you to a "coin heaven" of sorts, but if you enter it, you'll have to go back if you want to hit the checkpoint.

There are two exits here. The normal exit can be reached by climbing a vine and takes you absolutely nowhere, sending you in a circle and taking you right back to Chocolate Island 3. The secret exit is past the normal one, and you will need Caped Mario to get it. To fly there, fly to the right underneath the normal exit, and keep flying to the right. You'll eventually reach land that takes you to an alternate goal, which will take you to Chocolate Fortress.

Chocolate Fortress


This area has chocolate-brown colored lava, sharpened logs that act as spikes that move up and down, plenty of Dry Bones and fireballs shooting out from the right edge of the screen from out of nowhere. Be careful and time your jumps.

After the checkpoint, you'll be dealing with a ton of Thwomps. There will also be a couple of Thwimps here, and if you've activated some switch palaces, you can get take some of them out of the equation and make this part slightly easier.

The boss door is brown instead of red, which is a nice touch. You should know how to take care of the Reznors by now.

PrinceWatercress plays Super Mario World - Part 10 of 17


We're almost done with Forest of Illusion! Now it's time to take care of some loose ends on Star Road!

Overworld map by Rick Bruns. All other maps by Stefan Mahrla.


Forest of Illusion 4


There are Lakitus all over the level, and the first one you see will not only be in the air, but will have a 1-Up on a fishing pole. If you grab the 1-Up, he will start throwing Spinys. If you can jump on him and use the cloud later in the level, you can get a Dragon Coin that way.

The pipe after the checkpoint takes you to the secret area, which will take you to Forest Secret Level.

One of the pipes before the checkpoint takes you to a water area that will let you skip some of the level, but you will have to go back if you want the secret exit.

The normal exit takes you to Forest of Illusion 2.

In case you take a Koopa shell or a hold-able object with you, it will give you a Mushroom. If you are already big, you will get a 1-Up.

Forest Secret Area


This is a simple area with one exit, but it's a fun one compared to all the running around that you've been doing throughout this entire world. Take a ride to the end on a flying platform, and try not to get hit by any Paratroopas on the way there. The platforms cris-cross, and you can switch between them in your attempt to get all five Dragon Coins.

If the Blue ! Blocks are activated, you can get a free 1-Up.

If you can somehow get over the goal post without triggering it, you can get three 1-Ups.

Getting through here will take you to the Forest Fortress, but we're going we're going to take care of the castle here first.

#5 Roy's Castle


This area is the debut of something new: the block snake. Just jump onto it, and away it goes. Be sure to stay on it so that you don't fall into the lava or a pit of spikes. The block snake moves around in patterns and doesn't go in a straight line, so pay attention and keep moving, and avoid the Podaboos and falling spikes when you see them.

You'll also meet a new hazard: fire-spitting statues.

Roy (named after Roy Orbison, if the sunglasses are any indication) fights just like Morton Jr., but when you jump on him once, the walls close in a little bit, little by little. It can get stuffy in there, and it makes it harder to get away from Roy in case he is on the ceiling as well as to jump on him. Keep that Fire Flower ready!

After beating Roy, you'll find the fifth of Yoshi's friends and you will move on to Chocolate Island.

Forest Fortress


The first part of this is an auto-scroller, and there will be buzzsaws that will move on a path. You will have to avoid the buzzsaws, but you can spin jump on them to make them easier to deal with. You'll also have to deal with crushers as you get through this part. If you've activated all of the Switch Palces, getting to the door will be a breeze.

The second part is not an auto-scroller, and you'll be dodging a lot of buzzsaws and Podaboos as you make your way to the end. There is a top path to an alternate door leading to the Reznors you can take where you can fly over a huge lava pit as Caped Mario, but you had better be able to fly across it and avoid all the Podaboos if you want the extra lives that are here.

Speaking of the Reznors, you should know how to deal with them by now.

Beating the Fortress will take you to Star Road and Star World 4.

Star World 4


There are a lot of platforms and a lot of Koopas. You can get a Red Yoshi at the start if you need a Yoshi. Just remember to feed it.

The keyhole is below the area with the pipes, and you will need the Green and Red Switch Palaces in order to access it. However, if you have Yoshi and Caped Mario, you might be able to access it without getting either of them activated and without a Koopa Shell, which you'll need to hit the block next to the keyhole (unless, of course, you're Caped Mario).

The keyhole will take you to Star World 5, while the normal exit will take you back to the Star Road entrance. The entrance near Star World 5 takes you straight to Bowser's Castle, but we're not going there yet...

Saturday, September 1, 2018

Super Mario World - The Cartoon Intro


The Super Mario Bros. Super Show and The Adventures of Super Mario Bros. 3 weren't the only Mario cartoons. There was one for Super Mario World as well. Just like with the Super Mario Bros. 3 cartoon, this one only had 13 episodes and the late "Captain" Lou Albano and Danny Wells were not involved.

PrinceWatercress plays Super Mario World - Part 9 of 17


How does one whistle if they are COMPLETELY UNDERWATER

Overworld map by Rick Bruns. All other maps by Stefan Mahrla.


Forest of Illusion 2


There is a maze here, but it is a very linear one. You'll meet a new enemy here: sea urchins. The sea urchins will move back and forth or in a pattern very slowly. You can destroy them by hitting them with a block, but more often than not, you'll be waiting for them to get out of your way.

To the left of the goal is what looks like a wall, but in reality, you can swim past it. On the other side is a key and keyhole that sends you to the Blue Switch Palace. The normal exit will send you to Forest of Illusion 3.

Oh, and watch out for that Chargin' Chuck. His whistling will wake up all the Rip Van Fishes.

Blue Switch Palace


Grab all the coins, then hit both P Switches - preferably the silver one before the blue one - to get all the Spinys to come down as silver coins. Collect all the coins to get a ton of points and a 1-Up.

Just like the Red ! Blocks, the Blue ! Blocks do not give you anything if you hit them from underneath, but they can make for useful platforms.

Now that we're done here, it's time to switch paths and head to the Ghost House that is here.

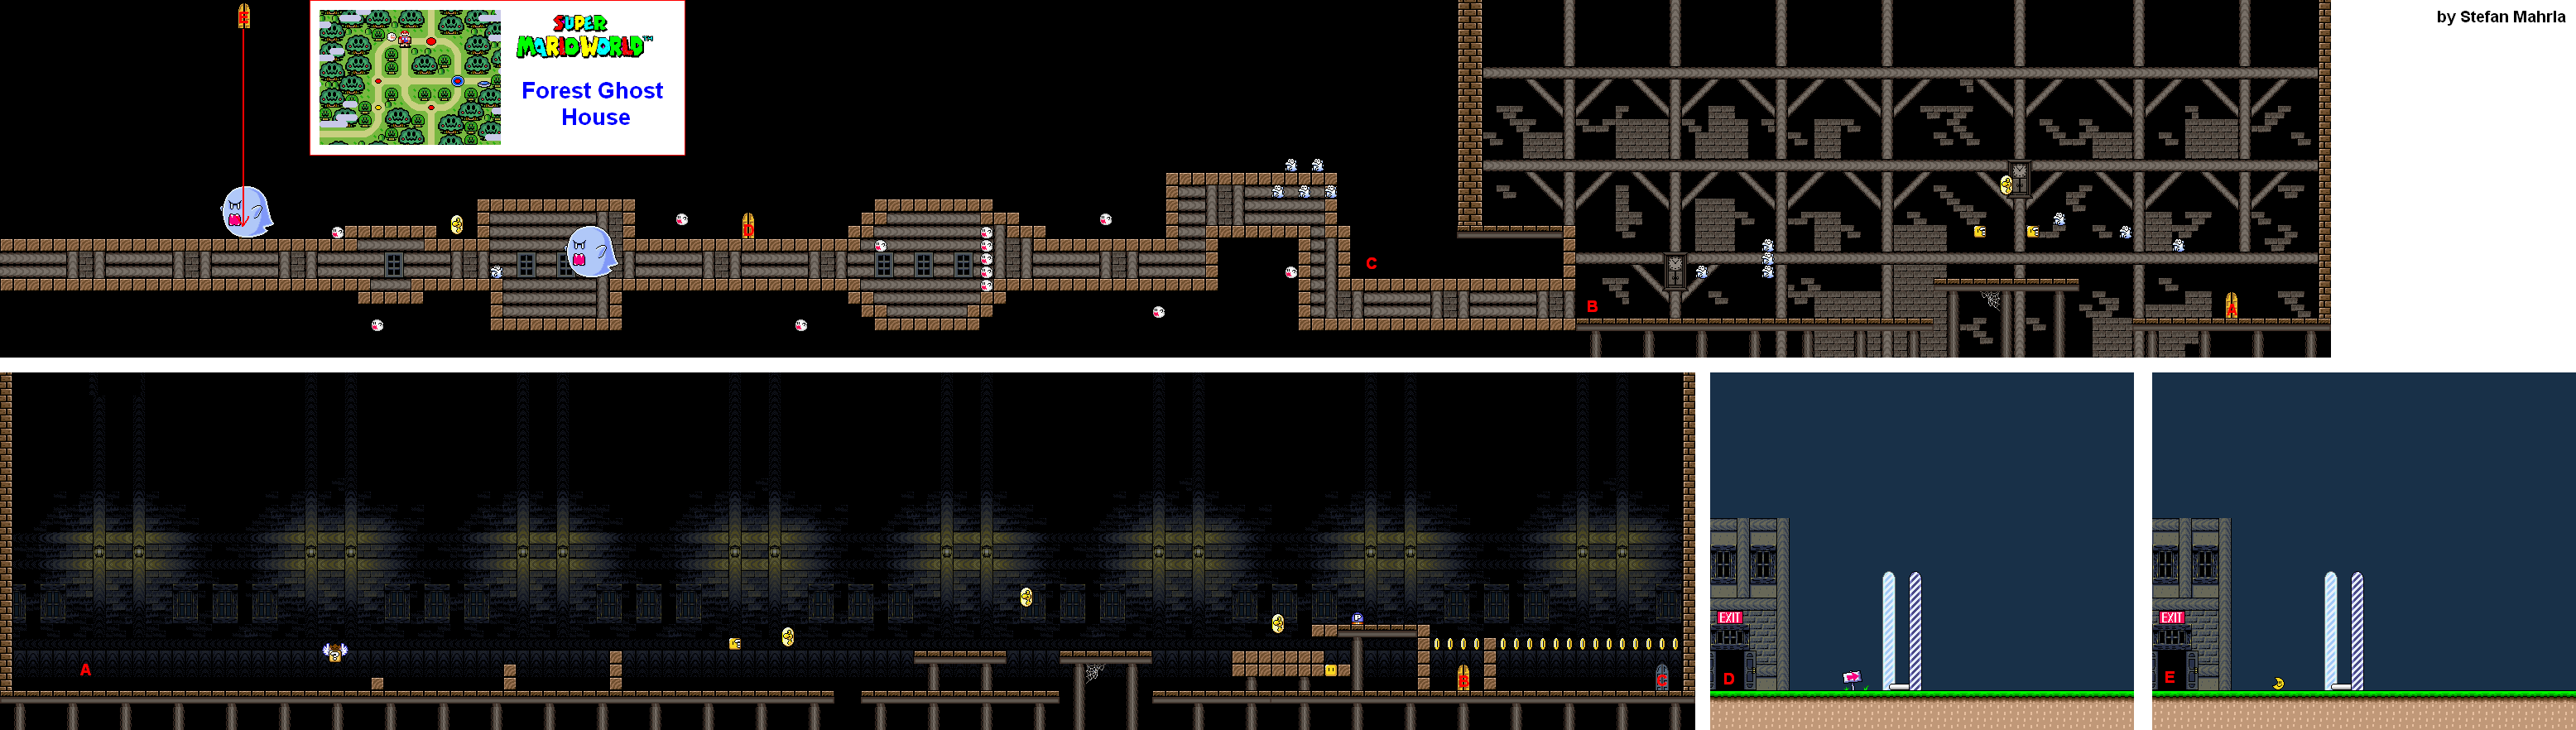
Forest Ghost House


Both the normal and secret exits are at the top at the beginning; the trick is getting there.

Make your way to the right, and avoid the Boos and Eeries. If you have to face away to get them out of your way, so be it. From there, keep going all the way to the right. You'll be in another room.

The next room has a P Switch at the end. Grab it and go all the way to the right, then stomp it to find a hidden door. The normal door just takes you back to the exit of the narrow corridor at the beginning. Watch for the Boo Buddies that dive down at you from the top of the screen.

The hidden door will take you to the roof of the narrow corridor. From there, go left. The first door you see will be the normal exit, and it will take you to Forest of Illusion 4. Going further to the left will take you back to Forest of Illusion 1, and also reward you with a 3-Up Moon. 

Forest of Illusion 3


In this level, you will see enemies in bubbles. If you run into the bubbles, or if the bubbles hit the ground, the bubbles will pop and the enemies will fall out. Once of the bubbles will contain a Mushroom. Thankfully, you can pop a bubble without accidentally running into the enemy inside of it.

The second blue pipe will take you to the three-block mini-game for some more 1-Ups.

In the air with the numerous ? Blocks, you can go up top and get some hidden 1-Ups, provided you jump onto them in a certain order.

The big green pipe after the Chargin' Chuck takes you to the key and keyhole. Make sure you are big so you can destroy the blocks here with a spin jump. The keyhole will take you to #5 Roy's Castle. Meanwhile, the normal exit will take you to Forest Ghost House.