Other than having a live actor playing Mikami, there's nothing really notable about this one.
Saturday, August 25, 2018
GS Mikami: Joreishi wa Nice Body Commercial
Other than having a live actor playing Mikami, there's nothing really notable about this one.

Friday, August 24, 2018
PrinceWatercress plays GS Mikami: Joreishi wa Nice Body - Part 4 of 8
And for the first time in the game, we die! I'm surprised I didn't die a second time against the boss.
The first enemy you'll meet is the moths with faces, but the flying pumpkins can be the worst as they are small and fly around in circular motions. Use your overhead swing to take care of the pumpkins.
To get rid of the dragonflies, strike at the holes in the trees that they come out of.
The banana-throwing plants can be destroyed in one hit. Thankfully, their throwing range is limited.
Don't be afraid to go back as you explore the first section of the level. You never know when you might find power-ups.
The purple monsters that hang on the fences attack you with their arms, but they can be dealt with even more easily if you have one of your own.
The second area introduce tree enemies that spit mushrooms and take two hits to kill. You'll also have to swat spores away with your baton as they cannot be destroyed.
The pumpkins are not only bigger, but also wackier-looking. Strike it once and it splits into two smaller pumpkins that move just like the tiny pumpkins in the first section.
There is a girl reading a book at the end. I'm pretty sure this is a regular character, but I have no info on this person.
Before the next boss, Mikami talks to Okimu, then you fight a ghost dog. This ghost dog will fly around. When it stops, be ready to duck in case it stops just before hitting the ground. If it hits the ground, it will rush across the ground and come back on the other side of the screen. This is your best chance of hitting the boss. Of course, if you're on the move a little bit, you can avoid getting touched by the dog and you may be abel to get some shots in.
After enough hits, you'll deal with two ghost dogs. One of them is the genuine article; the other one is a fake that disappears in one hit.
If you need to, use the talisman bomb to stun the boss. You'll be able to get one free hit on the boss. This is especially useful if you're low on health.
When you beat the boss, the ghost dog turns into a real, more corporeal and much more friendly dog. I guess this is what Omiku was telling us about?
The orange jewel adds bracers to the bust. We then see Mikami holding a broom, which costs 100 more yen than what Yokoshima makes just to rent. Mikami must ride the broom into the sky to find the next jewel.
PrinceWatercress plays GS Mikami: Joreishi wa Nice Body - Part 3 of 8
This stage is much shorter than the first two, but the boss here can be difficult if you're not careful.
Report 3
We're riding on a house cat on top of buildings. You know what that means: auto-scrolling time!
There are plenty of enemies to deal with, such as flying purple demons, birds that drop kicks, dragonflies that stay in place and bees that will swoop in on you. Some of the purple demons will carry power-ups.
The birds and the bees are the worst enemies of all, due to their movement patterns and the rocks that the birds drop. Be sure to use your overhead attack as much as possible.
Duck and jump under the low-hanging walls and the tall walls, respectively. Jump over the pipes when you see them.
Don't worry about jumping off the buildings; the cat you are riding on will take care of that automatically.
The boss here is a leaping masked guy. Watch out for the fleas that come out of them, and either strike them all or use a bomb to get rid of them. If he points his dart gun at you, you can duck under the darts, but you can also swat them back at him to do some damage. Also, watch the skies for falling objects, which you can also use against the boss.
It will probably take a while to get all the attack patterns down, but once you do, getting rid of the boss here will be wonderful. You'll get the purple gem, which adds boots and knee pads.
After this level, Mikami is back to her normal size in time to check out a haunted greenhouse.
Thursday, August 23, 2018
PrinceWatercress plays GS Mikami: Joreishi wa Nice Body - Part 2 of 8
asdf
Report 2
This stage has some pretty nice music, honestly.
Mikami is wearing a red dress. As a matter of fact, the color of her dress changes with every level. It's a nice change of pace from the usual purple dress she is known for wearing.
The water at the beginning of the level will push you back as you fight some of the new enemies that you face here: the plants that sprout out of the ground and spit out ghost peaches (I guess that's what they are), the frogs that leap towards you and the fish that swim back and forth and jump straight up out of the water every so often.
The red wave power up turns your baton red and also gives you a wave projectile that has more vertical coverage than the lightning. It has limited range, but it shoots forward a little bit whenever you attack and it's better than nothing.
The first pit that you see in the level leads to some hidden power-ups. Down there is a cake that replenishes two hits as well as a Mikami doll that gives you an extra life. The nearby platform will bring you back up. There is also a pink square with a "G" on the wall, but I have no idea what it is supposed to be there for.
Watch out for the spikes. There are usually fish near them.
The second section introduces you to bats, piranhas that leap up out of the background and come straight down, sleeping demons that wake up when you get close and follow you around, and bubbles that move up and down and shoot electricity in four directions.
You'll be platforming up the waterfall - careful with the jumps - then you'll make it to the top. Watch out for the rocks that roll towards you as you make your way to the right owards the abandoned hotel.
Inside the abandoned hotel is a doll. The doll turns into an evil doll spirit that tries to snatch Mikami with its hands. Strike at the hands, avoid and attack the dolls whenever necessary, and make sure the hands don't grab you. If you're moving around and attacking all the time, this boss fight is definitely easier, and the red jewel will be yours in no time. The red gem gives the statue demonic-looking shoulder pads.
Back at the apartment, Yokoshima is annoyed because he did not know that the hot springs hotel was haunted. Suddenly, a black-clad figure breaks in through the window, hitting Mikami with a dart and making her tiny. This leads to a rather interesting mission for next time.
PrinceWatercress plays GS Mikami: Joreishi wa Nice Body - Part 1 of 8
Saw a tool-assisted speedrun of this game; thought this would be a fun game to try out.
I was right.
The game is based on the early 1990s anime Ghost Sweeper Mikami, which has only seen a release in Japan (to the best of my knowledge).
The game starts with Mikami receiving a letter from Yakujin. A letter states that for helping him often, he is rewarding Mikami and her roommates/co-workers with the grand prize of a lottery: a stone bust which Mikami recognizes as a statue of the goddess Aegis. There are seven jewels that are supposed to be placed on it, and when that happens, the wish of the person who found them would come true. Mikami, fueled by her usual greed, goes out to find the seven gems. Her employee Yokoshima also wants in on the money that Mikami is supposedly going to get from this, as does Okimu (a ghost of a 13-year-old shrine girl who has wandered since death for three centuries and now works for Mikami for mere pennies).
Report 1
Y lets you attack with your spirit rod, B lets you jump. Left and Right let you move around, while holding Up while pressing Y let you attack with an overhead strike. Down lets you crouch, and you can attack while holding Down as well. Pressing A allows you to use screen-clearing bombs (more on those later).
At the bottom, the five hearts signify your health. Lose them all, and you will lose a life. Next to that is the current power-up you have, followed by the number of screen-clearing talisman bombs that you have - up to a maximum of three - and the amount of lives that you have.
The enemies here are pretty weak. You have pink blob-like ghosts that float towards you, ghosts of dead schoolgirls, and brown zombies. The zombies take two hits to kill, while the schoolgirls and the pink blobs only take one.
Sometimes, the pink blobs will endlessly pop out of a poster with a beautiful girl on it. Above her head is the name "Emi," which I assume is the name of the girl on the poster. Strike the poster, and you will not only burn the poster but also cause the picture of Emi to blink its eyes repeatedly.
The first section is pretty easy. Sometimes you will see zombies come out of the windows, as well as the occasional enemy from behind, but it's not that difficult.
The signs can be sent into enemies after being hit twice.
If you see a platform with a talisman on it, you can strike it by holding Up and pressing Y while in mid-air to latch on. From there, press Up, and Mikami will vault to the top. When she does this, she performs this mighty kick as she does it, and this kick can damage any nearby enemies.
Pots will contain power-ups. The yellow lightning bolt will turn your baton yellow and let you shoot out a lightning bolt projectile that travels a limited distance when you attack without holding Up or Down. You will lose the ability if you get hit, however.
The cake replenishes one hit points (two on easy mode).
The blue water droplet gives you a blue baton as well as a two-way shot. The projectiles do not travel as far as the lightning bolts, however. You start out with a "ghost sticker" bomb that sucks all enemies on the screen into a vortex. Picking up a "ghost sticker"-like scroll will switch you back to that kind of super attack.
The pendant gives you a water bomb in addition to adding one screen-wide attack to your inventory. Using it will cause water droplets to fall from the sky, but they do not cover the whole screen all at once. It also doesn't kill the enemies, either; instead, it stuns all enemies.
The second section is on the subway. There are ghost passengers who will attack you with newspapers, hands that crawl across the floor, carts that will fly towards you, bags that shoot out spirits and blue skull-faced spirits that fly towards you. If you see any doors, attack them three times to destroy them. If you see the spirit-spitting bags, destroy the bags. If you see the ghost passengers with the newspapers, attack the newspapers when they fly out.
It doesn't really matter which path you take at the forks in the roads; you'll reach the end regardless.
At the end, you'll meet the first boss: a malevolent blue spirit who encompasses the entire room. As the ghosts pops out of the walls, you'll want to attack the hand that pops out of the floor. If you can, use your overhead shot to hit the projectiles the boss spits out. Thankfully, this boss isn't that hard. You'll then get the yellow gem - the first of seven for the statue of Aegis. When you insert gems into the statue, the statue suddenly gains armor.
Yokoshima, Okimu and Mikami notice this. Mikami finds out that the next gem is in a hot spring hotel. Yokoshima wants to go over there, but Mikami tells him to stay put.
Wednesday, August 22, 2018
Donkey Kong Country 2: Diddy's Kong Quest - The OST
Here's all the music from Donkey Kong Country 2: Diddy's Kong Quest.
Here's all the music in one video as well as numerous sounds from the game.
PrinceWatercress plays Donkey Kong Country 2: Diddy's Kong Quest - Part 18 of 18
We have one more stage after Kaptain K. Rool, but once we beat it, we'll finally uncover the secret of The Lost World!
All maps by Tropicon.
The Lost World
Your skills with the animal buddies are put to the ultimate test!
Animal Antics
Bonus areas: One (1)
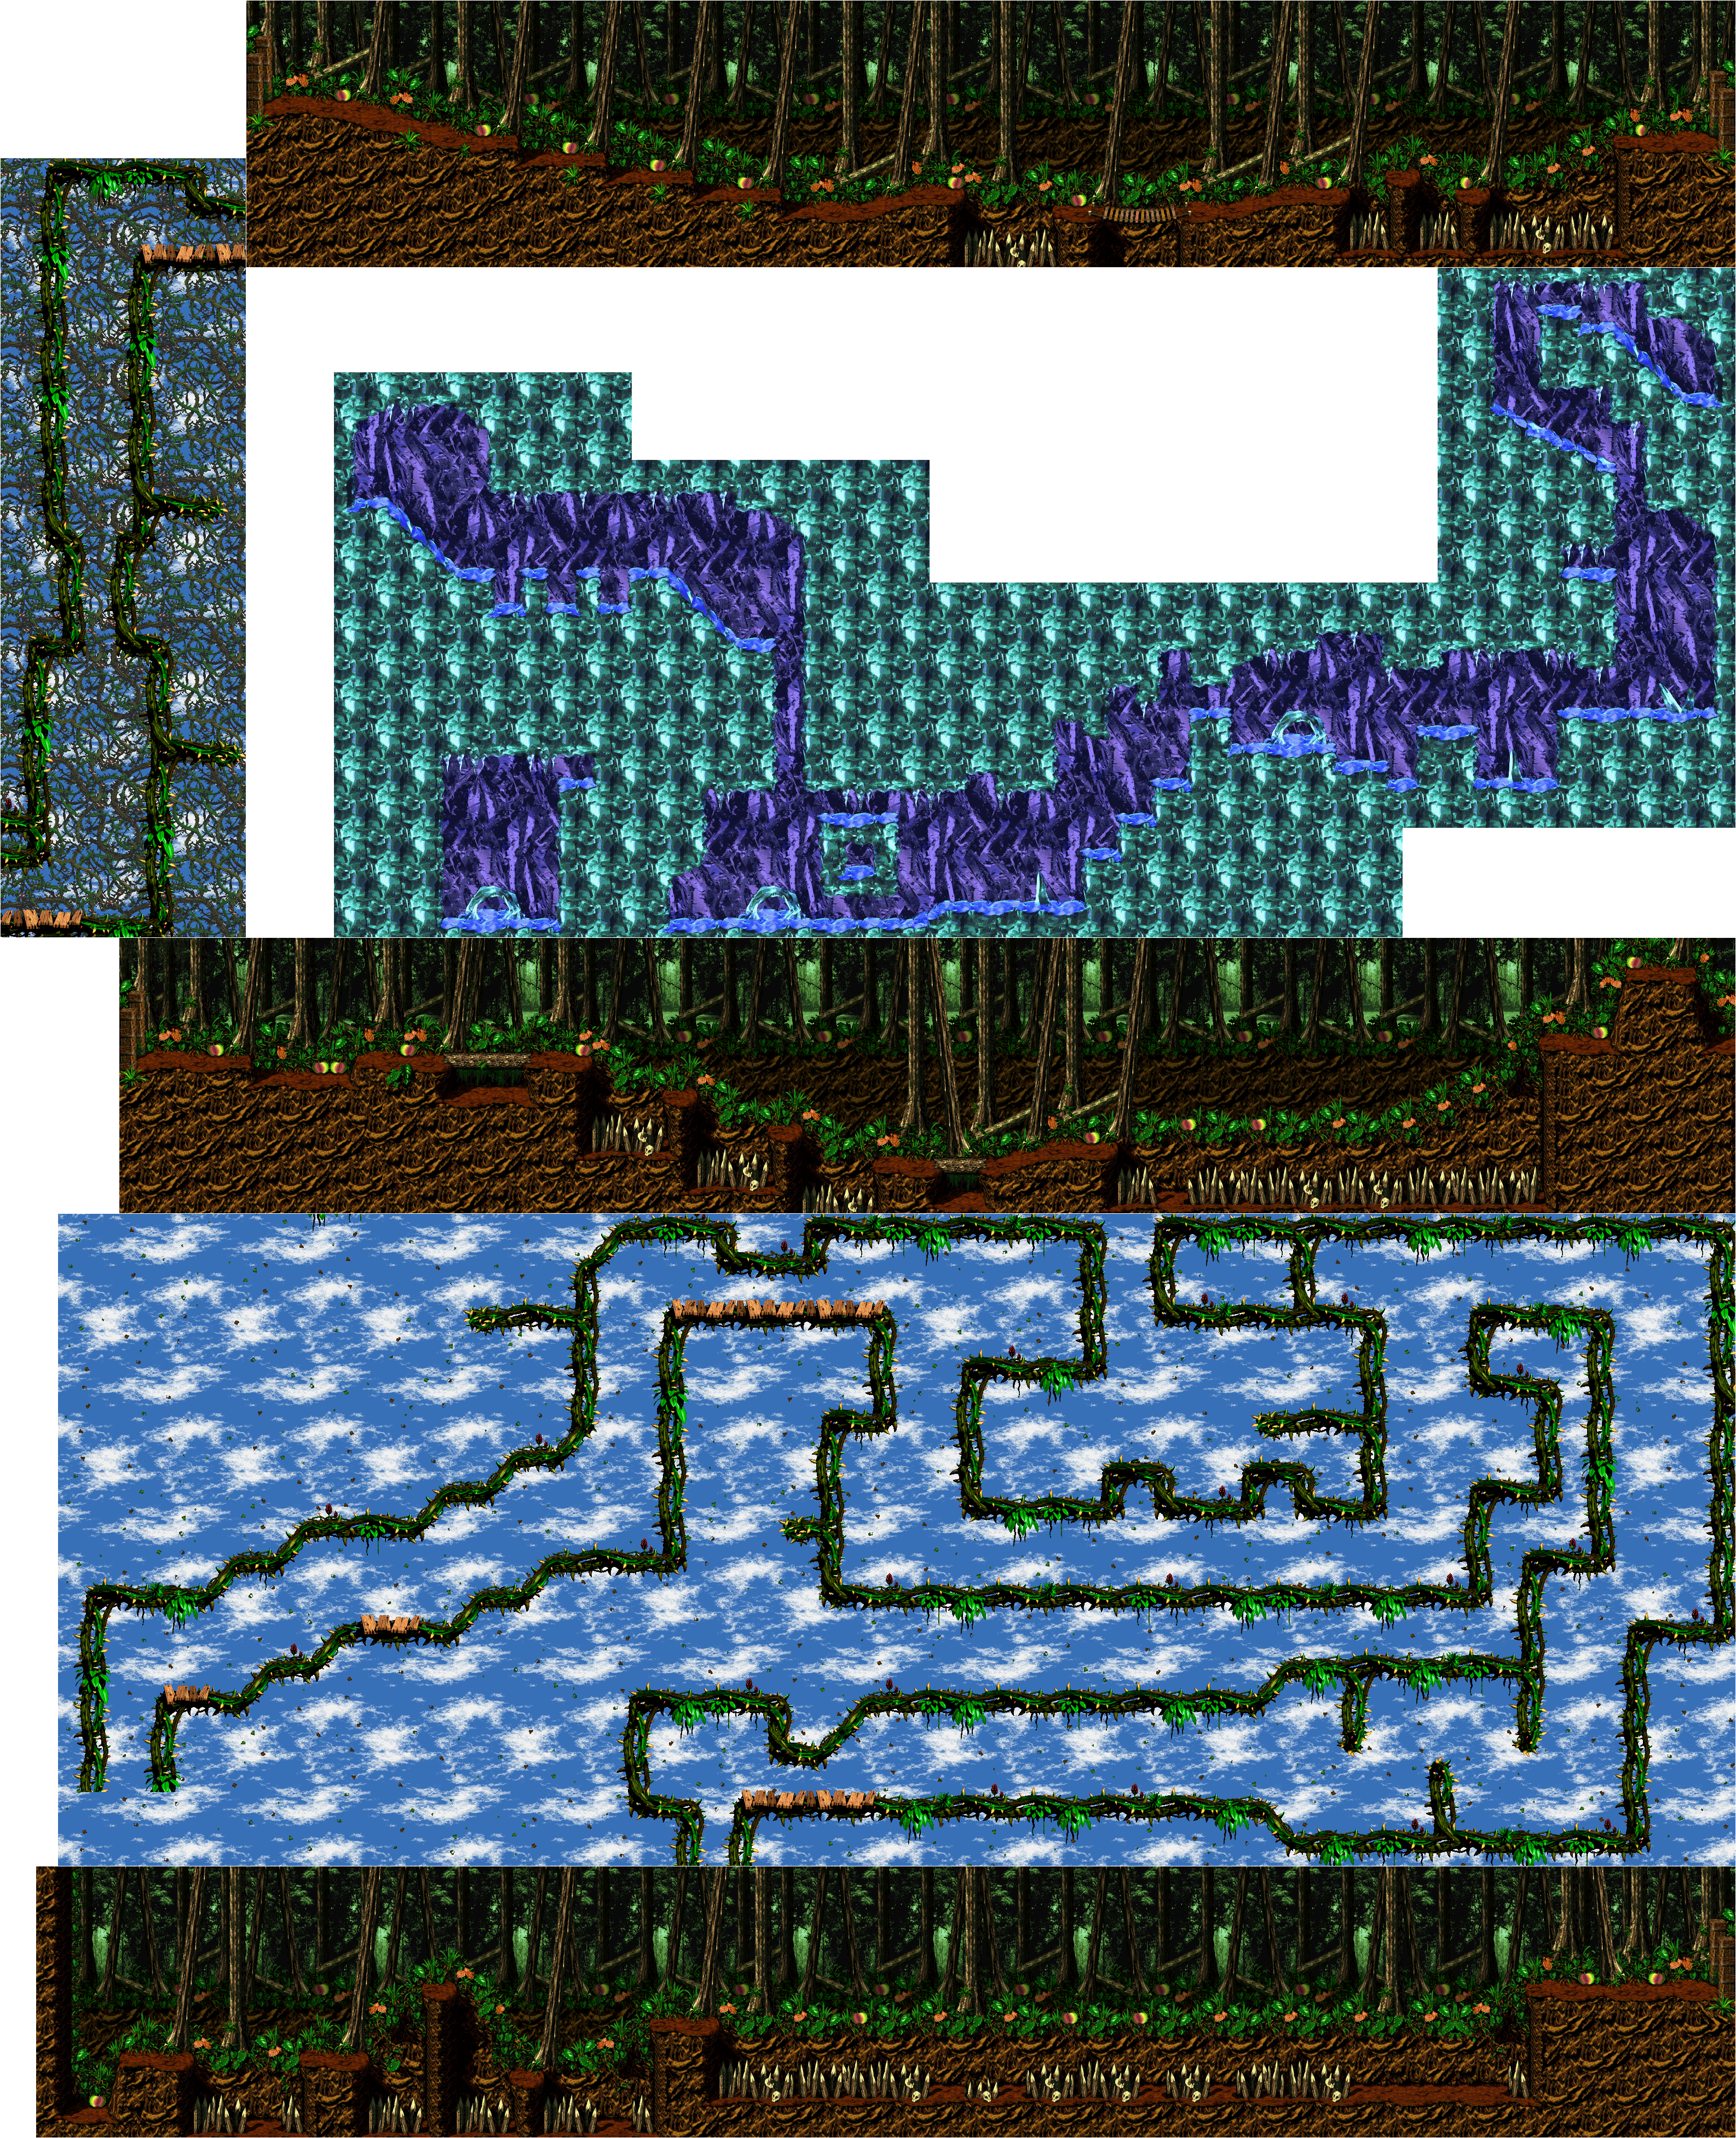
You'll start off as Rambi, then you'll be swimming around as Enguarde before making platforms as Squitter, flying around as Squawks and finally jumping high as Rattly.
Squawks' part is the worst, since you also have to deal with the wind blowing you around. Use Left and Right on the Control Pad to keep the wind from giving you trouble, and tap Left and Right if you have to.
In Enguarde's section, if you go all the way down after transforming and go to the left, you'll find a hidden room with a bunch of bananas and the O.
When you reach the Barrel Cannon leading to the Squawks section in Squitter's section, don't jump in. Instead, use platform webs to go over it and to the right. You'll find the last Bonus Barrel. Use platform webs to reach the Squawks Barrel while killing all the Zingers, then fly to the top and egg the rest of the Zingers to get the DK coin.
Krocodile Kore
Looks like the sharks weren't enough to kill Kaptain K. Rool. He pulls out all the stops to try to take you down, but if you can hit him once and only once, he's done.
After the fish come out of the gun, he shoots a purple blob. Jump over it.
He then shoots spiked cannonballs. Jump the fourth and sixth, duck under the rest.
Two more purple blobs are next. Jump the first, duck the second.
He will then shoot out eight spiked cannonballs that come out progressively faster. You'll be doing a jump, duck, jump, duck movement until the either and last one. Hope your reflexes are good here.
K. Rool shoots out three more purple blobs. Jump over them all.
He then shoots eight more spiked cannonballs. Jump over every single one of them. Once again, they are fired progressively faster the more that come out.
You'll get a slow purple blob followed by a fast one. Jump over both when they overlap.
You'll then have spiked cannonballs again. He'll shoot out slow one, then a fast one. He'll shoot another slow one followed by two fast ones, then a slow one followed by three fast ones. You may have to hang out at the opposite end of the room to avoid these.
Three more purple blobs: low, middle, high. These are easy to clear, as are the next three spiked cannonballs; also low, middle, high. He then shoots them out again; high, middle, low. The high-middle-low group is a little harder to dodge, you'll have to be a little closer at the apex of your jump to clear the high one.
After this, he shoots four more spiked cannon balls. There is a gap between the third and the fourth. He does this again. The first group ascends in height, while the second group descends. One again there is a gap between the third and the fourth in the second group.
After avoiding all of that, you get the barrel. Jump on it. Grab the cannonball. Throw it at K. Rool when he does the vacuum thing. You're done. You'll get the 40th and final DK coin, and Kaptain K. Rool falls into the core. Enjoy your 102% and your real ending!

Subscribe to:
Posts (Atom)