Saturday, June 4, 2022

PrinceWatercress plays Scrapyard Dog (Lynx) - Part 3 of 7


In this stage, we'll be beating up rabbits, entering holes in trees, riding a giant bird and fighting a frog.


Forest 1

Don't fall in the pits; they hurt. Same with the mud pits.

The rabbits hop every so often; using something like the gun works well against them.

If you duck down on some of the tree platforms and the bird nests, you can find power-ups. 

The blue door in the tree is a store that sells time.

The flamethrower is worth $15 and is short range, but packs a punch. Also, you can carry two weapons, and when one weapon runs out of ammo, you'll switch back to the last one you had.

If you jump up to the note, you'll get 2500 points.

Forest 2

Taking the high road will get you past a lot of enemies. 

The bees cannot be defeated, so avoid them at all costs.

There is an organ mini-game in a hole in a tree at the top of the level shortly after the start.

One of the logs on the floor has a hole that leads to a shield store. 

The gremlins just move back and forth. Also, there will sometimes be mushrooms that shoot arrows, albeit at a limited distance.

Press Up at the phone box at the end for 2500 points.

Forest 3

Here, your platforming will be put to the test. There is a time store in the tree at the start, and the second tree platform in the mud pit afterwards has a window mini-game. Land left of the last platform so you don't get hurt.

The log platforms that move back and forth in the air are pretty big, so landing on them is pretty easy.

The ice gun is like the flamethrower, but it freezes enemies temporarily. You can then use the enemies you have frozen like platforms. You can even create a mid-air platform if a projectile doesn't touch anything after a second.

Keep on the lookout for rocks in the lake and jump to them when you see them. Press Down on the note to get 2500 points.

Forest 4

Once again, you'll be flying around, this time on a giant bird. Watch out for the arrows and the enemies, and go through the openings in the tree. Also, you can shoot down the bees here. The chest contains another shield. 

Forest 5

The boss here is a giant frog. You'll want to keep your distance from the frog and it's long, massive tongue as you shoot at it. If it gets too far to the left, go to the upper-right corner and stay there to lure it back so you can give yourself more space. Be ready to shoot early so the frog jumps into your shots.

Once you beat the frog, you'll head to the mountains.

Friday, June 3, 2022

PrinceWatercress plays Scrapyard Dog (Lynx) - Part 2 of 7


The second world of the game takes us to the big city.


City 1

The cats are now black instead of white.

If you jump up to the door near the mailbox at the start and knock, a tiny door appears. If you still have the mini power-up for the junkyard, you can open the door; otherwise, don't even bother.

Much like in the windows mini-game, windows that open and close will knock you downwards.

Watch out for falling jars. White ones will fall when you're to the left of them; green ones that show up later will fall if you're to the right of them. Approach slowly and carefully!

Pressing Up at the payphone near Pat's Pets will net you temporary invincibility.

Jumping straight up at the awning that says "Place" nets you a clock worth 30 seconds.

If you knock on the door at the Fruit Packin Co. and enter it, you'll enter a store that sells shields for $10 each. It's definitely worth taking a few.

The door to the inn takes you to the door store and doesn't take you far at all.

Press Up at the payphone at the end of bonus points.

City 2

There are multiple paths through this city, and if you know where to look, you can get plenty of money in this stage.

The bank doors take you to a piano mini-game (which I accidentally skip despite knowing about). Jumping straight up at the nearby booth nets you $5.

You can buy time in a pipe that leads to a store if you crouch on top of it; I don't go to that store.

You can take a shortcut to the end with the windowsills above Ursula's. If you press Down at the envelope at the end, you can get 2500 bonus points.

City 3

Watch out for snakes. They will crawl towards you unless you can defeat or avoid them.

The opening in the wall contains $5 if you hold Up at it.

Some of the holes in the wall will lead further into the stage if you press Up at them. There's a shortcut from 10th Street to 20th Street at the start, and there's one soon after that which takes you to 30th Street.

For the can mini-game, pay attention to the can with the arrow above it and watch where it goes when you press A. If you can select the right can, you'll get a power-up. You only get one shot at this mini-game, so make it count!

Don't let the water droplets hit you.

Pressing Up at the phone box near the exit nets you 2500 bonus points.

City 4

You'll be flying around on a sphere. It takes a second to get going when you hold a direction, so you'd better be fast when moving around. At least you have infinite ammo with the weapon this things gives you.

Make sure to avoid the pipes as well as the jets of water that come out of some of the pipes. 

City 5

Keep firing shots at the boss and make sure you are never lined up with the cannon in the center. Make sure the middle of your flying machine is lined up with the visor so you can avoid the boss' shots while pulverizing it with your own.

You'll get an extra life and you'll soon head to the forest for the next world.


Thursday, June 2, 2022

PrinceWatercress plays Scrapyard Dog (Lynx) - Part 1 of 7


Here's a system I never thought I'd be playing: Atari Lynx. There's not a lot of games for it, but there are some good ones. Scrapyard Dog is one of them, and it's not all that bad.

At the start of the game, Mr. Big has one of his henchman kidnap Scraps, the dog of the game's protagonist Louie. Mr. Big then leaves a ransom note telling him to come to his lair if he wants Scraps back.

Junkyard 1

This is a "one-hit and you're dead" platformer, so you'll need to be ready to fight enemies. Left and Right let you move around. Down ducks. Up lets you knock on and enter doors. The B button attacks, and the A button jumps. Option 1 and Option 2 let you attack with the can even if you have a weapon.

The can is the default weapon for this game. Louie will throw the can at an arc, and if you keep pressing the Option buttons (or B if you don't have a weapon), the can will disappear when Louie throws it again. You can use this to your advantage.

At the HUD at the top of the display, you have the current amount of time you have left in the stage, the current amount of money you have, the ammo for your current weapon, the current amount of shields that you have and your current score. If you pause the game, you'll see how many lives you have left and you'll also see what level you're on. There are seven worlds in the game, with the first six having five levels and the last one having four.

Moneybags are used to buy things in the shops. Green bags are worth $1, while red ones are worth $5.

The birds fly back and forth and will drop projectiles downwards at an angle, and the mice just move back and forth.

If you leap or move into certain places, you can sometimes find hidden power-ups. I won't be finding all of them in this Let's Play; just some of them. The "No Trespasin" sign has a hidden red money back hidden in it.

The thin gangster dogs duck when you throw a can at them before jumping up into the air. If you keep throwing the can and making it re-appear, you can eventually defeat them. Just make sure to duck so their bullets don't hit you.

The crate near the first gangster dog has a shop where you can buy a gun with ten bullets for $5. To enter it, just stand on the crate and hold Down for a second. Guns fire bullets straight forward, and you can use them to take out the gangster dogs from a distance.

The cranes that move up and down hurt you; try not to touch them.

Ducking on top of the trash bin takes you to a pipe organ mini-game. Much like the hidden power-ups, I won't be playing all of these, especially since some of them can get a tad annoying. Pressing up at the red squares with the yellow P's on them will give you the notes that you need to play. Playing them nets you some money and a clock that gives you thirty seconds, and the notes that you play will rise to the top of the screen. If you pick those notes up, you'll get some bonus points off of them. The rewards get a little better later in the game, and they also get better if you play all the right notes in the proper order that the game gives you on the first try. This is easier said than done, as you will always bounce off the organ keys like a trampoline. You'll need to learn how to hop from one key on the organ to the next without messing up to play these bonus areas like a pro. To exit, go up to the center platform and jump straight up.

If you can somehow get to the note, you can get 2500 bonus points. I usually can't get it. At the end of every level, you'll get a note telling you what to expect next.

Junkyard 2

Jumping straight up on the center of the "Office" sign gives you a red money bag.

The piles of black sludge hurt you; don't run into them. The rolling blue drums also will hurt you; be sure to jump over them.

The moving gangster dog in the black hat and the blue coat will move towards you, and he will jump forwards after ducking if you try to throw a can at him. Duck down and wait for him to get close, then keep chucking the can at him with the Option buttons.

Ducking at the trash bin takes you a store that sells clocks for $10. A clock will give you thirty seconds of extra time.

Leaping around on the clotheslines afterwards can give you a blue firecracker that gives you temporary invincibility. As long as the music is playing, you're invincible, so move across the stage for the next few seconds and make some progress.

You can reach the envelope at the end for 2500 points, assuming you can get to it.

Junkyard 3

You have fences you can walk on to make getting past certain things a little easier.

The cats will dive down at you and move forward if you get too close.

If you can get in the trash bin on the lower level by gently tapping the jump button and keeping your jumps low, you can enter a window mini-game. Get the power-ups that pop out of the open windows and take out the enemies that are moving around. Press and hold Up and the exit door to open it up and exit.

The tire platforms will get you over the gunk. Wait for them to go all the way up before leaping to the next one. Use the last one to get to the envelope for 2500 points.

Junkyard 4

The recycling bins will take you to later points in the level, although you can warp backwards if you choose. Cans and Glass are paired together, as is Tin and Plastic. Paper takes you to another shop where you can buy guns.

The shield turns your jacket from green to red and gives you an extra hit. The more shields you have, the better.

The mini power-up makes you smaller and gives an extra hit, but you can't attack while shrunken down.

The chest at the end gives you a gun for the boss battle in the next level.

Junkyard 5

This is your first boss battle against a dog in a tank. Stay all the way to the left and keep ducking to avoid getting show. Jump and shoot so the fireballs from your gun hit the dog when he pokes his head out of the tank. After five hits, he's down and you'll get an extra life.

When you're fighting a boss, you'll have infinite ammo, and the part of the HUD where your weapon's ammo is will be replaced by a boss health meter with a number showing how many hits you have left.

From here, you'll head to the city.

Wednesday, June 1, 2022

PrinceWatercress plays Sumo Fighter - Part 15 of 15


...and with that, that's Super difficulty cleared and the game beaten!


Super - Stage 5

Stage 5-1

The floating head shows up just before you reach the bonus area. Also, there will be more enemies dropping down from the sky as you climb up the stage

Stage 5-2

There will be a couple of flying fireballs and demon heads through the area, especially where the bonus area is.

Stage 5-3

This stage has no changes between difficulties, so I'm just going to cut and paste here.

This area is pretty straightforward. If you need any power-ups, take the lower path in the fork in the road.

There are two bosses to end this journey. The first is a shogun. If you strike him, he will jump kick at you. To beat him, you'll need to jump over him, get all the way to the other side, then stomp as much as possible as he advances. When he gets close enough, you'll need to jump over him and repeat. When he is beaten, he will leave a full health pick-up.

As for the second boss, wait on the right side (but not too far to the right) and keep pressing B to palm strike. As the boss approaches, keep attacking. When you stun him, keep attacking and you'll bring him down very easily.

After that, that's it! You've beaten the game on all three difficulties! Well done!

Tuesday, May 31, 2022

Ways To Die In Space Quest II (by MrWhitman)


Yep, these videos again. Big brownie points for getting the last two deaths, one of which involves waiting 5 minutes and the other for 40. Play 'em off, MrWhitman!

PrinceWatercress plays Sumo Fighter - Part 14 of 15


The only good thing about this stage is that I only have to play it one more time.


Super - Stage 4

Stage 4-1

The angry white birds start showing up in numbers here. Be careful not to get knocked into the pits on the way to the end. One of the pits even has a guy dropping straight down from the sky as you jump over it. Not fun.

Stage 4-2

Remember that thing I said about leaving the pots near the pits alone so you can make better jumps? You'll be doing it here, especially when you'll have the parasol yokai showing up on the other sides of these jumps. Be sure to scroll the screen as far to the right as you can as you do this.

Stage 4-3

This is where it gets hard.

When you reach a pit with blocks on the left side of it, leave the blocks alone. You'll need them to make longer running jumps. Just like with Stage 4-2, scroll the screen as far to the right as you can so you can spawn the hawks from Stage 1-1 whenever possible. The hawks don't really show up until near the end of the stage, but they can definitely send you plummeting into a pit if you don't see them coming.

To beat the boss, get up to him and hit him. Avoid the rocks that he throws when he jumps into the air and buries himself in the ground. Wait for the dust to kick up under your feet. This will be where he will pop out. Move slightly to the side and hit him so you can do damage when he comes up, then stand still to avoid the first rock and jump up to avoid the second, and land where the boss is burying himself. It will take some practice to get the timing down, but if you can get it down, it makes beating this boss much easier. You'll have to keep doing this until he dies.

Near the end of the boss battle when you have the boss down to about one or two units left, you'll stun the boss instead. Keep palm striking him and he will be done.

Monday, May 30, 2022

Dilandau3000 plays Space Quest II: Vohaul's Revenge - Part 13 of 13


We've beaten Sludge Vohaul and aborted the clone launch, but the asteroid base is about to crash and we need to get off. We make it out in time, but this leads to a sequel tease.


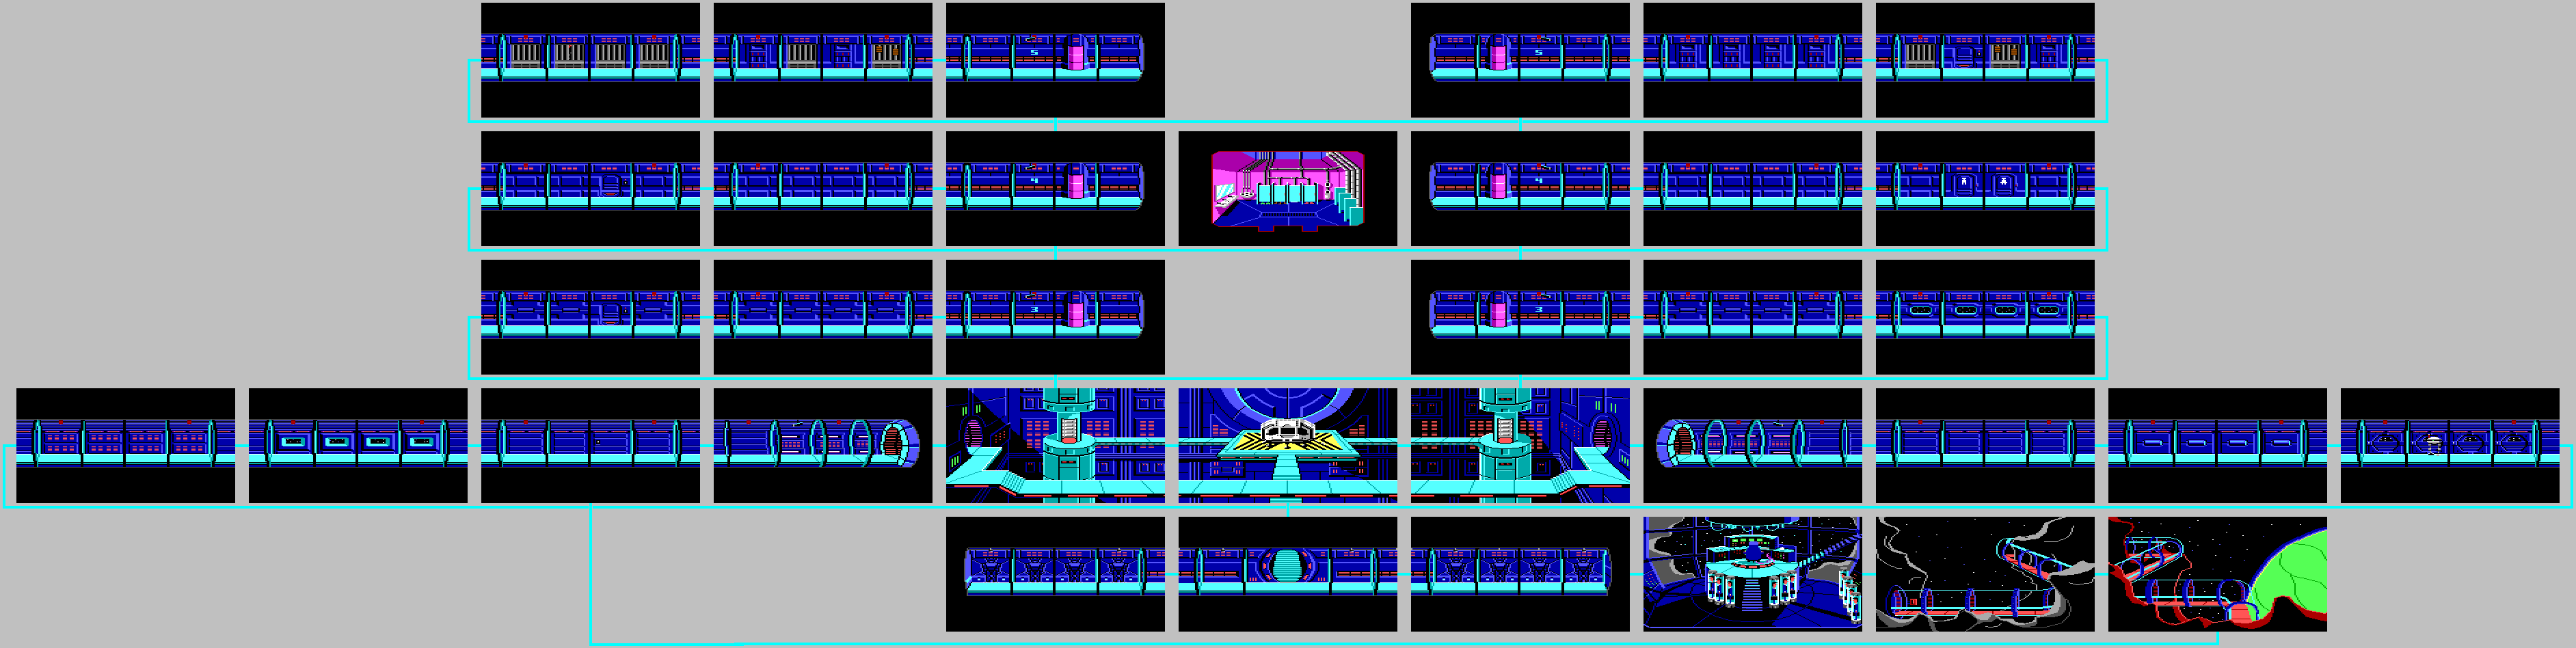
You'll be in one of the hallways. Head west and keep going. You'll come across a ED-209-esque droid. You'll need to push the button on the doors before it comes at you, so type PUSH BUTTON on the blue walls with the orange lines and press Enter at the escape pods. From there, press Enter at one of the white buttons where the droid is (the right-most one will do) and run to the east before the droid catches up to you. Keep going to the east until you go through a flashing tunnel. You'll be back where you landed, and the droid will be gone. Thankfully, the escape pod will be open, and you can go back in there without having to press the button. Just make sure you have ENTER POD pre-typed when you return to that screen so the droid doesn't get you. When you enter the pod, the droid will leave you alone.

Interestingly, there is a 40-minute time limit once you reach this part. If you take more than 40 minutes to get out of here, YOU WILL DIE.

Once you are seated in the escape pod, LOOK PANEL. There will be a clearly marked launch button. PUSH LAUNCH BUTTON. You'll get out of Vohaul's asteroid base, but suddenly, you'll get an oxygen warning, and you'll have about five minutes of oxygen left. If you wait five minutes, YOU WILL DIE. If you WEAR OXYGEN MASK, you'll also find out that the tank is empty.

Look around, and you'll find a sleep chamber . Go up to the right end of the pod and OPEN CHAMBER. ENTER CHAMBER. The sleep chamber will seal automatically to preserve oxygen, and you'll drift aimlessly in space until someone finds you...which blows the door wide open for the third game.

You've just beaten Space Quest II with all 250 points!