After playing through Donkey Kong Country 2, it only made sense to go ahead and play the third game.
All maps by Tropicon.
.gif)
The game starts with Dixie Kong showing up in the Northern Kremisphere, where Donkey Kong and Diddy Kong were last seen as they were off adventuring. She immediately ducks into Wrinkly's Save Cave, the official game saving area for this game. This time around, she is taking up fitness, retired from teaching and playing the brand-new Nintendo 64 (this is 1996, after all)...assuming she is not asleep, of course. She also tells us to find the Banana Birds as she explains the whole purpose of Wrinkly's Save Cave, where you go to save your game.
To the left of Wrinkly's Save Cave in Bazaar's General Store. Here, you can ask a few questions and see what you can buy with Bear Coins, which act as the currency of the game and replace the Banana Coins from the second game. Some of the questions will cost money, and there are two things that you can buy: the seashell, which you can buy almost immediately, and the mirror, which will take some saving to acquire. Bazaar is the first of the thirteen Brothers Bear that you will meet on your quest to rescue Donkey and Diddy, and ultimately reach 103% (which we will be doing, by the way).
To the right of Wrinkly's Save Cave is Funky's Rentals. This is one of the most important places in the entire game, as this is where you go to take a ride on assorted watercraft. You will only start with the Motorboat at the beginning, but as you play through the game, you will find tools that will allow you to repair more powerful watercraft that will allow you to access more of the Northern Kremisphere. This is also where you will be introduced to Kiddy Kong, who immediately shows up and joins you. Unlike the first two games, you start out with both Kongs almost immediately. You'll also re-learn the tag team throw that can be performed with the A button - a move that carries over from the second game - but it works differently this time around: Kiddy can throw Dixie to great height, but Dixie cannot throw Kiddy very far at all due to his size. However, the latter still has its advantages, and Kiddy can be used like a makeshift steel barrel if thrown into a wall and jumped on, and his girth can break weak floors which can lead to secrets.
There won't be a lot of places to go to on the Motorboat. Just use the Control Pad to move around. The main area you will will be to the west (as a matter of fact, it's the only area), and you won't be able to move past the rocks. North of the path leading into the first two worlds is a beach, and if you press A on it to get off, you'll uncover a cave. This is Bounty Beach, and it is the first of fifteen caves that you will find throughout the game.
When you enter the cave, you'll hear a tune played on the crystals. These crystals have a corresponding button on the Super NES controller that you have to press, and if you make a mistake, you'll have to re-enter the cave and try again with a different randomly-generated pattern. If you successfully mirror the pattern, you'll get one of those Banana Birds that Wrinkly Kong was talking about earlier. The patterns will start off short and easy when you begin the game, but as you go through more caves, the patterns become longer and more complex.
Once you're done with Bounty Beach, there is no other place to go but to the path on the right. Press A to park near the path once you're in front of it, and you'll head to Lake Orangatanga, the first world of the game. Press A to go in.
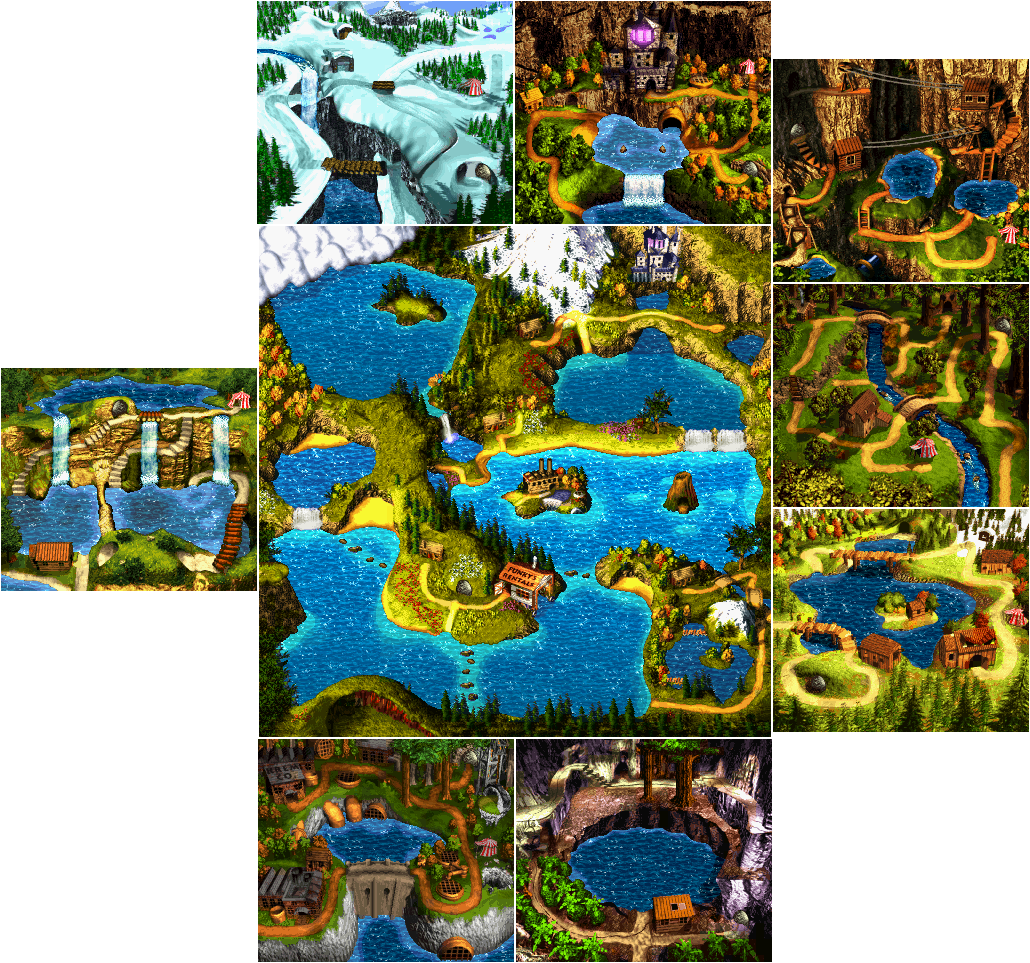
Lake Orangatanga
.gif)
Unlike the other two games in the series, you can leave from where you entered the world to back out and head to the overworld. This is really nice, especially if you have yet to get to Wrinkly's Save Cave in the current world and desperately need to save your progress.
There's only one place you'll be able to go, and that is Lakeside Limbo, the first regular stage of the game. Press A to go in.
Lakeside Limbo
Bonus areas: Two (2)
The control is the same as the last two games: Left and Right on the Control Pad let you move around, and Down lets you duck. B lets you jump, Y is used for running as well as holding and throwing barrels, and A is used for the tag throw, which was described earlier.
Use Kiddy to toss Dixie onto the roofs of the boardwalk to get some free hidden 1-Ups. Shortly after the beginning of the stage, you'll find the letter K. The Kong Letters - K, O, N and G - make a return appearance here, and as always, they give you an extra life when you find all four in a stage.
Shortly after the K, you can have Kiddy toss Dixie up into the air to the left to enter a Warp Barrel. Once again, the Warp Barrels are here to warp us through the stages of the first two worlds of the game. Just jump onto the platform after the K, walk to the edge, press A while playing with Kiddy while Dixie is with you, then jump off the edge and hold Up and Left before pressing Y to throw Dixie into that direction and into the Warp Barrel. You'll warp to the end of the stage.
The first two enemies you will meet will be the Sneeks (a more ragged-looking relation of the Neeks from the second game) and the Kobbles, who are the basic foot soldiers who amble back and forth.
When you meet the first Kobble, you will see a crack in the floor as well as the letter "A" made out of bananas. Just like the last two games, collecting 10 bananas will give you an extra life. Also, if you switch to Dixie and throw Kiddy onto the crack by holding Up and towards the crack before you throw, you can break the crack with Kiddy and enter the very first bonus area of the game. The "Collect The Stars" mini-game is back, and all you have to do here is switch to Dixie and collect all the stars with the Helicopter Spin and collect the Bonus Coin before time runs out. Once again, press and hold Y while in the air as Dixie, and use the Control Pad as you float downwards to move around. This one is not too hard, but later ones will be.
When you come back from the first bonus stage, you'll meet Koin, a green Kremling with a shield in his hands and a bucket on his head who will always be looking at you. You'll also see a steel keg nearby. Hitting him on the top of his head or from the front will do absolutely nothing, so you'll want to jump up, throw the barrel over him and keep him looking at you so that the barrel hits him in the back. By beating Koin, who appears once in every stage, you'll be able to get the DK Coin. These things are back, and you'll have to collect all of these things to find everything in the game.
There are two Bear Coins and a hidden 1-Up on the roof before the Star Barrel. Once again, the Star Barrel acts as a continue point. If you die after hitting it and come back to the level, you'll start back there instead of the beginning of the level.
If you roll off the edge towards water with Kiddy with the Y button, keep holding Y and the direction you want to go and press B as soon as you are about to hit the water. You can do this up to two times before you finally drop into the water. This is the Water Skip, and only Kiddy can do this. It will only prove slightly useful here (assuming you know how to do it and get the timing right), but it will come into play later.
If you ever drop into the water, just press B to keep ascending when necessary and hold Y to move faster. Left and Right still let you move, of course, and Up and Down quickens and slows down your ascent in water, respectively.
To get to the second bonus area, drop down in the gap between platforms where the N is. Swim to the right and you will find the Bonus Barrel. If you go all the way to the right before entering the Bonus Barrel, you will find a hidden 2-Up. Here, you will be grabbing 15 bananas that pop up in random locations before the timer runs out. The bananas won't be in the same place forever, and if one starts flashing, you'll have to grab it or else you will have to wait for another one to show up. When you collect enough bananas, the Bonus Coin will pop up, ready to be collected. Once again, this first one is simple, but later ones won't be!
Ellie the Elephant is in the box with the picture of the elephant on it. Break the box by jumping on it, then jump on Ellie to ride her. If you are near a barrel, stop moving and hold Y while facing the barrel so that Ellie can use her trunk to drag the barrel towards her until she picks it up with her trunk. If you let go of Y, you will throw the barrel straight forward. Jump up and release the button to send the barrel into the Booty Bird, who will be hiding the G. Booty Birds will be hiding treasures, so keep a look out.
The "No Elephant" sign makes it so that Ellie cannot go to the goal, but if you take her to the sign, you will be able to get a Bear Coin for your efforts.
If you tag throw up and left with Kiddy to the left of the sign, you can find a hidden 3-Up. Red balloons are worth one extra life, green ones are worth two and blue ones are worth three.
Grab the rope on the flagpole to clear the level. A pink flag means Dixie grabbed the rope, while a blue one means that Kiddy grabbed it. If the flag is limp, it means you did not find all the bonus areas in the stage; if it is fully furled out, you did. You can also use this legend to see if you have found everything in a stage on the overworld map. (You can also look at the stage name and look for an exclamation point If you collected the DK coin, you will see a yellow pennant flag for that stage in the overworld map.
If you explore around the end of stage flag post, you'll find a Bear Coin and two Banana Bunches. Banana Bunches are worth 10 bananas each.
Doorstop Dash
Bonus areas: Two (2)
Jump into the blue handle to grab it and open the nearby door. When you jump off the handle, the door will slowly start to close, but if you run, you'll be able to run under it to get to where you need to go. Once you're on the other side, there is usually no way to go back, so be careful.
The Warp Barrel is above the wooden platform just before the O. Use Kiddy to throw Dixie up there to reach it.
The green bees with the buzzsaws that you will see to the left of the first rope are Buzzes, and they replace the Zingers from the first two games. The green ones can be destroyed with regular Barrels, while the red ones (which you'll meet later) are only vulnerable to the explosions from TNT Barrels. If you keep going left, you'll find a handle. Toss Kiddy into it with Dixie, then use Dixie's Helicopter Spin to get to the other side, get a 1-Up and find the first bonus area. Here, you'll be collecting more stars. This time around, a handle-powered door will come into play. You'll have to grab it and race under the door to find all the stars and get the Bonus Coin.
You'll have to jump into a Barrel Cannon to get onto one of the handles. Jump in, and when it spins around, press B when it is aimed upwards toward the handle to grab it.
There is a hidden 1-Up to the right of the second rope. When you open the door to the right at the top, you'll get another bonus area. Use Dixie's Helicopter Spin to grab onto the handles and avoid the Buzzes to get the second Bonus Coin.
The doors on the floor will take you back to lower levels if you jump onto them with Kiddy.
If you go left on the first drop after the G, you'll find Koin. Grab the handle, then quickly scoop up the steel keg, throw it through the open doorway and wait. You'll hit Koin in the back for the second DK Coin.
If you know what you're doing (or using the Helicopter Spin), you can collect a 2-Up on the second drop.
Now that you're able to go into the water on the overworld, move towards it and use the Control Pad to guide yourself to the sandy beach to the north of the northern bridge. Press A, and you will enter Smuggler's Cove. Complete the pattern and you can get another Banana Bird.
You can also check out Barnacle's Island, where you can meet Barnacle Bear. He has a Banana Bird in a cage, but he also has a shell collection. He thinks there is no way to take the Banana Bird off his hands, but at this point, you'll have more than five Bear Coins. Leave Lake Orangatanga, head back to Funky's Rentals and head back to Bazaar's General Store to buy the shell for five coins. The first option that let you buy the shell will be a question asking "Who owns the castle?" The information is useless, but you'll learn about some castle grounds that you will be seeing later in the game. Take the shell back to Barnacle's Island and hand the shell over to Barnacle Bear to get your third Banana Bird.
Now that this is over with, you can save your game with Wrinkly's Save Cave if you wish. Any Banana Birds that you have collected will hang out here once they've been rescued.
Tidal Trouble
Bonus areas: Two (2)
Have Kiddy throw Dixie onto the roof at the start to get the steel keg, and throw it over Koin and into his back to get the DK Coin at the very start.
Unlike Lakeside Limbo, the water below moves faster and has a powerful current that pushes you to the left. This can work against you if you are not careful. The Water Skip will work wonders here.
The clown fish are named Coco. The green Cocos are stationary, but the red ones move around.
The green barrel enemy is Knocka. He can't hurt you, but he can knock you back. Jump on him once, and you'll be able to use him like a normal barrel and throw him into enemies or walls to get rid of him.
The platform before the Knocka leads to the Warp Barrel. Throw Dixie up and left without jumping to reach it.
Going left after the O sends you into an Enguarde Barrel that changes you into Enguarde. He controls much like he did in the first two games: the Control Pad moves you around, Y lets you stab enemies, and holding A for a second or two allows you to do the supercharge that lets you power through enemies and move at high speed. You'll need him to get past the two green Cocos and enter the first bonus area. Collect the stars, and stab the Lurchin in the center when he fully opens up to defeat him. You'll get the first Bonus Coin in no time. You'll go back to being Kongs after you leave.
The bugs that lead you to the N are called Knik-Knaks. Use them as stepping stones to get to the platform, where you can jump on Knocka and send him into the Booty Bird for the N.
From here, you can use Kiddy's Water Skip or Helicopter Spin with a running jump off the right edge with Dixie to reach the second Bonus Barrel. Here, you will have to defeat all the Knik-Knaks by jumping on them from above. If you leap into them from the sides or from below, you'll be booted back out and you'll have to enter the Bonus Barrel again. Beat the first return of the "Destroy Them All" mini-game - now called "Bash The Baddies!" here - to get another Bonus Coin.
The broken floor near the goal hides a 1-Up and a Barrel Cannon that automatically shoots you up towards the end of stage flag.
No comments:
Post a Comment