X is back! This time around, Sigma has come back with more followers...and he has a few new tricks up his sleeve! Are you ready?
Intro Stage
The first thing you'll be doing as soon as you start playing is shooting at a robot that just stands there as soon as you're shot off of your bike. Usually there's nothing near you, so it's an interesting change of pace to be thrown into the heat of battle (albeit with one enemy) as soon as the game starts. Just jump over the small metal balls he shoots at you as you take him out.
The screwdriver robots just jump around.
The wall robots will block your path. Unless you dash past them, you'll have to shoot them down after they lower. You can dash by either double-tapping forwards on the D-Pad or pressing A. Unlike the first game, you can now do this at the start of the game instead of having to earn it this time around, which also holds true in future games in the series.
Be sure to avoid the enemies inside the "doors" of the assembly line. You'll be able to destroy them after they're fully assembled.
Use the claw to get over the electrified junk pit. To do that, just let it latch on to you, and jump when you reach the other end. Thankfully, the electrified junk pit does not instantly kill you.
The purple flying robot with the extendable arms will try to crush you with the walls. Thankfully, it's pretty easy to get past it. It flies away when the walls below it crush into each other.
You'll soon face a giant purple robot with its own health meter. Yep, we got a boss. Avoid the spiked balls it has for fists and shoot at its head with fully-charged X-Buster shots. It'll go down in no time!
After beating this robot, three men named Violen, Serges and Agile watch Mega Man X from the shadows in an undisclosed location. The Mavericks will hopefully keep X busy for them to prepare to take down X themselves...
You'll then see the password screen. Unlike last time, you have four rows of numbers instead of three, which would also occur in the third game. I guess there's much more to see, do and keep track of in this game.
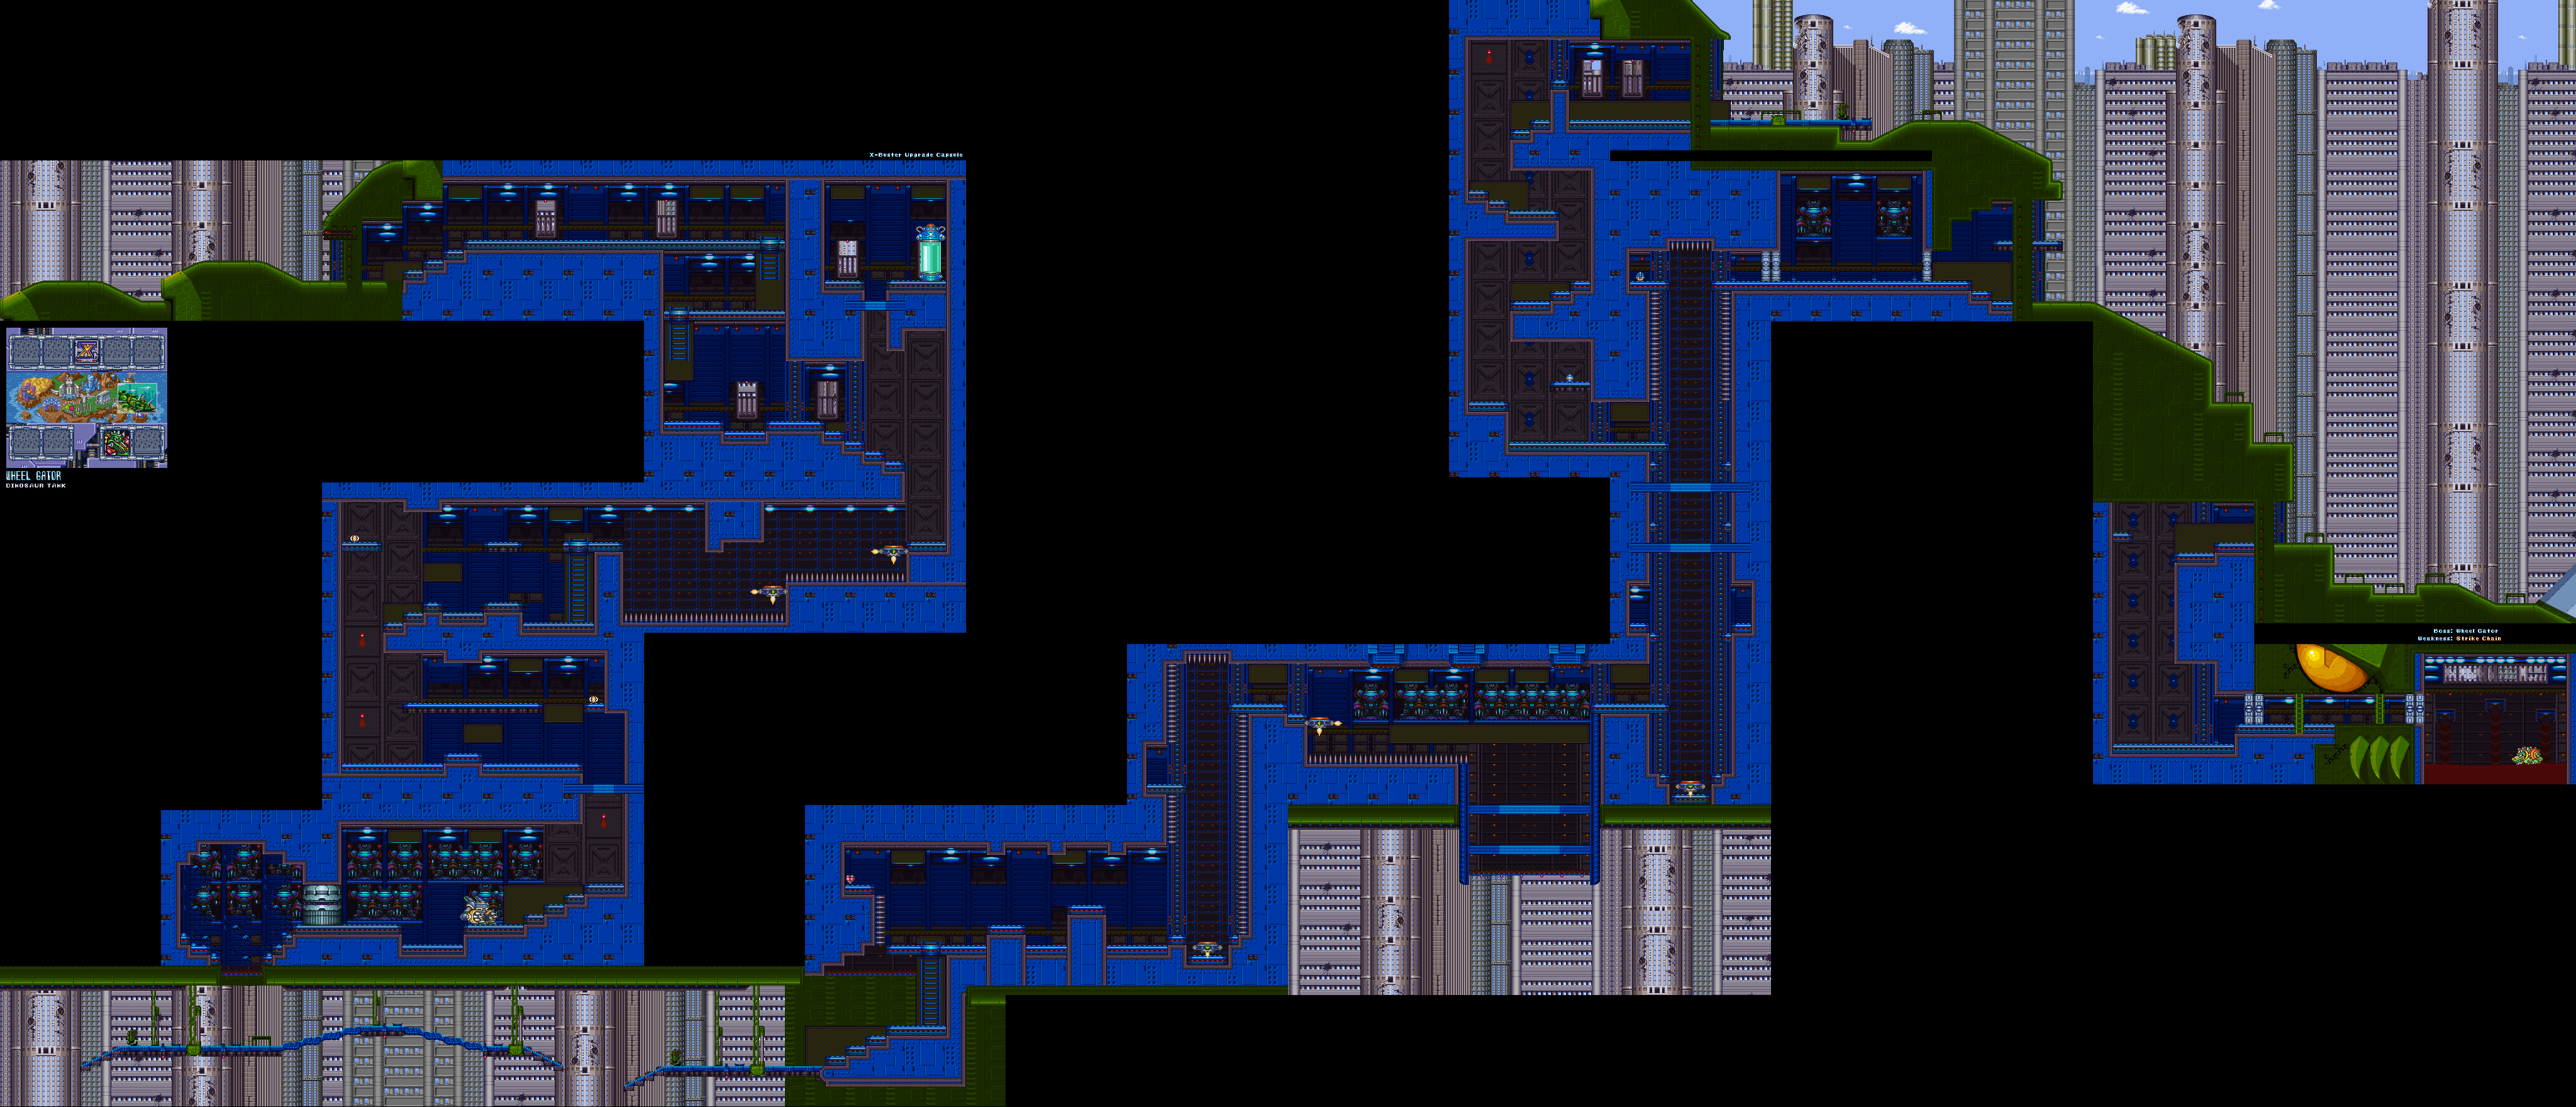
Wheel Gator
Well, you have eight Mavericks to choose from again. Compared to the first game, the stage select screen in this one is a lot more streamlined, and the third game would do something like this. This one looks better, though, because of the static effect on the Maverick's pictures.
Wheel Gator's stage not only has interesting music (it was later made into a YouTube Poop meme by YaminamoAlex), but it also has one of the more interesting locales of the game: a moving dinosaur tank that travels throughout the city. This time, Super Nintendo does what Nintendon't.
The first thing you'll notice as soon as you go right is a door at your feet that keeps spawning bird robots. Shoot at the door with fully charged X-Buster shots, and let the birds fly above you. They'll just keep going forward, and you'll be able to stop them from spawning.
The yellow triceratops robots are easy to kill off.
The platforms you see soon after this have little green arrows in the center that show which direction it's going.
To take out the robots with the shields, hit them will a fully charged X-Buster shot to knock the shields into the air for a second or two, then fire away from there while they're still vulnerable. If the shield comes back to them, charge up again and continue the assault. Just watch out for the spiky boomerangs that they throw at you.
The Robot Ride armor is back. Not only does it have spikes for fists, but it can also hover in the air for a brief time if you press and hold the B button in the middle of your jump. Like last time, you can also dash by double-tapping forward on the Control Pad. If you hold the Y button, you can do a charge punch after letting it go after a sec.
You'll see a Heart Tank after you have to get off the Robot Ride armor and climb up, but you won't be able to get it quite yet. The Heart Tanks increase your maximum health by a few notches. Collect all eight for maximum health.
You'll then come across a few elevators that go up. As you go up this giant dinosaur tank, you'll have to contend with the shield guys again.
If you keep riding the second one up past the spiked walls, you'll be able to get an extra life. There is a door to the right, and you can skip part of the level with it.
When you make it back outside on the dinosaur tank, keep an eye on the ground. You'll have to go left - back into the dinosaur tank - in order to make your way to Wheel Gator. If you go right, you can find some hidden health where the big gray spike is. Just jump on the "stairs" that make up the gray spikes to find it all.
Wheel Gator is in a room full of some weird, maroon-colored liquid. Avoid standing in this while Gator is swimming around in it, as he can get you and put you in some sort of vice grip from the deep in order to slowly drain your health. That attack doesn't happen until the wheel makes a second pass around the room, and if you're at the top of the room, he'll jump straight up out of the water, but won't be able to reach you.
You'll want to avoid the buzzsaw that is Wheel Gator's Spike Wheel as it travels across the walls and ceilings of the room. Just say near the ceiling and use your dash jump, and get back up the wall with your wall jump after you dodge it. To dash jump off the wall, press A and B at the same time while also pressing the Control Pad away from the wall.
Wheel Gator will eventually pop out. If you have the Strike Chain from the Wire Sponge stage, use it on him. Otherwise, shoot at him with the X-Buster. Sometimes he'll shoot some more spiked wheels out of his shoulder blades, which you can easily avoid if you watch where they bounce, but he'll usually go back underwater. If he does the former, this is your chance to get some free hits in with charged-up X-Buster shots as you dodge the wheels. He may also spit projectiles out of his mouth; these can be easily avoided.
He also has another attack that he can do. If Wheel Gator leaps up into the air and he looks like he's lying flat on his stomach when he does so, he's about to spin into the wall. Back off when he jumps up and go up the wall to avoid this attack.
It'll take a little bit of work, but Wheel Gator is still the easiest to defeat with the X-Buster. Beating Wheel Gator awards you with the Spin Wheel, which works much like Wheel Gator's own version of the wheel attack but is much smaller and doesn't stay on screen as long. When charged up, it goes in eight directions.
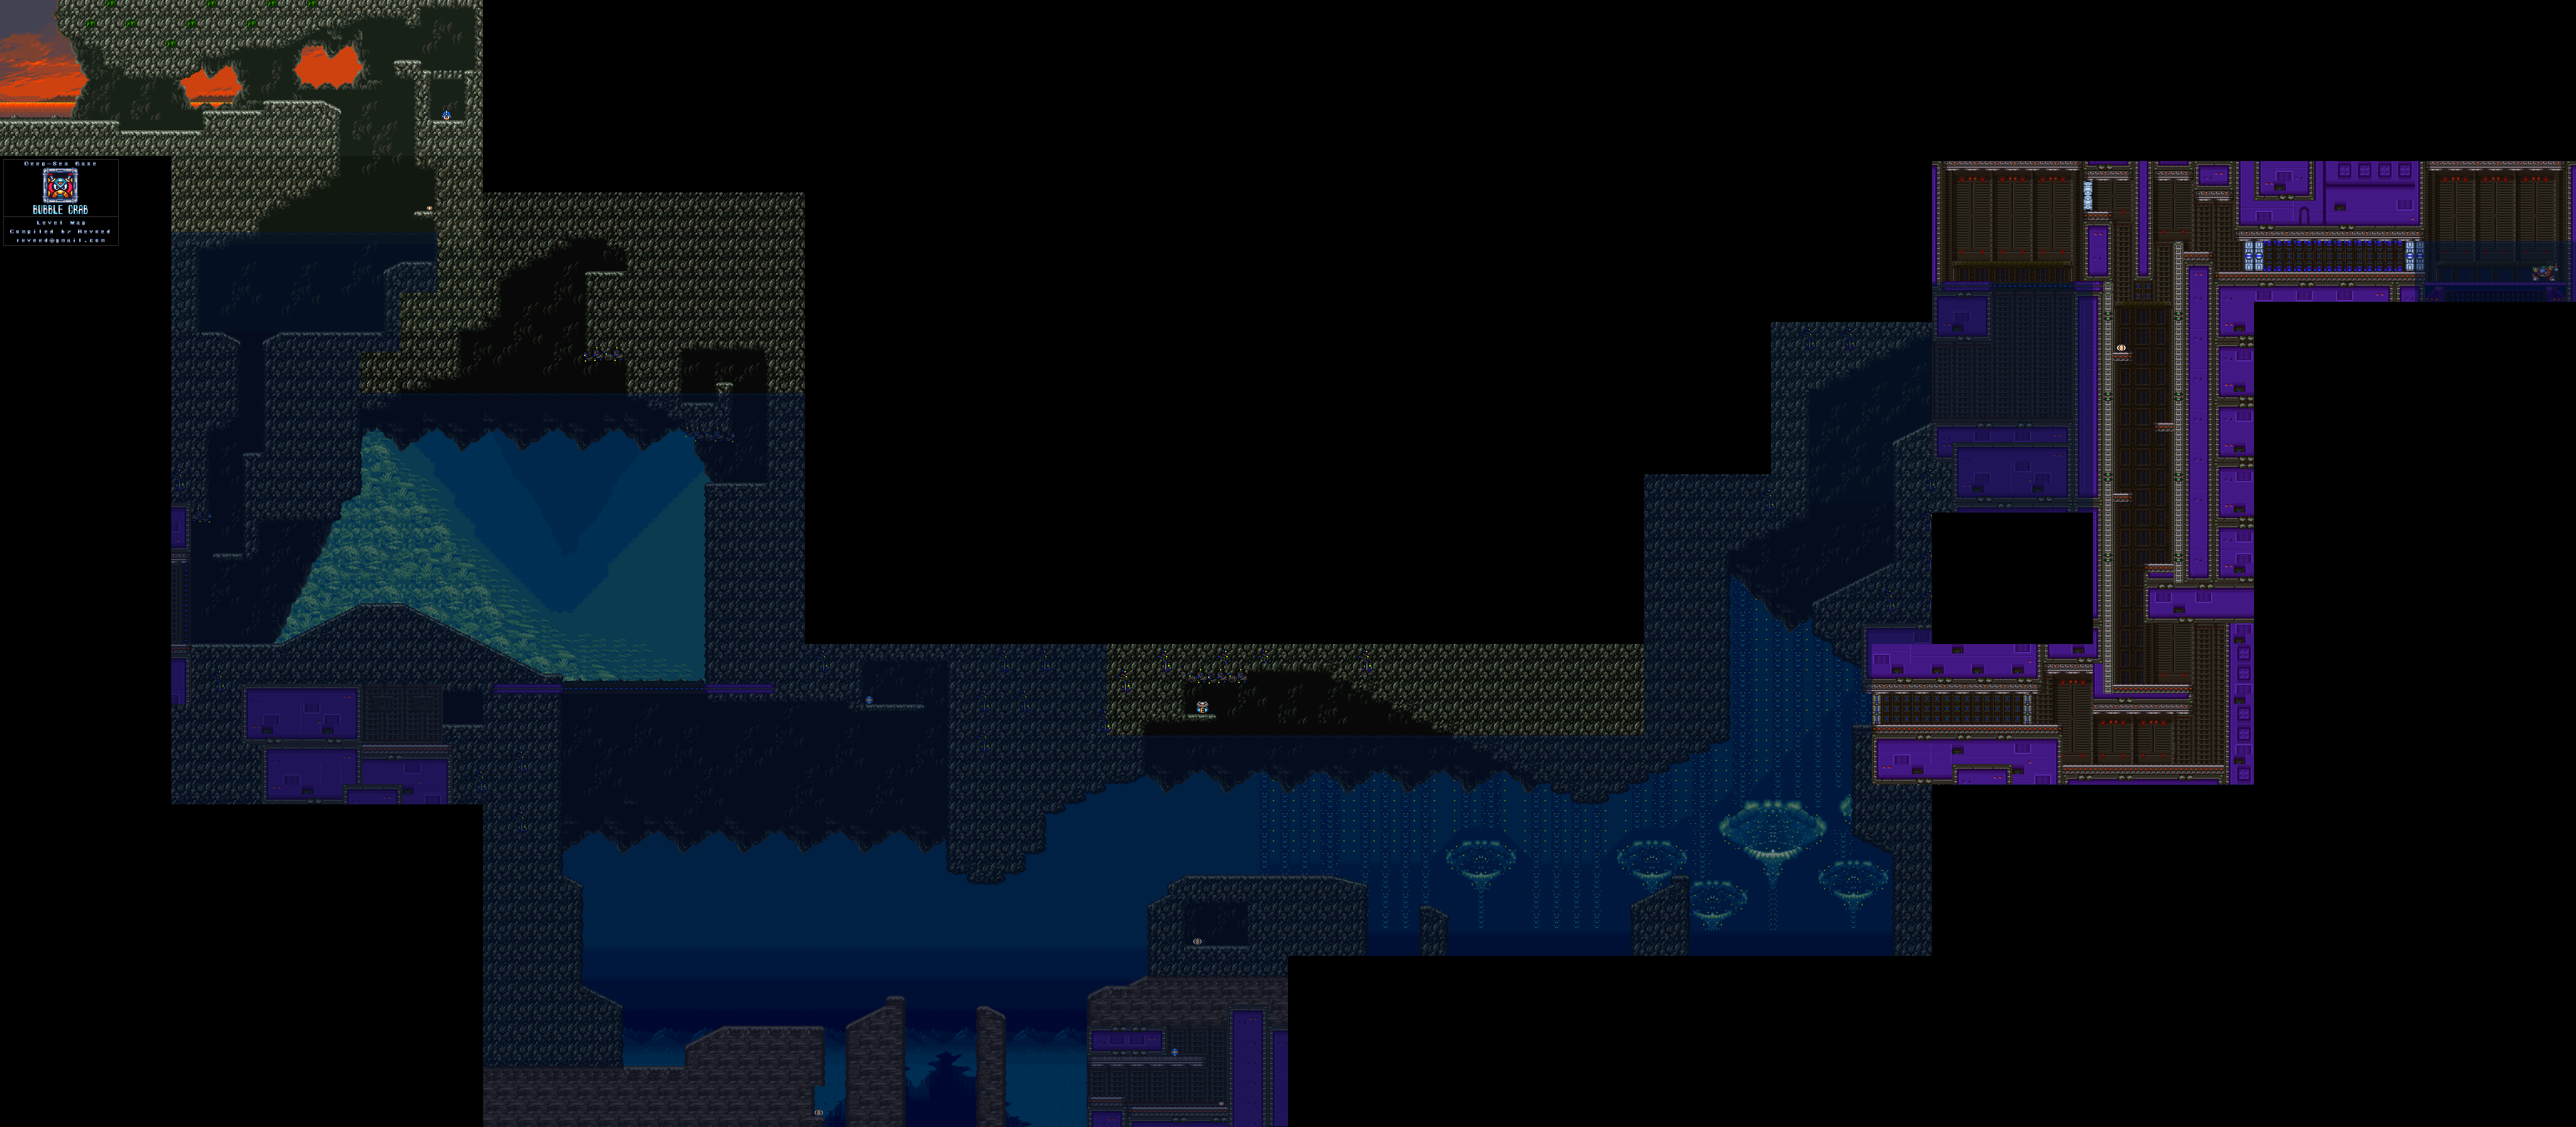
Bubble Crab
You can use the Spin Wheel to the right of the start to get a free 1-Up.
The bats from Armored Armadillo's stage in the first game are back, and they just fly at you like before. The fish you see as soon as you go underwater just swim back and forth and are just as easy to destroy.
Take out the fish tank with the Sonic Slicer, and destroy the radar light at the bottom first so that you don't get hit by a laser. Take the rest of the tank out afterward as you follow it around. Along the way you'll also meet up with jellyfish robots and columns that look like missiles.
There are some hidden passages near the bottomless pits that take you to hidden power-ups.
The jellyfish have a close range shock attack.
The column platforms can be used like a wall for some wall jumps, but you can also stand on the top of them to get to where you need to go, too.
You'll eventually go through a passage deep in the water, and the water will eventually drain from the area. Watch out for the wall robots with the three-way shots.
You'll soon meet Bubble Crab. Bubble Crab will cause the water level in the room to rise and lower every so often, making it harder to jump over him at times. Use the Spin Wheel to break through the bubble he encases himself in (and uses his main Bubble Splash weapon) and cause some major damage. Bubble Crab jumps around a lot for his attacks, but it's easy to anticipate where he'll land. Always use a dashing jump to jump over Bubble Crab.
Sometimes Bubble Crab will shoot two crabs inside of bubbles to the surface. If they're left alone long enough, they'll suddenly pop out of the bubbles and fly right at you. It takes a while for that to happen, though, so keep an eye on them if you can't shoot them down.
Beating Bubble Crab will give you the Bubble Splash. It lets you shoot bubbles that go upwards, and the colors on them are rather excellent. Powering it up lets you jump higher in water.
When you beat two Robot Masters, Agile, Serges and Violen start taking Mega Man X a little more seriously. Meanwhile, a mysterious group known as the X-Hunters have contacted the Maverick Hunters...and they are none other than Serges, Violen and Agile. They have Zero's body, albeit in three separated pieces. To get Zero's parts back, X must defeat them.
Pay attention to the map screen, as you'll see where the X-Hunters will teleport to. Then choose where one of them landed to fight them. The X-Hunters show up in random locations, so I'll cover them when we see them in the LP. If you kill off too many of the Mavericks, however, the remaning X-Hunters will flee. If that happens, you won't be able to rebuild Zero.
Thankfully, you can tell where they've landed by the Sigma symbols that show up at where the X-Hunters have moved to. Just position the red dot above them and you can track them down.
No comments:
Post a Comment