..and now, the whole game in one video minus commentary. Enjoy.
Remember Widget? You probably don't, but it was one of those children's television shows from the early 1990s in America where the order of the day was saving the environment and telling the kids to do the same, much like with Captain Planet. Just like with the television show, you'll be saving the environment in five stages, and while the game is rather short, you will be backtracking to get more health and magic.
Stage 1: Mega Slank
When you start the screen, you'll go straight to the map screen. While there's a map, only the first stage is available until you complete it; when you do, other stages open up.
When you start the stage, the high elders will task Widget with protecting Earth and give him his first assignment. In the first stage, Mega Slank form the planet Titanium is hypnotizing and forcing innocent people to do his dirty work, and Widget is tasked with investigating what is going on.
Left and Right move left and right, and Down ducks. A jumps, B fires the gun, and Up in conjunction with B fires upwards at a slight angle, which allows you to hit things that are flying.
At the bottom, you have your Life and Magic Points. Losing all your life causes you to lose a life and go back to a certain point depending on how far you've gone. Magic Points are used for your transformations, and the only one you have is the cannon form, which uses 2 MP. You'll get more forms as you beat stages. To the right of that are the two gauges for your gun: top for speed, and bottom for strength. By filling these gauges, the gun's bullets get faster and more powerful. That is followed by your current amount of lives, your current score, and the amount of time you have left.
To use forms, you'll need to press Select, then press A on the form you want to transform into. Pressing B lets you stay as/turn back to normal Widget. Cannon Widget can jump straight up, aim up and down with the Control Pad and shoot with the B button, but I end up never using it.
The green enemies with the four arms will advance when you attack it, but they go down in a few hits. In this game, enemies do not have invincibility frames, and because of this, you can wail on them endlessly until they die if you're in close.
The crocodiles will fire arrows at your current position, and you'll need to avoid those bullets while returning fire yourself.
There is a green star below you at the bottom. It allows you to power up the strength of your gun, but you'll need the Mouse Widget form in order to get it, and you'll need to beat Stage 1 in order to get it.
The mosquitos go down in a few hits, and aiming upwards makes taking them down easier. The worms take a few shots to take down.
When you reach the end of the first section, you'll need to jump into the pipe to get further. The ghosts that move back and forth go down in a few hits. Also, you can find coins. Small coins are worth 500 points, while the big ones are worth 1000. You won't find them very much.
To get past the crocodiles between the bottomless pits, you'll need to jump the pits and then immediately move towards them. When you get hit in this game, you'll have Castlevania-style knockback, and if you get hit too close to the pits, you're falling in, losing a life and going back a bit.
Sometimes enemies will drop things like coins, hearts and orbs. Hearts will refill a few hit points, while orbs refill a few magic points.
The blue circle icon refills your MP.
To climb ladders, just get above or below them and hold Up and/or down when necessary.
The burger enemies take a few hits to defeat. Be sure to keep firing to take them down as quickly as possible. To get the red star in the first section, there is a fake wall you can go through, and the fake wall segments can be identified if you look closely enough (in this case, the left parts are darker and not dithered). The red star increases your health by two units.
The green gun speeds up the shots from your gun. You'll find these more often than the green stars, of which there are only two in the game.
To get the blue star across the pit, you'll need the Bird Man form, which you get for beating Stage 3. The blue star increases your MP by two units.
In the last section, watch out near the ends of the conveyor belts that move you around for flying mosquitos. You can also find a gun icon here as well as another red star. Thankfully, enemies do not re-spawn when you defeat them, so you can clear them out ahead of time and take care of stuff where necessary.
The boss here is Mega Slank. To beat him, avoid him as he runs, fires and moves around. If you can get close to him and repeatedly fire at him, you can destroy him. As for the blue star here, you'll also need the Bird-Man form to get it.
When you beat Mega Slank, the people that he hypnotized will return to normal. You'll also get the Mouse Widget form, which you can use to get through narrow passages, move quickly, jump very far and find secrets at the cost of 3 MP.
If you press Select and select Mega-Brain, you can see the map for the current section you are in and your current position, you can get advice on certain things, and you can also use the "Escape" function to leave the stage and get back to the map screen regardless of whether you have beaten the stage or not.
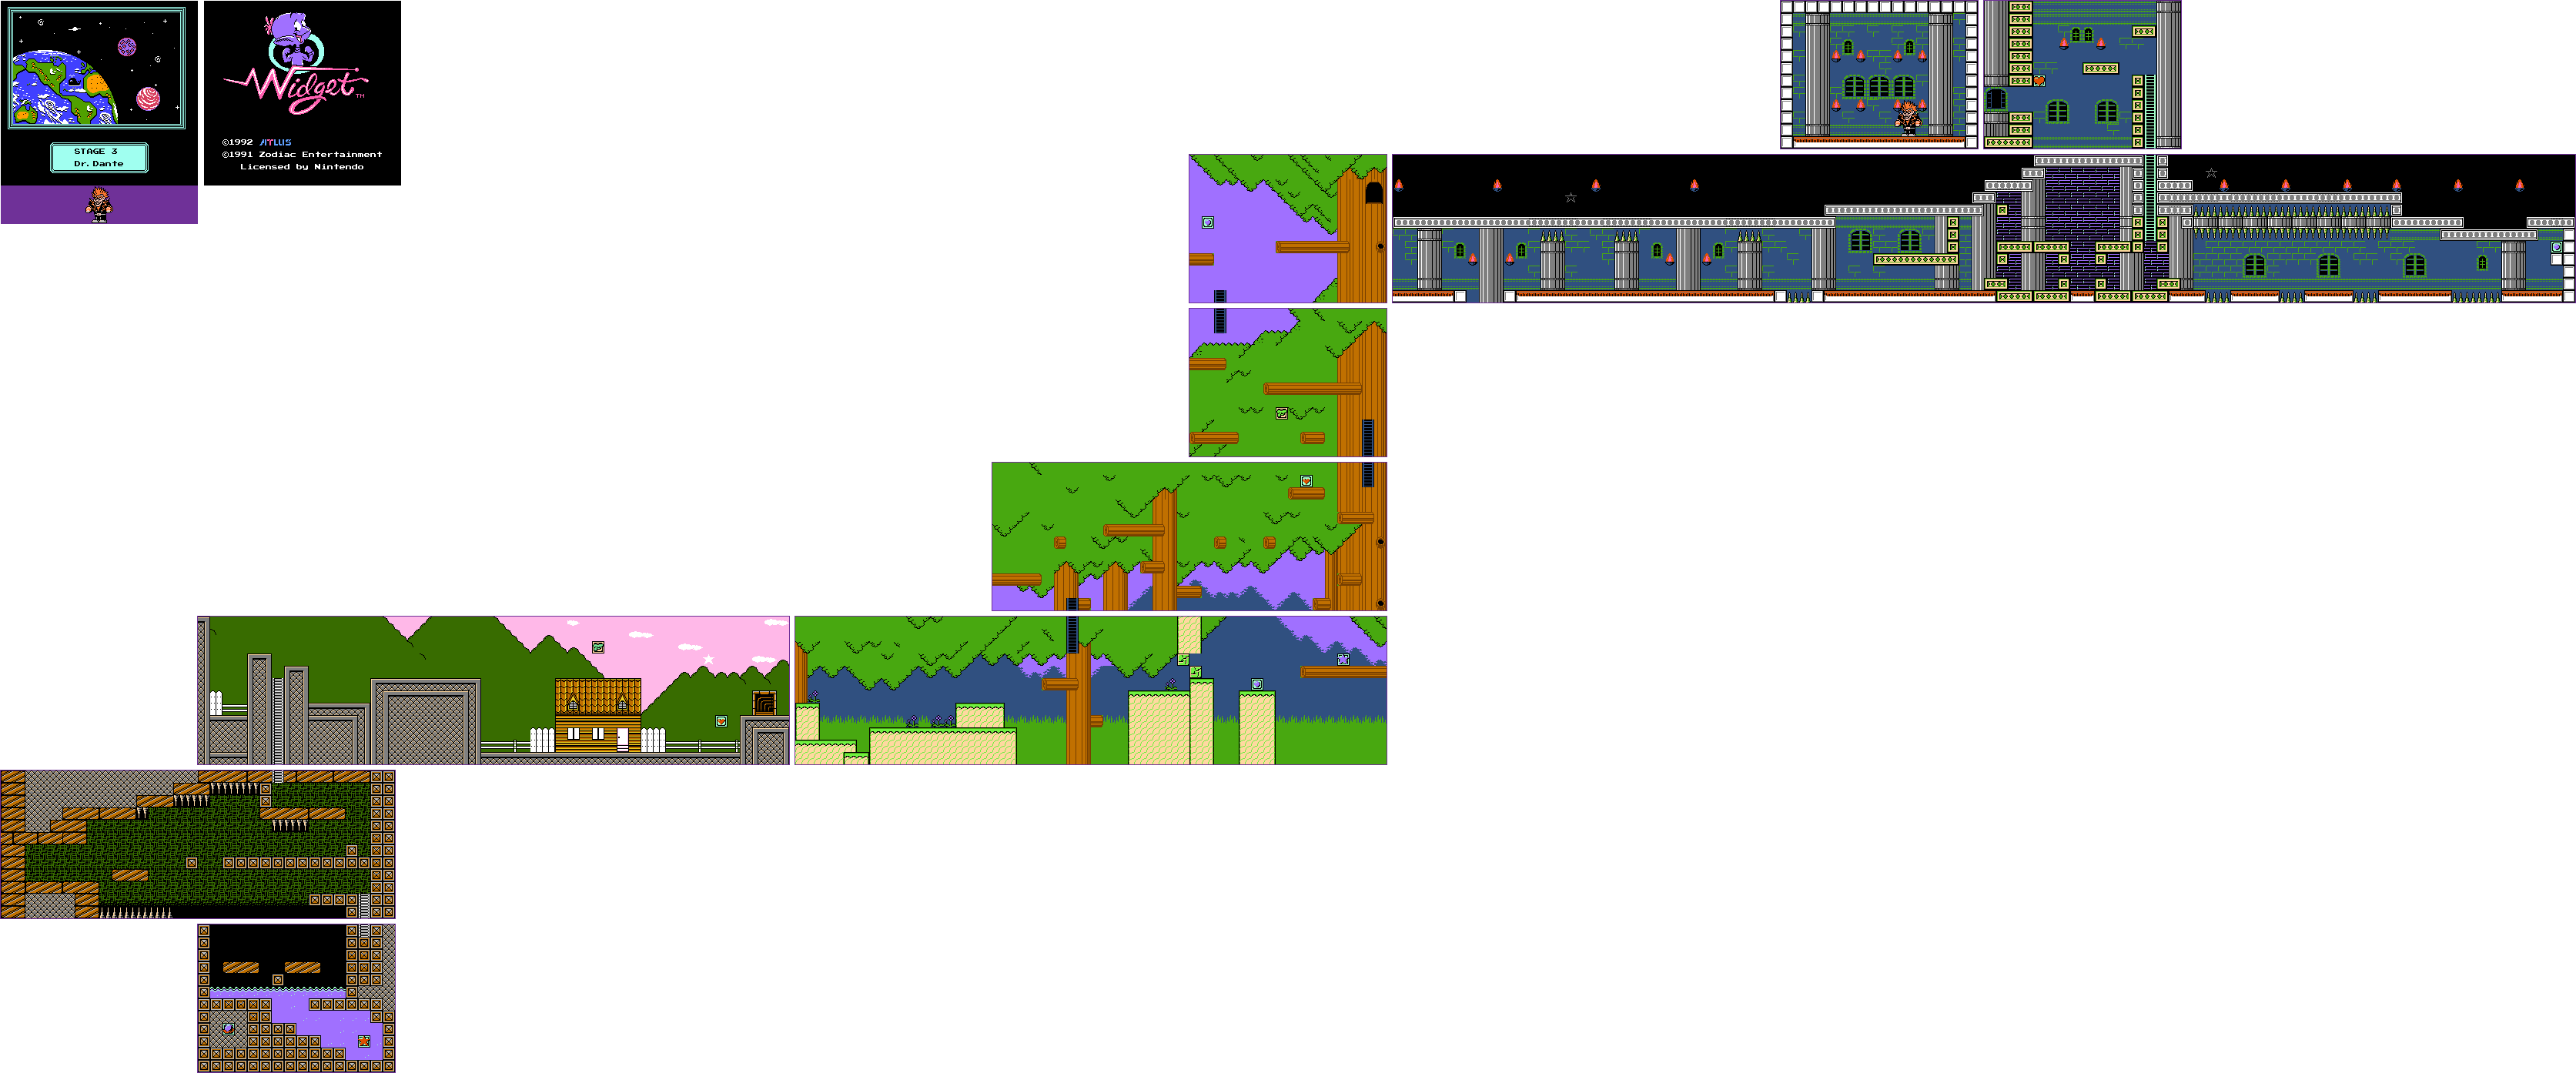
Stage 3: Dr. Dante
Believe it or not, you need to head here first and beat Dr. Dante to get something you'll need for Stage 2. Dr. Dante is stealing Earth's precious minerals and selling them to aliens from other planets and galaxies for crude, inflated profits to the point that it will put the planet into a crisis. Not surprisingly, Widget has to stop him.
When you enter this area, be ready to destroy the snake as quickly as possible, as the snake has bullets that track much like the gators'. Jump the gap with the low spiked ceiling by gently tapping the A button so you make a low hop as you go right. The bats will fly up and down as they approach.
There is a ladder below, and there is a fake wall to the right that allows you to get to it. You can get to the crystal ball that acts as a full MP refill, but you'll need the Dolphin Widget form from Stage 4 to get to the red star to increase health, as you'll drown and slowly lose health otherwise.
When you climb up above ground, don't go to the left unless you have the Bird-Man form, or else you'll have to use Mega-Brain to escape and start all over. The white enemies will bounce forward, bounce up, bounce back, bounce up and repeat until they are destroyed. The Bird-Man form is used to get the gun speed pick-up above the house. The house reminds me of Wacky Races for some reason.
You'll then enter a forest, which also reminds me of Wacky Races. The apples bounce back and forth when they drop, and they also have a weird stretching effect when they do. They go down after a few bullets. There is a ladder after where you first start in the forest, but further to the right are some cracked tiles. You'll need to use the Rock-Man Widget form from Stage 2 to break the tiles. Beyond the tiles is a blue star that extends your MP.
After climbing your way up the trees (where you'll find another gun speed power-up if you're willing to get it with the Mouse form) and using the fast, lengthy leap of the Mouse form to reach the final door of the forest, you'll enter a castle. The knights will slowly approach, but if you shoot them, they speed up. Be ready to mash the B button to take them out before they can hit you, although you may take a hit. Use the Mouse form to get through the tight spaces and get to the ladder leading up. The gray snakes are just like the green ones you saw earlier in the stage, so get rid of them. Past that ladder is a small orb that refills a few MP.
When you go up the ladder, stay on the ladder so that the big white enemy jumps around and into the wall, then out of your way. From there, use a small hop to get to the platform after the ladder, followed by a big jump to the left to get to the door where Dr. Dante is.
Dr. Dante will run around and throw needles up that will spin in place in mid-air for a second before coming down at you diagonally. When he is in his normal, peaceful scientist form, you can't hit him. You can only him when he is in his punk rocker form. If you can get close and mash the fire button, you should be able to destroy him in seconds. Afterwards, Dr. Dante will be astounded at his defeat. You'll also get the Bird-Man Widget form, which allows you to fly around like a pterodactyl for a limited time and shoot at enemies in the air with fireballs. This form costs 3 MP to use.
Stage 2: Bizarre Brain
In this stage, Bizarre Brain has stolen a mother whale's baby while smuggling whales, and it's up to Widget to find his hideout and save the whales.
At the start, you'll need to shoot at the snail in the shell while his head is sticking out, and avoid his bullets. The oyster enemies are only vulnerable when they open up to shoot fireballs straight ahead. The octopus tentacle in the pot is indestructible and must be avoided, which is easy to do. The crabs shoot multiple fireballs that can track you, but if you keep your distance, you can beat them. The sea urchin enemies that move back and forth are also indestructible and are best avoided, especially since you'll be seeing them in greater numbers later.
You'll need the Rock-Man Widget form to get past the purple cracked tiles after the start to get the health increase. As for the ladder leading upwards, you'll need the Bird-Man form to get the MP increase.
The Widget face icon is an extra life. Thankfully, you can use the Bird-Man form to get it.
At the start of the second section, you'll need the Bird-Man form to get across the water. If you don't have it yet, go back to Stage 3 with Mega-Brain's Escape feature and beat Dr. Dante to get that form. Afterwards, it's a straight move forward to the next section, which is an ice cave. You'll need the Dolphin Widget form to get the red star in the third section. Just watch out for the shark enemies that are swimming back and forth, and fire at them if you see them.
In the ice cave, watch out for the urchins that dog your path as they move back and forth, and be mindful of the ice physics that will make you slide around unless you jump straight up. If you can take out enemies ahead of time, do it; enemies don't come back when you scroll their location off the screen after defeating them in this game. There is an easy gun speed pick-up to grab at the end of the first section, and there is a ladder leading down at the far right side of the second section that leads to a blue star. If you don't have enough MP for the Mouse form, move into the narrow gap, and duck while moving. If you get stuck, move in the direction you want to go for a section, duck and you'll slide a little more, which can really help. After getting that blue star, you'll have to platform your way to the door near the start of the second section.
You'll then face Bizarre Brain. Bizarre Brain's head flies around and appears and disappears while his hands move around a bit and throw lightning bolts. Watch the hands and the bolts, and keep an eye out for the head and be ready to shoot. If you need to, hold Up while firing to angle your shot upwards. Save the heart in the room for when you get low on health. After enough hits, Bizarre Brain goes down, and you'll rescue the baby whale for a very thankful whale mother. You'll also get the Rock-Man Widget form, which allows you to break cracked blocks by punching or moving into them, although you'll be pretty slow. It costs 4 MP to use.
Stage 4: Flim Flam
In Stage 4, Flim and Flam, a two-headed alien, and their assistant Gyp (yep, that's his name) kidnap sentient animal alien humanoid-like beings to make them part of their intergalactic zoo, which is more or less akin to intergalactic slavery, kidnapping and holding sentient beings against their will. Widget and Mega-Brain find out about this and go out to stop it.
When you start the level, make a short hop to avoid the saw blade that comes at you. Shortly after that, keep moving right past the lone block and get ready to make a short hop by tapping A. to avoid the next saw blade, as the saw blades change direction upon falling off the edge of a platform and landing on the ground again.
The arrows that float above the ground stop short of where you are, but you can shoot them down. The men in white with the guns will try to shoot you, but they are slow to do so and you'll be able to jump the gun (pun intended) on them. The bouncing enemies just track you as they jump around and try to run into you. The jumping spike enemy just hops in place.
The rings of fire will home in on you, but you can mash B when they get close to annihilate them. As for the extra life and the red star in the green pool, you'll need the Dolphin form that you'll get for beating this stage to get them. If you accidentally fall in while platforming, use the Bird-Man form to fly out.
The next section is a bit of a maze at first, but then you'll have two routes. One leads to the door you need to get to, while the other leads to a red star and a blue star. If you go through the fake walls in the top route to go for those stars, use the Mouse form to get through the last fake wall, then use the Bird-Man form to get in and out. If you run out of MP, you can always fall down into the pit to start the section over and get to the door.
In the fourth section, use the Bird-Man form to get the extra life above the bottomless pit at the start. As for the blue star, you can use the Bird-Man form to get that and avoid the lizard bounty hunters, whose shots you'll have to duck before you can defeat them and get to the gun speed power-up at the end of the lower route. You'll also find a full MP refill after the blue star, which is good, as you may need the Bird-Man form to get across the pit. Just watch out for the arrows and the bouncing enemies. The train car entrance leads to the boss battle.
You'll then face Flim and Flam. These two will teleport around and show up in one of three places, and if you can somehow get close to them and fire up at them, you can tear them apart quickly. It is possible to shoot and hit them by firing in one of the three positions before they can show up in that position, making it a little easier to defeat them. Just watch out for the small flames that fall down as well as the fireballs that Flim and Flam throw at your current position.
When you beat Flim and Flam, Gyp will have a change of heart and free everyone that Flim and Flam kidnapped. You'll also get the Dolphin Form, which allows you to move freely underwater without drowning for a limited time with the D-Pad, with B allowing you to spit bubbles at enemies. It costs 4 MP to use.
When you beat all four stages, you'll open the fifth stage, which is the last one in the game.
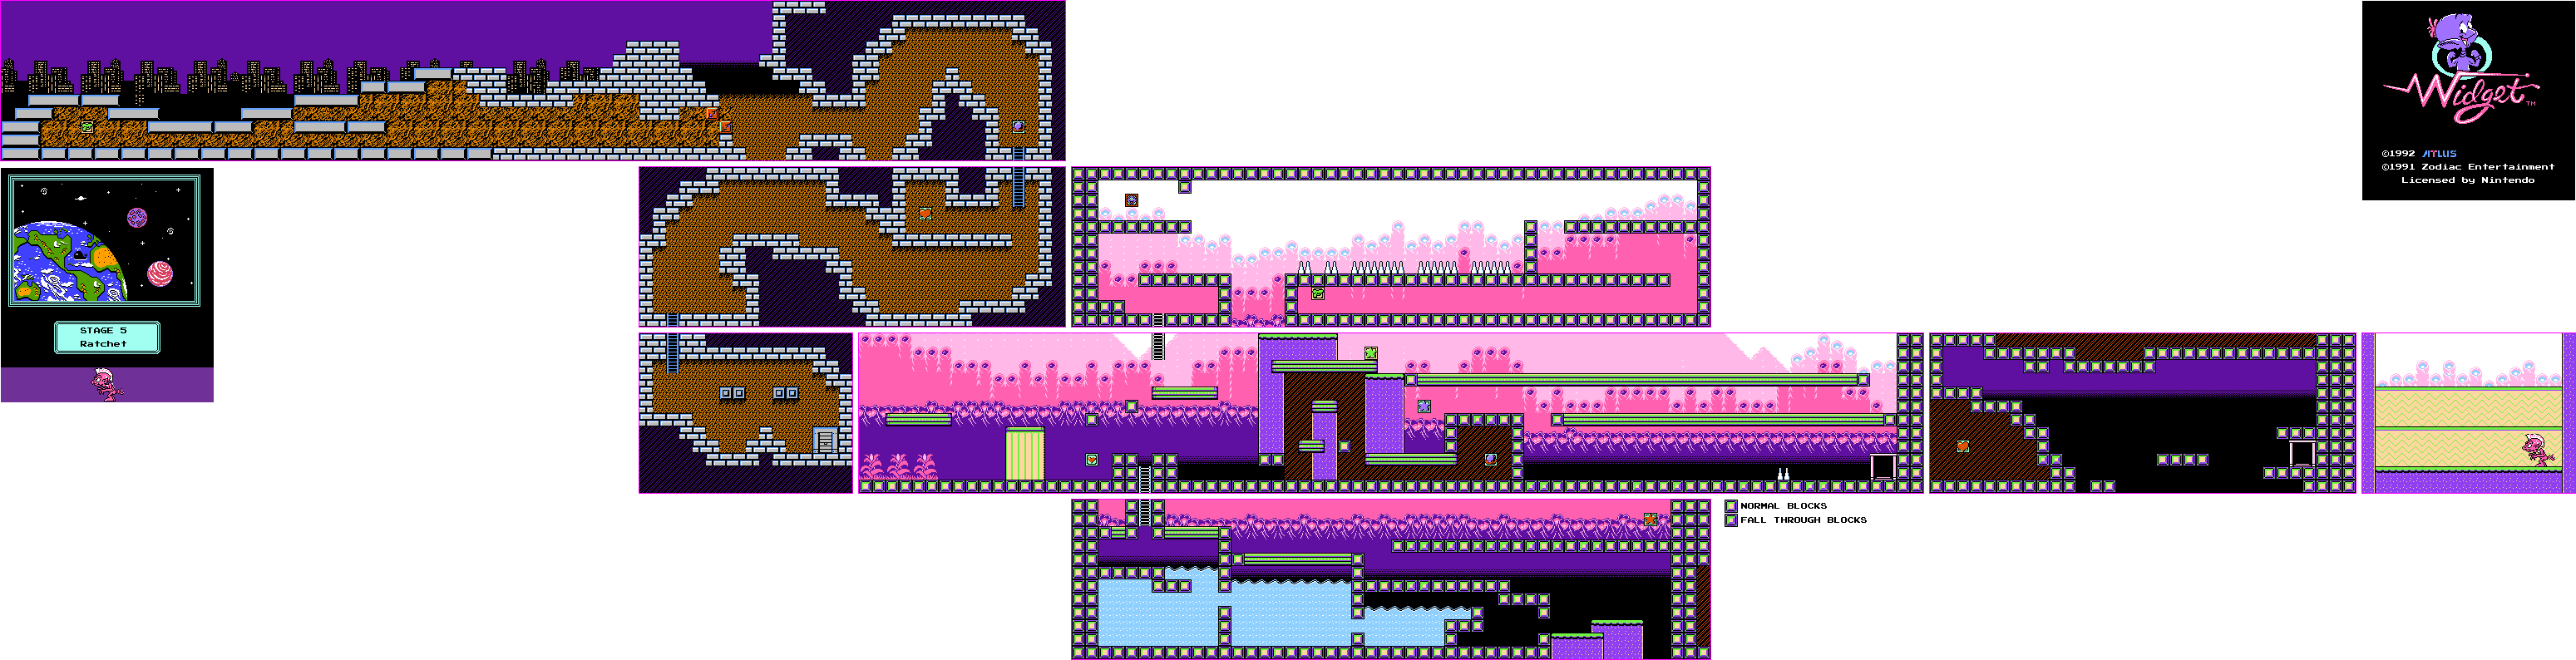
Stage 5: Ratchet
At the start of the final stage, Mega-Brain accidentally brings Widget's evil doppelganger Ratchet from the planet Pollutia to his and Widget's neck of the woods, and Ratchet starts causing havoc. Widget will have to stop Ratchet and force him back home.
The start of the stage is reminiscent of the city stage from Wacky Races in terms of appearance. The pigs with the pitchforks will move back and forth and charge at you like the knights from Stage 2. The one-eyed flying enemies fly in circles and will home in on you when shot at. The flowers spit multiple seeds in the air and can be shot at when they are opened up. The purple floating heads move forwards slowly and fire tracking projectiles, but they can quickly be shot down. Also, watch out for the brown flying enemies that swoop in and out.
You can use the Rock-Man and Mouse forms to get the gun speed power-up at the beginning of the stage.
You'll eventually enter a pink and purple forest area for the second section. At the start of the section, you can go either up or down. The top part is more useful for its extra life at the beginning that you can get with the Bird-Man form, and you probably won't need the gun speed power-up at the end that requires braving spikes and flying eye enemies. The bottom area leads to a red star, and will also have purple enemies that look like Ratchet that teleport in and out and fire at you. They're slow to beat, but you can easily avoid the shots and take them down with enough patience. You'll see these enemies further into the section, too.
In the pink and purple forest section, watch the titles. If the yellow tile at the center of a tile is smaller than normal, it is a fake tile that you can move - or fall - through. If you go forward past the two ladders, you'll be seeing these, and you'll have to find them to not only get around, but also avoid falling into bottomless pits that will force you to start the section over if you fall in. You may want to use the Bird-Man form to get past that last part. Also, you'll need to brave a bunch of purple teleporting enemies to get the second and last green star of the game, which will turn your red bullets (if you picked up the other one) to black, making them even faster and even more powerful, doing multiple hits to enemies and wiping them out.
The last section has a few enemies, and you'll need to make a big jump off the edge of the platforms to get to the door. If you need the big heart, you can use the Mouse Form at the start of the section to get it.
You'll then face Ratchet. Ratchet teleports in and out, and you'll need to keep your distance when you shoot them so you can avoid the small red projectiles that he throws at you upon hitting him in addition to the faster fireballs that he always throws at you. Just watch where he goes and keep hitting him whenever you can, and avoid those fireballs! When you beat Ratchet, the high elders will promote Widget to World Watcher First Class and task him with protecting Earth further before giving him a medal. With that, you've beaten Widget! Congratulations!

No comments:
Post a Comment